顯示具有 app 標籤的文章。 顯示所有文章

2023年3月29日 星期三

完整清除 Uninstall pCloud Drive app @ macOS 13.2.1


故事是這樣的,幾個月前實驗使用 Cryptomator + pCloud 備份,由於前者會將資料切個成常見的零碎的目錄結構,如果有檔案出現異常時,整個資料就無法讀取。

Error Code 4VHF:Q9JM:I1GP

最近 pCloud 很頻繁更新,再加上更新至 Cryptomator 1.7.3 ,很奇妙的,有一個高頻變動的目錄,開始出現無法讀取的現象。經過幾番追蹤後,確認是因為 Cryptomator + macFUSE 方案產生的現象,接著做檔案搬遷就會出錯,無論降低版本到 Cryptomator 1.6.17 還是升級 macFUSE 4.4.2,都沒法排除。

測試方式是建立新的加密庫,接著 rsync -avP 搬遷,皆會一陣子就出現 input/output error 。最後將 Cryptomator 更換成 WebDAV 模式後,才確定排除。且 Cryptomator 錯誤訊息介面可以快速跳到 github 4VHF:Q9JM:I1GP 相關討論區,也在講 macFUSE 的事情。排除問題後,就進入到這次的主題 pCloud app 的處理。

pCloud App Bug?沒有 synced folders 規則,還一直在同步

pCloud App Bug?沒有 synced folders 規則,添加時還顯示已在同步(已有規則)

重建完加密庫後,想要透過 pCloud app 同步資料時,發現整個 pCloud Drive app - macOS 進入到非常詭異的狀態,我只是把 pCloud app - Synced Folders 的目錄透過介面打 X 取消指定目錄同步,下一刻我發現本地的目錄被刪除了,對應的 pCloud 雲端上的資料也被刪除。這件事其實還滿嚴重的。

當初對 pCloud 的用法也是處於體驗,純粹當作另一處備份區,想說資料不見也沒差再重建就好。殊不知在本地重建時, pCloud app 一直還是不斷的 sync 指定目錄,且同步到 pCloud 的家目錄區(首頁),導致整個 pCloud 首頁大亂。

pCloud App Bug?同步上去都擺在家目錄,家目錄都亂了

我推論比較像 pCloud app 有問題,處理舊的同步規則時,似乎把所有東西都建立在 pCloud 家目錄,而非保有 Cryptomator 目錄結構:

% tree -L 2 My-Resource 
My-Resource 
├── d
│   ├── J2
│   └── XX
├── masterkey.cryptomator
├── masterkey.cryptomator.########.bkup
├── vault.cryptomator
├── vault.cryptomator.########.bkup
└── 重要.rtf

4 directories, 5 files

下一刻移除 pCloud 再重裝也是一樣,永遠都可以看到 pCloud app 很努力的在同步我剛在原處創建的 Cryptomator 加密庫,並且 pCloud 首頁永遠都是雜亂的 XD 

終於下定決心來找找,如何乾淨地移除 pCloud 設定檔,推論有一些 plist 紀錄著東西,也猜想 pCloud app 版本不同後,新舊版資料紀錄錯亂或是做了什麼相容架構,導致最新版刪不了舊版紀錄的資料,但又一直做相容架構,拿舊版的資料出來用。此時在新版 pCloud app 添加指定目錄同步時,會一直彈跳出不能重複設定的資訊(pCloud app UI 介面上可以看到,目前一條規則也沒有):Can not add new sync: Folder already syncing!

來個乾淨的刪除吧!

先把 pCloud app 從應用程式的目錄拖拉丟去垃圾桶:

% open /Applications 

接著檢查其他資料:

% sudo find /Library -iname "*pcloud*" 2>/dev/null
...
/Library/PrivilegedHelperTools/com.pcloud.pcloudfs.Mounter.Helper
/Library/Logs/DiagnosticReports/pCloud Drive_2023-##-##-#######_#####.diag
/Library/LaunchDaemons/com.pcloud.pcloudfs.Mounter.Helper.plist
...

% find ~/Library -iname "*pcloud*" 2>/dev/null
...
/Users/account/Library/WebKit/com.pcloud.pcloud.macos
/Users/account/Library/Preferences/com.pcloud.pcloud.macos.plist
/Users/account/Library/Application Scripts/com.pcloud.pcloud.macos.pCloudFinderExt
/Users/account/Library/HTTPStorages/com.pcloud.pcloud.macos.binarycookies
/Users/account/Library/Containers/com.pcloud.pcloud.macos.pCloudFinderExt
/Users/account/Library/Containers/com.pcloud.pcloud.macos.pCloudFinderExt/Data/Library/Application Scripts/com.pcloud.pcloud.macos.pCloudFinderExt
/Users/account/Library/Caches/com.pcloud.pcloud.macos

偷看 /Users/account/Library/Preferences/com.pcloud.pcloud.macos.plist 內容,他還記錄著 sync 目錄資訊。

最後就人工把以下的資料刪除:

/Library/PrivilegedHelperTools/com.pcloud.pcloudfs.Mounter.Helper
/Library/Logs/DiagnosticReports/pCloud Drive_2023-##-##-#######_#####.diag
/Library/LaunchDaemons/com.pcloud.pcloudfs.Mounter.Helper.plist
/Users/account/Library/WebKit/com.pcloud.pcloud.macos
/Users/account/Library/Application Scripts/com.pcloud.pcloud.macos.pCloudFinderExt
/Users/account/Library/HTTPStorages/com.pcloud.pcloud.macos.binarycookies
/Users/account/Library/Containers/com.pcloud.pcloud.macos.pCloudFinderExt
/Users/account/Library/Caches/com.pcloud.pcloud.macos
/Users/account/Library/Preferences/com.pcloud.pcloud.macos.plist

原本以為這樣就搞定了,殊不知裝完 pCloud app 啟動後,又發現繼續同步資料。最後想起一招:從 活動監視器 那邊看 pCloud app 開啟的檔案清單
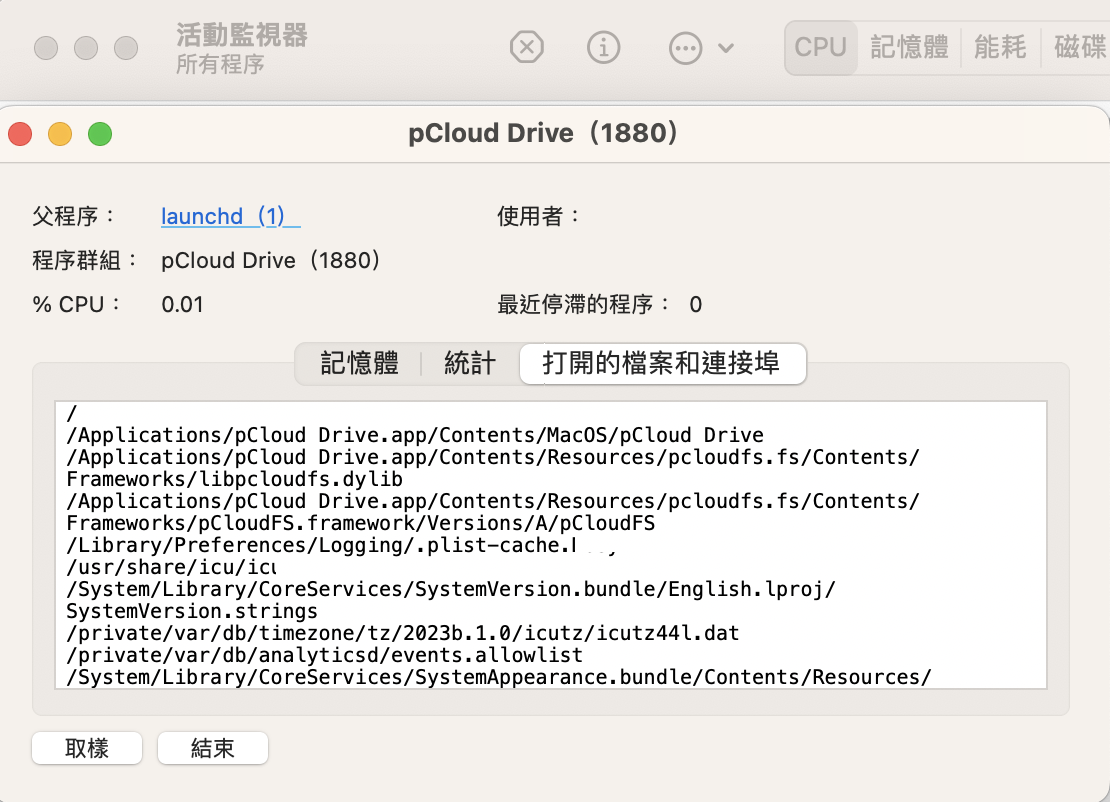


就發現有一處是 ~/.pcloud ,把他刪掉後,終於正常了。

2023年1月23日 星期一

安裝 PC 版 app 舊版 Line v6.7.3.2506 @ macOS 10.13.6

之前在 Macbook Pro 13-inch, Late 2011 在 2020年重灌後,一直靠 Chrome Browser extension 用 Line 服務 (Ver 2.5.8 @ 2022/12/22 更新),今年回鄉使用時,發現很多 app icon 縮圖也怪了,開始想裝舊版 PC app 了 XD 可惜 macOS App Store 的最新架上版本已經不能裝了,要求 macOS 版本不合。

找了一下,有些論壇都在提供舊版 dmg (或 App 壓縮檔案),瞬間才想起 macOS App Store 可以去找以前下載過的版本,瞬間可以解決需求 XD 且又不用擔心網路來源不明的程式。安裝到 Line v6.7.3.2506 版本,收工!

缺點就是佔了個 100MB 系統空間。

2022年8月30日 星期二

Electron 開發筆記 - 初探 ElectronJS 框架開發 PC app

約莫一年前團隊同事接了個用 ElectronJS 開發的程式,並且依照其框架成果再做出另一個 PC app ,最近播點時間來研究一下 ElectronJS 。幾個月前接觸 Golang 時,也曾想過用 Golang + Electron 練習一下 PC app ,只是整體上運作起來還是太卡了點。

整體上,要認識 ElectronJS 建議都先看一次官方文件 www.electronjs.org/docs/latest/ ,基本上寫的精簡不錯,看完一輪 Processes in Electron 就會學會:
  • Electron 的流程架構 (Process Model),可以分成 main process (node.js / main.js) 和 renderer process (BrowserWindow / renderer.js ),並且透過 preload.js 串起 main process 跟 renderer process 溝通橋樑
  • preload.js 是在 renderer process 執行前運行的,等於進入到 renderer process 前,可以打造一些溝通環境
  • 資安領域上,如何讓 renderer process 的權限不要太大 (Context Isolation)
  • 關於 main process 和 renderer process 溝通時,該怎樣進行 (ipcMain, ipcRenderer),可以分成 Renderer to Main 單向溝通、Renderer to Main 雙向溝通、Main to Renderer 溝通等
  • 看一眼 Process Sandboxing 情況,再多了解一下 MessagePorts 用法 (像 window.postMessage 之 iframe 溝通)
如此,就差不多可以來用 Electron 開發 PC app,然而有更多眉眉角角躲在 package.json 中以及一堆神秘的指令,如 electron-forge 等等。

我想,開發 Electron 的複雜度,源自於整個專案進行會跨非常多領域(指令)吧,每個混再一起就會覺得爆炸大,每個分離看待就會舒適許多。

像我自己也弄了:
  • env_nvm.sh:靠 nvm 切換 node.js 版本
  • env_vim.sh:靠 .vimrc 和 .vimrc_coc.nvim 完成簡易 coding style 和 auto-complete 設置
  • 把上述包裝在 init_env.sh 運行,每次開發就先跑一下 source init_env.sh 就行了
最後,對於 Electron PC app 開發,後續也都還會再做一些程式碼封裝方式(webpack等)和程式碼混淆等,當然,若還有開發框架 vue.js, react 等,也都還有對應的任務,所以連續動作還是很多的,之後繼續筆記一下。

2021年2月9日 星期二

Clubhouse 體驗心得


大概六天前剛拿到朋友的邀請,上去體驗了一下,非常新鮮。

聽到了海外大陸人在跟台灣人聊政治,且是很有理性的論述民主的好壞,像是台灣人說民主也沒因此比較多選擇(藍綠兩黨),還是會被媒體給包裝起來,但是!若選錯市長時,民主至少可以罷免!對於過去不認同的政治,可以身體力行去表達自己的心聲。而常說的民主會拖累經濟的議題,恰好有位在德國的大陸人在分享北上廣深的 GDP 其實跟台灣差不多,再加上自己老鄉連廁所都沒有,以此驗證民主也不會拖累經濟,講得還滿不錯的。

聽了在紐約的大陸人,在聊在美國或 App 朋友交際認識,不如線上遊戲那般親,線上遊線連討論個攻略,大家都毛起來教學 XD 而其他則是提到自己遠離曼哈頓,特不愛曼哈頓的急促、到時都要記得去抗爭(類似被欺負要去哪邊回報?!),聊仍在疫情中,跟大家介紹 crowdcow.com 可以買好吃又便宜的牛肉 XD 以及自己住的地方偏郊區,卻有什麼類似快捷大眾運輸,快速到市中心以及還可以轉乘到機場,且交通費便宜啊。是個很讚的聊天內容。

聽了一位台灣女生到北京外商 SaaS 發展,之前看了幾篇質量還不錯的科普文章,沒想到一年多沒更新是到北京發展了!聊了不少在 SaaS 的步調,包括公司估值方式或為何 SaaS 總是高估值、聊了訂閱制的經營方式,會有客戶經理在負責維護客戶忠誠度等等,也滿有意思的。途中也吸引到有一位從事投資的,回饋他在業界中常見的估值法,如同業比較法、評估新創的事業成長率等等,這段就還滿像 Youtuber 財經網紅 CK 的部分,就 CK 是一名在澳洲精算師,前陣子除了分享對總體經濟外,也分享她是怎樣評估股價(市值),過程就包括猜測成長率、套用估值公式等等,因此聽負責投資其他間公司的VC說話,特別有共鳴。

聽了葉丙成教授在那邊台語五四三,也滿逗趣的。不知哪個時間點自己也會變成那樣,喜歡跟幾位老友聊是非。讓我想起以前在工研院的老闆,英文很強,但總是愛台語,還會請特休去參加抗議活動,實在熱血 XD

聽了財報狗產品經理在分享他的工作方式,包括大老闆很挺他,也讓他去經營數個月的 podcast ,最終因為數據上並沒有顯著帶給財報狗對應的流量,再加上一集至少要五小時處理,每週一集的時間消耗也是很恐怖的。比較特別的是財報狗 PM 提到了一切都是數據導向,就算花兩週開發服務,最後的數據是差的,仍是會捨棄不上線的!而在招聘 RD 時,從一開始就會溝通可能高達 2/3 的 coding 都不會上線!大量專注在實驗、數據、決策等 growth hack 路線,對我而言是滿強化一些已知的手段,非常醒腦。而聊天提到了一些粗略的表單,沒想增加設計美感後,出現轉換率變差時,該怎樣去檢驗一直猜想,若拉不起來也不會上線的!核心 KPI 就是轉換率,轉換率沒變好就不會採用。非常專注。

也聽了一些早晨的新聞台,這我反而記憶最淺,而快速體驗後,感受到網路上的財經網紅會盡可能想搶流量,也不少在該領域非第一的網紅很努力地連續幾天都在開講,我一想到上班日都在做工作的事情,週末還要跑去聽工作相關的,而聊天品質又無法確定,實在累。

我想,嘗試過 clubhouse 後,對於一些尚未深入到 podcast 用戶,應當會感受非常新鮮。但對於已熟悉 podcast 來源者,可能會像我一樣又回味起 podcast 的高品質體驗。包括 podcast 可以快轉、可以看別人的評價,而 clubhouse 就是直播,且很有機會快速跟名人親近,是一種老早就存在的需求,但又重新被詮釋出來。然而 clubhouse 滿殺時間的,若參加到一場不錯的聊天,那心中會很充實,但如果加入到一場主持人不佳,講者也佳,想詮釋自己的想法也說不清時,那真的會聽不下去的 XD

果真核心項目是有限的時間資源,大家都在搶,搶人眼球、搶人耳朵、搶人時間,早已進入到任何的新創服務,就是要硬生生地佔領用戶的時間資源。而我,應該還是會回歸到 podcast 服務上,像是對岸的 得到app 也滿不錯的。這種專業的聲音產出內容,有那麼一種可預期的體驗感,有那麼可以快轉省時間的沾沾自喜感,而資訊/知識,其實也不打折的。

2020年6月20日 星期六

[Javascript] Shopify App - 修正 location.replace 與 GA 追蹤碼 utm_* 的應用

認真使用 Shopify 大概也有一個多月了,使用了一些付費 Shopify App 在做本地化加強,發現這些第三方 app 還滿善用 variant 機制,原先是拿來設計一個商品有多種顏色等用途,現在則是應用在多儲存一些在地化的資訊。

因此,當發現需要轉化成在地化資訊時,會透過接近導網址架構,多添加 variant 資訊:

var new_url = window.location.protocol + '//' + window.location.host + window.location.pathname + '?variant=' + variant_id;

然而這樣的小機制,卻把 utm_* 的追蹤碼都給去掉了 XD 所以在幫他補強一下:

var new_url = window.location.protocol + '//' + window.location.host + window.location.pathname + '?variant=' + variant_id;

if (window.location && window.location.href) {
var m = window.location.href.match(/[\?&]([^=]+=[^&]+)/g);
if (m) {
var params = null;
for (var i=0; i<m.length ; ++i) {
if (m[i].indexOf('utm_') > 0) {
if (params == null) {
params = m[i].substr(1);
} else {
params += '&' + m[i].substr(1);
}
}
}
if (params != null) {
new_url += '&' + params;
}
}
}

收工!

2020年2月27日 星期四

kobo desktop 下載 , kobo app download @ macOS / Windows

昨晚跟在 FB 工作的學弟通個電話,聊了一陣子,被推坑看了一本 2017 年再版的書。找了一陣子,實體書都賣光了,只剩 KOBO 有電子書在賣,恰好當年 Kobo 在台灣推廣時,一直說第一次購書可以折 100 元,當時 NETFLIX 給力很夯,只是我最後買了實體書 XD 因此,那一百元折價一直沒用,就這樣很快地刷卡。

接著下一刻就囧了,大家都說可以用電腦看,找了很久台灣官網上沒有下載連結,輾轉得知改用美版網站就有了!
  • https://www.kobo.com/us/en/p/desktop 下方有 Download Now
    • https://kbdownload1-a.akamaihd.net/desktop/kobodesktop/kobosetup.dmg
    • https://kbdownload1-a.akamaihd.net/desktop/kobodesktop/kobosetup.exe
最近共用了 Kindle 看書、豆瓣閱讀 Mobile app 跟 Web 觀看付費書籍,接下來試試 Kobo 囉

2019年9月18日 星期三

iOS 開發筆記 - 使用 Swift 完成 GA Measurement Protocol 實作

大概去年夏天,偶爾會寫一點 Swift 程式,雖然對 Objective c 比較熟,但時勢變遷就該順應潮流。那時採用 GoogleAnalytics 套件,但 Google Analytics for App 要在今年秋天下線了,Google一直要大家改用 Firebase ,且 Google 牌 cocoapods GoogleAnalytics 也的確幾年沒更新了。只是 Firebase 就明顯要人多花錢,例如要先把 Firebase 的數據匯入到 GA 上免錢,但有些查詢又要搞到 BigQuery 才行,雖然 BigQuery 有免費額度 啦 XD 因此趁 GA Measurement Protocol 還沒下線前,多用用他吧!把以前是 App Screen 就設法轉成 Web Pageview 吧,唯一的缺點是 Session 這類,若要硬做也是一招啦,在此就都不管了。

在此只包裝成 3 個函式供人使用即可,分別是取得 clientID、回報 pageview、回報 event 既可:

override func viewDidLoad() {
super.viewDidLoad()
// Do any additional setup after loading the view.

GAEvent(trackingID: "UA-########-#", clientID: getClientID(), eventCategory: "TestEC", eventAction: "TestEA", eventLabel: "TestEL", eventValue: 0)

GAPageView(trackingID: "UA-########-#", clientID: getClientID(), path:"/")
}

func getClientID() -> String {
// example
return UUID().uuidString
}

func GAPageView(trackingID:String, clientID:String, path:String ) {
var url = URLComponents(string: "https://www.google-analytics.com/collect")!
if trackingID.isEmpty || clientID.isEmpty || path.isEmpty {
return
}
url.queryItems = [
URLQueryItem(name: "v", value: "1"),
URLQueryItem(name: "tid", value: trackingID),
URLQueryItem(name: "cid", value: clientID),
URLQueryItem(name: "t", value: "pageview"),
URLQueryItem(name: "dh", value: "example.com"),
URLQueryItem(name: "dp", value: path),
]
//#if DEBUG
//url.queryItems?.append(URLQueryItem(name: "cd1", value: "DEBUG"))
//#endif
//if let appVersion = Bundle.main.infoDictionary?["CFBundleShortVersionString"] as? String, appVersion.isEmpty {
//    url.queryItems?.append(URLQueryItem(name: "cd2", value: appVersion))
//}

let request = URLRequest(url: url.url!)
let task = URLSession.shared.dataTask(with: request) {(data, response, error) in
//guard let data = data else { return }
//print(String(data: data, encoding: .utf8)!)
if let httpResponse = response as? HTTPURLResponse {
print("GAPageView: \(httpResponse.statusCode)" )
}
}
task.resume()
}

func GAEvent(trackingID:String, clientID:String, eventCategory:String, eventAction:String, eventLabel:String, eventValue:Int) {
var url = URLComponents(string: "https://www.google-analytics.com/collect")!
if trackingID.isEmpty || clientID.isEmpty || path.isEmpty {
return
}

url.queryItems = [
URLQueryItem(name: "v", value: "1"),
URLQueryItem(name: "tid", value: trackingID),
URLQueryItem(name: "cid", value: clientID),
URLQueryItem(name: "t", value: "event"),
URLQueryItem(name: "ec", value: eventCategory),
]
//#if DEBUG
//url.queryItems?.append(URLQueryItem(name: "cd1", value: "DEBUG"))
//#endif
//if let appVersion = Bundle.main.infoDictionary?["CFBundleShortVersionString"] as? String, appVersion.isEmpty {
//    url.queryItems?.append(URLQueryItem(name: "cd2", value: appVersion))
//}

if !eventAction.isEmpty {
url.queryItems?.append(URLQueryItem(name: "ea", value: eventAction))
if !eventLabel.isEmpty {
url.queryItems?.append(URLQueryItem(name: "el", value: eventAction))
if eventValue >= 0 {
url.queryItems?.append(URLQueryItem(name: "ev", value: "\(eventValue)"))
}
}
}

let request = URLRequest(url: url.url!)
let task = URLSession.shared.dataTask(with: request) {(data, response, error) in
//guard let data = data else { return }
//print(String(data: data, encoding: .utf8)!)
if let httpResponse = response as? HTTPURLResponse {
print("GAEvent: \(httpResponse.statusCode)" )
}
}
task.resume()
}


其中 getClientID() 只是個示意,因為每次呼叫 UUID().uuidString 都會產生一組新的,可以把它存起來使用,或是針對某些情境設計規劃,像是服務有提供登入機制時,就改用從 user id 計算得出等那類即可。

2016年4月25日 星期一

[PHP] Use iTunesConnect API to Add iOS App External Test User

其實,已經有 TestFlight 很方便了,但基於一些練習,就稍微仿別人做過的流程練習一下,原理不難:

  1. 使用 cURL + cookie 完成登入 iTunesConnect
  2. 切換至 App 頁面資訊,查看有多少 Test User
  3. 添加 Test User
  4. 刪除 Test User
如此而已 :P 於是乎,用 https://github.com/changyy/codeigniter-library-ios-test-user 紀錄一下。

2015年5月19日 星期二

GAE 筆記 - 在 Ubuntu Server 上傳 Google App Engine 程式碼 @ Ubuntu 14.04

最近嘗試在 Ubuntu server 開發,以前常在 Windows 、 Ubuntu Desktop 和 Mac OSX 等視窗介面,最近 Google App engine 也把認證的部分換了,以前是在 Google App engine tools 上輸入帳號密碼,現在都改用 OAuth 認證方式,實在方便。

若要在 Ubuntu server 上運行 Google App Engine ,透過 Command line 即可完成測試跟發佈:

測試:

$ cd /path/gae/project
$ python -m py_compile *.py && dev_appserver.py --port=8080 .


發佈:

$ cd /path/gae/project
$ python -m py_compile *.py && appcfg.py --oauth2 --noauth_local_webserver -A YourGAEProjectID update .

過程只需再用 browser 瀏覽指定的 link 以及完成 oauth 的認證即可發布啦!

2015年4月21日 星期二

iOS 開發筆記 - 製作 iOS Simulator app 版本送交給 Facebook 進行 review (creating-ios-simulator-build-for-review)

似乎...Facebook SDK 文件沒找到?只好隨意 Google 一些資料

$ cd /path/project
$ xcodebuild -showsdks
OS X SDKs:
OS X 10.9                     -sdk macosx10.9
OS X 10.10                     -sdk macosx10.10

iOS SDKs:
iOS 8.3                       -sdk iphoneos8.3

iOS Simulator SDKs:
Simulator - iOS 8.3           -sdk iphonesimulator8.3

$ xcodebuild -arch i386 -sdk iphonesimulator8.3


若用 CocoaPods (碰到 ld: library not found for -lPods-XXX ) 或 xcworkspace 維護的,需要多一點指令:

$ xcodebuild -arch i386 -sdk iphonesimulator8.3 -workspace YourName.xcworkspace -scheme YourName

接著,想執行看看:

$ ios-sim launch /Users/user/Library/Developer/Xcode/DerivedData/YourName-xxxxxx/Build/Products/Debug-iphonesimulator/YourName.app

其中 ios-sim 可以逛一下這邊:https://github.com/phonegap/ios-sim

2015年3月11日 星期三

Facebook 開發筆記 - Facebook app 無法取得真實的 account id

最近在開發 Facebook app 時,發現 Facebook API 已經有更新不少東西,其中有一項還滿不錯的,第三方 Facebook app 無法取得 Facebook user 的真實 ID 資訊,每個 app 會各別拿到一個,例如在 A app 跟 B app 詢問 graph api: /me 時,拿到的 id 會不一樣。然而,不一樣的 ID 卻仍可以一樣定位到同一個使用者。

這個最大的缺點是各個 Facebook app 沒有互通的資訊,但對於各個 facebook app 取得到的資訊卻還是一樣夠用。此外,可以用 www.facebook.com/id 去測試,可以發現仍可以定位到同一個 user,算是滿貼心的隱私設計。

https://developers.facebook.com/docs/graph-api/reference/v2.2/user
The id of this person's user account. This ID is unique to each app and cannot be used across different apps. Our upgrade guide provides more info about this.

2015年3月10日 星期二

Facebook 開發筆記 - 使用單一 Facebook app 仿 OAuth 架構提供單多平台多 app 登入使用

由於 Facebook app 在任何平台上,只能允許一個 app,例如 iOS platform 就只能綁定一個 iOS app,如果想要多個 iOS app 都用同一款 Facebook app 時,就出現了這奇妙的需求 :P

因此,再次包裝的方式,那就是用 UIWebview/WebView 來解吧!對於任何一款 Mobile app 都是採用 Browser 來完成登入的。而 Backend service 是維持採用同一款 Facebook app。

原理:主體是以 Facebook Javascript SDK 來使用,當完成 Facebook app 登入認證後,將 Javascript 端取得的 Facebook app token 丟給 backend service ,驗證後交換成自家 service token,未來用自己的 service token 來進行服務互動。

以上狀態僅需依照 Facebook SDK Javascript 文件已經可以完成大半了:

FB.getLoginStatus(function(response) {
  if (response.status === 'connected') {
    console.log('get facebook app token');
  }
  else {
    FB.login();
  }
});


在 response.status === 'connected' 就能取得 facebook token,再轉呼叫自家 service 來交換 token 即可收工。

然而?事情不是那麼簡單的 XD 在 mobile platform 環境上,用 chrome browser 或是 safari 都可以正常工作,唯獨 PhoneGap 等類似架構會出錯,主因是 Facebook SDK Javascript 登入時,會彈跳視窗,結束後可以再導回來,但在 PhoneGap 架構上,可能受限於沒有分頁機制而出錯?總之,解法:自行用 direct_url 跟 Facebook 互動吧!這招印象中是在寫 server side 的用法:

當使用者點擊 login 時,不要用 Facebook Javascript SDK,而是將網址導向到:

https://www.facebook.com/dialog/oauth?client_id=YourFacebookAppID&redirect_uri=http://localhostOrServiceWebURL/&response_type=token&scope=publish_stream,email

當使用者完成登入後,將導回你指定的位置,而這時在 FB.getLoginStatus 時,又可以正常取得 response.status === 'connected' 等資訊了。

2014年9月19日 星期五

[OSX] 使用 App Store 更新 Xcode 發生錯誤 @ Mac OS X 10.9.5, MBA


主因也有可能是空間太少了 :P
除了準備空間外,可以試看看 App Store Debug 界面:

$ defaults write com.apple.appstore ShowDebugMenu -bool true

接著重新打開 App Store 後,上方最右邊有 Debug 選項 -> Reset Application,大概多做幾次即可。如果很不幸的一直不幸,最終解法就是反安裝後,再下載。

2014年8月18日 星期一

iOS 開發教學 - 邀請使用者評論、評分 iOS app (Review/Rate your iOS app)

原理就是第一次使用時,埋一個時間進去,等下次使用者使用 iOS app 時,判斷時間是否夠長,達到時間間距時,使用 UIAleterView 詢問使用者是否願意 Rate your app。

假設 iOS app 預設啟用時,停留在某個 ViewController:

@interface ViewController () <UIAlertViewDelegate>
// ...
@end


@implementation ViewController

- (void)alertView:(UIAlertView *)alertView clickedButtonAtIndex:(NSInteger)buttonIndex
{
    switch (alertView.tag) {
        case YOUR_APP_ID:
        {
            //NSLog(@"buttonIndex: %d", buttonIndex);
            NSDate * now = [[NSDate alloc] init];
            switch (buttonIndex) {
                case 1: // YES
                    [[UIApplication sharedApplication] openURL:[NSURL URLWithString:[NSString stringWithFormat:@"itms-apps://itunes.apple.com/app/id%d", alertView.tag]]];
                    [[NSUserDefaults standardUserDefaults] setObject:now forKey:@"rateDone"];
                    break;
                case 2: // Remind me later
                    [[NSUserDefaults standardUserDefaults] setObject:now forKey:@"rateDate"];
                    break;
                default:
                    [[NSUserDefaults standardUserDefaults] setObject:now forKey:@"rateDone"];
                    break;
            }
            [[NSUserDefaults standardUserDefaults] synchronize];
        }
            break;
    }
}

- (void)viewDidLoad
{
    [super viewDidLoad];
    @try {
        //[[NSUserDefaults standardUserDefaults] removeObjectForKey:@"rateDone"];
        //[[NSUserDefaults standardUserDefaults] removeObjectForKey:@"rateDate"];
        //[[NSUserDefaults standardUserDefaults] synchronize];
     
        if (![[NSUserDefaults standardUserDefaults] objectForKey:@"rateDone"]) {
            NSDate * now = [[NSDate alloc] init];
            if (![[NSUserDefaults standardUserDefaults] objectForKey:@"rateDate"]) {
                [[NSUserDefaults standardUserDefaults] setObject:now forKey:@"rateDate"];
                [[NSUserDefaults standardUserDefaults] synchronize];
            } else {
                NSDate *prevDate = [[NSUserDefaults standardUserDefaults] objectForKey:@"rateDate"];
                if ([now timeIntervalSinceDate:prevDate] > 60 * 60 * 10) {
                    UIAlertView *alterView = [[UIAlertView alloc] initWithTitle:@"Rate this app" message:@"If you enjoy using this app, would you mind taking a moment to rate it?" delegate:self cancelButtonTitle:@"NO, Thanks" otherButtonTitles:@"YES", @"Remind me later", nil];
                    alterView.tag = YOUR_APP_ID;
                    [alterView show];
                }
            }
        }
    }
    @catch (NSException *exception) {
    }
    @finally {
    }
}

@end

2014年6月4日 星期三

iOS 開發筆記 - 初學 Swift 與 Storyboard 互動方式,以 UITableViewController 和 prepareForSegue 為例


WWDC 2014 讓 Swift 出世見人,想學習的可先看 Apple 官網 Swift 文件:The Swift Programming Language,大概只要看完 A Swift Tour 即可有基本功力,看完心得:簡潔有力。接著,就可以看看 Using Swift with Cocoa and Objective-C 這份了,也是此次筆記項目。

首先下載 Xcode 6 beta 下來用,新增 Project 時,選用 Swift 程式語言,這時的程式架構就是 Swift 語法,與 Objective-C 大同小異,初次看還滿清爽的。

AppDelegate:

import UIKit

@UIApplicationMain
class AppDelegate: UIResponder, UIApplicationDelegate {
                         
    var window: UIWindow?


    func application(application: UIApplication, didFinishLaunchingWithOptions launchOptions: NSDictionary?) -> Bool {
        // Override point for customization after application launch.
        return true
    }

    func applicationWillResignActive(application: UIApplication) {
        // Sent when the application is about to move from active to inactive state. This can occur for certain types of temporary interruptions (such as an incoming phone call or SMS message) or when the user quits the application and it begins the transition to the background state.
        // Use this method to pause ongoing tasks, disable timers, and throttle down OpenGL ES frame rates. Games should use this method to pause the game.
    }

    func applicationDidEnterBackground(application: UIApplication) {
        // Use this method to release shared resources, save user data, invalidate timers, and store enough application state information to restore your application to its current state in case it is terminated later.
        // If your application supports background execution, this method is called instead of applicationWillTerminate: when the user quits.
    }

    func applicationWillEnterForeground(application: UIApplication) {
        // Called as part of the transition from the background to the inactive state; here you can undo many of the changes made on entering the background.
    }

    func applicationDidBecomeActive(application: UIApplication) {
        // Restart any tasks that were paused (or not yet started) while the application was inactive. If the application was previously in the background, optionally refresh the user interface.
    }

    func applicationWillTerminate(application: UIApplication) {
        // Called when the application is about to terminate. Save data if appropriate. See also applicationDidEnterBackground:.
    }

}


ViewController:

import UIKit

class ViewController: UIViewController {
                         
    override func viewDidLoad() {
        super.viewDidLoad()
        // Do any additional setup after loading the view, typically from a nib.
    }

    override func didReceiveMemoryWarning() {
        super.didReceiveMemoryWarning()
        // Dispose of any resources that can be recreated.
    }

}


接著,則是使用 Storyboard,承襲之前用 Xcode 開發的模式,新增元件後,可以拖拉到對應的程式碼(此例為 ViewController),就可以填寫一些 Code 了。

例如 UIButton 行為:

    @IBOutlet var button : UIButton
 
    @IBAction func myClick(sender : AnyObject) {
        println("Click")
        button.setTitle("change", forState: UIControlState.Normal);
    }


例如 UITableViewController :

import UIKit

class MyTableViewController: UITableViewController {
    var dataList = String[]()
 
    override func numberOfSectionsInTableView(tableView: UITableView?) -> Int {
        return 1
    }
 
    override func tableView(tableView: UITableView?, numberOfRowsInSection section: Int) -> Int {
        return dataList.count
    }
 
    override func tableView(tableView: UITableView!, cellForRowAtIndexPath indexPath: NSIndexPath!) -> UITableViewCell! {
     
        var cell:UITableViewCell = UITableViewCell(style: UITableViewCellStyle.Default, reuseIdentifier: "Cell")
     
        cell.text = dataList[indexPath.row]
     
        return cell
    }
 
}


以及 prepareForSegue 的用法:

    override func prepareForSegue(segue: UIStoryboardSegue!, sender: AnyObject!) {
        if segue.identifier.compare("showTable") == 0 {
            if segue.destinationViewController.isKindOfClass(MyTableViewController) {
                // Type 'AnyObject!' cannot be implicitly downcast to 'UIViewController'
                // var vc:UIViewController = segue.destinationViewController

                var tvc:MyTableViewController = segue.destinationViewController as MyTableViewController
             
                tvc.dataList.append("Hello")
                tvc.dataList.append("World")
            }
        }
    }


以上的小練習,就可以用 Swift 跟 Storyboard 切換 ViewController 等行為,而 UITableViewController 也稍微用了一下。

最後一提,目前使用 Swift 開發的不習慣之處:AutoComplete ! 沒了這招就真的等於砍掉重練了,試用的結果,不是按了 "." 之後會彈跳出來,而是要打 "->" 才會出現 Orz 我想應該還有不少待釐清的用法。

2014年4月10日 星期四

iOS 開發筆記 - The Facebook server could not fulfill this access request: no stored remote_app_id for app


犯了一個小錯誤 XD 太久沒用 Facebook app 了,新版界面忘了新增 iOS Bundle ID 導致 Reviewer 無法登入 :P 但很妙的這個現象是在 iOS 使用內建系統 Facebook 帳號整合時,才會出現的。

至於新增 iOS app 的設定:
developers.facebook.com -> Your App -> 設定 -> 新增平台
預設沒有顯示出來,所以...不小心忽略了。

2014年3月5日 星期三

iOS 開發筆記 - App Submission Feedback (Resolution Center) - 2.23: Apps must follow the iOS Data Storage Guidelines or they will be rejected

這理由收過兩次才過,累積成就筆記一下 XD 與其跟 Reviewer 解釋資料產生本來就會耗那麼多空間,不如還是自己乖乖丟到 NSTemporaryDirectory 吧 Orz

We found that your app does not follow the iOS Data Storage Guidelines, which is required per the App Store Review Guidelines.

In particular, we found that on launch and/or content download, your app stores 1x.xx MB. To check how much data your app is storing:

- Install and launch your app
- Go to Settings > iCloud > Storage & Backup > Manage Storage
- If necessary, tap "Show all apps"
- Check your app's storage

The iOS Data Storage Guidelines indicate that only content that the user creates using your app, e.g., documents, new files, edits, etc., should be backed up by iCloud.

Temporary files used by your app should only be stored in the /tmp directory; please remember to delete the files stored in this location when the user exits the app.

Data that can be recreated but must persist for proper functioning of your app - or because customers expect it to be available for offline use - should be marked with the "do not back up" attribute. For NSURL objects, add the NSURLIsExcludedFromBackupKey attribute to prevent the corresponding file from being backed up. For CFURLRef objects, use the corresponding kCFURLIsExcludedFromBackupKey attribute.

For more information, please see Technical Q&A 1719: How do I prevent files from being backed up to iCloud and iTunes?.

It is necessary to revise your app to meet the requirements of the iOS Data Storage Guidelines.
For discrete code-level questions, you may wish to consult with Apple Developer Technical Support. Please be sure to:

- include the complete details of your rejection issues
- prepare any symbolicated crash logs, screenshots, and steps to reproduce the issues for when the DTS engineer follows up.

For information on how to symbolicate and read a crash log, please see Tech Note TN2151 Understanding and Analyzing iPhone OS Application Crash Reports.

If you have difficulty reproducing this issue, please try testing the workflow as described in <https://developer.apple.com/library/ios/qa/qa1764/>Technical Q&A QA1764: How to reproduce a crash or bug that only App Review or users are seeing.


解法:
  • 挑 NSTemporaryDirectory() 來儲存資料
  • 當 app 被強制或使用者手動關閉時,清一下資料吧(連續兩下 Home 等切到背景不算)

    - (void)applicationWillTerminate:(UIApplication *)application {
    // remove data ...
    }

2013年12月15日 星期日

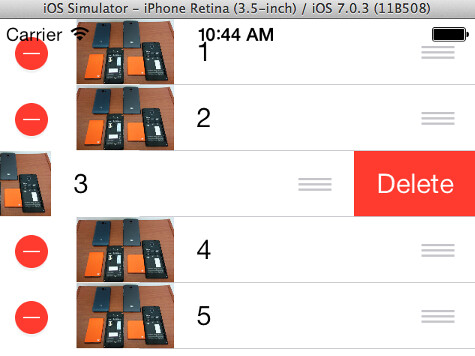
iOS 開發筆記 - UITableViewController Editing Mode 隱藏 Delete 按鈕(Move Only)

UITableViewControllerEditMode

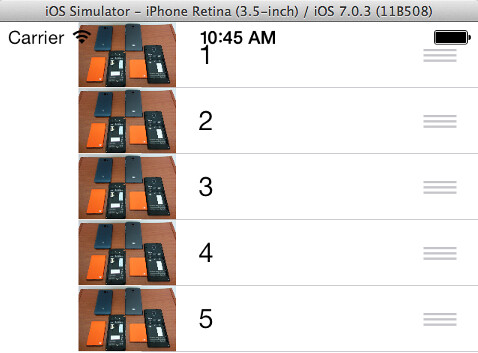
開始把玩 UITableViewController Editing mode,由於不想讓使用者刪資料,所以就需要把 Delete 相關的操作介面給關掉。

簡言之:

- (UITableViewCellEditingStyle)tableView:(UITableView *)tableView editingStyleForRowAtIndexPath:(NSIndexPath *)indexPath
{
    //if (self.editing)
    //    return UITableViewCellEditingStyleDelete;
 
    return UITableViewCellEditingStyleNone;
}


如此一來即可:

UITableViewControllerEditModeWithoutDeletition

2013年12月14日 星期六

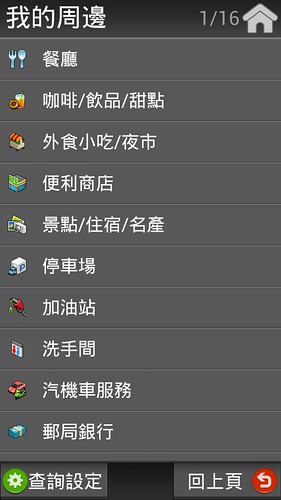
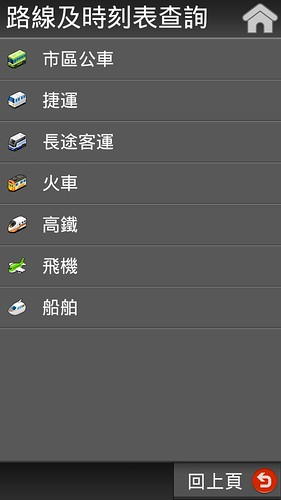
免費導航王 - 台灣版小米機可免費使用勤崴導航王 android app 一整年

導航王小米版

半年前幫家人添購一台小米2S,最近我自己也用了一台,然後莫名又有一台紅米。當我徜徉於紅米的高 CP 時,看到台灣小米機又可以免費用「導航王」!有更賺到的感覺!(台灣版小米2S或紅米都可以使用)

紅米機的性能的確已經非常夠用,特別適用那些常用來打電話,但偶爾又想透過手持裝置獲得瀏覽網頁資訊的人。有了免費的導航王後,紅米又可以變身為導航車機啦!

詳情請參閱:歡慶【導航王】成為小米台灣獨家導航軟體合作夥伴!

用法:

  1. 從 勤崴官網 下載專屬於台版小米機的 導航王 app (NaviKing_Android_XiaoMi_WXGA_2.134.0.116.apk)
  2. 透過 USB 傳輸線,把下載好的 NaviKing_Android_XiaoMi_WXGA_2.134.0.116.apk 擺在小米機上,如 Download 資料夾
  3. 使用小米機內建檔案管理,開啓 NaviKing_Android_XiaoMi_WXGA_2.134.0.116.apk 即可進行安裝
  4. 安裝完導航王後,啟動後再下載圖資
  5. 一切安裝完後,重新啟動導航王即可

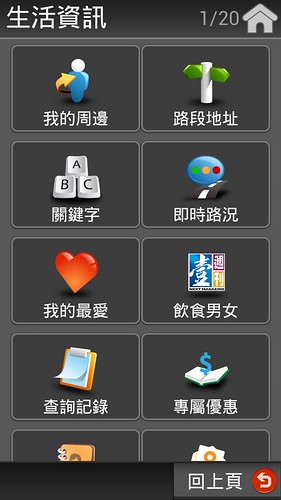
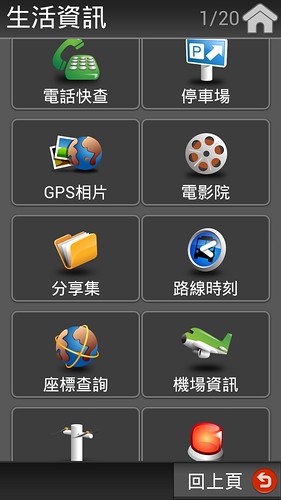
此外,試用了導航王後,發現他已經把一些常用的旅遊、生活類功能都做進去了!不見得要把它當行車導航的 app :

導航王小米版1

導航王小米版2

導航王小米版3

導航王小米版4

導航王小米版5

2013年12月11日 星期三

iOS 開發筆記 - 使用 Core Graphics 進行文字繪圖輸出並設定 NSString Attributes (Font、Alignment) 等

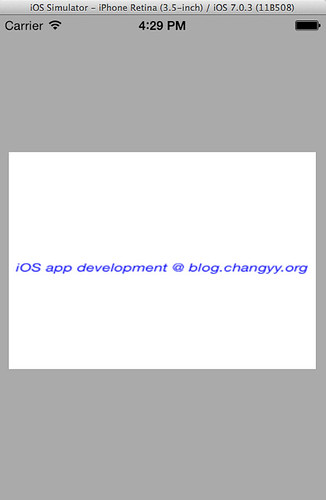
draw string

整理一年多前的程式碼,發現用的函數已經在 iOS 7 宣告為 deprecated 啦,恰好重看 CS193P 時,得知 NSAttributedString 這東西,以為是最新出來的,沒想到這在 iOS 3.2 就存在啦。

順便把一些筆記都記下吧:

+ (UIImage *)buildImageAndDrawText:(NSString *)text size:(CGSize)size ios7:(BOOL)iOS7SDK
{
    UIGraphicsBeginImageContext(size);
    CGContextRef context = UIGraphicsGetCurrentContext();
    CGContextSetRGBFillColor(context, 1, 1, 1, 1);
    CGContextFillRect(context, CGRectMake(0, 0, size.width, size.height));

    UIFont *font = [UIFont italicSystemFontOfSize:15];
    UIColor *fontColor = [UIColor blueColor];

    if (iOS7SDK) {
        NSMutableParagraphStyle *paragrapStyle = [[NSMutableParagraphStyle alloc] init];
        [paragrapStyle setLineBreakMode:NSLineBreakByWordWrapping];
        [paragrapStyle setAlignment:NSTextAlignmentCenter];
     
        [text drawInRect:CGRectIntegral(CGRectMake(0, size.height/2, size.width, size.height))
          withAttributes:@{
                           NSParagraphStyleAttributeName: paragrapStyle,
                           NSFontAttributeName: font,
                           NSForegroundColorAttributeName: fontColor}
         ];
    } else {
        [fontColor set];
        [text drawInRect:CGRectIntegral(CGRectMake(0, size.height/2, size.width, size.height)) withFont:font lineBreakMode:NSLineBreakByWordWrapping alignment:NSTextAlignmentCenter];
    }
 
    UIImage *outImage = UIGraphicsGetImageFromCurrentImageContext();
    UIGraphicsEndImageContext();
    return outImage;
}


用法:

self.imageView = [YourClass buildImageAndDrawText:@"iOS app development @ blog.changyy.org" size:CGSizeMake(300, 300) ios7:YES];

細節可參考 Core Graphics Framework Reference