顯示具有 js 標籤的文章。 顯示所有文章

2024年8月2日 星期五

Node.js 開發筆記 - 分別透過 Pyodide, Brython, WebAssembly 在 node.js 呼叫 Python Code @ node.js v20, python3.11

一時興起研究一下 node.js 呼叫 python code 的方式,當然,都在 linux server 可以直接用 child_process 直接呼叫 python 去運行,例如 nodejs.org/api/child_process.html 的範例

```
const { spawn } = require('node:child_process');
const ls = spawn('ls', ['-lh', '/usr']);

ls.stdout.on('data', (data) => {
  console.log(`stdout: ${data}`);
});

ls.stderr.on('data', (data) => {
  console.error(`stderr: ${data}`);
});

ls.on('close', (code) => {
  console.log(`child process exited with code ${code}`);
}); 
```

然而,有沒有可能在 node.js 內,直接做 python 直譯的過程等方式?當個樂子,找了一下,還真的有,這樣搞的優勢是降低環境部署的變因,當然,效率上不見得是好辦法,但可以讓不同語言的開發者進行融合(誤),目前看到兩種整合方式:
其中 Brython 屬於設計在 Web Browser 下運行(需要 DOM 資源),而 Pyodide 則不需要。分別筆記一下用法。

首先是要執行的 python code 內有 python 的 re 跟 json 模組的使用:

```
% cat script.py 
import re
import json

def runTest(inputData):
    output = {}
    flags = 0
    pattern = r'''(?x)
      (?:
        \.get\("n"\)\)&&\(b=|
        (?:
          b=String\.fromCharCode\(110\)|
          (?P<str_idx>[a-zA-Z0-9_$.]+)&&\(b="nn"\[\+(?P=str_idx)\]
        ),c=a\.get\(b\)\)&&\(c=|
        \b(?P<var>[a-zA-Z0-9_$]+)=
      )(?P<nfunc>[a-zA-Z0-9_$]+)(?:\[(?P<idx>\d+)\])?\([a-zA-Z]\)
      (?(var),[a-zA-Z0-9_$]+\.set\("n"\,(?P=var)\),(?P=nfunc)\.length)'''

    try:
        result = re.search(pattern, inputData, flags)
        if result:
            output["status"] = True
            output["data"] = result.groupdict()
    except Exception as e:
        output["error"] = str(e)
    return json.dumps(output, indent=4)

runTest(data)
```

Pyodide 用法:

```
% nvm use v20
Now using node v20.10.0 (npm v10.2.3)
% npm install pyodide
% cat package.json 
{
  "dependencies": {
    "pyodide": "^0.26.2"
  }
}

% cat run.js
const fs = require('fs').promises;
const { loadPyodide } = require("pyodide");

async function main() {
  const fileContent = await fs.readFile('mydata.bin', 'utf8');
  let pyodide = await loadPyodide();
  pyodide.globals.set("data", pyodide.toPy(fileContent));
  const pythonCode = await fs.readFile('script.py', 'utf8');
  let result = pyodide.runPython(pythonCode);
  console.log(result);
}

main();

% echo "Hello World" > mydata.bin

% node run.js
{}
```

上述使用過程算直觀,但偷懶把要傳遞的資料設定在全域變數,在用 node.js 環境接住 python 運算的結果,看來這個效果是很 OK ,有正常運行得到期待的結果。

接著研究 Brython 用法,他設計上需要 Browser 環境做事:

% head -n 9 brython.js
// brython.js brython.info
// version [3, 11, 0, 'final', 0]
// implementation [3, 11, 3, 'dev', 0]
// version compiled from commented, indented source files at
// github.com/brython-dev/brython
var __BRYTHON__=__BRYTHON__ ||{}
try{
eval("async function* f(){}")}catch(err){console.warn("Your browser is not fully supported. If you are using "+
"Microsoft Edge, please upgrade to the latest version")}

在 node.js 需要 jsdom 模擬一些環境,而下載 brython.js 和 brython_stdlib.js 則參考官網文件,透過 pip install brython 工具出來使用,所以這邊的流程會多了 python 工具的安裝,且現況用 python 3.12 會顯示有些問題,就先定在 3.11 版。此外 brython.js 運行環境,也是可以用最新版 node.js v22 ,但是會看到 [DEP0040] DeprecationWarning: The `punycode` module is deprecated. Please use a userland alternative instead. 訊息,所以先退到 node.js v20 避免額外的訊息

連續動作:

```
% python3.11 -m venv venv
% source venv/bin/activate
(venv) % pip install brython
Collecting brython
  Using cached brython-3.11.3-py3-none-any.whl.metadata (1.0 kB)
Using cached brython-3.11.3-py3-none-any.whl (1.6 MB)
Installing collected packages: brython
Successfully installed brython
(venv) % brython-cli install
Installing Brython 3.11.3
done
(venv) % ls
README.txt brython_stdlib.js index.html venv
brython.js demo.html unicode.txt
```

接著回到 node.js 主場:

```
% nvm use v20
Now using node v20.10.0 (npm v10.2.3)
% cat package.json 
{
  "dependencies": {
    "jsdom": "^24.1.1"
  }
}
% cat run-via-dom.js 
const { JSDOM } = require('jsdom');
const fs = require('fs');
const path = require('path');

const dom = new JSDOM(`<!DOCTYPE html>
<html>
    <head></head>
    <body>
        <script></script>
    </body>
</html>`, {
    runScripts: "dangerously", 
    resources: "usable"
});

const brythonJsPath = path.join(__dirname, 'brython.js');
const brythonStdlibJsPath = path.join(__dirname, 'brython_stdlib.js');

const brythonJs = fs.readFileSync(brythonJsPath, 'utf8');
const brythonStdlibJs = fs.readFileSync(brythonStdlibJsPath, 'utf8');

try {
    dom.window.eval(brythonJs);
    dom.window.eval(brythonStdlibJs);
} catch (error) {
    console.error('Error executing brython.js:', error);
}

const scriptPath = path.join(__dirname, 'script.py');
const pythonScript = fs.readFileSync(scriptPath, 'utf8');

const dataPath = path.join(__dirname, 'mydata.bin');
const binaryData = fs.readFileSync(dataPath, 'utf8');
const base64Data = Buffer.from(binaryData).toString('base64');

const scriptElement = dom.window.document.createElement('script');
scriptElement.type = 'text/python';
scriptElement.textContent = `
import base64
data = base64.b64decode("""${base64Data}""")

${pythonScript}

from browser import document
document.output = runTest(data)
`
dom.window.document.body.appendChild(scriptElement);
try {
    dom.window.brython({debug: 1, pythonpath: ['.']})
    console.log(dom.window.document.output);
} catch (error) {
    console.error('Error executing dom.window.brython:', error);
}
console.log('Python script execution completed.');

% echo "Hello World" > mydata.bin

% node run-via-dom.js 
{"status": false, "data": {}, "error": "not the same type for string and pattern"}
Python script execution completed.
```

很可惜的,剛好要實驗複雜的 python regular expression,在 brython.js + node.js v20 + jsdom 環境上失敗了,甚至小改 index.html 搭配 python3 -m http.server 用 Chrome browser 執行(給予他完整的 Chrome 瀏覽器環境)還是有一樣的錯誤訊息,這邊就暫時推論失敗了,而上述的範例已經包括從 node.js 傳資料到 python code ,以及運行完如何把回傳資料傳到 node.js 使用,眼尖的人,應該會發現在 brython 用法內,使用了 `document.output = runTest(data)` ,其實是多呼叫了一次 runTest(data),因為原先 `${pythonScript}` 也有做,但沒在細追怎樣接運算結果,剛好不合預期就放棄研究。

最後,就是 WebAssembly 領域(一開始寫這篇筆記就是要研究 WebAssembly ,不小心走偏),把某一種 python code 轉成 wasm 格式,接著用 wasmer 運行,或是在其他語言(如 node.js)運行 wasm code。

先透過 MacPorts 安裝 wasmer:

% port search wasmer
wasmer @4.3.5 (lang, devel)
    The leading WebAssembly Runtime supporting WASI and Emscripten
% sudo port install wasmer

接著試著用 py2wasm 把 script-main.py 轉成 script-main.wasm,其中 py2wasm 官網有提到目前僅支援 python3.11:

% python3.11 -m venv venv
% source venv/bin/activate
(venv) % pip install py2wasm
(venv) % py2wasm script-main.py -o script-main.wasm

程式碼:

```
% cat script-main.py
import re
import json

def runTest(inputData):
    output = { "status": False, "data": {}, "error": None}
    flags = 0
    pattern = r'''(?x)
      (?:
        \.get\("n"\)\)&&\(b=|
        (?:
          b=String\.fromCharCode\(110\)|
          (?P<str_idx>[a-zA-Z0-9_$.]+)&&\(b="nn"\[\+(?P=str_idx)\]
        ),c=a\.get\(b\)\)&&\(c=|
        \b(?P<var>[a-zA-Z0-9_$]+)=
      )(?P<nfunc>[a-zA-Z0-9_$]+)(?:\[(?P<idx>\d+)\])?\([a-zA-Z]\)
      (?(var),[a-zA-Z0-9_$]+\.set\("n"\,(?P=var)\),(?P=nfunc)\.length)'''

    try:
        result = re.search(pattern, inputData, flags)
        if result:
            output["status"] = True
            output["data"] = result.groupdict()
    except Exception as e:
        output["error"] = str(e)
    return json.dumps(output, indent=4)

if __name__ == "__main__":
    import sys
    if len(sys.argv) < 2:
        print("Usage: python script-main.py <inputData>")
    else:
        print(runTest(sys.argv[1]))

% python3 script-main.py 
Usage: python script-main.py <inputData>

% python3 script-main.py "Hello World"
{
    "status": false,
    "data": {},
    "error": null
}
```

wasmer 實測:

```
% wasmer run script-main.wasm 
Usage: python script-main.py <inputData>

% wasmer run script-main.wasm "Hello World"
{
    "status": false,
    "data": {},
    "error": null
}
```

接著讓 Node.JS 來運行,這邊就來煩 ChatGPT 並小改一下,有了一個比較堪用的版本:

```
% cat run.js 
const fs = require('fs');
const { WASI } = require('wasi');
const path = require('path');
const { TextDecoder } = require('util');

const runWasm = async (inputData) => {
    const wasmPath = path.resolve('./script-main.wasm');
    const wasmBinary = fs.readFileSync(wasmPath);

    // Setup a WASI instance
    const wasi = new WASI({
        args: inputData ? ['script-main.wasm', inputData] : ['script-main.wasm'],
        env: {},
        version: 'preview1'
    });

    // Create a memory buffer for the stdout
    const memory = new WebAssembly.Memory({ initial: 1 });

    // Compile and instantiate the WebAssembly module
    const { instance } = await WebAssembly.instantiate(wasmBinary, {
        wasi_snapshot_preview1: wasi.wasiImport,
        env: { memory }
    });

    // Start the WASI instance
    wasi.start(instance);

    // Read and decode the stdout data
    const stdout = new Uint8Array(memory.buffer);
    const decoder = new TextDecoder('utf8');
    const output = decoder.decode(stdout);
    console.log(output.trim());
};

// Get the inputData from the command line arguments
runWasm(process.argv[2] || null).catch(console.error);

% nvm use v20
Now using node v20.10.0 (npm v10.2.3)

% node run.js 
(node:22046) ExperimentalWarning: WASI is an experimental feature and might change at any time
(Use `node --trace-warnings ...` to show where the warning was created)
Usage: python script-main.py <inputData>

% node run.js "Hello World"
(node:22050) ExperimentalWarning: WASI is an experimental feature and might change at any time
(Use `node --trace-warnings ...` to show where the warning was created)
{
    "status": false,
    "data": {},
    "error": null
}
```

回過頭來,故事起源是想善用一些 open source 甚至不同程式語言的整合架構,因此稍微研究一些跨語言的整合,很可惜的,最佳的路線應當還是各自跑在各自的 runtime 環境,以上就當趣味筆記一下。

2024年3月13日 星期三

Node.js 開發筆記 - 將 C structure 轉成 Javascript code 流程

在 C code 處理記憶體時,有些偷閒招數是強制型態轉換,這時要移植到 node.js 運行的 js code 有點繞,整個開發過程就不斷在 c code 輸出 structure 的資訊,跟 js code 那端交叉比對,理解後也沒什麼難,就是要計算記憶體位置

C code: 

// 宣告
typedef struct 
{
char flag[16];
unsigned int number1;
unsigned int number2;
unsigned int number3;
unsigned int number4;
} MyHeader;


// 用法:
{
    MyHeader *header;
    header = (MyHeader *)buffer;
}

接著在 js code 要對應處理稍微累了點,但也還行:

const buffer = ....;
const headerOffset = 0;
const headerData = buffer.slice(headerOffset, headerOffset + 32);

headerFlag = headerData.slice(0, 16).toString('ascii');
headerNumber1 = headerData.readUInt32LE(16);
headerNumber2 = headerData.readUInt32LE(20);
headerNumber3 = headerData.readUInt32LE(24);
headerNumber4 = headerData.readUInt32LE(28);

如此可以做簡單的 C Code 轉 node.js Javascript code。

建議移植時,要分別在 C & JS 輸出數值來比對,小步小步進行,避免程式碼很大包,最後出包了難 debug (大概稱得上 test-driven development 吧?)

2022年9月13日 星期二

Javascript 開發筆記 - 使用 Vue.js 和 Vite

規劃網頁開發時,引入一個框架是不錯的選項,讓團隊有共同溝通的語言,目前打算把以前接觸 Vue.js 部分複習一下,直接來用 Vue 3 以及 Vite ,其中 Vite 是一個很像 Webpack 的工具,號稱是下一代前端開發工具且運作效率高,看了一下是可以達成打包的程式碼任務,也能提供 dev web server + hot reload (hot module replacement/HMR) 服務。

文件資料:
這次主要接觸了 Vite ,才跑去看一下 Vue.JS 作者是誰 XD 我用了好一陣子都沒去認識一下。跑去看了一下 Vue.JS 作者的 twitter 跟 WIKI,發現人在新加坡且學經歷也滿有趣的,偶爾會分享跟小孩相處的經驗,並且也分享網路受訪又被辱罵等文,在 2022.08 剛和團隊產出了 Vue.JS 3 中文文檔,年紀相仿,滿有趣的生活。

快速上手法:

% nvm use v16
Now using node v16.13.0 (npm v8.1.0)
% npm -v
8.1.0
% npm create vite@latest my-vue-app --template vue
Need to install the following packages:
  create-vite@latest
Ok to proceed? (y) y
✔ Select a framework: › Vue
✔ Select a variant: › JavaScript

Scaffolding project in /private/tmp/my-vue-app...

Done. Now run:

  cd my-vue-app
  npm install
  npm run dev
% cd my-vue-app 
% cat package.json 
{
  "name": "my-vue-app",
  "private": true,
  "version": "0.0.0",
  "type": "module",
  "scripts": {
    "dev": "vite",
    "build": "vite build",
    "preview": "vite preview"
  },
  "dependencies": {
    "vue": "^3.2.37"
  },
  "devDependencies": {
    "@vitejs/plugin-vue": "^3.1.0",
    "vite": "^3.1.0"
  }
}
% tree     
.
├── README.md
├── index.html
├── package.json
├── public
│   └── vite.svg
├── src
│   ├── App.vue
│   ├── assets
│   │   └── vue.svg
│   ├── components
│   │   └── HelloWorld.vue
│   ├── main.js
│   └── style.css
└── vite.config.js

4 directories, 10 files
% npm install
% npm run dev

  VITE v3.1.0  ready in 435 ms

  ➜  Local:   http://127.0.0.1:5173/
  ➜  Network: use --host to expose

接著去編輯 src/components/HelloWorld.vue 可以看到網頁內容立即改變。如此大概就可以窺見 Vite 的基本用法,接著是編譯:

% npm run build

> my-vue-app@0.0.0 build
> vite build

vite v3.1.0 building for production...
✓ 16 modules transformed.
dist/assets/vue.5532db34.svg     0.48 KiB
dist/index.html                  0.44 KiB
dist/assets/index.43cf8108.css   1.26 KiB / gzip: 0.65 KiB
dist/assets/index.795d9409.js    52.87 KiB / gzip: 21.33 KiB

% tree dist 
dist
├── assets
│   ├── index.43cf8108.css
│   ├── index.795d9409.js
│   └── vue.5532db34.svg
├── index.html
└── vite.svg

1 directory, 5 files

% cat dist/index.html 
<!DOCTYPE html>
<html lang="en">
  <head>
    <meta charset="UTF-8" />
    <link rel="icon" type="image/svg+xml" href="/vite.svg" />
    <meta name="viewport" content="width=device-width, initial-scale=1.0" />
    <title>Vite + Vue</title>
    <script type="module" crossorigin src="/assets/index.795d9409.js"></script>
    <link rel="stylesheet" href="/assets/index.43cf8108.css">
  </head>
  <body>
    <div id="app"></div>
    
  </body>
</html>

以上就簡單過一下常用的東西。

Javascript 開發筆記 - 使用 npm/npx degit 管理開發模板

當你把你習慣的部分都設置在 github 後,可以靠以下資料快速複製出來使用:

% npx degit changyy/study-node-electron-simple my-project 
> cloned changyy/study-node-electron-simple#HEAD to my-project
% cd my-project 
% source env_nvm.sh 
Now using node v16.13.0 (npm v8.1.0)
% npm install
% npm run start

> my-electron-app@1.0.0 start
> electron-forge start

✔ Checking your system
✔ Locating Application
✔ Preparing native dependencies
✔ Launching Application

其中 degit 套件還滿方便的,可以快速複製樣板出來並去除 git 相關結構。而使用 npx 的指令,他本身 man page 介紹是 Run a command from a local or remote npm package,可以用完就拋掉也不用安裝在本地。

相關資料:

2022年8月30日 星期二

Electron 開發筆記 - 初探 ElectronJS 框架開發 PC app

約莫一年前團隊同事接了個用 ElectronJS 開發的程式,並且依照其框架成果再做出另一個 PC app ,最近播點時間來研究一下 ElectronJS 。幾個月前接觸 Golang 時,也曾想過用 Golang + Electron 練習一下 PC app ,只是整體上運作起來還是太卡了點。

整體上,要認識 ElectronJS 建議都先看一次官方文件 www.electronjs.org/docs/latest/ ,基本上寫的精簡不錯,看完一輪 Processes in Electron 就會學會:
  • Electron 的流程架構 (Process Model),可以分成 main process (node.js / main.js) 和 renderer process (BrowserWindow / renderer.js ),並且透過 preload.js 串起 main process 跟 renderer process 溝通橋樑
  • preload.js 是在 renderer process 執行前運行的,等於進入到 renderer process 前,可以打造一些溝通環境
  • 資安領域上,如何讓 renderer process 的權限不要太大 (Context Isolation)
  • 關於 main process 和 renderer process 溝通時,該怎樣進行 (ipcMain, ipcRenderer),可以分成 Renderer to Main 單向溝通、Renderer to Main 雙向溝通、Main to Renderer 溝通等
  • 看一眼 Process Sandboxing 情況,再多了解一下 MessagePorts 用法 (像 window.postMessage 之 iframe 溝通)
如此,就差不多可以來用 Electron 開發 PC app,然而有更多眉眉角角躲在 package.json 中以及一堆神秘的指令,如 electron-forge 等等。

我想,開發 Electron 的複雜度,源自於整個專案進行會跨非常多領域(指令)吧,每個混再一起就會覺得爆炸大,每個分離看待就會舒適許多。

像我自己也弄了:
  • env_nvm.sh:靠 nvm 切換 node.js 版本
  • env_vim.sh:靠 .vimrc 和 .vimrc_coc.nvim 完成簡易 coding style 和 auto-complete 設置
  • 把上述包裝在 init_env.sh 運行,每次開發就先跑一下 source init_env.sh 就行了
最後,對於 Electron PC app 開發,後續也都還會再做一些程式碼封裝方式(webpack等)和程式碼混淆等,當然,若還有開發框架 vue.js, react 等,也都還有對應的任務,所以連續動作還是很多的,之後繼續筆記一下。

2022年6月16日 星期四

C開發筆記 - 使用 JS Engine : Duktape 接收與傳遞 Javascript Object

對嵌入式設備來說,如果資源夠大的話,直接用 Node.js 絕對是個不錯方案,受限於硬體資源限制,採用了 Duktape JS Engine。

寫 C Code 操作 Duktape JS Engine 時,呼叫的方式還滿像以前學生時代寫組語的感覺,要先一步步把參數先配置好,接著在呼叫函示去運算。這次就筆記一下,如何從 JS Code 傳遞 Object 到 C Code,以及 C Code 要怎樣傳遞 Object 回 JS Code。

從 JS Code 傳遞 Object 到 C Code:

//
// _js_helper_fetch_url_more 是從 C Code 植入 function,並且接送一個 JS Object,有 url 跟 request_header 兩個屬性
//
if (typeof _js_helper_fetch_url_more !== "undefined") {
    var ret = _js_helper_fetch_url_more({
        url: 'https://ipinfo.io/country',
        request_header: [
            'Content-Type: HelloWorld',
            'X-MAN: HelloWorld',
        ],  
    }); 
    console.log(JSON.stringify(ret));
}

在 C Code 要取得傳進來的 JS Object,並存取 url 跟 request_header 兩個屬性:

if (duk_is_object(ctx, -1) && duk_has_prop_string(ctx, -1, "url")) {
    duk_get_prop_string(ctx, -1, "url");
    const char *url = duk_to_string(ctx, -1);
    duk_pop(ctx);
}

if (duk_has_prop_string(ctx, -1, "request_header")) {
    duk_get_prop_string(ctx, -1, "request_header");
    if (duk_is_object(ctx, -1) && duk_has_prop_string(ctx, -1, "length")) {
        duk_get_prop_string(ctx, -1, "length");
        int header_length = duk_get_int(ctx, -1);
        printf("#JS_Helper_Fetch_Url_More> access input_object.request_header.length: %d\n", header_length);
        duk_pop(ctx);

        for (int i=0 ; i<header_length ; ++i) {
            duk_get_prop_index(ctx, -1, i);
            const char *header_value = duk_get_string(ctx, -1);
            printf("#JS_Helper_Fetch_Url_More> access input_object.request_header[%d] = [%s]\n", i, header_value);
            duk_pop(ctx);
        }
    }
    duk_pop(ctx);
}

最後,想要從 C Code 傳遞一個 JS Object 回去的方式:

//
// 傳回 {"status": true, "errorCode": 0}
//

duk_idx_t obj_idx;
obj_idx = duk_push_object(ctx);

int errorCode = 0;
duk_push_int(ctx, errorCode);
duk_put_prop_string(ctx, obj_idx, "error_code");

if (errorCode == 0) {
    duk_push_true(ctx);
} else {
    duk_push_false(ctx);
}
duk_put_prop_string(ctx, obj_idx, "status");

更多完整資訊,請參考:github.com/changyy/study-duktape

2021年9月10日 星期五

Node.js 筆記 - Loopback 2 與 MySQL 查詢緩慢的瓶頸排除 @ loopback-connector-mysql, connectionlimit

花了兩天幫同事追一個問題:為何有個服務重啟後,一直處於不穩甚至無法服務的狀態,但隨著時間是有機會變穩定的。

這算是一個 IoT 老服務了,當裝置上線時會跟服務保持連線(Websocket),其中有一些認證跟服務會使用到 DB server。當運行好一段時間,沒什麼大問題,反應速度也很良好。但碰到服務發布時,都會有一段期間無法正常使用。

此現象主要是 IoT 裝置們當初設計了自動連上雲台的架構,每台裝置啟動後,依序連上雲服務。但是,當服務更新時,若採到斷線機制時,將導致大量的裝置重新連線,而連線過程若有要認證就會佔用到 DB query 資源。此時若有些回應慢,將導致有些裝置認為服務不正常而自行斷線,並且又進入 retry 機制,導致災難性的自家人打自家人 DDoS 世界奇觀。

追了好一陣子,鎖定了一套使用 node.js - loopback 2 框架的服務,並且追到 DB query 瓶頸。主要透過對 db 查詢結果做 cache ,可以大幅度改善狀態,去減少 db query。並且當下 db 並未忙碌到回應緩慢。包括用其他對應機器追蹤查詢 db server 效率,以及在雲台出問題的機器上,直接用 mysql command line 查詢,即可交叉驗證應當是 node.js - loopback 的狀態問題。

原本也有意先把套件都升一升,可惜要跳到 LoopBack 4 並不是簡單的事 Orz 最後,老覺得這件事還是不太正常,就用 concurrent limit loopback mysql 關鍵字逛逛,大部分都在討論連線異常,很少提到連線數的問題,很幸運最後找到 connectionlimit 關鍵字,並且在查一下 loopback-connector-mysql 得知預設是只用 10 這個數字!

  
if (isNaN(s.connectionLimit)) {
    s.connectionLimit = 10;
  }

因此,就只需要在 loopback 框架下的 datasources.json ,多定義 connectionLimit 即可,例如來個 100 ,並且在系統上追蹤連線數:

$ netstat -np --inet | grep "YourDBServerIP:3306" | wc -l
100

這樣就搞定啦!當時想說 loopback 2 太舊太難升,是不是弄個類似 mysql command line 查詢機制來頂著用 XD 還因此配合 server 環境用 php5 寫好小工具了:

% echo '{"db_host":"DB_IP","db_user":"DB_USER","db_pass":"password","db_database":"DB_NAME","db_query":"SELECT count(*) FROM device;"}'  | jq ''     
{
  "db_host": "DB_IP",
  "db_user": "DB_USER",
  "db_pass": "password",
  "db_database": "DB_NAME",
  "db_query": "SELECT count(*) FROM device;"
}

% echo '{"db_host":"DB_IP","db_user":"DB_USER","db_pass":"password","db_database":"DB_NAME","db_query":"SELECT count(*) FROM device;"}'  | php db_helper.php /tmp/db_helper.log N M | jq ''
{
  "input": [
    [
      {
        "count(*)": "1234567"
      }
    ]
  ],
  "log": [
    0.34358501434326,
    0.11107587814331,
    0.47047901153564
  ],
  "status": true
}

還設計了 db_helper.php 能不能支援最多跑 N 隻,每隻也來個 timeout M 秒,並透過 lock 機制來保護溝通等,想想這段旅行也是滿好玩的。先把尚未妥善測試的 php5 工具丟到 github 記一下。

2021年7月20日 星期二

Node.js 筆記 - 使用 Puppeteer 進行 JS Injection 與 Custom function 定義實作 @ Puppeteer v10, Node.js v16.5.0

之前使用 Puppeteer 方便自己撰寫一些監控 http requests ,像是即時監控 remote resource 變化。接著,要來把玩 JS Injection。

如果使用 Puppeteer 的用法是包括持續瀏覽網頁的話,那適合在網頁 onload 的情況下植入:

// https://pptr.dev/#?product=Puppeteer&version=v10.0.0&show=api-event-domcontentloaded
// https://developer.mozilla.org/en-US/docs/Web/API/Window/load_event
//
// The load event is fired when the whole page has loaded, including all dependent resources such as stylesheets and images. This is in contrast to DOMContentLoaded, which is fired as soon as the page DOM has been loaded, without waiting for resources to finish loading.
//
page.on('load', async () => {
console.log('on.load');
});

如果是瀏覽網頁後,立馬植入 JS Code 運行並且任務就結束了,那就是適合在 network 連線閒置後處理:

await page.goto(target_url, {
waitUntil: 'networkidle0',
});
console.log('networkidle0');

而 JS Injection 的方式:

await page.evaluate((js_code) => {return Promise.resolve(window.eval(js_code));}, js_resource_content);

其中 js_resource_content 就是預計植入的 JS Code 字串。例如有多份程式碼要植入,可以跑回圈:

for(let i=0 ; i<js_resource.length ; ++i) {
console.log('inject: '+js_resource[i]+', size: '+js_resource_content[i].length);
await page.evaluate((js_code) => {return Promise.resolve(window.eval(js_code));}, js_resource_content[i]);
}

其中 js_resource[] 紀錄的是 js code 網址,而 js_resource_content[] 是紀錄該 js code 網址的內容。

最後,提一下自訂函數的寫法:

// https://github.com/puppeteer/puppeteer/blob/main/examples/custom-event.js
// Define a window._puppeteer_helper function on the page.
await page.exposeFunction('_puppeteer_helper', (data) => {
console.log(`_puppeteer_helper fired`);
});

如此,又可以靠 JS Injection 去呼叫 window._puppeteer_helper ,或是靠 phage.evaluate 執行了:

let result = await page.evaluate((data_to_page) => {
let data = data_to_page;
return Promise.resolve(window.eval(`
window._puppeteer_helper();
`));
}, 'nothing');

2021年6月27日 星期日

Node.js 筆記 - 以 HTTP API 提供 ffmpeg 轉檔,以 jpg 轉成 png 為例 @ node.js v10.24.1, macOS 11.4

最近接獲一個任務研究了一下 Javascript 與 H264 的解決方案,首先會立馬想到 ffmpeg 方案,就研究了以下 JS 專案:
其中 ffmpeg.wasm 無法在 node.js v10 運行。在不考慮 node.js 升級的前提上,就來把玩其他三者,而 tinyh264 的源頭是 h264bsd 專案,在 h264bsd 專案中有 js solution 可以挖出來跑,包括裡頭有 github.com/oneam/h264bsd/blob/master/js/test_node.js 這隻程式很小巧美麗,可以欣賞一下。而裡頭把玩最多的是 ffmpeg.js 這專案,有興趣可以看看他的 Makefile ,很簡單清楚,比較特別是他分別產出 ffmpeg-webm.js 和 ffmpeg-mp4.js ,兩者不同的地方是 ffmpeg 支援的 encoder/muxer 不同,可能是為了精簡 js code size 因此就拆成 webm 跟 mp4 的用法。這邊把玩的是善用 ffmpeg.js Makefile 去重編 ffmpeg-*.js 增加 demuxer/decoder 和 encoder/muxer。

這邊滿適合看一下 ffmpeg 框架:


接著,工作上的任務是讓 input 支援 h264,而 output 支援 jpg/png 等。這邊把範圍限縮到 input 支援 jpg ,輸出支援 png 來筆記。最後包裝個 HTTP API 出來筆記一下,結果花最多時間是在確認如何從檔案系統讀出檔案資料,以及透過 http.request 將圖片資料下載回來 Orz 還派上 md5sum 來檔案內容是否正常。

而 ffmpeg.js 真的設計得不錯,用起來很方便,可以參考 local-file-cmd.js 用法:

const ffmpeg = require('./ffmpeg-20210624_1550/ffmpeg-mp4.js');
//const ffmpeg = require('./ffmpeg-default/ffmpeg-mp4.js');
const fs = require('fs');
const crypto = require('crypto');

let from_local_file = '/tmp/test.jpg';
let raw_data = fs.readFileSync(from_local_file);
let testData = Uint8Array.from(raw_data);
const md5sum = crypto.createHash('md5');
md5sum.update(raw_data);
console.log('[INFO][from_local_file][size:'+raw_data.length+'][md5:'+md5sum.digest('hex')+'][path:'+from_local_file+']');

const result = ffmpeg({
MEMFS: [{name: 'test.jpg', data: testData}],
arguments: ['-i', 'test.jpg', 'test.png']
})
const out = result.MEMFS[0];
const outputContent = Buffer.from(out.data);

console.log('[INFO] Done. Input size: ' + raw_data.length +', testData size: '+testData.length+', output size: '+outputContent.length);

更多資訊:changyy/study-wasm-ffmpeg-jpg-to-png

2021年1月14日 星期四

[Javascript] 複寫 XMLHttpRequest 來紀錄 Network Request URL @ Chrome Browser DevTools

最近 podcast 很夯,來研究 <audio> 。之前研究過 <video> 就有發現現在都用很夯 blob 的播放方式,透過 JS 片段下載資料交給 <video> 播放,以至於從 JS 調閱出 <video> 元件時,看不到真實的影片來源,而是一連串 blob (Binary Large Object) 記憶體位置。

原本想說在 Chrome DevTools 下,能不能靠 JS 取得 network request 發送清單來做應用,看著看著突然腦筋一轉,乾脆就用 XMLHttpRequest 好了,多包一層就可以收集了。

用法:

//
// https://stackoverflow.com/questions/7775767/javascript-overriding-xmlhttprequest-open
//
(function() {
var proxied = window.XMLHttpRequest.prototype.open;
window.XMLHttpRequest.prototype.open = function() {
// console.log( arguments );
//
// 只關注 m3u8 來源
//
if (arguments.length >= 2 && arguments[1].indexOf('.m3u8') > 0) {
console.log( arguments );
// return;
}
return proxied.apply(this, [].slice.call(arguments));
};
})();

2020年6月20日 星期六

[Javascript] Shopify App - 修正 location.replace 與 GA 追蹤碼 utm_* 的應用

認真使用 Shopify 大概也有一個多月了,使用了一些付費 Shopify App 在做本地化加強,發現這些第三方 app 還滿善用 variant 機制,原先是拿來設計一個商品有多種顏色等用途,現在則是應用在多儲存一些在地化的資訊。

因此,當發現需要轉化成在地化資訊時,會透過接近導網址架構,多添加 variant 資訊:

var new_url = window.location.protocol + '//' + window.location.host + window.location.pathname + '?variant=' + variant_id;

然而這樣的小機制,卻把 utm_* 的追蹤碼都給去掉了 XD 所以在幫他補強一下:

var new_url = window.location.protocol + '//' + window.location.host + window.location.pathname + '?variant=' + variant_id;

if (window.location && window.location.href) {
var m = window.location.href.match(/[\?&]([^=]+=[^&]+)/g);
if (m) {
var params = null;
for (var i=0; i<m.length ; ++i) {
if (m[i].indexOf('utm_') > 0) {
if (params == null) {
params = m[i].substr(1);
} else {
params += '&' + m[i].substr(1);
}
}
}
if (params != null) {
new_url += '&' + params;
}
}
}

收工!

2019年11月24日 星期日

[JS] Google Adsense 自動廣告 - 關閉 錨定廣告/重疊廣告 方式

前陣子跟 Google Adsense 的新加坡客戶經理聊過幾句,被她引導開啟了一些自動化廣告最佳化的項目。最近發現公司的網站出現 錨釘 廣告,想說是不是不小心誤上程式碼,最後想起應當是自動化廣告的機制。

對於一些頁面不想開啟置頂或置底的錨定廣告,可用以下方式關閉:

<script>
(adsbygoogle = window.adsbygoogle || []).push({
enable_page_level_ads: false
});
</script>


剛好去年是要手動靠 enable_page_level_ads: true 啟用的,一時之間還以為實驗的程式碼不小心發布了 :P 因為去年研究時感受到他很容易覆蓋掉一些網路應用的版面,如導覽功能,因此決議不讓他上線。

2019年11月20日 星期三

[PHP] OAuth / Sign in with Apple JS - 使用 Apple JS SDK 讓網站支援 Apple ID 登入

SignInWithApple00

最近幫看同事串 Sign In with Apple 好像有很多不順的地方,拿自己的 Apple developer 帳號試試 :P 相關文件:
首先就來闖關吧,先進行 Sign In with Apple 設定,需要指定某個 email domain 給 Apple 跟用戶溝通,此例用 appid.changyy.org 網域為例:

Certificates, Identifiers & Profiles -> More -> Sign In with Apple -> Configure

SignInWithApple03

在添加網域進去之前,請記得先設定 SPF DNS Record,不然 Apple 一驗證不合 SPF 時,又得等 DNS Cache 更新等到天荒地老 Orz

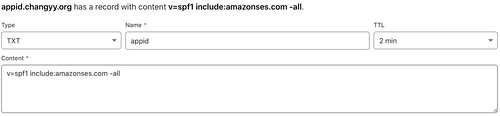
在此先添加 Type=TXT 的 DNS Record 吧!

v=spf1 include:amazonses.com -all

SignInWithApple02

接著用 dig 驗一下:

% dig -t txt appid.changyy.org

; <<>> DiG 9.10.6 <<>> -t txt appid.changyy.org
;; global options: +cmd
;; Got answer:
;; ->>HEADER<<- opcode: QUERY, status: NOERROR, id: 47410
;; flags: qr rd ra; QUERY: 1, ANSWER: 1, AUTHORITY: 0, ADDITIONAL: 1

;; OPT PSEUDOSECTION:
; EDNS: version: 0, flags:; udp: 512
;; QUESTION SECTION:
;appid.changyy.org. IN TXT

;; ANSWER SECTION:
appid.changyy.org. 119 IN TXT "v=spf1 include:amazonses.com -all"

;; Query time: 56 msec
;; SERVER: 8.8.8.8#53(8.8.8.8)
;; WHEN: Wed Nov 20 00:48:09 CST 2019
;; MSG SIZE  rcvd: 92


添加 appid.changyy.org 網域,按下 Register 時,接著努力驗證通過即可。如果沒有先添加 SPF 就會出現類似訊息:The domain 'appid.changyy.org' is not SPF compliant.

接著再回到 Apple Developer 網站繼續按 Register (不是立刻通過,要等 DNS Cache 過期),就可以進行後續的認證了,如 https://appid.changyy.org/.well-known/apple-developer-domain-association.txt 配置等。接著又得搞 https 連線,又進入了 免費SSL/TLS憑證 - Let's Encrypt 與 NGINX 的設定 XD 在此不贅述。

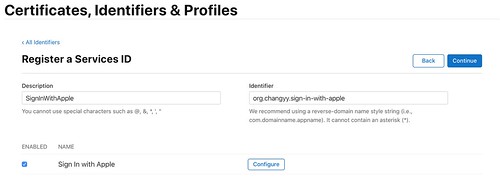
終於可以進入 Apple Developer Account 其他設定了,首先要建立 Services IDs 時,會要求有一個 App ID 為 primary App ID ,這件事也代表 Sign In with Apple 的核心還是 App ,此例新建一個 App ID = org.changyy.apple.app-id 為例,並且在下方勾選 Sign In with Apple 且 Enable as a primary App ID。

接著,建立 Services IDs :

Certificates, Identifiers & Profiles -> Identifiers -> Add -> Services IDs -> 建立一個 org.changyy.sign-in-with-apple 並啟用 Sign In with Apple -> Configure -> Web Domain = appid.changyy.org 而 Return URLs = https://appid.changyy.org/callback.php 並按 Add 和 Save -> 再按 Continue 完成

SignInWithApple08

最後,再來建立一組 Key 用來溝通:

Certificates, Identifiers & Profiles ->  Keys -> 添加一組 Key Name = SignInWithAppleKey,記得勾選 Sign In With Apple -> 點擊 Configure 挑選完 App ID 按 Save -> 最後會下載一個 AuthKey_KeyID.p8 檔案,就是後續溝通的項目。

SignInWithApple10

SignInWithApple11

如此一來,在上述的過程中可以得到以下關鍵物:

  • Service ID Identifier = org.changyy.sign-in-with-apple (後續是 OAuth 的 Client_ID)
  • Key ID = 在 *.p8 的檔名上,或是在 Certificates, Identifiers & Profiles -> Keys -> SignInWithAppleKey 瀏覽可看到
  • Team ID = 在 Apple Developer 登入後右上角可看見,或是在 Certificates, Identifiers & Profiles -> Identifiers -> 隨意一組 App ID -> App ID Prefix 就有標記 (Team ID) 資訊
  • Return URLs = 在 Service ID 內編輯的,如 https://appid.changyy.org/callback.php

把這些資訊弄個 JSON 紀錄:

$ cat settings.json
{
        "CLIENT_ID": "org.changyy.sign-in-with-apple",
        "SCOPES": "name email",
        "REDIRECT_URI": "https://appid.changyy.org/callback.php",
        "STATE": "",
        "TEAM_ID": "YourTeamID",
        "KID" : "YourKeyID",
        "Key_P8_PATH" :"../keystore/AuthKey_YourKeyID.p8",
        "" : ""
}


最後把 https://github.com/changyy/sign-in-with-apple-js 拿來用,在根目錄建立 keystore 並擺放 AuthKey_YourKeyID.p8 以及上述 settings.json 擺在 /path/sign-in-with-apple-js/php/settings.json ,在把 https://appid.changyy.org/ Document_Root 設定在此專案的 /path/sign-in-with-apple-js/php 目錄上,如此用 https://appid.changyy.org/ 時,就會有以下畫面:

SignInWithApple12

點擊後就會被引導完成 Apple 登入,登入後會導向到 https://appid.changyy.org/callback.php 並且看到簡單的 OAUTH code 的使用:
oepnssl = OpenSSL 1.1.1  11 Sep 2018
jwt_header = Array
(
    [typ] => JWT
    [alg] => ES256
    [kid] => YourKeyID
)

jwt_payload = Array
(
    [iss] => YourTeamID
    [iat] => 1574184061
    [exp] => 1574187661
    [aud] => https://appleid.apple.com
    [sub] => YourServiceID
)

apple_public_keys = Array
(
    [keys] => Array
        (
            [0] => Array
                (
                    [kty] => RSA
                    [kid] => AIDOPK1
                    [use] => sig
                    [alg] => RS256
                    [n] => lxrwmuYSAsTfn-lUu4goZSXBD9ackM9OJuwUVQHmbZo6GW4Fu_auUdN5zI7Y1dEDfgt7m7QXWbHuMD01HLnD4eRtY-RNwCWdjNfEaY_esUPY3OVMrNDI15Ns13xspWS3q-13kdGv9jHI28P87RvMpjz_JCpQ5IM44oSyRnYtVJO-320SB8E2Bw92pmrenbp67KRUzTEVfGU4-obP5RZ09OxvCr1io4KJvEOjDJuuoClF66AT72WymtoMdwzUmhINjR0XSqK6H0MdWsjw7ysyd_JhmqX5CAaT9Pgi0J8lU_pcl215oANqjy7Ob-VMhug9eGyxAWVfu_1u6QJKePlE-w
                    [e] => AQAB
                )

        )

)

apple_public_key_pem = 

-----BEGIN PUBLIC KEY-----
MIIBIjANBgkqhkiG9w0BAQEFAAOCAQ8AMIIBCgKCAQEAlxrwmuYSAsTfn+lUu4go
ZSXBD9ackM9OJuwUVQHmbZo6GW4Fu/auUdN5zI7Y1dEDfgt7m7QXWbHuMD01HLnD
4eRtY+RNwCWdjNfEaY/esUPY3OVMrNDI15Ns13xspWS3q+13kdGv9jHI28P87RvM
pjz/JCpQ5IM44oSyRnYtVJO+320SB8E2Bw92pmrenbp67KRUzTEVfGU4+obP5RZ0
9OxvCr1io4KJvEOjDJuuoClF66AT72WymtoMdwzUmhINjR0XSqK6H0MdWsjw7ysy
d/JhmqX5CAaT9Pgi0J8lU/pcl215oANqjy7Ob+VMhug9eGyxAWVfu/1u6QJKePlE
+wIDAQAB
-----END PUBLIC KEY-----


apple_public_key_alg = RS256


[Lcobucci\JWT]
request data = Array
(
    [client_id] => YourServiceID
    [client_secret] => A.B.C1
    [code] => c
    [grant_type] => authorization_code
    [redirect_uri] => https://YourServiceIDReturnURL
)


response = Array
(
    [access_token] => a
    [token_type] => Bearer
    [expires_in] => 3600
    [refresh_token] => r
    [id_token] => id_token
)


[Firebase\JWT]
request data = Array
(
    [client_id] => YourServiceID
    [client_secret] => A.B.C2
    [code] => c
    [grant_type] => authorization_code
    [redirect_uri] => https://YourServiceIDReturnURL
)


response = Array
(
    [error] => invalid_client
)


[Firebase\JWT and \Lcobucci\JWT\Signer\Ecdsa\MultibyteStringConverter]
request data = Array
(
    [client_id] => YourServiceID
    [client_secret] => A.B.C3
    [code] => c
    [grant_type] => authorization_code
    [redirect_uri] => https://YourServiceIDReturnURL
)


response = Array
(
    [error] => invalid_grant
)


[Firebase\JWT without openssl_pkey_get_private and \Lcobucci\JWT\Signer\Ecdsa\MultibyteStringConverter]
request data = Array
(
    [client_id] => YourServiceID
    [client_secret] => A.B.C4
    [code] => c
    [grant_type] => authorization_code
    [redirect_uri] => https://YourServiceIDReturnURL
)


response = Array
(
    [error] => invalid_grant
)
網路上滿多人在討論 firebase/jwt 的用法,但其實在 2019/11/20 來看,firebase/jwt 仍就沒有完整 Sign In with Apple 所需的 JWT 編碼格式,我則是靠 Lcobucci/JWT 套件完成打通  Sign In with Apple 的,並且看懂為何 firebase/jwt 還不能打通 :P 拿著 Lcobucci/JWT 內的 MultibyteStringConverter 來小試身手果真就通了。再找個時間貢獻 firebase/jwt 來修正好了,這次為了檢驗 firebase/jwt 失敗問題,大概至少看了 5套 php-jwt 的寫法,結果大多都是從 luciferous/jwt fork 擴充的,這可是 2011 的程式呢。

而跟 Apple Auth API 溝通的結果,若本身 JWT 製作踩到演算法等問題只會收到 {"error":"invalid_client"},但這也包含 OAUTH REDIRECT_URI 不合法等等,如果演算法打通了,而 Code 過期或是被重複使用時,會收到 {"error":"invalid_grant"} 資訊。

2018年10月11日 星期四

PHP 開發筆記 - 判斷瀏覽器語系機制

就 Javascript 來說,很方便:

var userLanguage = navigator.language || navigator.userLanguage;

而 server site 就靠 $_SERVER['HTTP_ACCEPT_LANGUAGE'] 啦,但他的格式還會有語系偏好比重,需要小小處理一番:

//
// $_SERVER['HTTP_ACCEPT_LANGUAGE'] == 'zh-TW,zh;q=0.9,en-US;q=0.8,en;q=0.7';
//
function _detect_browser_language($_SERVER_VAR, $system_prefer = array( 'en' => 1, 'cn' => 1 )) {
if (isset($_SERVER_VAR['HTTP_ACCEPT_LANGUAGE'])) {
$langs = array();
foreach(explode(',', $_SERVER['HTTP_ACCEPT_LANGUAGE']) as $entry) {
$t1 = explode(';', $entry);
$cnt = count($t1);
if ($cnt == 2) {
$t2 = explode('=', $t1[1]);
if (count($t2) == 2)
array_push($langs, array($t1[0], floatval($t2[1])));
else
array_push($langs, array($t1[0], 1.0));
} else if ($cnt == 1)
array_push($langs, array($t1[0], 1.0));
}
function lang_prefer_sort($a, $b) {
if( $a[1] == $b[1] ) return 0;
if( $a[1] > $b[1] ) return -1;
return 1;
}
usort($langs, 'lang_prefer_sort');
foreach($langs as $lang_info) {
if (is_array($lang_info)) {
if (isset($system_prefer[$lang_info[0]]))
return $lang_info[0];
$checker = explode('-', $lang_info[0]);
if (count($checker) == 2) {
if (isset($system_prefer[$checker[0]]))
return $checker[0];
else if ($checker[0] == 'zh')
return 'cn';
}
}
}
}
return 'en';
}

2017年5月10日 星期三

[Javascript] 添加密碼規則要求 - 使用 jQuery.validator

剛好碰到需求,且沒有太嚴重的部分,就先偷懶用前端擋:

<script src="https://ajax.googleapis.com/ajax/libs/jquery/2.1.4/jquery.min.js"></script>
<script src="https://cdnjs.cloudflare.com/ajax/libs/jquery-validate/1.16.0/jquery.validate.min.js"></script>

<script>

$(document).ready(function() {
// 要有 a-z
$.validator.methods.passwd_rule1 = function( value, element ) {
return this.optional( element ) || /[a-z]+/.test( value );
}
// 要有 A-Z
$.validator.methods.passwd_rule2 = function( value, element ) {
return this.optional( element ) || /[A-Z]+/.test( value );
}
// 要有 0-9
$.validator.methods.passwd_rule3 = function( value, element ) {
return this.optional( element ) || /[0-9]+/.test( value );
}


$("form").validate({
rules: {
newPassword: {
required: true,
minlength: 8,
passwd_rule1: true,
passwd_rule2: true,
passwd_rule3: true,
},

checkNewPassword: {
equalTo: "#newPassword"
}
},

messages: {
newPassword: "密碼必須8位數以上,且需含大小寫英文跟數字",
checkNewPassword: "輸入錯誤,請確認密碼",
}
});
});
</script>


其他把玩:

在 Chrome console 引入 library 測試,而非修改 source code

var js = document.createElement('script');
js.src = "https://ajax.googleapis.com/ajax/libs/jquery/2.1.4/jquery.min.js";
document.getElementsByTagName('head')[0].appendChild(js);
var js = document.createElement('script');
js.src = "https://cdnjs.cloudflare.com/ajax/libs/jquery-validate/1.16.0/jquery.validate.min.js";
document.getElementsByTagName('head')[0].appendChild(js);


替沒有 id tag 的 input 添加 id:

$('[name=newPassword]').attr('id', 'newPassword');

2016年7月4日 星期一

Bootstrap 筆記 - 讓 table 以 <tr> 為單位支援 click event

這功能其實不難,但順手筆記一下自己選的解法:

<table class="table table-striped table-hover">
<thead>
<tr>
<td cols="3">
<img class="img-responsive" src="something"/>
</td>
</tr>
</thead>
<tbody>
<tr data-href="link">
<td>Data1</td>
<td>Data2</td>
<td><a href="link">Data3</a></td>
</tr>
</tbody>
</table>


搭配 Javascript(jQuery):

<script>
$(document).ready(function() {
$(".table > tbody > tr").css('cursor', 'pointer').click(function() {
var link = $(this).data("href").trim();
if (link.length > 0)
window.document.location = link;
return false;
});
});
</script>


簡單的說,就是在某個 <td> 欄位裡埋入 <a> tag,但在 <tr> 裡的屬性多個 data-href 來記錄,最後再用 Javascript 埋入 <tr> click event。

看起來好像多埋了 <a> tag ,其主因是為了 SEO。

2015年8月29日 星期六

Node.js 筆記 - 使用 Bloom Filter 實作大量 URL Checker/Filter (SPAM)

最近想要針對 UGC 資料進行過濾,首先要面對的就是 SPAM/18+ 資料,接著,沒想到聽到 Bloom Filter 字眼!這個學生時代就碰過的東西,竟然會被提及,就那把玩一下吧!對於 Bloom Filter 的用法需要留意一下,本身設計是用時間省空間的架構,並且有誤判的機率,只要用得恰當都還好啦。

有點久沒摸 node.js 了,就挑他來試試,立馬找到有人已經實作好了 XD https://www.npmjs.com/package/bloomfilter 我只好接著使用啦 :P

接著不知不覺就蹦出一個 url-spam-checker 了 :P 有需要想把玩的可以試試:

$ npm install url-spam-checker
$ vim test.js
var
sys = require('sys'),
path = require('path'),
url_spam_checker = require('url-spam-checker')
;

url_spam_checker.createServer([
function handle_resource(callback){
var ret = [];
ret.push('yahoo.com');
ret.push('google.com.tw');
callback(null, ret);
}
], 8000, sys.log, sys.log);
$ node test.js


就會在 8000 port 起了 HTTP server ,接著可以用 http://localhost:8000/?url=http://tw.yahoo.com 的方式測試,若存在會回傳 HTTP 200 OK,不存在則是 HTTP 404 NOT FOUND。

當要驗證的 URL = http://tw.yahoo.com 也會被判定 200 OK,因為這邊是檢驗 domain level 的,不是 hostname 而已,同理在 URL = http://yahoo.com.tw 則是 404 NOT FOUND。而上述 handle_resource 可以自行填寫,例如回傳個20萬筆也是 ok 的。

這邊在使用 Bloom Filter 時,其 bit space =  Pattern 數量 x 256,這是因為我設定 hash function 有 8 組,所以 256 = 2^8  囉。

有興趣可以參考這邊:https://www.npmjs.com/package/url-spam-checker

2015年5月7日 星期四

Javascript 開發筆記 - 使用 Yuotube Player API for iframe Embeds 將 videos 串成 playlist

透過 Youtube Player API 可以動態把一堆 Youtube video 串成一個 playlist 來播放。網路上不少範例,但很少看到處理多則 video 的方式,有也是一則 video 搭配一個 player 架構,摸了一下終於搞懂其設計架構,片段程式碼:

<div id="player"></div>
<script>
var player;
var videos = ['LzHFD1sEqpE', 'iV8JDbtXZm4', '-sjfQWGkGF4'];
(function() {
if (videos.length) {
var tag = document.createElement('script');
tag.onload = function() {
YT.ready(function() {
player = new YT.Player('player', {
playerVars: {
playlist: videos.join(","),
}
});
});
}
tag.src = "https://www.youtube.com/iframe_api";
var firstScriptTag = document.getElementsByTagName('script')[0];
firstScriptTag.parentNode.insertBefore(tag, firstScriptTag);
}
})();
</script>


更多資訊請參考:https://developers.google.com/youtube/iframe_api_reference

2015年1月2日 星期五

MongoDB 開發筆記 - 替 Mongoose (Node.js MongoDB Driver) 送 patch 的經驗

大概 2014 年 11 月附近,下了班仍會抽空把玩 MongoDB ,當時就決定搭配 node.js 來把玩 :P 當時在挑選 Node.js MongoDB Driver 時,看到官方文件提到了 Mongoose ,就順勢把玩了幾下。

對於 nodejs - mongoose 跟 nodejs - mongodb 的差異點在於 mongoose 做了滿多整合方式,例如 QueryStreams 的效果,在處理大量資料時,非常便利!

除了適應 node.js 的 async 架構外,又發現 mongoose 跟原生 mongodb 設計上已經有些 out of date,在 Stack Overflow 和 mongoose issue 有不少抱怨,就試著 trace mongoose 架構,再送看看 patch,很幸運地被接受了 :P 而且只多寫了 2~3 行 code,果真好的 framework 都已經設計的很好,可能花了 15 分鐘了解架構,而 testing 花了 30 分鐘,結果 coding 才 3 分鐘 XDD

只是送 patch 的過程並沒有很順利,包含未先讀 mongoose / CONTRIBUTING.md 的描述就直接上 code,被挑了 coding style 問題,另外,還沒有跑 unit test XDDD 就碰到 CI 回報錯誤 Orz 接著才發現補上的那段 code 並不嚴謹。把 code 嚴謹化後,CI 也直接回報可以 merge :) 就這樣非常快地 2 天內就被 merge 進 master 了。

這次 patch 經驗:

  • 開發上碰到需求不被滿足,接著搜尋 Stack Overflow 及該專案的 issue tracking,發現問題一直沒被解決時,就可以著手看看要不要抽時間來貢獻
  • 接著發現解法後,一定要先看專案的 CONTRIBUTING 規定
  • 不錯的專案一定都有 unit test,記得跑一下
  • 提供簡單的 testing 程式碼跟預期結果,可以加速 commiter 閱讀及提升認同感

剩下的就只要花時間等待了 Orz 例如這次的 commiter 是 MongoDB New York RD,作息剛好日夜顛倒,因此每一次完整的互動大概都花了 2 天。

2014年7月11日 星期五

[Javascript] 使用 AJAX/jQuery 與 JSONP/Callback 處理跨 domain 問題

很久沒寫 ajax 了 :P 由於機器整合不易?所以 API 就是要跨網域多台機器要互動。至於原理可以看看 wiki JSONP 簡介,在此筆記一下 Server Site 跟 Client Site 的用法

Server Site API 支援 JSONP 使用模式:

假設 API 輸出結果為 {"status":true} 的 JSON 格式,改成多一個 function name 來包裝: callbackFunc({"status":true})

例如:

$ wget -qO- http://example.com/api
{"status":true}

$ wget -qO- 'http://example.com/api?mycallback=HelloCallback'
HelloCallback({"status":true})


Client Site:

<script>
$(document).ready(function(){
$.ajax({
type: 'GET',
dataType: 'jsonp' ,
jsonpCallback: 'HelloCallback',
url: 'http://example.com/api',
data: 'mycallback=HelloCallback',
success: function(data) {
console.log(data);
}
});
});
</script>


若 Server Site 用的參數剛好是 callback 的話:

$ wget -qO- http://example.com/api
{"status":true}

$ wget -qO- 'http://example.com/api?callback=HelloCallback'
HelloCallback({"status":true})


那 Client Site 可以化簡成:

<script>
$(document).ready(function(){
$.ajax({
type: 'GET',
dataType: 'jsonp' ,
url: 'http://example.com/api',
success: function(data) {
console.log(data);
}
});
});
</script>


可以用 Chrome Browser 觀看 jQuery 發出的 Requests 長什麼樣子,主因是 jQuery 預先幫忙包好了。