顯示具有 ubuntu 標籤的文章。 顯示所有文章

2025年2月26日 星期三

[macOS] 使用 Windows APP (原 Microsoft RDP app) 遠端登入 Ubuntu 24.04 Desktop 遠端桌面 及 Error code: 0x207 問題排除 @ macOS 15.3.1


把自己的 Pi 5 安裝 Ubuntu 24.04 Desktop 後,原本想要裝 VNC 來提供遠端桌面的,搞了半天才發現已經有內建的 RDP 服務,接著當然就是在 macOS 上找尋很多年前已裝過的 Microsoft Windows Remote Desktop app ,找了半天也沒找到,最後才發現 macOS App Store 已更名為 Windows App

第一次在 macOS 上 Windows APP 登入到 Ubuntu 24.04 Desktop 是正常的,但很詭異的是之後一直會收到錯誤訊息:

We couldn't connect to the remote PC. This might be due to an expired password. If this keeps happening, contact your network administrator for assistance. Error code: 0x207

我也是趁這次才知道,原來 Ubuntu 24.04 Desktop 內建的 RDP 服務,必須使用者先登入過桌面才行,並且鎖住螢幕也不行。事後發現有一連串的方式解套。


首先是使用者必須先登入過桌面,那就開啟自動登入就好,剛好在 Pi 5 實驗裝置不會踩到資安議題。接著是鎖住螢幕的問題,有一派是調整成不自動鎖住,此時發現還可以透過額外安裝 GNOME Extension Manager,並且在裡頭下載 Allow Locked Remote Desktop 就好,設定好重啟。

$ sudo apt install gnome-shell-extension-manager

最後,關於 macOS 上第二次起登入 Ubuntu Desktop 總是碰到的 Error code: 0x207 問題,神人解法是先把設定檔匯出,接著修改關鍵設定,把 "use redirection server name:i:0" 更新成 "use redirection server name:i:1" ,再匯入回去即可搞定。有些討論串認為是 macOS - Windows app 的 bug


搞定

ref:

2024年7月2日 星期二

Linux 開發維護 - OpenSSH Server 資安漏洞補強,資安事件代號:CVE-2024-6387 @ Ubuntu 22.04

2024.07.02 一早就看到了 OpenSSH Server 漏洞,到處都在講,可參考 iThome 的文章:

iThome 2024.07.02 - OpenSSH含有可遠端攻陷伺服器的回歸漏洞

其中文章最後有提到:

OpenSSH團隊亦於本周一釋出了OpenSSH 9.8/9.8p1, 以修補CVE-2024-6387及另一個邏輯漏洞。該團隊亦說明,在實驗室環境下,要攻陷CVE-2024-6387需要不斷建立連結並持續6~8小時,直至達到伺服器極限,目前已於具備ASLR的32位元Linux系統上成功展現。

因此,除了修正外,也可以安裝一些阻擋 retry ssh 登入的行為,以前學生時代裝 denyhosts ,現在問 ChatGPT 得到 fail2ban 套件,在 Ubuntu 22.04 快速上手:

$ sudo apt-get update
$ sudo apt-get install fail2ban
$ sudo cp /etc/fail2ban/jail.conf /etc/fail2ban/jail.local
$ sudo systemctl restart fail2ban

建議還是要去看一下 /etc/fail2ban/jail.local 設定,像是 sshd retry 幾次會阻擋,以此評估是不是適合自己(常打錯密碼擋到自己也很無奈的)。裝完就可以用以下指令得知資訊:

$ sudo fail2ban-client status sshd 
Distributor ID: Ubuntu 
Description: Ubuntu 22.04.4 LTS 
Release: 22.04 
Codename: jammy 
Status for the jail: sshd 
|- Filter 
| |- Currently failed: 4 
| |- Total failed: 13 
| `- File list: /var/log/auth.log 
`- Actions 
|- Currently banned: 0 
|- Total banned: 0 
`- Banned IP list: 

不過,回到 CVE-2024-6387 資安事件,其實只要單純把 Ubuntu 系統更新,Ubuntu TLS 都給你傳便便:


Ubuntu 24.04
openssh-client - 1:9.6p1-3ubuntu13.3
openssh-server - 1:9.6p1-3ubuntu13.3

Ubuntu 23.10
openssh-client - 1:9.3p1-1ubuntu3.6
openssh-server - 1:9.3p1-1ubuntu3.6

Ubuntu 22.04
openssh-client - 1:8.9p1-3ubuntu0.10
openssh-server - 1:8.9p1-3ubuntu0.10

例如 Ubuntu 22.04 openssh 1:8.9p1-3ubuntu0.10 內容:


openssh 1:8.9p1-3ubuntu0.10 source package in Ubuntu
Changelog
openssh (1:8.9p1-3ubuntu0.10) jammy-security; urgency=medium

  * SECURITY UPDATE: remote code execution via signal handler race
    condition (LP: #2070497)
    - debian/patches/CVE-2024-6387.patch: don't log in sshsigdie() in log.c.
    - CVE-2024-6387

 -- Marc Deslauriers <email address hidden>  Wed, 26 Jun 2024 09:11:55 -0400

而自己的系統就只要查一下是否有更新至此版即可:

$ sudo apt upgrade && sudo apt upgrade && lsb_release -a && sudo apt policy openssh-server && ssh -V
...
Distributor ID: Ubuntu
Description: Ubuntu 22.04.4 LTS
Release: 22.04
Codename: jammy

openssh-server:
  Installed: 1:8.9p1-3ubuntu0.10
  Candidate: 1:8.9p1-3ubuntu0.10
  Version table:
 *** 1:8.9p1-3ubuntu0.10 500
        500 http://archive.ubuntu.com/ubuntu jammy-updates/main amd64 Packages
        500 http://security.ubuntu.com/ubuntu jammy-security/main amd64 Packages
        100 /var/lib/dpkg/status
     1:8.9p1-3 500
        500 http://archive.ubuntu.com/ubuntu jammy/main amd64 Packages

OpenSSH_8.9p1 Ubuntu-3ubuntu0.10, OpenSSL 3.0.2 15 Mar 2022

2024年1月1日 星期一

使用 do-release-upgrade 把 Oracle Cloud - Ubuntu 18.04 升級至 20.04 再繼續升級到 22.04

在 2019年搶了一台 Ubuntu 18.04 後,一直在那邊做例行公事。應該近一年 apt upgrade 也沒法多升級什麼就涼在那邊,趁 2024-01-01 假期,來整理一下。

升級絕對有風險,請自行評估跟承擔,在此謹流水帳紀錄,適合我的 VM 情況不代表大家都能升。

由於之前有設定防火牆來做一些簡單的防護,這次升級時要打開 1022 port 來小心一下:

$ sudo iptables -I INPUT 1 -p tcp --dport 1022 -j ACCEPT
$ sudo service netfilter-persistent save

開始操作:

$ sudo do-release-upgrade 
...
Calculating the changes

Could not calculate the upgrade

An unresolvable problem occurred while calculating the upgrade.

This was likely caused by:
* Unofficial software packages not provided by Ubuntu
Please use the tool 'ppa-purge' from the ppa-purge
package to remove software from a Launchpad PPA and
try the upgrade again.

If none of this applies, then please report this bug using the
command 'ubuntu-bug ubuntu-release-upgrader-core' in a terminal. If
you want to investigate this yourself the log files in
'/var/log/dist-upgrade' will contain details about the upgrade.
Specifically, look at 'main.log' and 'apt.log'.

接著安裝一下:

$ sudo apt-get install ppa-purge
$ sudo do-release-upgrade 
...

又碰到問題,大概看了一下 bugs.launchpad.net/ubuntu/+source/llvm-toolchain-9/+bug/1886748 ,偷懶衝:

$ sudo apt install clang-9
$ sudo do-release-upgrade 
...
Do you want to start the upgrade? 


17 packages are going to be removed. 209 new packages are going to be 
installed. 759 packages are going to be upgraded. 

You have to download a total of 886 M. This download will take about 
1 hour 52 minutes with a 1Mbit DSL connection and about 1 day 10 
hours with a 56k modem. 

Fetching and installing the upgrade can take several hours. Once the 
download has finished, the process cannot be canceled. 

 Continue [yN]  Details [d]Y

...
System upgrade is complete.

Restart required 

To finish the upgrade, a restart is required. 
If you select 'y' the system will be restarted. 

Continue [yN] Y

所幸...連得上 XD 看來完成了 Ubuntu 20.04 了

$ lsb_release -a
No LSB modules are available.
Distributor ID: Ubuntu
Description: Ubuntu 20.04.6 LTS
Release: 20.04
Codename: focal

繼續升上去!

$ sudo do-release-upgrade 
...
Reading cache

Checking package manager

Continue running under SSH? 

This session appears to be running under ssh. It is not recommended 
to perform a upgrade over ssh currently because in case of failure it 
is harder to recover. 

If you continue, an additional ssh daemon will be started at port 
'1022'. 
Do you want to continue? 

Continue [yN] Y

Starting additional sshd 

To make recovery in case of failure easier, an additional sshd will 
be started on port '1022'. If anything goes wrong with the running 
ssh you can still connect to the additional one. 


To continue please press [ENTER]

Do you want to start the upgrade? 


12 packages are going to be removed. 128 new packages are going to be 
installed. 826 packages are going to be upgraded. 

You have to download a total of 746 M. This download will take about 
2 minutes with your connection. 

Installing the upgrade can take several hours. Once the download has 
finished, the process cannot be canceled. 

 Continue [yN]  Details [d] Y

done
Processing triggers for dbus (1.12.20-2ubuntu4.1) ...
Processing triggers for libgdk-pixbuf-2.0-0:amd64 (2.42.8+dfsg-1ubuntu0.2) ...
Reading package lists... Done    
Building dependency tree          
Reading state information... Done

Processing snap replacements

refreshing snap lxd

refreshing snap oracle-cloud-agent

Searching for obsolete software
Reading state information... Done

Remove obsolete packages? 


127 packages are going to be removed. 

Removing the packages can take several hours. 

 Continue [yN]  Details [d]Y

...

System upgrade is complete.

Restart required 

To finish the upgrade, a restart is required. 
If you select 'y' the system will be restarted. 

Continue [yN] Y

再次登入:

$ lsb_release -a
No LSB modules are available.
Distributor ID: Ubuntu
Description: Ubuntu 22.04.3 LTS
Release: 22.04
Codename: jammy

2023年1月31日 星期二

[Linux] cross compile tmux for Synology DS723+ via DSM 7.1 ToolChain - AMD x86 Linux 4.4.180 (r1000)

終於想不開把家裡的 NAS 升級了,一口氣跳到 AMD Ryzen R1600 型號,接著又要找一下編譯 tmux 的方法 Orz 參考六七年前寫的這篇:[Linux] cross compile tmux for Synology DS216play via DSM 6.1 Tool Chains - STMicroelectronics Monaco Linux 3.10.102 @ Ubuntu 16.04 64bit

過程:
原本找了一台小機器 Ubuntu 18.04 編譯,結果一直出錯,最後還是找個乾淨的機器,一下就搞定。這次用 libevent-2.1.12-stable 時,先略過 openssl 編譯 ,雖然編 openssl 也沒那麼難,但就是這麼懶 XD

Docker 流水帳:

% docker pull ubuntu
Using default tag: latest
latest: Pulling from library/ubuntu
10175de2f0c4: Pull complete 
Digest: sha256:9dc05cf19a5745c33b9327dba850480dae80310972dea9b05052162e7c7f2763
Status: Downloaded newer image for ubuntu:latest
docker.io/library/ubuntu:latest
% docker run -it --platform linux/amd64 -p 10022:22 -p 18000:8000 ubuntu:22.04  
# apt update && apt upgrade -y && apt install -y lsb-release net-tools
# lsb_release -a
No LSB modules are available.
Distributor ID: Ubuntu
Description: Ubuntu 22.04.1 LTS
Release: 22.04
Codename: jammy

# apt install -y gcc g++ make python3 tmux vim git wget xz-utils file

開工:

# cd ~/
# wget https://global.download.synology.com/download/ToolChain/toolchain/7.1-42661/AMD%20x86%20Linux%204.4.180%20%28r1000%29/r1000-gcc850_glibc226_x86_64-GPL.txz
# tar -xvf r1000-gcc850_glibc226_x86_64-GPL.txz

# cd ~/
# wget https://ftp.gnu.org/pub/gnu/ncurses/ncurses-6.4.tar.gz
# tar -xvf ncurses-6.4.tar.gz
# cd ncurses-6.4
~/ncurses-6.4# PATH=$HOME/x86_64-pc-linux-gnu/bin:$PATH CC=x86_64-pc-linux-gnu-gcc CFLAGS="-I$HOME/x86_64-pc-lix-gnu/include" ./configure --build x86_64-pc-linux-gnu --prefix=$HOME/x86_64-pc-linux-gnu/
~/ncurses-6.4# PATH=$HOME/x86_64-pc-linux-gnu/bin:$PATH make -j2 install

# cd ~/
# wget https://github.com/libevent/libevent/releases/download/release-2.1.12-stable/libevent-2.1.12-stable.tar.gz
# tar -xvf libevent-2.1.12-stable.tar.gz
# cd libevent-2.1.12-stable
~/libevent-2.1.12-stable# PATH=$HOME/x86_64-pc-linux-gnu/bin:$PATH CC=x86_64-pc-linux-gnu-gcc CFLAGS="-I$HOME/x86_64-pc-lix-gnu/include" ./configure --build x86_64-pc-linux-gnu --prefix=$HOME/x86_64-pc-linux-gnu/ --disable-openssl
~/libevent-2.1.12-stable# PATH=$HOME/x86_64-pc-linux-gnu/bin:$PATH make -j2 install

# cd ~/
# wget https://github.com/tmux/tmux/releases/download/3.3a/tmux-3.3a.tar.gz
# tar -xvf tmux-3.3a.tar.gz 
# cd tmux-3.3a
~/tmux-3.3a# PATH=$HOME/x86_64-pc-linux-gnu/bin:$PATH CC=x86_64-pc-linux-gnu-gcc CFLAGS="-I$HOME/x86_64-pc-linux-gnu/include -I$HOME/x86_64-pc-linux-gnu/include/ncurses" LDFLAGS="-L$HOME/x86_64-pc-linux-gnu/lib" ./configure --build x86_64-pc-linux-gnu --prefix=$HOME/x86_64-pc-linux-gnu/ --enable-static
~/tmux-3.3a# PATH=$HOME/x86_64-pc-linux-gnu/bin:$PATH make -j2
...
x86_64-pc-linux-gnu-gcc -std=gnu99 -O2    -I/root/x86_64-pc-linux-gnu/include -I/root/x86_64-pc-linux-gnu/include/ncurses -static  -L/root/x86_64-pc-linux-gnu/lib -o tmux alerts.o arguments.o attributes.o cfg.o client.o cmd-attach-session.o cmd-bind-key.o cmd-break-pane.o cmd-capture-pane.o cmd-choose-tree.o cmd-command-prompt.o cmd-confirm-before.o cmd-copy-mode.o cmd-detach-client.o cmd-display-menu.o cmd-display-message.o cmd-display-panes.o cmd-find-window.o cmd-find.o cmd-if-shell.o cmd-join-pane.o cmd-kill-pane.o cmd-kill-server.o cmd-kill-session.o cmd-kill-window.o cmd-list-buffers.o cmd-list-clients.o cmd-list-keys.o cmd-list-panes.o cmd-list-sessions.o cmd-list-windows.o cmd-load-buffer.o cmd-lock-server.o cmd-move-window.o cmd-new-session.o cmd-new-window.o cmd-parse.o cmd-paste-buffer.o cmd-pipe-pane.o cmd-queue.o cmd-refresh-client.o cmd-rename-session.o cmd-rename-window.o cmd-resize-pane.o cmd-resize-window.o cmd-respawn-pane.o cmd-respawn-window.o cmd-rotate-window.o cmd-run-shell.o cmd-save-buffer.o cmd-select-layout.o cmd-select-pane.o cmd-select-window.o cmd-send-keys.o cmd-server-access.o cmd-set-buffer.o cmd-set-environment.o cmd-set-option.o cmd-show-environment.o cmd-show-messages.o cmd-show-options.o cmd-show-prompt-history.o cmd-source-file.o cmd-split-window.o cmd-swap-pane.o cmd-swap-window.o cmd-switch-client.o cmd-unbind-key.o cmd-wait-for.o cmd.o colour.o control-notify.o control.o environ.o file.o format.o format-draw.o grid-reader.o grid-view.o grid.o input-keys.o input.o job.o key-bindings.o key-string.o layout-custom.o layout-set.o layout.o log.o menu.o mode-tree.o names.o notify.o options-table.o options.o paste.o popup.o proc.o regsub.o resize.o screen-redraw.o screen-write.o screen.o server-acl.o server-client.o server-fn.o server.o session.o spawn.o status.o style.o tmux.o tty-acs.o tty-features.o tty-keys.o tty-term.o tty.o utf8.o window-buffer.o window-client.o window-clock.o window-copy.o window-customize.o window-tree.o window.o xmalloc.o osdep-linux.o    compat/closefrom.o compat/fgetln.o compat/freezero.o compat/getdtablecount.o compat/getpeereid.o compat/getprogname.o compat/setproctitle.o compat/strlcat.o compat/strlcpy.o compat/strtonum.o compat/recallocarray.o compat/getopt.o compat/imsg.o compat/imsg-buffer.o compat/vis.o compat/unvis.o compat/fdforkpty.o -lutil -lncurses -levent_core -lm  -lncurses -lresolv
cmd-parse.o: In function `yylex_token_tilde':
cmd-parse.c:(.text+0x61d): warning: Using 'getpwnam' in statically linked applications requires at runtime the shared libraries from the glibc version used for linking
cmd-parse.c:(.text+0x6a9): warning: Using 'getpwuid' in statically linked applications requires at runtime the shared libraries from the glibc version used for linking
/root/x86_64-pc-linux-gnu/lib/libevent_core.a(evutil.o): In function `test_for_getaddrinfo_hacks':
evutil.c:(.text+0x1836): warning: Using 'getaddrinfo' in statically linked applications requires at runtime the shared libraries from the glibc version used for linking
/root/x86_64-pc-linux-gnu/lib/libevent_core.a(evutil.o): In function `evutil_unparse_protoname':
evutil.c:(.text+0x1272): warning: Using 'getprotobynumber' in statically linked applications requires at runtime the shared libraries from the glibc version used for linking
/root/x86_64-pc-linux-gnu/lib/libevent_core.a(evutil.o): In function `evutil_parse_servname':
evutil.c:(.text+0x11ee): warning: Using 'getservbyname' in statically linked applications requires at runtime the shared libraries from the glibc version used for linking

~/tmux-3.3a# file tmux
tmux: ELF 64-bit LSB executable, x86-64, version 1 (GNU/Linux), statically linked, for GNU/Linux 3.2.0, with debug_info, not stripped

~/tmux-3.3a# python3 -m http.server 
Serving HTTP on 0.0.0.0 port 8000 (http://0.0.0.0:8000/) ...

還記得當初跑 docker 時有把本機的 18000 port 對到裡頭的 8000 port ,這時就可以靠 http://localhost:18000/tmux 去下載 tmux 來用。

實際運行:

$ uname -a
Linux NAS 4.4.180+ #42962 SMP Thu Dec 8 21:34:11 CST 2022 x86_64 GNU/Linux synology_r1000_723+

$ ~/bin/tmux -V
tmux-tool 3.3a

另外,在 NAS 內運行時,可以多設定 shell 環境資訊:

$ cat ~/.profile 
export PATH=$HOME/bin:$PATH
export TERM=xterm

收工!

2022年9月11日 星期日

[Linux] 免費註冊 pCloud 獲得 500GB 空間 / 掛載 pCloud 空間進來使用 @ Docker - Ubuntu 22.04 Image

圖:pcloud.com 活動截圖 

pCloud 是瑞士的雲端空間服務,有在推 500GB/2TB/10TB 等終身付費服務,通常會隨著節慶推出 80% OFF 的方案(兩折),有興趣可以去逛逛粉絲團,像是註冊完一個免費帳號後 ( https://u.pcloud.com/#page=register&invite=cFRj7ZYwNRty 使用此連結註冊成功有機會送我1GB空間? ),接著再瀏覽 https://www.pcloud.com/zh/500GB_free 連結,可以啟用 3個月 500GB 免費方案 (這應該是限時活動,不知何時結束)

接著再來講講在 Linux/Ubuntu server 把 pCloud 網路空間用網芳的機制掛在進來,實作上是用 Filesystem in Userspace (FUSE) 機制。我在 Ubuntu 18.04 上,原本要安裝特定環境,但踩到 libudev-dev 安裝上的套件限制,想著想就改用 docker 來跑:

$ sudo docker run -i -t --privileged ubuntu:22.04

root@109661692d2c:/# 

# uname -a
Linux 109661692d2c 5.4.0-1082-oracle #90~18.04.1-Ubuntu SMP Mon Aug 15 16:42:41 UTC 2022 x86_64 x86_64 x86_64 GNU/Linux

# apt update

# apt-get install cmake zlib1g-dev libboost-system-dev libboost-program-options-dev libpthread-stubs0-dev libfuse-dev libudev-dev fuse build-essential git 


# cd ./console-client/pCloudCC/lib/pclsync/
# make clean && make fs
# cd ../mbedtls/ && cmake . && make clean && make 
# cd ../.. && cmake . && make && make install
# ldconfig
# which pcloudcc
/usr/local/bin/pcloudcc
# pcloudcc 
pCloud console client v.2.0.1
Username option is required!!!

以上就是編譯出 pCloud - pcloudcc 指令的過程,接著使用時,在 docker 裡可以靠 tmux or screen 來切換,在此用 screen (因為我已經先用 tmux 包一層 XD)

# apt install screen
# screen

screen 1# pcloudcc -u YourpCloudAccount           
pCloud console client v.2.0.1
Down: Everything Downloaded| Up: Everything Uploaded, status is LOGIN_REQUIRED
Please, enter password
logging in
Down: Everything Downloaded| Up: Everything Uploaded, status is CONNECTING
Down: Everything Downloaded| Up: Everything Uploaded, status is SCANNING
Down: Everything Downloaded| Up: Everything Uploaded, status is READY

如此,接著可以靠 screen 切另一個視窗

screen 2# df -h
Filesystem      Size  Used Avail Use% Mounted on
overlay          45G   38G  7.7G  84% /
tmpfs            64M     0   64M   0% /dev
tmpfs           487M     0  487M   0% /sys/fs/cgroup
shm              64M     0   64M   0% /dev/shm
pCloud.fs       500G  7.3G  493G   2% /pcloud

screen 2# tree /pcloud/
/pcloud/
|-- Getting\ started\ with\ pCloud.pdf
|-- My\ Music
|   |-- Demo\ Audio\ 2.mp3
|   |-- GotJoy.mp3
|   |-- Lovely\ Day.wav
|   `-- Momentum.mp3
|-- My\ Pictures
|   |-- friends.jpg
|   |-- happy-family.jpg
|   |-- in-the-sky.jpg
|   |-- lovers.jpg
|   |-- romance.jpg
|   `-- sweet.jpg
`-- My\ Videos
    `-- pCloud.mp4

3 directories, 12 files

最後,如果要打包目前 docker 的環境,要回到 host 上進行 commit :

$ sudo docker ps
CONTAINER ID   IMAGE          COMMAND   CREATED          STATUS          PORTS     NAMES
123456789012   ubuntu:22.04   "bash"    25 minutes ago   Up 25 minutes             eager_bardeen

$ sudo docker commit 123456789012 pcloudcc:1.0
sha256:daf74928ed5ef2ee7c8d158ecf066d2b0707a9c145df4829488e01bf3bda751b

$ sudo docker images
REPOSITORY           TAG       IMAGE ID       CREATED              SIZE
pcloudcc             1.0       daf74928ed5e   43 seconds ago       769MB

下次要使用時,再進入,可以省去重裝一堆東西:

$ sudo docker run -i -t --privileged pcloudcc:1.0
root@06bbad280e77:/# 

另外,若想跟 host 環境做綁定,可以用 sudo docker run -i -t --privileged -v ~/my_host_dir:/vm_dir cloudcc:1.0,把 host 端的目錄掛載進去 docker vm 中,可以在靠 rsync 等指令把檔案傳到 pCloud 空間上!在 Oracle VM - JP Region 上,上傳到 pCloud US region 的速度可以來到均速 20MB/s 上喔,算是非常不錯的品質

此外,pCloud 採用類似網芳方式 mount 進來使用,對於這些虛擬機器只有 20GB, 40GB 來說,可以瞬間擴大到 500GB 等空間,很舒服 XD 且不像使用 Dropbox 機制,佔用到本機空間的。

最後,補充一下關於 docker 使用,由於 pcloudcc 會使用 fuse 環境,因此要求更高權限:特權容器 (privileged container) ,這件事是有風險的,當 docker 裡頭運行的程式被黑了,有可能傷及到 host 環境,但無論如何,在 host 安裝環境本來也會有風險沒錯 XD 就留意一下即可

以上體驗後,再自行評估要不要拿來當虛擬機的備份用法囉!

[Linux] apt: error while loading shared libraries: libudev.so.1: cannot open shared object file: No such file or directory @ Ubuntu 18.04

安裝套件時,有碰到 libudev-dev 相關套件太新:

$ sudo apt install libudev-dev
Reading package lists... Done
Building dependency tree       
Reading state information... Done
Some packages could not be installed. This may mean that you have
requested an impossible situation or if you are using the unstable
distribution that some required packages have not yet been created
or been moved out of Incoming.
The following information may help to resolve the situation:

The following packages have unmet dependencies:
 libudev-dev : Depends: libudev1 (= 237-3ubuntu10.53) but 237-3ubuntu10.54 is to be installed
E: Unable to correct problems, you have held broken packages.

$ dpkg -l | grep libudev
ii  libudev1:amd64                            237-3ubuntu10.54                            amd64        libudev shared library

$ lsb_release -a
No LSB modules are available.
Distributor ID: Ubuntu
Description: Ubuntu 18.04.6 LTS
Release: 18.04
Codename: bionic

然後,就耍蠢把他移掉 XD

$ sudo dpkg --purge --force-all libudev1
dpkg: libudev1:amd64: dependency problems, but removing anyway as you requested:
 util-linux depends on libudev1 (>= 183).
 libpci3:amd64 depends on libudev1 (>= 196).
 initramfs-tools-bin depends on libudev1 (>= 183).
 liblvm2app2.2:amd64 depends on libudev1 (>= 183).
 libplymouth4:amd64 depends on libudev1 (>= 183).
 udev depends on libudev1 (= 237-3ubuntu10.54).
 libusb-1.0-0:amd64 depends on libudev1 (>= 183).
 snapd depends on libudev1 (>= 183).
 liblvm2cmd2.02:amd64 depends on libudev1 (>= 183).
 libdevmapper1.02.1:amd64 depends on libudev1 (>= 183).
 open-vm-tools depends on libudev1 (>= 183).
 lvm2 depends on libudev1 (>= 183).
 dosfstools depends on libudev1 (>= 183).
 libapt-pkg5.0:amd64 depends on libudev1 (>= 183).

(Reading database ... 157028 files and directories currently installed.)
Removing libudev1:amd64 (237-3ubuntu10.54) ...
Processing triggers for libc-bin (2.27-3ubuntu1.6) ...

一堆指令都高度依賴不能跑了 XD

$ sudo apt update
apt: error while loading shared libraries: libudev.so.1: cannot open shared object file: No such file or directory

解法也不難,在用 dpkg 裝回來,在 http://archive.ubuntu.com/ubuntu/pool/main/s/systemd/ 尋找

$ wget http://archive.ubuntu.com/ubuntu/pool/main/s/systemd/libudev1_237-3ubuntu10.54_amd64.deb
$ sudo dpkg -i libudev1_237-3ubuntu10.54_amd64.deb
Selecting previously unselected package libudev1:amd64.
(Reading database ... 157024 files and directories currently installed.)
Preparing to unpack libudev1_237-3ubuntu10.54_amd64.deb ...
Unpacking libudev1:amd64 (237-3ubuntu10.54) ...
Setting up libudev1:amd64 (237-3ubuntu10.54) ...
Processing triggers for libc-bin (2.27-3ubuntu1.6) ... 
$ sudo apt update
Get:1 http://security.ubuntu.com/ubuntu bionic-security InRelease [88.7 kB]
Hit:2 http://ap-tokyo-1-ad-1.clouds.archive.ubuntu.com/ubuntu bionic InRelease
Get:3 http://ap-tokyo-1-ad-1.clouds.archive.ubuntu.com/ubuntu bionic-updates InRelease [88.7 kB]
Get:4 http://ap-tokyo-1-ad-1.clouds.archive.ubuntu.com/ubuntu bionic-backports InRelease [74.6 kB]
Fetched 252 kB in 2s (128 kB/s)   
Reading package lists... Done
Building dependency tree       
Reading state information... Done
All packages are up to date.

記錄一下,而真實的任務還沒解決,推論應該是裝上舊把對應的 so 路徑修一下即可,目前還是走安全一點的路徑,用虛擬環境/docker來執行

ref:

2021年7月7日 星期三

[Linux] 修復 Ubuntu 12.04 無法安裝軟體 - W: Failed to fetch 404 @ Ubuntu 12.04

老機器環境:

$ lsb_release -a
No LSB modules are available.
Distributor ID: Ubuntu
Description: Ubuntu 12.04.5 LTS
Release: 12.04
Codename: precise

主要是在 server 運行 apt-get update 時,會出現一堆 404 問題:

W: Failed to fetch http://archive.ubuntu.com/ubuntu/dists/precise-backports/multiverse/binary-i386/Packages 404

追了一下應當是 12.04 已經不維護了。運氣不錯,有找到 old-releases.ubuntu.com 位置:
  • https://archive.ubuntu.com/ubuntu/
  • https://old-releases.ubuntu.com/ubuntu/
接著就動手換掉 /etc/apt/sources.lis 即可,包括來源 server 換完後,記得要再把 /var/lib/apt/lists 先移除:

$ sudo mv /var/lib/apt/lists /var/lib/apt/lists-backup
$ sudo mkdir -p /var/lib/apt/lists
$ sudo apt-get update

如此就會修復相關資訊,可以在靠 apt-get 安裝軟體了。

此外,若剛好在除錯時,刪除了已安裝過的軟體,接著做了上述後,又要安裝時,會碰到資訊對不上的問題,如:

dpkg:error processing package XXX (--configure):
subprocess installed post-installation script returned error exit status 10

解法就是清除 /var/lib/dpkg/info/ 下相關套件的資料後,重新安裝或是跑完後續流程:

$ sudo mkdir /var/lib/dpkg/info/backup
$ sudo mv /var/lib/dpkg/info/XXX* /var/lib/dpkg/info/backup/
$ sudo apt-get install -f

2021年1月8日 星期五

[Linux] 使用 FlyVPN 與 EZCast EZC-5200 Hotspot 設置跳板開發服務(RTL8821CU Linux Driver) @ Ubuntu 20.04 Desktop

ezcast ezc-5200 ic

最近要模擬俄羅斯客戶使用產品上碰到的問題,由於產品是需要聯網的,手頭上的 AWS/GCP 都沒有俄羅斯節點,只好透過 FlyVPN 翻牆到莫斯科,而 FlyVPN 操作方式是非常簡單的,並且提供了各類平台的運行程式。

若服務邏輯可以在 PC 上執行,那就很搭配 FlyVPN 快驗證完,但如果是要在聯網裝置驗證,下一刻就得研究如何讓設備也處於莫斯科環境了!想了想,就是拿一台 Ubuntu Desktop 建立 Hostspot 環境,再讓 IoT 等設備透過 Hotspot 聯外就對了。

整個過程就是先從 EZCast 官網左下角的產品型錄(Product Catalog),得知 EZCast EZC-5200 是採用瑞昱的 RTL8821CU 晶片,接著研究一下 RTL8821CU Driver,就屬 brektrou/rtl8821CU 維護這份最不錯(很奇怪為何不在 RealTek 的官網找到 XD 或是類似官方 github.com/rtlwifi-linux 找到),且各處的程式碼編譯上都可能有問題,例如 linux kernel 大於 5.8 會踩到一些重複    定義的 structure 問題等等,總之,這次在 github.com/brektrou/rtl8821CU 得到很好的編譯體驗。

而挑選 Ubuntu Desktop 是比較適合打包成 VM ,方便傳遞給需要的同事當作測試環境,類似的做法在 Windows 也是能對應實現的(在 Windows 跑 FlyVPN 、建置熱點等等)。在此使用 VirutalBox 並且把 USB 設定自動掛在這 EZC-5200 網卡

virtualbox-usb-device-auto-mount

流水帳 - 環境建置:

$ sudo apt update 

$ sudo apt upgrade

$ sudo apt autoremove

$ sudo apt autoclean

$ sudo apt install net-tools git curl wget tmux vim dkms build-essential bc unzip linux-headers-$(uname -r) -y

流水帳 - 編譯 Linux Driver:

$ git clone https://github.com/brektrou/rtl8821CU.git

$ cd rtl8821CU

$ sudo ./dkms-install.sh

$ sudo usb_modeswitch -KW -v 0bda -p 1a2b

$ sudo systemctl start bluetooth.service

$ sudo vim /lib/udev/rules.d/40-usb_modeswitch.rules

在 LABEL="modeswitch_rules_end" 之前添加

# Realtek 8211CU Wifi AC USB

ATTR{idVendor}=="0bda", ATTR{idProduct}=="1a2b", RUN+="/usr/sbin/usb_modeswitch -K -v 0bda -p 1a2b"

$ sudo reboot

接著進入系統後,從右上角就可以看到無線網路了,進入無線網路的設定,想要開啟熱點時,會收到 "系統原則禁止做為熱點" ,查了一下貌似 Ubuntu 20.04 的 bug ?主因是權限不夠大,但這段應當要有用 sudo 來運行的方式才對?總之,就改用 root 登入即可,而 GUI 預設是不允許 Root 登入的。

ubuntu-20.04-wifi-hotspot-error

流水帳 - 啟用 Root 登入 GUI 方式:

先替 Root 設定密碼:

$ sudo passwd

開放 Root 登入權限:

$ sudo vim /etc/gdm3/custom.conf

添加

AllowRoot = true

$ sudo /etc/pam.d/gdm-password

添加 # 註解下段限制

# auth   required        pam_succeed_if.so user != root quiet_success

$ sudo reboot

最後在 GUI 登入介面上,挑選其他帳號(點擊"沒有列出來?"),就可以靠輸入帳號密碼的方式,用 root 登入,登入後就可以順利建制 Hotspot 出來使用

流水帳 - 查看是否有偵測到 USB WIFI:

$ lsusb

Bus 001 Device 003: ID 0bda:XXXX Realtek Semiconductor Corp. 802.11ac NIC

...

Ubuntu 20.04 Hotspot 建立方式:

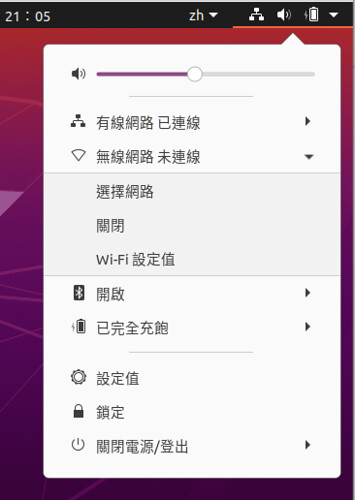
右上角網路Icon -> 無線網路未連線 -> Wi-Fi 設定值 -> 新視窗的右上角 ... -> 開啟 Wi-Fi 熱點 -> 設定 SSID 跟 PSK 就可以完成啟動

ubuntu-20.04-wifi-setup

關於 FlyVPN 的啟動方式,就參考官網即可,建議先完成 FlyVPN 的連線後,再開啟 Hotspot ,例如用手機連上 Hotspot 時,可以開瀏覽器瀏覽 ipinfo.io 看看顯示的地區是否有正確更換。

流水帳 - FlyVPN :

$ ./flyvpn login

$ ./flyvpn list

$ sudo .flyvpn connect "Moscow #13"

選 tcp 即可

如此在 Ubuntu 可以另外再開個 terminal 運行 curl ipinfo.io 就得知 IP 是否有變換到莫斯科了

2018年12月9日 星期日

[Linux] dev_appserver.py ERROR module.py:1652] The PHP runtime cannot be run with the "Memcache" PECL extension installed @ Ubuntu 16.04

在 Ubuntu server 上,首推 https://cloud.google.com/sdk/downloads#linux 安裝法,不要靠 apt 套件管理,不然會踩到很多麻煩:

$ curl https://dl.google.com/dl/cloudsdk/channels/rapid/downloads/google-cloud-sdk-183.0.0-linux-x86_64.tar.gz | tar -xvf -
$ cd google-cloud-sdk
$ ./install.sh


裝完後,若是要運行 php-sdk 時,會踩到 php 環境問題,通常就是要指定 --php_executable_path 位置:

$ dev_appserver.py --enable_host_checking false --host 0.0.0.0 --port 8080  --php_executable_path /usr/bin/php-cgi5.6 app.yaml

只是執行時又會踩到缺套件等等的問題,裝到最後產生了 Memcache 套件問題,就要再把 Memcache 套件關閉即可:

$ php5.6 --ini
Configuration File (php.ini) Path: /etc/php/5.6/cli
Loaded Configuration File:         /etc/php/5.6/cli/php.ini
Scan for additional .ini files in: /etc/php/5.6/cli/conf.d
Additional .ini files parsed:      /etc/php/5.6/cli/conf.d/10-opcache.ini,
/etc/php/5.6/cli/conf.d/10-pdo.ini,
/etc/php/5.6/cli/conf.d/20-apcu.ini,
/etc/php/5.6/cli/conf.d/20-bcmath.ini,
/etc/php/5.6/cli/conf.d/20-calendar.ini,
/etc/php/5.6/cli/conf.d/20-ctype.ini,
/etc/php/5.6/cli/conf.d/20-exif.ini,
/etc/php/5.6/cli/conf.d/20-fileinfo.ini,
/etc/php/5.6/cli/conf.d/20-ftp.ini,
/etc/php/5.6/cli/conf.d/20-gettext.ini,
/etc/php/5.6/cli/conf.d/20-iconv.ini,
/etc/php/5.6/cli/conf.d/20-igbinary.ini,
/etc/php/5.6/cli/conf.d/20-json.ini,
/etc/php/5.6/cli/conf.d/20-memcache.ini,
/etc/php/5.6/cli/conf.d/20-msgpack.ini,
/etc/php/5.6/cli/conf.d/20-phar.ini,
/etc/php/5.6/cli/conf.d/20-posix.ini,
/etc/php/5.6/cli/conf.d/20-readline.ini,
/etc/php/5.6/cli/conf.d/20-shmop.ini,
/etc/php/5.6/cli/conf.d/20-sockets.ini,
/etc/php/5.6/cli/conf.d/20-sysvmsg.ini,
/etc/php/5.6/cli/conf.d/20-sysvsem.ini,
/etc/php/5.6/cli/conf.d/20-sysvshm.ini,
/etc/php/5.6/cli/conf.d/20-tokenizer.ini,
/etc/php/5.6/cli/conf.d/25-memcached.ini

$ sudo vim /etc/php/5.6/cli/conf.d/20-memcache.ini
; uncomment the next line to enable the module
;extension=memcache.so

$ sudo vim /etc/php/5.6/cli/conf.d/25-memcached.ini
; priority=25
;extension=memcached.so

2016年6月30日 星期四

[Linux] 系統時區設定與檢查 @ Ubuntu 14.04

習慣在 AWS EC2/RDS 採用 UTC +0 的時區,然後在自家 VMware ESXi server 架設機器沒留意(忘記是選了台北時區還是從台灣下載 Ubuntu ISO 的差別),導致開發與正式站的時區不同 :P 筆記一下驗證與處理方法。

查看系統現況時間
$ date

查看系統時區資訊
$ cat /etc/timezone
Asia/Taipei

設定時區: None of the above -> UTC
$ sudo dpkg-reconfigure tzdata


將相關服務都重啟,像是 Web server 有用到 PHP-FPM 就要重啟動,這樣 PHP 環境才會拿到正確的時間

2015年11月10日 星期二

[Linux] 架設 Jenkins 筆記,以 Git plugin 與 PHP CodeIgniter - command-line interface (CLI) 定期任務為例 @ Ubuntu 14.04

架設還滿簡單的,幾行指令搞定:

$ wget -q -O - http://pkg.jenkins-ci.org/debian/jenkins-ci.org.key | sudo apt-key add -
$ sudo sh -c 'echo deb http://pkg.jenkins-ci.org/debian binary/ > /etc/apt/sources.list.d/jenkins.list'
$ sudo apt-get update
$ sudo apt-get install jenkins
$ sudo service jenkins start


如此一來,預設在 http://localhost:8080 就可以瀏覽到。

接著安裝一些工具,之後會用到:

$ sudo apt-get install git

接著紀錄一下自己的操作設定:
  • 管理 Jenkins -> 設定全域安全性
    • 勾選 Disable remember me
    • 安全性領域
      • 使用 Jenkins 內建使用者資料庫
    • 授權
      • 矩陣型安全性
        • 關閉 匿名使用者 所有權限
  • 管理 Jenkins -> 管理外掛程式
    • 更新
      • 把所有項目更新
    • 可用的
      • 搜尋 GIT plugin 跟 GIT client plugin 並安裝(若系統沒有 git,安裝完可以在 Jenkins 組態裡看到一些錯誤訊息)
其中授權那塊,必須先建立使用者,可以先從"登入成功的使用者可以做任何事"開始設定,過程會導入到建立使用者的流程。若有設定錯誤的地方導致無法管理時,可以修改 /var/lib/jenkins/config.xml 將 <useSecurity>true</useSecurity> 改成 <useSecurity>false</useSecurity> 後,再重新啟動 jenkins (sudo service jenkins restart)即可解決。

如此一來,就建立好 Jenkins 環境,而新工作也能夠用 git 了!擬個範例試試:假設專案在 bitbucket 管理,並使用 PHP CodeIgniter 架構,定期透過此專案來執行分析任務

作法:
  • Jenkins -> 新增作業 -> 填寫作業名稱(StudyJenkinsRoutine) -> 建置 Free-Style 軟體專案
    • 原始碼管理
      • Git
        • Repository URL: git@bitbucket.org:group/project.git
        • Credentials -> Add -> SSH Username with private key -> Enter directly (搭配 Bitbucket SSH 存取即可)
        • Additional Behaviours -> Advanced sub-modules behaviors -> 勾選 Recursively update submodules
    • 建置觸發程序
      • 定期建置(每十五分鐘跑一次,語法跟 crontab 一樣,但會建議用 H/15 來使用)
        • */15 * * * *  
    • 建置
      • 執行 Shell
        • php $WORKSPACE/index.php controller/function
如此一來,透過 Jenkins 的 Web 介面就可以設定與執行一些功能了,唯一留意的是執行工作上是否擁有相關的環境資源,例如範例是執行 PHP Framework 做事,那就得確保 php5-cli 裝了沒,若做的事跟資料庫相關,又得確定 php5-mysql 裝了沒等等。此外,上頭執行的 Shell 有用到 Jenkins 環境變數,要留意有些資料是跟 Jenkins 建立的工作名稱是相關的,例如工作名稱若有空白、等號以及相關的特殊符號時,極有可能會影響 shell script 的執行的。

關於 Jenkins 相關的路徑安排都跟 jenkins 帳號相關,例如 Jenkins 家目錄在 /var/lib/jenkins ,而添加一個任務名為 StudyJenkinsRoutine 時,其 $WORKSPACE 會是 /var/lib/jenkins/jobs/StudyJenkinsRoutine/workspace 的,這個位置也是 git clone 的資料所在。

最後,如果 Jenkins 是架設在 AWS EC2 上,若可以搭配 ELB 跟 SSL 憑證時,可以偷懶使用 ELB 將 https 流量導向到 Jenkins 8080 ,可以無痛提供 https 服務囉。

2015年10月30日 星期五

[Linux] Python Fabric - 在 SSH 架構上,進行服務部署 @ Ubuntu 14.04

強者同事又獻技 fab 指令,從官網簡介:

Fabric is a Python (2.5-2.7) library and command-line tool for streamlining the use of SSH for application deployment or systems administration tasks.

原來如此!我還活在播接時代再把玩 bash script XDD 其實之前也有試過一些同時發 ssh remote command 的工具,但悲劇收場後,就沒再用了,現在就在來吸收這套吧!

$ sudo apt-get install fabric
$ fab
Fatal error: Couldn't find any fabfiles!

Remember that -f can be used to specify fabfile path, and use -h for help.

Aborting.


是的, fab 指令會尋找當前目錄下的 fabfile.py:

$ vim fabfile.py
def hello(what):
print 'hello ' + str(what)


$ fab hello:world
hello world

Done.


非常簡潔明瞭,反正 fab 後面接的字串就是個 fabfile.py 裡定義的函數,冒號後面就是給進去的參數。接著要寫一些遠端部署指令就是寫個 function 定義一些想傳的參數,接著就愉快地寫 python 就好!可以省去用一堆 ssh target_host "remote_command" 的方式了!

$ vim fabfile.py
from fabric.api import run, task, execute, runs_once
from fabric.colors import green, magenta
import fabric.api as api

@task(default=True)
def heartbeat():
        _info("hearbeat")
run("date")

def _info(message):
        print green(message + " on %s" % api.env.host_string)

def _warn(message):
        print magenta(message + " on %s" % api.env.host_string)
$ fab
hearbeat on None
No hosts found. Please specify (single) host string for connection: localhost
[localhost] run: date
[localhost] Login password for 'user':
[localhost] out: Fri Oct 30 12:51:51 UTC 2015
[localhost] out:


Done.
Disconnecting from localhost... done.

$ fab -H localhost
[localhost] Executing task 'heartbeat'
hearbeat on localhost
[localhost] run: date
[localhost] Login password for 'user':
[localhost] out: Fri Oct 30 12:53:09 UTC 2015
[localhost] out:


Done.
Disconnecting from localhost... done.


接下來,就可以想想一連串的行為了!

2015年5月19日 星期二

GAE 筆記 - 在 Ubuntu Server 上傳 Google App Engine 程式碼 @ Ubuntu 14.04

最近嘗試在 Ubuntu server 開發,以前常在 Windows 、 Ubuntu Desktop 和 Mac OSX 等視窗介面,最近 Google App engine 也把認證的部分換了,以前是在 Google App engine tools 上輸入帳號密碼,現在都改用 OAuth 認證方式,實在方便。

若要在 Ubuntu server 上運行 Google App Engine ,透過 Command line 即可完成測試跟發佈:

測試:

$ cd /path/gae/project
$ python -m py_compile *.py && dev_appserver.py --port=8080 .


發佈:

$ cd /path/gae/project
$ python -m py_compile *.py && appcfg.py --oauth2 --noauth_local_webserver -A YourGAEProjectID update .

過程只需再用 browser 瀏覽指定的 link 以及完成 oauth 的認證即可發布啦!

2015年1月24日 星期六

[Linux] 快速安裝 Gitlab 及簡易設定 @ Ubuntu 14.04

感覺近年來幾套出色的管理套件都是 Ruby 派的,例如 Redmine 等,然而有許多安裝瑣事要處理 Orz 所幸 Gitlab 官方有打包一個 debian package 讓初學者可以快速上手:

$ wget https://downloads-packages.s3.amazonaws.com/ubuntu-14.04/gitlab_7.6.2-omnibus.5.3.0.ci.1-1_amd64.deb
$ sudo apt-get install openssh-server
$ sudo apt-get install postfix # Select 'Internet Site'
$ sudo dpkg -i gitlab_7.6.2-omnibus.5.3.0.ci.1-1_amd64.deb
$ sudo gitlab-ctl reconfigure


如此一來,預設 http://localhost/ 就可以登入查看了。然而,預設環境比較適合體驗啦,我又多做了幾個動作,包含也在系統裝上 Ruby2.0 方便未來的相關使用。

更新 Gitlab 環境:
$ sudo vim /etc/gitlab/gitlab.rb

# 對外 Web 資訊
external_url = 'http://YourPublicDomainName'
# 對外 SSH 資訊
gitlab_rails['gitlab_ssh_host'] = 'YourPublicDomainName'
# 時區
gitlab_rails['time_zone'] = 'Asia/Taipei'
# 開啟 https 服務, 以及強制使用 https
nginx['redirect_http_to_https'] = true
nginx['redirect_http_to_https_port'] = 80
nginx['ssl_certificate'] = "/etc/gitlab/ssl/YourPublicDomainName.crt"
nginx['ssl_certificate_key'] = "/etc/gitlab/ssl/YourPublicDomainName.key"

$ sudo gitlab-ctl reconfigure
$ sudo gitlab-ctl restart


更新 Postfix 環境:

$ sudo vim /etc/postfix/main.cf
myhostname = YourPublicDomainName
$ sudo postfix reload


安裝 Ruby 2.0 (非必要):

$ sudo apt-get update
$ sudo apt-get install ruby2.0 ruby2.0-dev
$ ruby -v
ruby 1.9.3p484 (2013-11-22 revision 43786) [x86_64-linux]
$ gem -v
1.8.23
$ sudo ln -sf /usr/bin/ruby2.0 /usr/bin/ruby
$ sudo ln -sf /usr/bin/gem2.0 /usr/bin/gem
$ ruby -v
ruby 2.0.0p384 (2014-01-12) [x86_64-linux-gnu]
$ gem -v
2.0.14


以上則是稍微完整一點的調整。

然而,有時為了確保服務長久性,會有一些變動方式,例如 gitlab 資料儲存在於 /var/opt/gitlab ,可以給予一個獨立空間維護,因此,在安裝 gitlab 軟體前,先自行把 /var/opt/gitlab 擺在額外的 partition (此例是 AWS EC2 管理,給予一個 64GB 空間: http://docs.aws.amazon.com/AWSEC2/latest/UserGuide/ebs-using-volumes.html ):

$ lsblk
NAME    MAJ:MIN RM SIZE RO TYPE MOUNTPOINT
xvda    202:0    0  20G  0 disk
└─xvda1 202:1    0  20G  0 part /
xvdb    202:16   0   4G  0 disk /mnt
xvdc    202:32   0  64G  0 disk
$ sudo mkfs -t ext4  /dev/xvdc
$ sudo mkdir /64GB
$ sudo mount /dev/xvdc /64GB
$ sudo mkdir -p /64GB/gitlab /var/opt
$ sudo ln -s /64GB/gitlab /var/opt/gitlab


接著再跑安裝 gitlab 流程...如果已經安裝了,那就是配置好 /64GB 後:

$ sudo gitlab-ctl stop
ok: down: logrotate: 1s, normally up
ok: down: nginx: 0s, normally up
ok: down: postgresql: 0s, normally up
ok: down: redis: 1s, normally up
ok: down: sidekiq: 0s, normally up
ok: down: unicorn: 0s, normally up
$ sudo cp -a /var/opt/gitlab /64GB/gitlab
$ sudo mv /var/opt/gitlab /var/opt/gitlab-bak
$ sudo ln -s /64GB/gitlab /var/opt/gitlab
$ sudo gitlab-ctl start

2015年1月21日 星期三

[C++] JSON Library - jsoncpp @ Ubuntu 14.04, Mac OS X 10.10.1

JSON Format 現今已經是一個非常常見的溝通管道,最近常在 Ubuntu server 上練習 C++,偶爾沒網路時也會想用 Mac OS X 進行,因此,著重在如何輕鬆管理 C++ JSON Library 的用法,找了一下,大概就是 jsoncpp 啦

在 Ubuntu 14.04:

$ sudo apt-get install libjsoncpp-dev
$ g++ -I/usr/include/jsoncpp/ main.cpp -ljsoncpp


在 Mac OS X 10.10.1 搭配 MacPorts 管理:

$ sudo port install jsoncpp
$ g++ -std=c++11 -I/opt/local/include/ -L/opt/local/lib main.cpp -ljsoncpp


由於都可以透過系統常見的管理工具安裝,即可省去下載 source code 編譯等管理成本。簡易範例:

$ vim example.cpp
#include <iostream>       // std::cout
#include <string>         // std::string
#include <json/json.h>

int main() {
        std::string raw = "{\"key\":\"value\",\"我\":\"是誰\",\"array\":[\"a\",\"b\",123]}";
        Json::Reader reader;
        Json::Value value;
        std::cout << "Input: " << raw << std::endl;
        if (reader.parse(raw, value)) {
                std::cout << "parsing: " << value ;//<< std::endl;
                std::cout << "get: " << value["我"] ;//<< std::endl;
                std::string data = value["key"].asString();//toStyledString();
                std::cout << "string: [" << data << "]" << std::endl;

                // with -std=c++11
                std::cout << "---" << std::endl;
                for (auto it : value) {
                        std::cout << "elm: " << it ;//<< std::endl;
                        if (it.isArray()) {
                                for (auto it2 : it)
                                        std::cout << "array data: " << it2 ;//<< std::endl;
                        }
                }        
        }
        return 0;
}
$ g++ -I/opt/local/include/ -L/opt/local/lib main.cpp -ljsoncpp
$ ./a.out
Input: {"key":"value","我":"是誰","array":["a","b",123]}
parsing:
{
"array" : [ "a", "b", 123 ],
"key" : "value",
"我" : "是誰"
}
get: "是誰"
string: [value]
---
elm: [ "a", "b", 123 ]
array data: "a"
array data: "b"
array data: 123
elm: "value"
elm: "是誰"

2014年8月21日 星期四

[Linux] 安裝 nicstat @ Ubuntu 12.04

在 Ubuntu 14.04 只需用 atp-get install nicstat 即可,但在 12.04 就得自己編了:

$ sudo apt-get install gcc gcc-multilib
$ cd /tmp
$ wget -qO- http://nchc.dl.sourceforge.net/project/nicstat/nicstat-1.92.tar.gz | tar -xvzf -
$ cp /tmp/nicstat-1.92/Makefile.Linux /tmp/nicstat-1.92/Makefile
$ cd /tmp/nicstat-1.92 && make && sudo make install

[Linux] 使用常見的指令進行系統監控 @ Ubuntu 14.04

取得 Server 代號 - 使用 hostname 指令:

$ hostname

取得 Server OS 資訊 - 使用 lsb_release 指令:

$ lsb_release -a

取得 CPU 使用率 - 使用 vmstat、tail 和 awk 指令:

$ echo $((100-$(vmstat|tail -1|awk '{print $15}')))

取得 System Loading 資訊 - 使用 uptime 和 awk 指令:

$ uptime | egrep -o 'load average[s]*: [0-9,\. ]+' | awk -F',' '{print $1$2$3}' | awk -F' ' '{print $3}'
$ uptime | egrep -o 'load average[s]*: [0-9,\. ]+' | awk -F',' '{print $1$2$3}' | awk -F' ' '{print $4}'
$ uptime | egrep -o 'load average[s]*: [0-9,\. ]+' | awk -F',' '{print $1$2$3}' | awk -F' ' '{print $5}'


取得 Apache Web Server Processes 資訊 - 使用 pgrep 跟 wc 指令:

$ pgrep apache2 | wc -l

取得 Memory 使用率 - 使用 free、grep 跟 awk 指令:

$ free -m | grep Mem | awk '{print $3/$2 * 100}'

取得 Network 即時流量 - 使用 nicstat、grep 跟 awk,假定網路卡是 eth 開頭:

In:
$ nicstat | grep eth |  awk '{print $3}'

Out:
$ nicstat | grep eth |  awk '{print $4}'


最後,檢查上述指令是否都存在:

#!/bin/sh
CMD_USAGE=$(echo 'hostname curl pgrep wc awk tail uptime vmstat free nicstat' | tr ";" "\n")
for cmd in $CMD_USAGE
do
        path=`which $cmd`
        if [ -z $path ] || [ ! -x $path ] ; then
                echo "$cmd not found"
                exit
        fi
done


其他資源:

2014年7月2日 星期三

[Linux] 使用 ClamAV 掃毒 @ Ubuntu 14.04 Server

有一台Linode機器一直用來當跳板,若沒出事就不會進去逛,最近突然想到,不會不哪天被入侵還不知道?就先試看看最粗淺的用法,掃毒:

$ sudo apt-get install clamav
$ sudo freshclam
$ sudo clamscan -r /
...

----------- SCAN SUMMARY -----------
Known viruses: 3492457
Engine version: 0.98.1
Scanned directories: 13386
Scanned files: 50860
Infected files: 0
Total errors: 8826
Data scanned: 1996.67 MB
Data read: 19701.90 MB (ratio 0.10:1)
Time: 210.216 sec (3 m 30 s)

$ df -h
Filesystem      Size  Used Avail Use% Mounted on
/dev/xvda        47G   20G   25G  44% /
none            4.0K     0  4.0K   0% /sys/fs/cgroup
devtmpfs        996M  4.0K  996M   1% /dev
none            200M  208K  200M   1% /run
none            5.0M     0  5.0M   0% /run/lock
none            997M     0  997M   0% /run/shm
none            100M     0  100M   0% /run/user


看起來耗時不多,有沒有用就是另一回事了 XDD 例如躲在記憶體內以及沒被偵測出來的...

2014年6月10日 星期二

[Linux] Apache Error Log: configuration error: couldn't perform authentication. AuthType not set!: / @ Ubuntu 12.04, Ubuntu 14.04

最近部署環境時,想要偷懶共用一個 apache 設定檔,由於 Ubuntu 14.04 預設是安裝 apache 2.4.7 而 Ubuntu 12.04 預設是安裝 Apache 2.2.2。

忘記是 apache 哪版開始,預設必須加上:

Order allow,deny
Allow from all


Require all granted

才能正常使用,然而這兩段剛好一個是 apache 2.2,另一個是 apache 2.4 使用,並且不相容,所幸,還有個解法...那就是 Satisfy Any 啦

<Directory /path/www>
        Options Indexes FollowSymLinks MultiViews
        AllowOverride None

        Order allow,deny
        allow from all

        Require all granted

        Satisfy Any
</Directory>

2014年5月10日 星期六

[Linux] AWS RDS + PHPMyAdmin + HTTPS + HTTP Basic authentication @ Ubuntu 14.04

為了配合 AWS RDS 而開始用 mysql-server-5.6 ,就試著用 EC2 + Ubuntu 14.04,安裝 PHPMyAdmin 時,採用的 DB 不是在本機的,而是 RDS 上。雖然我也不常用 PHPMyAdmin ,但為了提供其他人使用,所以就來架設一下 XD

$ sudo apt-get install mysql-client-5.6 php5 apache2 apache2-utils git php5-mysql
$ sudo a2ensite default-ssl.conf
$ sudo php5enmod mcrypt
$ sudo service apache2 restart

$ sudo vim /etc/phpmyadmin/config-db.php
// 在底部新增:
$dbuser='rds_account';
$dbpass='rds_password';
$dbserver='rds_location';

$ sudo vim /etc/phpmyadmin/config.inc.php

// 採用 HTTP Basic authentication
//$cfg['Servers'][$i]['auth_type'] = 'cookie';
$cfg['Servers'][$i]['auth_type'] = 'http';

// ...
// 最底層加上強制 HTTPS
$cfg['ForceSSL'] = true;


如此一來,使用 http://hostname/phpmyadmin 時,就會強制轉成 https://hostname/phpmyadmin,並且會採用 HTTP Basic authentication 機制。

註:不知為何,採用 HTTP Basic authentication 機制時,logout 後再進行 login 時,url後面會帶有 old_usr 資訊時,無法正常登入,所以後來就放棄了 XD