2010年9月30日 星期四

OPDS Catalog 1.0 筆記

OPDS Catalog,一種制式的書籍資訊的呈列方式,其他對應的例子以 RSS 最廣為人知。而 RSS 也是一種制式格式,常用在 Blog 文章、新聞發布,當然,連現在流行的微網誌也有部份提供,讓各家閱讀器可以透過統一的格式讀取資訊,讓使用者可以只用一款閱讀器軟體,把他想要追蹤的資訊通通透過 RSS 訂閱起來,十分方便。而 OPDS Catalog 也是要提供這種制式的規範,以便各家閱讀器可以方便處理,只是,OPDS Catalog 著眼的是書籍資訊的傳播,產生的 OPDS Catalog 則是常用在電子書閱讀器上。


因為 OPDS Catalog 規範的事宜包括電子書可提供的交流方式,因此,除了呈列書單外,還可提供額外的連結導向到書籍供應者,例如直接下載、借書等等,在 Catalog 1.0 就定義了以下可能的情境:


http://opds-spec.org/acquisition
http://opds-spec.org/acquisition/open-access
http://opds-spec.org/acquisition/borrow
http://opds-spec.org/acquisition/buy
http://opds-spec.org/acquisition/sample
http://opds-spec.org/acquisition/subscribe


其中 acquisition 算是通用的,若要細分,則有公開書籍(open-access)、借書(borrow)、買書(buy)、部份內容(sample),而 subscribe 有時也用在其他未定義的項目。因此,關於一本書的來源之範例描述:


<link rel="http://opds-spec.org/acquisition" href="/content/free/4561.epub" type="application/epub+zip"/>
<link rel="http://opds-spec.org/acquisition" href="/content/free/4561.mobi" type="application/x-mobipocket-ebook"/>
<link rel="http://opds-spec.org/acquisition/buy" href="/content/4561.pdf" type="application/pdf">
    <opds:price currencycode="USD">18.99</opds:price>
    <opds:price currencycode="GBP">11.99</opds:price>
</link>


其中 rel 代表這本書來源的狀況,而 href 則是連結位置,type 則是檔案的型態,可以用在讓電子書閱讀器挑選它支援的格式,常見格式:


application/epub+zip
application/pdf
application/x-mobipocket-ebook


另外,書籍來源要付費時,此例是 http://opds-spec.org/acquisition/buy,則可以使用 opds:price 的標籤進行價格和貨幣的描述。


接著,既然在電子書閱讀器上使用,那來個書籍封面的顯示也不為過吧!來個一張大圖,一張小圖,讓閱讀器依狀況使用:


<link rel="http://opds-spec.org/image" href="/covers/4561.lrg.png" type="image/png"/>
<link rel="http://opds-spec.org/image/thumbnail" href="/covers/4561.thmb.gif" type="image/gif"/>


經過上述的描述後,也差不多都有提到關鍵的東西,接著看一下一則書籍的描述吧,此時就將顯示很多想得到的資訊,如書籍標題、作者、發佈日期、語言、分類、摘要、簡短內容等等:


  <entry>
    <title>Bob, Son of Bob</title>
    <id>urn:uuid:6409a00b-7bf2-405e-826c-3fdff0fd0734</id>
    <updated>2010-01-10T10:01:11Z</updated>

    <author>
      <name>Bob the Recursive</name>
      <uri>http://opds-spec.org/authors/1285</uri>
    </author>
    <dc:language>en</dc:language>
    <dc:issued>1917</dc:issued>
    <category scheme="http://www.bisg.org/standards/bisac_subject/index.html"
              term="FIC020000"
              label="FICTION / Men's Adventure"/>

    <summary type="text">The story of the son of the Bob and the gallant part
      he played in the lives of a man and a woman.</summary>
    <content type="text">The story of the son of the Bob and the gallant part
      he played in the lives of a man and a woman. Bob begins his humble life
      under the wandering eye of his senile mother, but quickly learns how to
      escape into the wilder world. Follow Bob as he uncovers his father's past
      and uses those lessons to improve the lives of others.</content>

    <link rel="http://opds-spec.org/image"
          href="/covers/4561.lrg.png"
          type="image/png"/>
    <link rel="http://opds-spec.org/image/thumbnail"
          href="/covers/4561.thmb.gif"
          type="image/gif"/>

    <link rel="self"
          href="/opds-catalogs/entries/4571.complete.xml"
          type="application/atom+xml;type=entry;profile=opds-catalog"/>

    <link rel="http://opds-spec.org/acquisition"
          href="/content/free/4561.epub"
          type="application/epub+zip"/>
    <link rel="http://opds-spec.org/acquisition"
          href="/content/free/4561.mobi"
          type="application/x-mobipocket-ebook"/>
 </entry>


接著,就是關於把一堆書整理成清單的事情了,常見的清單有熱門書籍、最新書籍、依字母順序等等的,你想的到的都差不多有了:


http://opds-spec.org/sort/new
http://opds-spec.org/sort/popular
http://opds-spec.org/featured
http://opds-spec.org/crawlable
http://opds-spec.org/shelf
http://opds-spec.org/subscriptions
subsection


其中 sort/new 顧名思義就是照發佈日期排序,而 sort/popular 則是熱門程度,其他的就沒有順序的要求,但也可以用 subsection 提供依照字母排序的清單,上述比較特別的有 crawlable 這個字樣,提供像 Search Engines 這類服務撈資料用的。


當書單很大時,該怎麼辦? OPDS Catalog 是建立在 Atom 上,因此可以提供分頁功能:


<link rel="self" href="alpha_1.xml" type="application/atom+xml;profile=opds-catalog"/>
<link rel="first" href="alpha.xml" type="application/atom+xml;profile=opds-catalog"/>
<link rel="last" href="alpha_2.xml" type="application/atom+xml;profile=opds-catalog"/>
<link rel="previous" href="alpha.xml" type="application/atom+xml;profile=opds-catalog"/>
<link rel="next" href="alpha_2.xml" type="application/atom+xml;profile=opds-catalog"/>


其中,每一頁應該都會提供 self, first 和 last 的資訊,剩下的就依照資料量跟頁數的資訊,提供 previous 跟 next 的資訊,例如第一頁不該有 previous 而最後一頁也不該有 next 等。


以上範例等資訊來自於:


http://opds-spec.org/specs/opds-catalog-1-0


更多細節請參考 OPDS Catalog 1.0


相機配腳架

相機配腳架


這是跟同事借的腳架,才過沒幾次,就覺得還挺不錯的,更多細節可以參考這邊:Joby Gorillapod - 章魚小腳架


這台相機是我家第二台數位相機,第一台相機已經壞了,是 Acer 5xxx 的相機!我家買相機都是買最便宜的,直到最近工作穩定才買了稍微好一點的相機,大概五千元吧!不多說,再放幾張這兩天是拍的,都是用夜景模式。


2010/09/30 18:10 公園宿舍 2010/09/29 公園宿舍


有時看到美景會迫不及待地想要拍,但轉個角度想想,難道在路上看到正妹就要去搭訕嗎?所以,一切還是隨緣拍吧


[Python] 使用 Comma-separated values (CSV)

Comma-separated values (CSV) 就是以逗號為欄位分隔,並以 line-based 的儲存格式,細節可參考 Wikipedia - Comma-separated values


在 Python 裡也有對應得 lib 可以用,只需 import csv 就行啦


範例:


csvfile = open( target_file , 'rb' )
dialect = csv.Sniffer().sniff(csvfile.read(1024))
dialect.escapechar = '\\'
dialect.lineterminator = '\n'

csvfile.seek(0)
for row in list(csv.reader( csvfile , dialect=dialect , delimiter=',' ) ):
        print "====" , len(row) , "===="  , row


安裝與修正 Hinedo 線上廣播軟體 @ Ubuntu 10.04

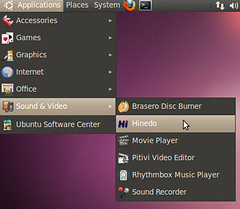
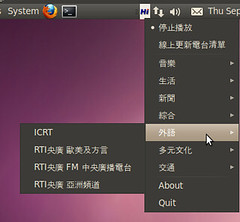
Hinedo Hinedo


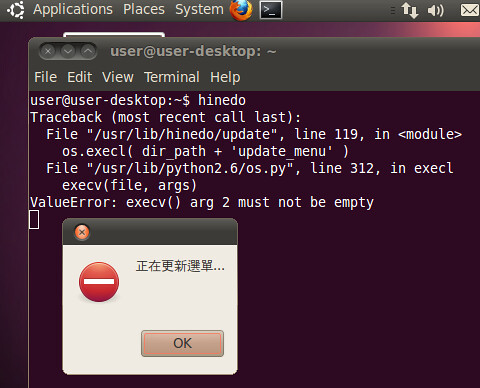
Hinedo 是一套國人開發的免費廣播軟體,個人覺得十分夠用。然而在 Ubuntu 10.04 上安裝後,跑起來會有問題,其錯誤訊息:


$ /usr/bin/hinedo
Traceback (most recent call last):
  File "/usr/lib/hinedo/update", line 119, in <module>
    os.execl( dir_path + 'update_menu' )
  File "/usr/lib/python2.6/os.py", line 312, in execl
    execv(file, args)
ValueError: execv() arg 2 must not be empty


Hinedo


這應該只是 Python 版本的問題,僅需稍微修正即可:


$ sudo vim /usr/lib/hinedo/update
將最後一行 os.execl( dir_path + 'update_menu' ) 更新成


os.execl( dir_path + 'update_menu' , '' )


只是多加一個空白的參數而已,如此一來就能正常使用囉


另外,安裝上若想要編原始碼,那就安裝一下其他部分:


$ sudo apt-get install build-essential libgtk2.0-dev
$ wget http://www.openfoundry.org/of/download_path/hinedo/2007.11.18/hinedo-0.4.tar.bz2
$ tar -xvf hinedo-0.4.tar.bz2 && cd hinedo-0.4 && make && make install


2010年9月27日 星期一

[Python] MARC21 與 ISO 2709 筆記

這陣子接觸圖書館服務,其中關於書目清單底層匯出的格式採用 MARC 格式,也是 ISO 2709 格式,相關資料如下:


花一點時間,總算看懂了。請看 Library of Congress >> MARC >> Authority >> LeaderMARC的結構 來對照,因為有時我竟然看不太懂中文!


圖書館系統理論上都支援 MARC 的匯出,其中匯出的資料採用 ISO 2709 格式,而 ISO 2709 就是以前磁帶備份的格式。MARC 匯出的資料格式,如同 Wikipedia - ISO_2709 底部那個看不懂的範例,因為 MARC 本身就叫 MAchine-Readable Cataloging 而非 Human-Readable Cataloging,但也有接近人眼看得懂得 MARC XML 格式,但不在這篇的討論。


MARC的結構 看看老故事,得知資料都是 Sequence 並且每一筆前 24 bytes 就等同於 record begin delimiter。而 MARC 每一筆 Record 共分成 header + dictionary + data 三個部份。而 header 裡 12-16 bytes 就是紀錄接下來的 dictionary 的大小是多少,當然也可以用它計算出直接取得 data 位置。而 dictionary 主要都是 12 bytes 為單位,分別是 3 bytes, 4 bytes, 5 bytes,但 dictionary 紀錄的大小是 "12 的倍數 + 1",細節可在 MARC的結構 得知。


切 Records:


def pre_process():
        target = 'marc_data'
        f = open( target , 'rb' )
        rec_cnt = 0
        total_size = 0
        print "### 012345678901234567890123 ###"
        while True:
                header = f.read(24)
                total_size  = total_size + len( header )
                if not header:
                        break

                record_size = int( header[0:5] )
                record_data = f.read( record_size - 24 )

                total_size  = total_size + len( record_data )
                rec_cnt = rec_cnt + 1

                print "---",header,"---",record_size
                if False :
                        o = open( '/tmp/marc.'+str(rec_cnt) , 'wb' )
                        o.write( header )
                        o.write( record_data )
                        o.close()
                #print record_data

        print "Total:",total_size,", Record Cnt:",rec_cnt
        f.close


從 header 這 24 bytes 資料,其前五個 Bytes 記錄的就是該 Record 大小(包括header)


對指定的 Record 分析 Header & 回傳指定 field 的 values:


def getFieldValue( rawdata , field = None , dictField = None ):
        if dictField is None:

                header = rawdata[0:24]
                field_length = int( header[20:21] )
                field_offset = int( header[21:22] )
                data_begin_offset = int( header[12:17] )
                raw_field_info = rawdata[24:data_begin_offset - 1]      # skip field end delimiter

                dictField = {}
                for i in range( 0 , len(raw_field_info) , 12 ):
                        begin = i
                        end = i+3
                        sub_field_name = raw_field_info[ begin : end ]

                        begin = end
                        end = begin + field_length
                        sub_field_data_length = raw_field_info[ begin : end ]

                        begin = end
                        end = begin + field_offset
                        sub_field_data_offset = raw_field_info[ begin : end ]

                        if sub_field_name not in dictField:
                                dictField[ sub_field_name ] = []
                        dictField[ sub_field_name ].append( [ int(sub_field_data_length) , int(sub_field_data_offset) + data_begin_offset ] )

        out = []
        if field is not None and field in dictField:
                #print dictField[field]
                for data_length_and_offset in dictField[field]:
                        out.append( rawdata[ data_length_and_offset[1] : data_length_and_offset[0] + data_length_and_offset[1] ] )

        return ( out , dictField )


用法:


tmp = None
value , tmp = getFieldValue( rawdata , '003' , tmp )
value , tmp = getFieldValue( rawdata , '005' , tmp )

...


其中 rawdata 是完整的資料,包括 header + dinctionary + data 三部分;value 是一個 array ,因為有些指定的 field name 可能出現多次,所以就用 array 記錄; tmp 是用來暫存 dictionary 資料,可以省下重新處理來增加效率的


建個 class 使用:


class MARC( object ):
        def __init__ ( self , file_list=[] ):
                self.file_list = file_list if file_list is not None and len(file_list) > 0 else []
                self.fd = None
                self.RE_FIELD_DATA = re.compile( '\x1f.([^\x1e\x1f]+)' )

        def get_raw_entries( self , cnt = None ):
                out = []
                cnt = int(cnt) if cnt is not None else 0
                while True:
                        if self.fd is None:
                                if  self.file_list is None or len( self.file_list ) == 0 :
                                        return out
                                try:
                                        self.fd = open( self.file_list[0] , 'rb' )
                                        self.file_list = self.file_list[1:]
                                except Exception as inst:
                                        print inst
                                        return out
                        try:
                                header = self.fd.read( 24 )
    
                                if not header:  # EOF
                                        self.fd.close()
                                        self.fd = None
                                else:
                                        record_size = int( header[0:5] )
                                        record_data = self.fd.read( record_size - 24 )
                                        out.append( header + record_data )
                        except Exception as inst:
                                print inst
                                return out
    
                        if cnt != 0 and len(out) == cnt:
                                return out

        def get_field_value( self , rawdata , field , dictField = None ):
                if dictField is None:

                        header = rawdata[0:24]
                        field_length = int( header[20:21] )
                        field_offset = int( header[21:22] )
                        data_begin_offset = int( header[12:17] )
                        raw_field_info = rawdata[24:data_begin_offset - 1]      # skip field end delimiter

                        dictField = {}
                        for i in range( 0 , len(raw_field_info) , 12 ):
                                begin = i
                                end = i+3
                                sub_field_name = raw_field_info[ begin : end ]

                                begin = end
                                end = begin + field_length
                                sub_field_data_length = raw_field_info[ begin : end ]

                                begin = end
                                end = begin + field_offset
                                sub_field_data_offset = raw_field_info[ begin : end ]

                                if sub_field_name not in dictField:
                                        dictField[ sub_field_name ] = []
                                raw_value = [ int(sub_field_data_length) , int(sub_field_data_offset) + data_begin_offset ]
                                dictField[ sub_field_name ].append( raw_value )

                out = []
                if field is not None and field in dictField:
                        for data_length_and_offset in dictField[field]:
                                out.append( rawdata[ data_length_and_offset[1] : data_length_and_offset[0] + data_length_and_offset[1] ] )

                return ( out , dictField )


使用方式:


marc = MARC( [target_file] )

for rawdata in marc.get_raw_entries():
        tmp = None
        value , tmp = marc.get_field_value( rawdata , 'FIELD_ID' , tmp )
        if len(value) > 0:
                for raw in re.findall( marc.RE_FIELD_DATA , value[0] ):
                        print raw
                        break


最後一提,其實有 pymarc libary 可以用:http://pypi.python.org/pypi/pymarc/,而我要做的事也差不多搞定,所以就不用那個 lib 囉


2010年9月23日 星期四

[Python] OPDS Catalog 產生器

之前看了 opds-toolscalibre2opds ,前者是 Python 寫的,後者是 Java 版本。但是前者有點隱藏功能或是在等待 OPDS Catalog 1.0 ,並沒有完整實做,可以看到一些程式碼被註解起來,但是打開註解又找不到對應的程式碼;後者卻綁在 Calibre 的資料庫格式,所以我選擇先對 opds-tools 開刀看看。


經過一陣子的修改,的確可以把 opds-tools 改到可以動了,但是殘缺的程式碼不禁讓我覺得不自在,在加上丟 issue 沒回應、該程式還要安裝 Genshi - Python toolkit for generation of output for the web 這套 framework,所以,最後就跳下去作了 XD 主要是我想要有可以丟進 MapReduce 的彈性架構,因此很在意可攜性,加上功能殘缺,所以就寫吧!(之前送 issue 出去,還被大主管唸說要送 Patch 才對!但是,這個 Patch 就等於重寫一個出來,所以我就自行建立一個出來啦)


http://code.google.com/p/opds-builder/


以下是在 Stanza 這個 iPhone 上的電子書閱讀器瀏覽的成果:


目前的範例只會產生 4 個


點選 Alphabetical 可查看分頁功能,但測資只有三項,每一頁只有一項 XD


至於原先提到的 MapReduce 則是因為需求面還沒到,所以就把實做一半的東西刪掉了。另外,可以透過 http://opds-builder.googlecode.com/hg/demo_out/index.xml (或 http://tinyurl.com/opds1 、http://tinyurl.com/opds-builder)查看 Demo 的效果。


2010年9月19日 星期日

[動畫] 夏日大作戰


來源:夏日大作戰 - 維基百科,自由的百科全書


心情煩悶,無意間看了這齣長達快兩小時的動畫,看完也有幾番感觸。故事是跟虛擬網路世界有關,看完很感概,讓我第一個想到的是 Facebook API,為什麼呢?因為現在他的使用者人數龐大,外加一堆個人隱私,並且很多應用都漸漸與 Facebook API 綁在一起。那豈不是跟這電影動畫的一些情節很像?另外還有雲端服務,哪天雲端資安出了大問題,那雲端一定比本地端還慘啊


很難得看了動畫還能帶出這點與近況相似東西,動畫裡還看得到 iPhone!剩下多說了就是故事情節了,就到此吧。


2010年9月16日 星期四

[Python] 編碼效能測試

想要作 MapReduce 的工作,大概拿 Hadoop Streaming 試試,於是想要把資料弄成 line-based 模式,接著想到資料壓縮處理,然後就想測一下到底哪種比較合適


  • base64

  • json

  • bz2

  • gzip


雖然腦子裡大概有譜了,但還是測一下好了


#!/usr/bin/env python

from timeit import Timer
import json
import base64
import bz2
import zlib

s = '1234567890abcdefghijklmnopqrstuvwxyzABCDEFGHIJKLMNOPQRSTUVWXYZ~!@#$%^&*()_+|'
def do_base64():
        encoded = base64.b64encode( s )
        decoded = base64.b64decode( encoded )

def do_json():
        encoded = json.dumps( s )
        decoded = json.loads( encoded )

def do_bz2():
        encoded = bz2.compress( s )
        decoded = bz2.decompress( encoded )

def do_gzip():
        encoded = zlib.compress( s )
        decoded = zlib.decompress( encoded )

if __name__ == '__main__':
        t1 = Timer( "do_base64()" , "from __main__ import do_base64" )
        try:
                print "Encode & Decode By base64: " + str( t1.timeit() )
        except:
                t1.print_exc()
        t2 = Timer( "do_json()" , "from __main__ import do_json" )
        try:
                print "Encode & Decode By json: " + str( t2.timeit() )
        except:
                t2.print_exc()

        t3 = Timer( "do_bz2()" , "from __main__ import do_bz2" )
        try:
                print "Encode & Decode By bz2: " + str( t3.timeit() )
        except:
                t3.print_exc()

        t4 = Timer( "do_gzip()" , "from __main__ import do_gzip" )
        try:
                print "Encode & Decode By gzip: " + str( t4.timeit() )
        except:
                t4.print_exc()


在 AMD x4 955 + 4 GB DDR3 1200 搭配 Ubuntu 10.04 i386:


$ python t.py
Encode & Decode By base64: 2.40118098259
Encode & Decode By json: 12.9051868916
Encode & Decode By bz2: 105.709769011
Encode & Decode By gzip: 19.3650279045


看來 base64 還是挺不錯的選擇,過去對他的印象是資料編碼後大小會長 50% 左右。另外,timeit 預設是跑 1,000,000 次。(由於測資沒有重複性,大概對壓縮類的不公平 XD)


相關資料


2010年9月7日 星期二

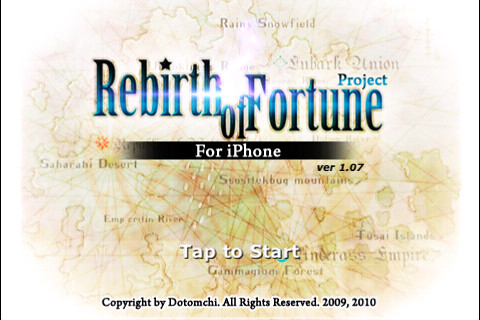
Rebirth of Fortune For iPhone

Rebirth of Fortune


這是一款 iPhone 遊戲,上週免費時下載的,偶爾玩個幾關累積。終於破關了,共有 100 關 XD 配樂還不錯,遊戲設計也還 ok ,唯一的缺點就是好漫長,玩到最後有點撐不下去啦,整體上我覺得還是不錯,說畫面有畫面,說特效有特效,說音樂有音樂。好久沒有把一個遊戲破關了!


最後都在練法師


Rebirth of Fortune


最後一關都是法師


Rebirth of Fortune


2010年9月6日 星期一

NCC 自用切結書

幾個禮拜前,訂購新款的 Amazon Kindle 3 閱讀器,其全名:Kindle Wireless Reading Device, Wi-Fi, 6" Display, Graphite - Latest Generation,這是只有 Wi-Fi 功能版的,下完單後,緊接著接到電話通知,說要準備好"射頻"跟"功率"資料,這時就有點大囧。


偷懶不尋求正規方式,直接 Google 的下場,就只是看到一堆抱怨文章,像是東西被扣在機場海關等等的訊息,完全是沒幫助又浪費時間。於是,探問前輩得知美國那邊也有類似的機構,稱作 Federal Communications Commission (FCC),因此,就筆記一下找資料的過程。


  1. 首先,必須找到購買機型的一些資訊,如 FCC ID 等,這部份就只好上官網找找,也就是 Kindle Wireless Reading Device, Wi-Fi, 6" Display, Graphite - Latest Generation,其下方有個 Kindle User's Guide,裡頭會跟你說 FCC ID 是多少,你可以用 Search 的方式

  2. 接著,可以只用 "FCC id search" 三個關鍵字去問 Google,他會告訴你 OET -- FCC ID Search,就是用來查詢機器資訊的

  3. 然而,這台 Kindle 竟然有兩個型號!XSX-1013 和 X7N-0610 啊,那又該怎樣確定呢?用法就是兩個型號都查一下,最後在 [Display Exhibits] -> [Detail] -> [External Photos] 可以看看他外觀那個是你要得,慶幸的 Wi-Fi Only 是黑色的 XD 所以就能確認是 XSX-1013,接著可以在 [Display Grant] 得知 Frequency Range (MHZ) 和 Output Watts 資訊

  4. 最後,要填寫的單子比較要找資料的項目:

    • 器材名稱:  KINDLE WIRELESS READING DEVICE

    • 廠牌:  AMAZON KINDLE

    • 型號:  D00901 (說明書有寫 Model Number)

    • 工作頻率:  Wi-Fi, 2412-2462 MHz(有人會直接寫 Wi-Fi 、3G Wireless 的方式,我是寫兩個試試)

    • 輸出功率:   0.155 W


最後稍微提一下 FCC ID Search 的那個表單,Grantee Code 和 Product Code,前者是三碼,後者則是有包括 "-" 喔,也就是在這個例子要輸入 "-1013" 才能查到,當初光這個就誤了我大半時間,最後跑去問老闆,雖然一開始也是一樣卡在那邊,但 30 秒後老闆馬上點了 Product Code 的敘述資訊,就看到輸入規則有包含 "-" 了 Orz 這就是有經驗跟沒經驗的差別啊。


2010年9月3日 星期五

iOS 開發教學 - 使用 UIWebView 之 Javascript 呼叫 Objective C & 實做簡單的 Web Server?

幾個月前學習使用 UIWebView 時,就是作一個簡單得 Browser 出來,提供輸入 URL 以及上下頁等等基本功能,然後在這樣得過程中,在切換上下頁時,又想要更新 URL 欄位資訊,此時就是替 UIViewController 加上 UIWebViewDelegate 並使用 - (BOOL)webView:(UIWebView *)webView
shouldStartLoadWithRequest:(NSURLRequest *)request
navigationType:(UIWebViewNavigationType)navigationType 解決。


已經有一陣子跟同事討論有沒有可能用 Javascript 去呼叫 Objective-C 做的 function 呢?雖然一直反反覆覆地回他,但今天認真看一下,找到這篇 Calling Objective-C from JavaScript in an iPhone UIWebView ,原來,他用到的技巧就是之前學作一個簡單 Browser 會用到的,去偵測點到的 hyperlink!因此,換個方式以 Javascript 使用 window.location = 'call?HelloWorld'; 時,透過 UIViewController + UIWebViewDelegate 攔截到 url 後,就可以透過 pattern matching 來決定啟用自己內定的 Objective-C function 啊!這麼簡單就解決了,果真學東西要融會貫通才有用!

下一步的思考:那我可不可以寫個簡單的 web server 擺在 iPhone native app 咧?這個答案是有可能的!並且可以考慮使用 Ajax !

現在從 Javascript 可以呼叫 Objective-C 後,而 Objetive-C 本身就可以呼叫 Javascript 啦,那就只需要從 Javascript 呼叫 Objective-C 時,準備好 callback function,之後在 Objective-C 處理完後,可以透過控制 UIWebView 去呼叫 Javascript 囉!

關於 Ajax Query 部份:

經過測試,使用 Ajax 並不能被偵測出來,只能用那種真的有在換頁的效果的,如 <a href="http://www.google.com.tw">Google</a> 這種方式,或是原先的 window.location 囉!

程式碼:

@ UIWebViewController.h (直接建立一個 UIViewController 並新增以下資料即可)

#import <UIKit/UIKit.h>
@interface UIWebViewController : UIViewController<UIWebViewDelegate> {
}
@end

@ UIWebViewController.m (直接建立一個 UIViewController 並新增以下資料即可)

- (BOOL)webView:(UIWebView *)webView shouldStartLoadWithRequest:(NSURLRequest *)request navigationType:(UIWebViewNavigationType)navigationType
{
        NSString *target = [[request URL] absoluteString];
        NSRange check = [target rangeOfString:@"MyCGI?"];
        //
        //  用來判斷是否有進入這個 function
        //
        NSLog(@"Catch:%@",target);
        if( check.location != NSNotFound )
        {
                //
               
// 這邊就是自己的 CGI 要做的事,包含處理 request 以及呼叫 Javascript callback function!
               
//
                [webView stringByEvaluatingJavaScriptFromString:
                        [NSString stringWithFormat:@"report('[MyCGI Report] %@');", [target substringFromIndex:check.location]]];

                return NO;
        }
        return YES;
}

- (void)viewDidLoad {
    [super viewDidLoad];

        UIWebView *myWebView = [[UIWebView alloc] init];
        [myWebView setFrame:self.view.frame];
        [self.view addSubview:myWebView];

        [myWebView
                loadData:[NSData dataWithContentsOfFile:[[NSBundle mainBundle] pathForResource:@"index" ofType:@"html"]]
                MIMEType:@"text/html"
                textEncodingName:nil
                baseURL:nil];
        [myWebView setDelegate:self];
        [myWebView release];

}

@ YourAppDelegate

#import "UIWebViewController.h"

- (BOOL)application:(UIApplication *)application didFinishLaunchingWithOptions:(NSDictionary *)launchOptions {

    // Override point for customization after application launch.
        UIWebViewController *webViewCtrl = [[UIWebViewController alloc] init];
        [window addSubview:webViewCtrl.view];
        //
        // 在此偷懶不 release 他(不然無法正確偵測)!正規寫法應該要在 header 宣告,並且在 dealloc 進行 release
        //

    [window makeKeyAndVisible];

        return YES;
}

@ index.html (別忘了擺這個檔案進去 app 囉)

<html>
        <body>
                <script language="Javascript">
                        function report( s , clear )
                        {
                                var report;
                                if( ( report  = document.getElementById( 'report' ) ) )
                                {
                                        while( clear && report.hasChildNodes() && report.childNodes.length >= 1 )
                                                report.removeChild( report.firstChild );
                                        if ( s )
                                                report.innerHTML = s + '<br/>';
                                }
                        }
                        function doQuery( target )
                        {
                                report( null , true );
                                try
                                {
                                        var ajReq = new XMLHttpRequest();
                                        ajReq.open( 'GET' , target , true );
                                        ajReq.send(null);
                                        report( 'Query: ' + target );
                                }
                                catch(err)
                                {
                                        report( '[Error] ' + err , true );
                                }
                        }
                        function doLQuery( target )
                        {
                                report( null , true );
                                report( 'LQuery: ' + target );
                                window.location = target;
                        }
                </script>
                <div id="report"></div>
                <button onclick="doQuery('http://www.google.com.tw');">Ajax Query - Google</button><br />
                <button onclick="doQuery('http://localhost/MyCGI?HelloWorld');">Ajax Query - MyCGI</button><br />
                <button onclick="doLQuery('http://www.google.com.tw');">location Query - Google</button><br />
                <button onclick="doLQuery('http://localhost/MyCGI?HelloWorld');">location Query - MyCGI</button><br />
                <a href="http://www.google.com.tw" target="_blank">Google.com</a>
                <a href="http://localhost/MyCGI?HelloWorld" target="_blank">MyCGI</a>
        </body>
</html>

參考資料:


2010年9月2日 星期四

關閉文章留言

這幾個禮拜,每天都會收到幾個不等的廣告留言,有會員也有非會員,但非會員的留言相較起來多很多,所以先只允許會員迴響一陣子看看。真的想留言問問題,就...註冊吧,不過這邊本來就是自己的筆記為主,鮮少互動就是了 :P


iPod Touch 4!


今天已經看到許多關於 Apple 的新聞,有一項是 iPod Touch 4 的亮相!此 iPod Touch 4 跟以往不一樣,跟 iPhone 4 的差距只剩下電話與 3G 網路的差別,也就是說 iPod Touch 4 已經有 Camera ,並且跟 iPhone 4 一樣是有前後兩種。仔細回顧一些細節,我覺得對 iOS app 開發者而言,跨入的門檻越來越低囉!只需要 iPod Touch 4 + Mac mini + 開發者年費,最低額台幣僅 8960(229美金) + 19900(學生價) + 3200(99美金) !


偶爾留意一下台灣 iPhone App 的排行榜,除了遊戲容易上榜外,看得出來目前一些工具以 LBS 最吸引人,像是即時的台北公車時間、停車場空位、火車高鐵查詢訂位等,甚至還有女生的好朋友記錄軟體以及一堆跟算命、拍照相關的軟體。


覺得 iPhone 對最吸引人我的是 LBS 服務和拍照。隨時隨地拿起來就拍一張,雖然還不及一些低階的數位相機,但其方便性已經超越低階相機囉!所以 iPod Touch 4 可以拍照後,再加上它的低價還滿令人心動的。只是不知道是不是 iPhone 4 硬體跟 iPod Touch 4 有差?不然光能打個電話跟 3G 上網,價差就超過一萬!我承認 3G 上網的價值才是 Mobile Device 的最大特點,但沒想到價差還不少,或是該說 iPhone 跟電信業者合作包含兩年(通常綁約兩年)的 3G 無線上網的費用呢?若是這樣就還稱得上划算吧。


早上跟高中同學閒聊,他說他沒空花時間去開發程式,時間就是金錢,以這句話來說,他也是變相在賺錢啊 :D 所以,仔細想想,凡事還是要好好規劃,不要一窩蜂地只做賺錢的事而已,該衡量對自己真正的價值在哪才行動,我很佩服那位高中同學很花心思地照顧小孩,也該播個時間去拜訪囉!至於 iOS app 的市場,我覺得漸漸會縮到幾間大廠或幾個特定項目的服務吧!如同前陣子看到國外新聞在講 iOS app 已經有二十多萬個,能找到自己需要的程式嗎?轉個角度來說,會不會漸漸地跟目前現實生活的生態一樣,就只挑名牌廠商做的?而新興的小程式又會有誰看到呢?只是這樣的生態還要幾年才會穩定,目前的開發者還是有機會成為百萬富翁啦!


相關文章: