2014年2月28日 星期五

MongoDB 開發筆記 - 使用 find / aggregate: $match 找尋必有或必無某屬性(property/element/field)的資料

話說 MongoDB 真是越用越順手,也唯有這樣才能體會大家為何對他驚歎 :P 在處理資料時,由於 schema free style,有時分析資料時,希望每筆資料都要有某個屬性才來處理,或是資料不能有某個屬性:

db.collection.find( { property: {$ne: null }} )
db.collection.find( { property: null} )


如果 property 的內容物是一個 array,如 { "property":[ ... ] } ,這時想要要求此 array 個數要大於 1 時,則可以改用 "$where" 語法(據說效率較慢,但 it's works !):

db.collection.find( { "$where": "this.property && this.property > 1" } )

然而,在 aggregate 的 $match 卻無法使用 "$where" 語法,可惜了點,會有以下錯誤訊息:

failed: exception: $where is not allowed inside of a $match aggregation expression

此外,就算分析出來,還是有要分析到 array 裡頭項目,又發現 aggregate 有 $unwind 的功能!效果就是幫你把 array 裡頭的資料一筆筆輸出:

db.collection.aggregate([
{
$match: {
property: { $ne : null }
}
},
{
$unwind: "$property"
},
{
$group: {
_id: "$property.name",
count: {
$sum: 1
}
}
}
])


單筆資料如:

{
"id": "client",
"date": "date",
"property":
[
{ "name": "ios", "version": 1 } ,
{ "name": "android", "version": 1 } ,
{ "name": "ios", "version": 2 }
]
}


假設資料就上述一筆,透過 aggregate $unwind 總輸出會是 property.length 個數:

{ "id": "client", "date": "date", "name": "ios", "version": 1 }
{ "id": "client", "date": "date", "name": "android", "version": 1 }
{ "id": "client", "date": "date", "name": "ios", "version": 2 }
2014年2月27日 星期四

[Linux] 申請 Godaddy Wildcard Certificate 和設定 Nginx Web Server @ Ubuntu 12.04

ssl-01

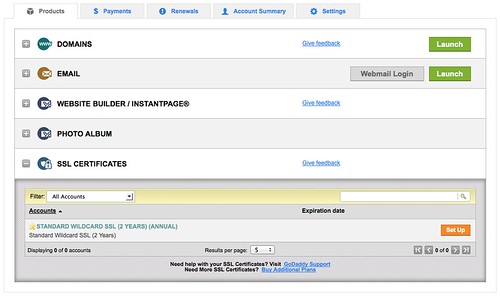
在 Godaddy 購買 Domain Name,接著就來申請 SSL 憑證,依據需求就買了 wildcard certificate 版本。自簽憑證的經驗不少,但是還沒設定過 wildcard 版本 XD

ssl-03

首先先完成 Godaddy 的購買,可以參考 [筆記] SSL 憑證購買記

接著,很快就進入 Godaddy SSL 設定界面,並要求貼上 Certificate Signing Request(CSR) 資料。這邊需留意的是建立 CSR 的過程中,以前在 Common Name 總是輸入完整的 hostname (如 blog.changyy.org),現在要改輸入成 * 開頭(如: *.changyy.org),算是關鍵之處。

$ openssl req -new -newkey rsa:2048 -nodes -keyout wildcard.domainname.key -out wildcard.domainname.csr

最後再把 wildcard.domainname.csr 打開後,複製內文貼上即可進行。

ssl-04

由於是購買 wildcard 版本,如果 common name 不是輸入 * 開頭,會看到錯誤訊息,也是個不錯的防呆。

ssl-06

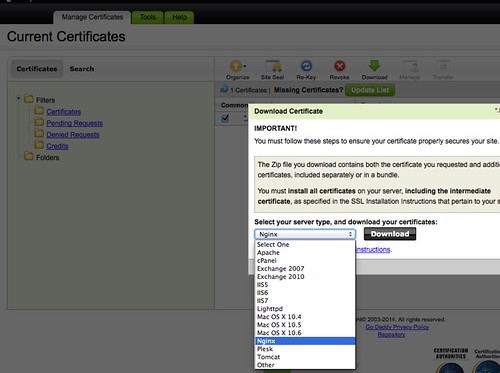
接著,再切換到下載頁面,就可以挑選屬於自己的 web server 資料。

對於 nginx 的部分,下載回來共有兩個 csr 檔案,對 apache web server 而言,可以分開設定剛剛好,但 nginx 只有 ssl_certificate 跟 ssl_certificate_key 兩個啊,因此,只要把 godaddy 給你的兩個 crt 串起來使用即可:

$ cp xxxx.crt hostname.crt
$ cat gd_bundle-g2-g1.crt >> hostname.crt


接著在 nginx 設定檔中,把 ssl_certificate 填 hostname.crt 而 ssl_certificate_key 則是最早建立 crt 的 key (此例 wildcard.domainname.key)

2014年2月26日 星期三

MongoDB 開發筆記 - Aggregate 之 Group BY Timestamp / GROUP BY ObjectID getTimestamp @ MongoDB Server v2.4.9

上回看文件時,上頭說系統預設 ObjectID(_id) 中,已經有時間戳記了,並且建議不需要額外在儲存一個時間:
ObjectId is a 12-byte BSON type, constructed using:
a 4-byte value representing the seconds since the Unix epoch,
a 3-byte machine identifier,
a 2-byte process id, and
a 3-byte counter, starting with a random value.
開發環境:MongoDB Server v2.4.9
目標:SELECT `timestamp`, count(*) AS count FROM `test` GROUP BY `timestamp`;

儘管 ObjectID 有提供 _id.getTimestamp() 方式存取時間,但是在用 aggregate 時卻無法動態取用($year, $month, $dayOfMonth),如:

mongodb> db.test.aggregate({
$group:{
_id: {
year: { $year: "$_id.getTimestamp()" } ,
month: { $month: "$_id.getTimestamp()" } ,
day: { $dayOfMonth: "$_id.getTimestamp()" }
},
count: {
$sum:1
}
}
})
mongodb> aggregate failed: {
        "errmsg" : "exception: can't convert from BSON type EOO to Date",
        "code" : 16006,
        "ok" : 0
}


看來在 v2.4.9 版的應用時,還是需要建立一個 timestamp 出來,然而 db.collection.update 無法拿 document 自身資料來更新,例如從 ObjectID 抽出時間來用:

mongodb> db.test.update({timestamp: null }, { $set : { timestamp: _id.getTimestamp() } }, {multi:true})
ReferenceError: _id is not defined


需要改用 forEach 來一筆筆更新:

mongodb> db.test.find({timestamp:null}).snapshot().forEach(
function (item) {
item.timestamp = item._id.getTimestamp();
//db.test.save(item);
db.test.update(
# query
{
'_id': item['_id']
},
# update
{
'$set':
{
'timestamp': item['timestamp']
}
},
upsert=False, multi=False
);
}
)


接著終於可以 GROUP BY DATE 了 Orz

mongodb> db.test.aggregate(
{
$group:{
_id: {
year: { $year: "$timestamp" } ,
month: { $month: "$timestamp" } ,
day: { $dayOfMonth: "$timestamp" }
},
count: {
$sum:1
}
}
}
)
{
        "result" : [
                {
                        "_id" : {
                                "year" : 2014,
                                "month" : 2,
                                "day" : 22
                        },
                        "count" : 23
                },
                {
                        "_id" : {
                                "year" : 2014,
                                "month" : 2,
                                "day" : 21
                        },
                        "count" : 15
                },
                {
                        "_id" : {
                                "year" : 2014,
                                "month" : 2,
                                "day" : 20
                        },
                        "count" : 200
                }
        ],
        "ok" : 1
}

[Linux] 使用 Node.js 與 MongoDB 溝通與帳號認證 @ Ubuntu 12.04

透過 apt-get 安裝 node.js:

$ sudo apt-get install python-software-properties
$ sudo add-apt-repository ppa:chris-lea/node.js
$ sudo apt-get update
$ sudo apt-get install nodejs


建立 project:

$ cd project
$ npm install mongodb
$ vim test.js
var Db = require('mongodb').Db,
        MongoClient = require('mongodb').MongoClient;

var db_host = 'localhost';
var db_port = 27017;
var auth_db = 'admin';
var auth_name = 'account';
var auth_pass = 'password';

MongoClient.connect("mongodb://"+auth_name+":"+auth_pass+"@"+db_host+":"+db_port, function(err, db) {
        console.log(err);
        console.log(db.databaseName);
        db.close();
});

MongoClient.connect("mongodb://"+db_host+":"+db_port, function(err, db) {
        db.authenticate(auth_name, auth_pass, function(err, ret) {
                console.log(err);
       console.log(db.databaseName);
                console.log(ret);
       db.close();
        });
});
$ node test.js
Failed to load c++ bson extension, using pure JS version
null
admin
null
admin
true


以上為兩種跟 mongodb 進行認證的方式,一種是寫在 URI 中,另一種則是透過 db.authenticate 方式,至於這份程式的輸出不見得 "true" 是在最後一列,也有可能在第三列,這是因為 node.js async 架構關係,在這份 code 中不保證哪個 function 先跑。

如果 mongodb 本身要求認證,而未認證則會有錯誤訊息:

{ [MongoError: unauthorized] name: 'MongoError', ok: 0, errmsg: 'unauthorized' }

比較疑惑的地方是對於 auth_db 的部分,之前在用 pymongo 時,或是直接用 mongo 指令時,必須透過指定 authenticationDatabase 才能通過認證,但在 node.js 中,似乎沒有問題?再來摸看看好了。

2014年2月25日 星期二

[Linux] 從 MongoDB Standalone (Single-Noe) 到 MongoDB HA (Replica Set) 的線上轉移方式(without shutdown/offline) @ Ubuntu 12.04

不關機的轉換原理應該都差不多?例如把水管從 A 處改接到到 B 處,只是情境跟操作手法適不適用是需要考慮的重要因素,在此先敘述使用情境:
  • 一隻 PHP 定期收到資料後,把資料存在 /tmp 區,再透過 popen 在背景發動一隻 pymongo 程式讀取 /tmp  資料,由 pymongo client 連到 mongodb server 塞資料,塞完後就斷線的模式。所以 CGI 有自己的 PID,而 pymongo 寫的 tool 也有自己的 PID。
  • 資料的單純作 insert 為主,還沒有負責處理 query 的需求,故 mongodb 只要能確保資料有被記錄起來,沒有損失即可,但無法保證讓 Replica Set 的資料馬上就跟 Standalone 一致。
線上轉換原理:
  1. 架設 MongoDB Replica Set
  2. 將更改 pymongo 程式,將 mongodb server 位置改到 Replica Set 即可
  3. 將 Standalone MongoDB 用 mongoexport 匯出資料 table.json, table2.json, ...
  4. 將資料用 mongoimport 方式匯入到 Replica Set 之 PRIMARY node 即可
在上述的使用情境下,資料的收集就不會間斷,至於官方介紹的方式也可以參考一下,屬於把 mongod 關掉後重開:Convert a Standalone to a Replica Set

此外,一些心得:
  • 原先資料就使用系統 _id 管理,不覆蓋 _id ,而 _id 有時間資訊,匯入新的機器(Replica Set) 沒有問題
  • 匯入資料若碰到 _id 一樣時,會 skip 掉,所以不必擔心重複匯入的問題
  • 如果匯錯資料時,例如預計到 table 1,結果不小心匯到 table 2 時,假設兩種資料格式有關鍵的差異點,例如在 table 1 的 record 才有 {"helloworld":0} 的屬性,那就好辦,把這類 record 找出來刪掉即可

# 找尋 table2 中,record 裡 hellworld 屬性的資料筆數
firstset:PRIMARY> db.table2.find({helloworld: { $ne : null } }).count()
firstset:PRIMARY> db.table2.remove({helloworld: { $ne : null } })

[Linux] ~/.dropbox-dist/dropboxd : Segmentation fault (core dumped) @ Ubuntu 12.04 64Bit

三天前還正常...不知為何突然掛了。

$ ~/.dropbox-dist/dropboxd
Segmentation fault (core dumped)

試過了砍掉 ~/.dropbox 和重裝還是一樣

$ rm -rf ~/.dropbox ~/.dropbox-dist
$ cd ~ && wget -O - "https://www.dropbox.com/download?plat=lnx.x86_64" | tar xzf -
$ ~/.dropbox-dist/dropboxd
Segmentation fault (core dumped)


最後找到解法:

$ sudo apt-get install nautilus
$ ~/.dropbox-dist/dropboxd
This computer isn't linked to any Dropbox account...
Please visit https://www.dropbox.com/cli_link?host_id=xxxxxxxx to link this device.

2014年2月23日 星期日

人生各自精彩!


話說,若要這麼計較的話,從第一份工作就是跟 startup 相關的,在一個鼓吹以技術進行 spinoff 的單位且之後的旅程也差不多...但 startup/spinoff 不見得是因為理想,而是為了營運管理類的。

隨著年紀增長,週邊的同輩、學長弟妹一個個地跳入大家口中的 startup 了,不少人在喊:離開舒適圈、精實創業。今年初漸漸對這些口號麻木了,大概也得知許多八卦吧(大多是底心底薪的欲望),據前輩的分享,在矽谷的生態中,其實 startup 可是早就被當成商品在公司之間賣來賣去的,所以...聽首歌好了 XD


今年的新體悟:
口號一切都源自于人性層面,所謂的 startup ,粗略定義:自己當老闆。廣義一點是做自己想做的事,甚至第一手享受到成果。然而,回鄉接爸媽的事業就稱不上嗎?把自己的生活過得更充實稱不上嗎?把家庭顧好稱不上嗎? 體驗不一樣的生活稱不上嗎?
我想,站在經濟推動上,可以增加工作機會,對社會有幫助仍是十分鼓勵的。但是,單純在喊離開舒適圈等等的說詞(有些startup還過得比較爽),就比較像廣告台詞、算命先常說,那種統計學很容易打到底心話:你是否爾偶覺得沒人懂你,或是天氣預報:晴時多雲偶陣雨 XD

現在我比較會推薦別人,先想想自己要過怎樣的生活 :) 至於要不要 startup 倒是其次的(但鼓勵持著 startup 珍惜資源的精神去做規劃),並且其含義可以延伸許多相關事物,看看自己要挑哪樣就好:
  • 個人角度,珍惜時間並規劃時程,看是要學哪個語言、樂器、興趣、運動或是旅行增廣閱歷都是十分好的以個人為基準的 startup ,不見得一定要掙錢角度,只要珍惜光陰都是!因為時間是生命中絕對有限資源
  • 公司角度,珍惜資源,把角色做好尋求貢獻度,也稱得上團體中的 startup 吧 XD 有股份的就幫公司掙錢,沒股份的,就找尋個人成就感、作出自己的代表作

2014年2月20日 星期四

當 MicroUSB <-> USB 傳輸線一條不用 25 元時...

MicroUSB <-> USB

記得兩三年前看過一則影片是在講經濟學的事情:
當貧富差距越大時,奢侈品的花費 >> 民生必需品
例如在看一場電影是要花很多錢,但吃一頓飯則不用,這不是國家很貧窮,而是貧富差距大,導致只有有錢人才可以看電影院,為了電影院的營運,只好收費提升。然而,正當我在路邊攤看到手機傳輸線兩條賣 50 元時,我開始在想,智慧手機是不是變成民生用品啦?既然我路邊攤買的到一條 25 元,那肯定有地方賣更便宜...

於是我找一下露天...果真如此...一條 1M 的只賣 9元 XDDD

當這種 USB <-> MicroUSB 傳輸線已經進入像牙籤、口罩、牙刷等民生用品的價碼時,站在經濟學的角度,是不是有什麼慢慢顯現了?搜尋露天:彩色麵條

彩色麵條

[Linux] 使用 MAXMIND GeoLite2 Free 進行 Offline 查詢 IP 與 Country 和 City 對應 @ Ubuntu 12.04

使用 MAXMIND DB 進行 Offline 查詢 IP 與 Country 和 City 對應

雖然網路上還有不少可以線上查詢的服務,將 IP 轉成地區資訊,如:

$ curl ipinfo.io/8.8.8.8
{
  "ip": "8.8.8.8",
  "hostname": "google-public-dns-a.google.com",
  "city": null,
  "region": null,
  "country": "US",
  "loc": "38.0000,-97.0000",
  "org": "AS15169 Google Inc."
}


不過,大多都有查詢次數的限制,所以,自己架一個來處理吧,在此就挑選 MAXMIND GeoLite2 Free 來使用,其中 FREE 版本就只提供查詢 Country 跟 City 而已。

以 GeoLite2-City.mmdb 為例:

<?php

$target_ip = isset( $_REQUEST['ip'] ) && !empty($_REQUEST['ip']) ? $_REQUEST['ip'] : ( isset($_SERVER['REMOTE_ADDR']) ? $_SERVER['REMOTE_ADDR'] : NULL ) ;
// $target_ip = '8.8.8.8';

require( 'MaxMind/Db/Reader.php' );
require( 'MaxMind/Db/Reader/Decoder.php' );
require( 'MaxMind/Db/Reader/InvalidDatabaseException.php' );
require( 'MaxMind/Db/Reader/Metadata.php' );

$reader = new MaxMind\Db\Reader('/path/GeoLite2-City.mmdb');
$record = $reader->get($target_ip);
$reader->close();
echo "<pre>";
print_r( $record );
echo "</pre>";


其中 MaxMind 程式碼可在 github.com/maxmind/MaxMind-DB-Reader-php 下載,此外,在 Ubuntu apt-get 上也有 php5-geoip - GeoIP module for php5 可安裝。

查詢 8.8.8.8:

Array
(
    [continent] => Array
        (
            [code] => NA
            [geoname_id] => 6255149
            [names] => Array
                (
                    [de] => Nordamerika
                    [en] => North America
                    [es] => Norteamérica
                    [fr] => Amérique du Nord
                    [ja] => 北アメリカ
                    [pt-BR] => América do Norte
                    [ru] => Северная Америка
                    [zh-CN] => 北美洲
                )

        )

    [country] => Array
        (
            [geoname_id] => 6252001
            [iso_code] => US
            [names] => Array
                (
                    [de] => USA
                    [en] => United States
                    [es] => Estados Unidos
                    [fr] => États-Unis
                    [ja] => アメリカ合衆国
                    [pt-BR] => Estados Unidos
                    [ru] => США
                    [zh-CN] => 美国
                )

        )

    [location] => Array
        (
            [latitude] => 38
            [longitude] => -97
        )

    [registered_country] => Array
        (
            [geoname_id] => 6252001
            [iso_code] => US
            [names] => Array
                (
                    [de] => USA
                    [en] => United States
                    [es] => Estados Unidos
                    [fr] => États-Unis
                    [ja] => アメリカ合衆国
                    [pt-BR] => Estados Unidos
                    [ru] => США
                    [zh-CN] => 美国
                )

        )

)


查詢台灣IP:

Array
(
    [city] => Array
        (
            [geoname_id] => 1668341
            [names] => Array
                (
                    [de] => Taipeh
                    [en] => Taipei
                    [es] => Taipéi
                    [fr] => Taipei
                    [ja] => 台北市
                    [pt-BR] => Taipé
                    [ru] => Тайбэй
                    [zh-CN] => 台北市
                )

        )

    [continent] => Array
        (
            [code] => AS
            [geoname_id] => 6255147
            [names] => Array
                (
                    [de] => Asien
                    [en] => Asia
                    [es] => Asia
                    [fr] => Asie
                    [ja] => アジア
                    [pt-BR] => Ásia
                    [ru] => Азия
                    [zh-CN] => 亚洲
                )

        )

    [country] => Array
        (
            [geoname_id] => 1668284
            [iso_code] => TW
            [names] => Array
                (
                    [de] => Republik China
                    [en] => Taiwan
                    [es] => Taiwán
                    [fr] => Taïwan
                    [ja] => 中華民国
                    [pt-BR] => Taiwan
                    [ru] => Тайвань
                    [zh-CN] => 台湾
                )

        )

    [location] => Array
        (
            [latitude] => 25.0392
            [longitude] => 121.525
            [time_zone] => Asia/Taipei
        )

    [registered_country] => Array
        (
            [geoname_id] => 1668284
            [iso_code] => TW
            [names] => Array
                (
                    [de] => Republik China
                    [en] => Taiwan
                    [es] => Taiwán
                    [fr] => Taïwan
                    [ja] => 中華民国
                    [pt-BR] => Taiwan
                    [ru] => Тайвань
                    [zh-CN] => 台湾
                )

        )

    [subdivisions] => Array
        (
            [0] => Array
                (
                    [geoname_id] => 7280290
                    [names] => Array
                        (
                            [de] => Taipeh
                            [en] => Taipei
                            [es] => Taipéi
                            [ja] => 台北市
                            [pt-BR] => Taipé
                            [ru] => Тайбэй
                        )

                )

        )

)

2014年2月19日 星期三

[Linux] 使用 vnstat 監控網路流量,提供每小時、每日、每週、每月流量總報表 @ Ubuntu 12.04

vnstat

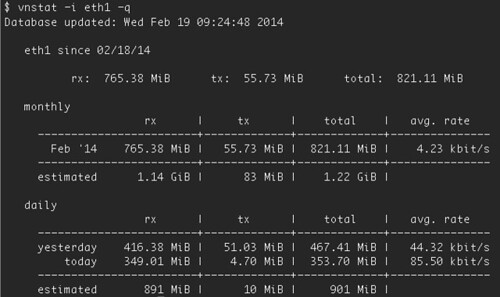
最近在用雲端服務,採用用多少資源付多少錢,其中的變動收費的就是網路流量,所以就裝一下 vnstat 來計算一下,實在很夠用!

$ sudo apt-get install vnstat

接著就可以很方便地用 command line 執行顯示了。

2014年2月18日 星期二

[Linux] MongoDB Replica Set with Auth & KeyFile @ Ubuntu 12.04

mongod shutdown error

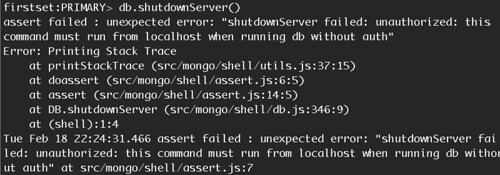
建 cluster 不見得需要帳號管控,因為多數處在保護的網路環境,而 MongoDB 預設沒有帳密管控且帳密管控做的很簡單,分成 read-only 跟 read-write 模式。而使用認證的主因是為了遠端關掉機器,沒有認證機制的服務僅能透過 localhost 關掉服務,有一派說是透過 service mongodb stop 指令,又有一派說直接 kill process 即可,但有文章說如此容易造成問題?還是要用正式的關機流程比較妥( mongo> db.shutdownServer() )。

參考文件:
架設 Replica Set 的流程:
  1. 啟動多台 mongod --replSet set_name
  2. 挑選一台 mongod 登入
  3. 使用 rs.init() 初始化後,再用 rs.add() 加入其他 mongod 或是使用 db.runCommand({'replSetInitiate':{'members':[]}}) 一次新增
架設需要認證的 Replica Set 的流程:
  1. 用 default 模式啟動一台 mongod
  2. 建立帳號
  3. 建立 keyFile (檔案內容隨意,但需要多過6個字元)
  4. 關掉後以 --replSet set_name 與 --keyFile key_file_path 模式啟動多支 mongod
  5. 登入一台 mongod 以及完成帳號認證
  6. 使用 rs.init() 初始化後,再用 rs.add() 加入其他 mongod 或是使用 db.runCommand({'replSetInitiate':{'members':[]}}) 一次新增
上述兩者流程的差別在於後者要先建帳號後,再用 --replSet 跟 --keyFile 模式啟動。而後,為了測試就寫了隻 script 筆記一下:

未使用認證模式:

$ python replset_init.py --reset

Init DB(0), Port: 30000, Path: /home/id/data/mongodb-study/cluster/db/db-0
 $ mongod --dbpath /home/id/data/mongodb-study/cluster/db/db-0 --port 30000 --oplogSize 700 --logpath /home/id/data/mongodb-study/cluster/log/db-0.log --rest --replSet firstset

Init DB(1), Port: 30001, Path: /home/id/data/mongodb-study/cluster/db/db-1
 $ mongod --dbpath /home/id/data/mongodb-study/cluster/db/db-1 --port 30001 --oplogSize 700 --logpath /home/id/data/mongodb-study/cluster/log/db-1.log --rest --replSet firstset

Init DB(2), Port: 30002, Path: /home/id/data/mongodb-study/cluster/db/db-2
 $ mongod --dbpath /home/id/data/mongodb-study/cluster/db/db-2 --port 30002 --oplogSize 700 --logpath /home/id/data/mongodb-study/cluster/log/db-2.log --rest --replSet firstset

nohup: ignoring input and appending output to `nohup.out'

Waiting...
        localhost:30000: .....OK
        localhost:30001: OK
        localhost:30002: OK

Connect to localhost:30000

Initialize the First Replica Set:

$ monogo localhost:30000/admin
mongo> db.runCommand( {'replSetInitiate': {'_id': 'firstset', 'members': [{'host': 'localhost:30000', '_id': 1}, {'host': 'localhost:30001', '_id': 2}, {'host': 'localhost:30002', '_id': 3}]}} )

Result:
{u'info': u'Config now saved locally.  Should come online in about a minute.', u'ok': 1.0}

All is done.

server info:
 $ mongo localhost:30000/admin --eval 'printjson(rs.status())'

shutdown servers:
 $ mongo localhost:30000/admin --eval 'db.shutdownServer()'
 $ mongo localhost:30001/admin --eval 'db.shutdownServer()'
 $ mongo localhost:30002/admin --eval 'db.shutdownServer()'


使用認證模式:

$ python replset_init.py --reset --auth-key-file keyfile --auth-user account --auth-pass password

Init DB(0), Port: 30000, Path: /home/id/data/mongodb-study/cluster/db/db-0
 $ mongod --dbpath /home/id/data/mongodb-study/cluster/db/db-0 --port 30000 --oplogSize 700 --logpath /home/id/data/mongodb-study/cluster/log/db-0.log --rest
nohup: ignoring input and appending output to `nohup.out'

Waiting...
        localhost:30000: ..OK

Connect to localhost:30000

Initialize the First Replica Set:

$ monogo localhost:30000/admin
mongo> db.addUser( {user: "account", pwd:"password", roles:["userAdminAnyDatabase"] })

Add account done.

Restart the mongod:

Init DB(0), Port: 30000, Path: /home/id/data/mongodb-study/cluster/db/db-0
 $ mongod --dbpath /home/id/data/mongodb-study/cluster/db/db-0 --port 30000 --oplogSize 700 --logpath /home/id/data/mongodb-study/cluster/log/db-0.log --rest --replSet firstset --keyFile keyfile

Init DB(1), Port: 30001, Path: /home/id/data/mongodb-study/cluster/db/db-1
 $ mongod --dbpath /home/id/data/mongodb-study/cluster/db/db-1 --port 30001 --oplogSize 700 --logpath /home/id/data/mongodb-
study/cluster/log/db-1.log --rest --replSet firstset --keyFile keyfile

nohup: ignoring input and appending output to `nohup.out'
Init DB(2), Port: 30002, Path: /home/id/data/mongodb-study/cluster/db/db-2
 $ mongod --dbpath /home/id/data/mongodb-study/cluster/db/db-2 --port 30002 --oplogSize 700 --logpath /home/id/data/mongodb-
study/cluster/log/db-2.log --rest --replSet firstset --keyFile keyfile

nohup: ignoring input and appending output to `nohup.out'

Waiting...
        localhost:30000: .......OK
        localhost:30001: ...................................OK
        localhost:30002: .OK

Connect to localhost:30000

Initialize the First Replica Set:

$ monogo localhost:30000/admin
mongo> db.runCommand( {'replSetInitiate': {'_id': 'firstset', 'members': [{'host': 'localhost:30000', '_id': 1}, {'host': 'localhost:30001', '_id': 2}, {'host': 'localhost:30002', '_id': 3}]}} )

Result:
{u'info': u'Config now saved locally.  Should come online in about a minute.', u'ok': 1.0}

All is done.

server info:
 $ mongo localhost:30000/admin -u account -p password --eval 'printjson(rs.status())'

shutdown servers:
 $ mongo localhost:30000/admin -u account -p password --eval 'db.shutdownServer()'
 $ mongo localhost:30001/admin -u account -p password --eval 'db.shutdownServer()'
 $ mongo localhost:30002/admin -u account -p password --eval 'db.shutdownServer()'

2014年2月13日 星期四

翻來翻去的筆記: Proxy、VPN 和 SSH Tunnel、iptables port forwarding 混用

???

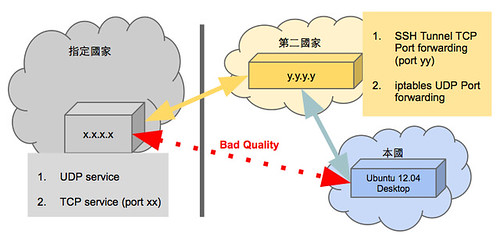
有想要翻出去,就會有人想要翻進去 XD 在指定國家內架一檯 server ,提供 proxy 、 VPN 服務,提供另一個國家連線,這是一個滿常見的做法,只是,如果國家網路掌控很威,那需要嘗試一些小手段:

前提:

自家機器 IP: localhost , 可用 local_port
指定國家 SERVER IP: x.x.x.x , target service port: xx
第二國家 SERVER IP: y.y.y.y , port forward: yy

SSH Tunnel

假設在指定國家內的 server 服務都是跑 TCP 時,如果直接連它還是不夠順,那就試試 Service over SSH tunnel 吧!

$ ssh -N -L local_port:x.x.x.x:xx x.x.x.x

如此一來,原先的服務就可以改連 localhost:local_port 代替 x.x.x.x:xx 服務。若 ssh tunnel 需要斷掉還能自動重連,在 Ubuntu 就是用 autossh ,把 ssh 指令換成 autossh 即可。若開機就執行,就寫在 /etc/rc.local,另外也用 key-pair 登入來取代密碼輸入:

$ sudo vim /etc/rc.local
su -s /bin/sh account -c 'autossh -N -f -L x.x.x.x:xx x.x.x.x'


有時候單純是 routing table 的問題,需要假藉另一個國家 y.y.y.y 當跳板,這時 TCP/UDP 都可以用 iptables 處理掉(-p tcp 或 -p udp),在 y.y.y.y 機器設定:

$ iptables -A PREROUTING -t nat -i eth0 -p tcp --dport yy -j DNAT --to x.x.x.x:xx
$ iptables -A FORWARD -p tcp -d x.x.x.x --dport xx -j ACCEPT


如此一來,連 y.y.y.y:yy 等同連到 x.x.x.x:xx 。

此外,純 TCP 在 Ubuntu 中還可以透過 redir 套件來處理,若 redir 已安裝好後,好處相較于 iptables 可以不需要 root 權限:

$ redir --lport yy --laddr=y.y.y.y --cport=xx --caddr=x.x.x.x

以 Proxy、VPN 這類服務而言,大概能搞的招數就這些吧,例如 Proxy over SSH tunnel 或甚至 SSH tunnel 是從第二國家建立,以此強制 routing 的改變。

iOS 開發筆記 - Xcode: Your application is being uploaded: request timeout / Application loader: Authenticating with the iTunes Store

your application is being uploaded

重灌 OSX ,試了一下發現這種現象 Orz 參考以下資料:

搞了一陣子憑證外,也裝了 Java 等等,當然,連 Application loader 也試過一輪,仍還沒改善,最後看到這則:
看完比較釋懷,然後,再試試 Application loader (with https.proxyPort=80) 幾次時,就意外通過了 XD 

大概耗掉兩小時的生命啊...人生啊~

[Linux] 架設 OpenVPN server 與 OpenVPN client 設定 @ Ubuntu 12.04

嘗過過 PPTP、L2TP 後,接著把玩 OpenVPN。此例 OpenVPN server 跟 OpenVPN client 都是 Ubuntu 12.04,其中一個是 server 版,另一個是 desktop 版。

Ubuntu Server: 安裝:

$ sudo apt-get install openvpn

Ubuntu Server: 憑証(順便把 OpenVPN client 做完):

$ cp -r /usr/share/doc/openvpn/examples/easy-rsa/2.0 /tmp/easy-rsa
$ cp /tmp/easy-rsa/openssl-1.0.0.cnf /tmp/easy-rsa/openssl.cnf
$ cd /tmp/easy-rsa/
$ source ./vars
$ ./clean-all
$ ./build-dh
$ ./pkitool --initca
$ ./pkitool --server server
$ ./build-key client
$ sudo su
# chown -R root:root /tmp/easy-rsa/keys/
# cd keys
# cp ca.crt server.crt server.key dh*.pem /etc/openvpn/


Ubuntu Server: 建立 /etc/openvpn/server.conf:

$ sudo cp /usr/share/doc/openvpn/examples/sample-config-files/server.conf.gz /etc/openvpn
$ sudo gunzip /etc/openvpn/server.conf.gz


Ubuntu Server: 設定 /etc/openvpn/server.conf (修改要跑的 port, ip, tcp or udp mode):

$ sudo vim /etc/openvpn/server.conf

Ubuntu Server: 讓 OpenVPN client 可以透過 OpenVPN server 連出去外網,其中 eth0 為 OpenVPN server 對外網卡、10.8.0.0/24 是預設的 OpenVPN 區段:

$ sudo vim /etc/openvpn/server.conf
push "redirect-gateway def1 bypass-dhcp"
push "dhcp-option DNS 8.8.8.8"

$ iptables -t nat -A POSTROUTING -s 10.8.0.0/24 -o eth0 -j MASQUERADE


Ubuntu Client: 安裝(從OpenVPN server 取得 ca.crt、client.crt、client.key):

$ sudo apt-get install openvpn
$ sudo cp -r /usr/share/doc/openvpn/examples/sample-config-files/ /etc/openvpn/example
$ sudo cp ca.crt client.crt client.key /etc/openvpn/example


Ubuntu Client: 設定(修改 server ip, port, tcp or udp mode):

$ sudo vim /etc/openvpn/example/client.conf

Ubuntu Client: 執行:

$ sudo openvpn --config /etc/openvpn/example/client.conf

Ubuntu Client: 開機執行:

$ sudo vim /etc/rc.local
openvpn --config /etc/openvpn/example/client.conf > /var/log/openvpn_client.log 2>&1 &


如果 OpenVPN client 還有提供 NAT 服務,那記得 iptables 要加上這段(tun0可以用 ifconfig查看):

VIF="tun0"
iptables -t nat -A POSTROUTING -o $VIF -j MASQUERADE

[Linux] /etc/rc.local : Syntax error: Bad fd number @ Ubuntu 12.04

最近把一堆工作塞在 /etc/rc.local ,發現有些指令明明在 command 下執行無誤,但搬進去 /etc/rc.local 後,測試 sudo sh /etc/rc.local 時,會收到 Syntax error: Bad fd number 訊息。

追了一下是因為系統 /bin/sh -> dash 的問題,所以一些語法要調整。

出錯 commands:

$ command >& /tmp/log &

改成:

$ command > /tmp/log 2>&1 &

iOS 開發筆記 - App Submission Feedback (Resolution Center) - non-consumable In-App Purchase(s)

最近一直收到 App Submission Feedback 信件轟炸,直到今天我終於搞懂這些 reviewer 的意思了 Orz 乃覺三十里!!

主因是使用了 non-consumable products,接著每次都收到一模模一樣樣的回應:

We found that your app offers In-App Purchase(s) that can be restored but does not include the required "Restore" feature to allow users to restore the previously purchased In-App Purchase(s), as specified in the Hosting Non-Consumable In-App Purchases section of the iTunes Connect Developer Guide:

"Users purchase non-consumable products only once, so if you host your own non-consumables, you need to provide a way for users to restore them. (You implement the restoreCompletedTransactions method in Store Kit to do so)."

To restore previously purchased In-App Purchase products, it would be appropriate to provide a "Restore" button and initiate the restore process when the "Restore" button is tapped by the user.

For more information on restoring In-App Purchases, see the section, Restoring Transactions, in the In-App Purchase Programming Guide.

A screenshot has been attached for your reference.

直到測試幾番後,終於搞懂他們在想什麼,也就是 non-consumable IAP products 必須提供類似 Restore button 才行,也不是沒實作,而是購買後才顯示出來,第一次還沒購買時,並不會顯示 Restore 字樣,就這樣一直調整 IAP 流程,每次調整都還是收到這樣的回應,直到把 non-consumable IAP products 一開始就加上 Restore button 時才通過。

2014年2月12日 星期三

[Linux] System Monitor / Load Indicator @ Ubuntu 12.04 desktop

indicator-multiload

印象中以前用 Ubuntu 10.04 時,常把 System Monitor Loading 顯示在右上角,但用了 Ubuntu 12.04 時,由於 Desktop GUI 更新後,遲遲找不到用法 XD 今天才把它解掉 Orz

$ sudo apt-get install indicator-multiload

接著在 Dash Home 搜尋 System 就可以看到 System Load indicator。

設定登入啟動:

$ cp /usr/share/applications/indicator-multiload.desktop ~/.config/autostart

2014年2月11日 星期二

[Linux] VPN L2TP client + DHCP server + NAT iptables @ Ubuntu 12.04 desktop

VPN client + DHCP server + NAt

試了一個小型的網路架構,原本打定把 AP 刷成 DD-WRT 後,即可將 WAN 設定成 VPN 走法,可惜 AP 實在不穩,就改拉一台 PC 來用。此例用一台 Ubuntu 12.04 Desktop 當作 VPN client,此外,為了讓其他 clients 不需要處理 VPN 的連線,因此,讓這台 Ubuntu desktop 又充當 DHCP server,藉以再接一台 AP 出來,供眾人使用,眾人只需要連上 AP 後,就可以走指定的 VPN 通道。

為此,先介紹 Ubuntu 12.04 這檯機器,需要兩張網卡,分別為 NIC 1 跟 NIC 2 ,以下則用 eth0 跟 eth1 區分,而 VPN 走的網卡是 ppp0 (可以連通 VPN 後,用 ifconfig 查看)。其中 eth0 的網路是自動取得 IP 的。

設定 eth1 網卡:

$ sudo vim /etc/network/interfaces
auto eth1
iface eth1 inet static
address 192.168.168.1
netmask 255.255.255.0
network 192.168.168.0

broadcast 192.168.168.255


架設 DHCP server:

$ sudo apt-get install isc-dhcp-server
$ sudo vim /etc/default/isc-dhcp-server
INTERFACES="eth1"
$ sudo vim /etc/dhcp/dhcpd.conf
option domain-name "example.org";
option domain-name-servers 8.8.8.8;
subnet 192.168.168.0 netmask 255.255.255.0 {
  range dynamic-bootp 192.168.168.50 192.168.168.100;
  option routers 192.168.168.1;
}
$ sudo service isc-dhcp-server restart


設定 NAT 與 iptables:

$ echo "1" > /proc/sys/net/ipv4/ip_forward
$ sudo vim /etc/rc.local

echo "1" | tee /proc/sys/net/ipv4/ip_forward

OIF="eth0"
VIF="ppp0"
IIF="eth1"
INNET="192.168.168.0/24"

iptables -F
iptables -X
iptables -t nat -F
iptables -t nat -X

iptables -A INPUT -i lo -j ACCEPT
iptables -A OUTPUT -o lo -j ACCEPT

iptables -t nat -A POSTROUTING -o $OIF -s $INNET -j MASQUERADE
iptables -t nat -A POSTROUTING -o $VIF -j MASQUERADE


如此一來,即可收工。

[Linux] VPN L2TP client mode @ Ubuntu 12.04 Desktop

持續惡搞網路中,這次換把一台 Ubuntu desktop 當成 VPN Client 去連線。

$ sudo apt-add-repository ppa:werner-jaeger/ppa-werner-vpn
$ sudo apt-get update
$ sudo apt-get install l2tp-ipsec-vpn

註:若採用 Ubuntu 12.04 內建的 apt-get source list 安裝 l2tp-ipsec-vpn 後,卻連不上 :P

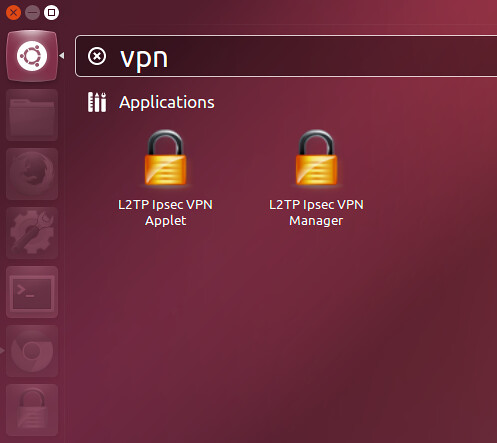
接著到左上角的 Dash Home 搜尋 VPN 來用:

vpn_client_setting_0

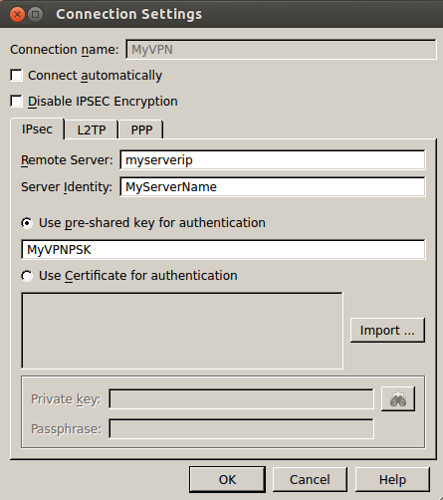
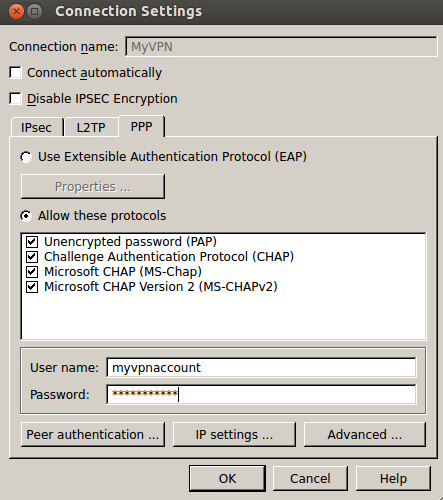
接著,就可以依序填寫資料:

vpn_client_setting_1

vpn_client_setting_2

填寫完記得按 "OK" 與 "Close" 後,再去右上角的 L2TP Ipsec VPN Applet 去點選連線囉!

如果,進行的不順利,可以試著跑去 VPN Server 上,查看 logs ,而 logs 預設沒有啟動,要去修改:

$ sudo vim /etc/ipsec.conf
config setup
  # ...
  # Use this to log to a file, or disable logging on embedded systems (like openwrt)
  plutostderrlog=/var/log/ipsec.log

$ sudo touch /var/log/ipsec.log
$ sudo service ipsec restart
ipsec_setup: Stopping Openswan IPsec...
ipsec_setup: Starting Openswan IPsec 2.6.37...
$ sudo tail -f /var/log/ipsec.log
added connection description "L2TP-PSK-noNAT"
listening for IKE messages
adding interface eth0/eth0 x.x.x.x:500
adding interface eth0/eth0 x.x.x.x:4500
adding interface lo/lo 127.0.0.1:500
adding interface lo/lo 127.0.0.1:4500
loading secrets from "/etc/ipsec.secrets"
loading secrets from "/var/lib/openswan/ipsec.secrets.inc"
...


如此一來,有人連線就會噴訊息囉。

2014年2月7日 星期五

[Linux] VPN (L2TP) 與使用 iptable 設定 Port forward @ Ubuntu 12.04

這樣的標題不是很恰當,但我暫時想不到好的方式。

使用情境:

  • 有 A, B 兩檯在不同國家的機器
  • 對 A 機器而言,無法直接連到 B 機器之國家內的服務
  • 解法透過 B 機器架設 VPN 服務,讓 A 透過 VPN 進入到 B 機器所在的國家網路
  • 這兩個國家的網路直連很慢,恰好 C 機器所在的國家,對這兩國連線都不錯

很繞口,但事實就擺在眼前 XD 這時候在 B 機器已經架好 VPN 服務了,從 A 也能夠連到,但是速度表現不佳,所以想要繞道從 C 機器所在的國家進去。

這時 C 機器就只需做 port forwarding 來處理即可,共有 UDP 500, 1701, 450 port 要處理:

$ iptables -A PREROUTING -t nat -i eth0 -p udp --dport 500 -j DNAT --to B_SERVER_IP:500
$ iptables -A PREROUTING -t nat -i eth0 -p udp --dport 4500 -j DNAT --to B_SERVER_IP:4500
$ iptables -A PREROUTING -t nat -i eth0 -p udp --dport 1701 -j DNAT --to B_SERVER_IP:1701
$ iptables -A FORWARD -p udp -d B_SERVER_IP --dport 500 -j ACCEPT
$ iptables -A FORWARD -p udp -d B_SERVER_IP --dport 4500 -j ACCEPT
$ iptables -A FORWARD -p udp -d B_SERVER_IP --dport 1701 -j ACCEPT

2014年2月6日 星期四

D-LINK DIR-632 從 DD-WRT 刷回原廠 firmware

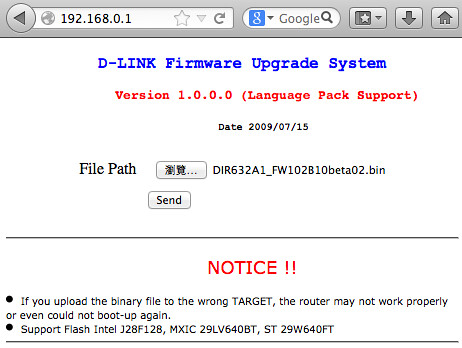
back_to_firmware

上回一拿到 DIR-632 後,馬上刷成 DD-WRT ,連原廠的都還沒測。現在想測回廠 firmware ,才發現需要找一下祕技才能 XD 就順便筆記一下吧。

關鍵之處,莫過於 D-LINK 機台有提供特別的刷 firmware 的方式,透過這招才刷回去:
  1. 首先,先下載 D-LINK DIR-632 官方韌體 (DIR632A1_FW102B10beta02.bin)
  2. 拔掉 AP 電源線,用筆壓出 Reset 鍵
  3. 持續按著 Reset 鍵,把 AP 電源線接上
  4. 當 AP 電源燈號閃爍時,即可把 Reset 放開
  5. 把電腦接上網路孔 1 ,並且手動設定電腦 IP 為 192.168.0.2/255.255.255.0 後,用 Firefox 瀏覽器瀏覽 http://192.168.0.1 (此為 AP 預設 IP)
  6. 上傳 DIR632A1_FW102B10beta02.bin ,可觀察電源燈是否持續在閃爍,若上傳一陣子後不閃爍時,即代表完成(可以透過 ping 192.168.0.1 觀察 AP 狀態)
其他心得:
  • 不知為何用 Chrome Browser 時,遲遲無法上傳成功 :P 就改用 Firefox 了

2014年2月5日 星期三

[MongoDB] 透過 MapReduce 進行 Collections Join @ Ubuntu 12.04

使用 NOSQL 時,其先天設計無法提供像 MySQL Table Joins 等招數,此時的解法就是把兩個 tables 倒進一張 table 來解決。

以 MongoDB command line 操作,新增資料:

> use mydb
switched to db mydb
> db.t1.insert({"data":1, "data2":2, "data3":3})
> db.t1.insert({"data":4, "data2":5, "data3":6})
> db.t1.insert({"data":7, "data2":8, "data3":9})
> db.t1.find()
{ "_id" : ObjectId("52f1f9c7bf6317bb2615b216"), "data" : 1, "data2" : 2, "data3" : 3 }
{ "_id" : ObjectId("52f1f9cbbf6317bb2615b217"), "data" : 4, "data2" : 5, "data3" : 6 }
{ "_id" : ObjectId("52f1f9cebf6317bb2615b218"), "data" : 7, "data2" : 8, "data3" : 9 }
> db.t2.insert({"data4":3, "data5":2, "data6":1})
> db.t2.insert({"data4":6, "data5":5, "data6":4})
> db.t2.insert({"data4":9, "data5":8, "data6":7})
> db.t2.find()
{ "_id" : ObjectId("52f1f9d4bf6317bb2615b219"), "data4" : 3, "data5" : 2, "data6" : 1 }
{ "_id" : ObjectId("52f1f9d7bf6317bb2615b21a"), "data4" : 6, "data5" : 5, "data6" : 4 }
{ "_id" : ObjectId("52f1f9dbbf6317bb2615b21b"), "data4" : 9, "data5" : 8, "data6" : 7 }


定義 t1 跟 t2 的 mapper function:

> t1_map = function() {
emit(this.data3, { "data": this.data, "data2": this.data2, "data3": this.data3 });
}
> t2_map = function() {
emit(this.data4, { "data4": this.data4, "data5": this.data5, "data6": this.data6 });
}


定義 reducer function:

> reducer = function(key, values){
var result = {} ;
values.forEach( function(value){
var field;
for(field in value)
if( value.hasOwnProperty(field) )
result[field] = value[field];
});
return result;
}


進行 map-reduce:

> db.tmp.drop()
true
> db.t1.mapReduce(t1_map, reducer , {"out":{"reduce":"tmp"}} )
{
        "result" : "tmp",
        "timeMillis" : 10,
        "counts" : {
                "input" : 3,
                "emit" : 3,
                "reduce" : 0,
                "output" : 3
        },
        "ok" : 1,
}
> db.tmp.find()
{ "_id" : 3, "value" : { "data" : 1, "data2" : 2, "data3" : 3 } }
{ "_id" : 6, "value" : { "data" : 4, "data2" : 5, "data3" : 6 } }
{ "_id" : 9, "value" : { "data" : 7, "data2" : 8, "data3" : 9 } }
> db.t2.mapReduce(t2_map, reducer , {"out":{"reduce":"tmp"}} )
{
        "result" : "tmp",
        "timeMillis" : 6,
        "counts" : {
                "input" : 3,
                "emit" : 3,
                "reduce" : 0,
                "output" : 3
        },
        "ok" : 1,
}
> db.tmp.find()
{ "_id" : 3, "value" : { "data4" : 3, "data5" : 2, "data6" : 1, "data" : 1, "data2" : 2, "data3" : 3 } }
{ "_id" : 6, "value" : { "data4" : 6, "data5" : 5, "data6" : 4, "data" : 4, "data2" : 5, "data3" : 6 } }
{ "_id" : 9, "value" : { "data4" : 9, "data5" : 8, "data6" : 7, "data" : 7, "data2" : 8, "data3" : 9 } }


以上的概念就是 t1 採用 data3 作為 join key,而 t2 採用 data4 ,分別跑 map-reduce 後儲存在 tmp 這張表(collection),如此 tmp 即為常用的 SQL Join 結果。

以上須留意的是跑 map-reduce 時,要指定 out 為 reduce 形態,細節可以在 out Options 查看,可分成 replace, reduce, merge ,若沒指定為 reduce 的話,上述最後結果僅有 t2 的資料。

此外,在 pymongo 上也能達成,有興趣可以參考 map-reduce-join.py,寫的彈性一點,所以閱讀性較差,用法:

$ python map-reduce-join.py --host localhost --database mydb --reset-result --result tmp --show-result --select-out-1 data data2 data3 --join-key-1 data3 --select-out-2 data4 data5 data6 --join-key-2 data4

結果:

Mapper 1 Code:
                function() {
                        emit(this.data3, {"data": this.data, "data2": this.data2, "data3": this.data3});
                }

Reducer 1 Code:
                function(key, values) {
                        var out = {};
                        values.forEach( function(value) {
                                for ( field in value )
                                        if( value.hasOwnProperty(field) )
                                                out[field] = value[field];

                        });
                        return out
                }

{u'counts': {u'input': 3, u'reduce': 0, u'emit': 3, u'output': 3}, u'timeMillis': 34, u'ok': 1.0, u'result': u'tmp'}
{u'_id': 3.0, u'value': {u'data': 1.0, u'data3': 3.0, u'data2': 2.0}}
{u'_id': 6.0, u'value': {u'data': 4.0, u'data3': 6.0, u'data2': 5.0}}
{u'_id': 9.0, u'value': {u'data': 7.0, u'data3': 9.0, u'data2': 8.0}}
Mapper 2 Code:
                function() {
                        emit(this.data4, {"data4": this.data4, "data5": this.data5, "data6": this.data6});
                }

Reducer 2 Code:
                function(key, values) {
                        var out = {};
                        values.forEach( function(value) {
                                for ( field in value )
                                        if( value.hasOwnProperty(field) )
                                                out[field] = value[field];
                        });
                        return out
                }

{u'counts': {u'input': 3, u'reduce': 0, u'emit': 3, u'output': 3}, u'timeMillis': 5, u'ok': 1.0, u'result': u'tmp'}
{u'_id': 3.0, u'value': {u'data5': 2.0, u'data4': 3.0, u'data6': 1.0, u'data': 1.0, u'data3': 3.0, u'data2': 2.0}}
{u'_id': 6.0, u'value': {u'data5': 5.0, u'data4': 6.0, u'data6': 4.0, u'data': 4.0, u'data3': 6.0, u'data2': 5.0}}
{u'_id': 9.0, u'value': {u'data5': 8.0, u'data4': 9.0, u'data6': 7.0, u'data': 7.0, u'data3': 9.0, u'data2': 8.0}}