2014年1月28日 星期二

D-LINK DIR-632 刷 DD-WRT

D-Link DIR 632

最近持續惡搞ing,所以敗了一台 D-LINK DIR-632 ,理由不是他有 8 ports ,而是單純查 DD-WRT 有 supported 的關係 XD 且看在無線範圍有 50m 所以就用了這台。

不過,下載的韌體卻無法刷機,稍微 google 了一下,發現只要修改一個 byte 即可

$ vim factory-to-ddwrt_NA.bin

接著按 g 再按 a ,就可以切到檔尾,把 1 改成 2 即可:

A101-AR7242-RT-100324-01 => A101-AR7242-RT-100324-02

[Linux] 架設 VPN Server (PPTP/IPSEC/L2TP) @ Ubuntu 12.04

研究上需要架設一台 VPN,於是架了 PPTP 後,也順便把 IPSEC、L2TP 補齊。流程:

安裝需要的軟體:

$ sudo apt-get install pptpd openswan xl2tpd ppp

PPTP:

$ sudo vim /etc/pptpd.conf
# (Recommended)
localip 192.168.0.1
remoteip 192.168.0.234-238,192.168.0.245

$ sudo vim /etc/ppp/pptpd-options
# …
ms-dns 8.8.8.8
# …
logfile /var/log/pptpd.log

$ sudo touch /var/log/pptpd.log

$ sudo vim /etc/ppp/chap-secrets
# PPTP
username pptpd password *
# L2TP
username l2tpd password *

其中 username, password 都是明碼


IPSEC/L2TP:

$ sudo su
$ echo "net.ipv4.ip_forward = 1" | tee -a /etc/sysctl.conf
$ echo "net.ipv4.conf.all.accept_redirects = 0" | tee -a /etc/sysctl.conf
$ echo "net.ipv4.conf.all.send_redirects = 0" | tee -a /etc/sysctl.conf
$ for vpn in /proc/sys/net/ipv4/conf/*; do echo 0 > $vpn/accept_redirects; echo 0 > $vpn/send_redirects; done
$ sysctl -p


$ sudo vim /etc/rc.local
for vpn in /proc/sys/net/ipv4/conf/*; do echo 0 > $vpn/accept_redirects; echo 0 > $vpn/send_redirects; done
iptables --table nat --append POSTROUTING --jump MASQUERADE


$ sudo vim /etc/ipsec.conf
conn L2TP-PSK-NAT
    rightsubnet=vhost:%priv
    also=L2TP-PSK-noNAT

conn L2TP-PSK-noNAT
    authby=secret
    pfs=no
    auto=add
    keyingtries=3
    rekey=no
    ikelifetime=8h
    keylife=1h
    type=transport
    left=SERVER_IP
    leftprotoport=17/1701
    right=%any
    rightprotoport=17/%any


$ sudo vim /etc/ipsec.secrets
SERVER_IP  %any:  PSK "L2TP_PRIVATE_KEY"


$ sudo vim /etc/xl2tpd/xl2tpd.conf
[global]
ipsec saref = yes

[lns default]
ip range = 10.1.2.2-10.1.2.255
local ip = 10.1.2.1
;require chap = yes
refuse chap = yes
refuse pap = yes
require authentication = yes
ppp debug = yes
pppoptfile = /etc/ppp/options.xl2tpd
length bit = yes


$ sudo vim /etc/ppp/options.xl2tpd
require-mschap-v2
ms-dns 8.8.8.8
asyncmap 0
auth
crtscts
lock
hide-password
modem
debug
name l2tpd
proxyarp
lcp-echo-interval 30
lcp-echo-failure 4


重啟相關服務:

$ sudo service pptpd restart
Restarting PPTP:
Stopping PPTP: pptpd.
Starting PPTP Daemon: pptpd.

$ sudo service ipsec restart
ipsec_setup: Stopping Openswan IPsec...
ipsec_setup: Starting Openswan IPsec 2.6.37...
ipsec_setup: No KLIPS support found while requested, desperately falling back to netkey
ipsec_setup: NETKEY support found. Use protostack=netkey in /etc/ipsec.conf to avoid attempts to use KLIPS. Attempting to continue with NETKEY

$ sudo service xl2tpd restart
Restarting xl2tpd: xl2tpd.


服務驗證:

$ sudo ipsec verify
Checking your system to see if IPsec got installed and started correctly:
Version check and ipsec on-path                                 [OK]
Linux Openswan U2.6.37/K3.2.0-58-generic (netkey)
Checking for IPsec support in kernel                            [OK]
 SAref kernel support                                           [N/A]
 NETKEY:  Testing XFRM related proc values                      [OK]
        [OK]
        [OK]
Checking that pluto is running                                  [OK]
 Pluto listening for IKE on udp 500                             [OK]
 Pluto listening for NAT-T on udp 4500                          [OK]
Two or more interfaces found, checking IP forwarding            [OK]
Checking NAT and MASQUERADEing                                  [OK]
Checking for 'ip' command                                       [OK]
Checking /bin/sh is not /bin/dash                               [WARNING]
Checking for 'iptables' command                                 [OK]
Opportunistic Encryption Support                                [DISABLED]

[OSX] 使用 Mac OS X 內建 Mail app 收信筆記(UTF-8, Auto bcc) @ Mac 10.9

約莫用了快一個月收信了,其中 mail server 是 Microsoft Exchange 系統,有一些筆記:

自動密件自己(auto bcc):

新增:
$ defaults write com.apple.mail UserHeaders "{'Bcc'='myemail@domain.local’;}”


顯示:
$ defaults read com.apple.mail UserHeaders
{
    Bcc = "myemail@domain.local";
}

刪除:
$ defaults delete com.apple.mail UserHeaders


強制 UTF-8 編碼:

由於其他人常用 Outlook 收信,會發現他們的 outlook 無法判斷編碼(但 Webmail 顯示正常),解法就是在信件內容加上 UTF-8 特殊符號即可,例如擺在簽名檔等:

✉ : email@local.com

2014年1月26日 星期日

[OSX] 使用 ffmpeg 將 mp4 list 依序串接起來 (ffmpeg concat) @ Mac OS X 10.9

最近研究了一下對岸的影音播放,發現有的服務實作時,將一部短片以固定時間進行切割,這樣在服務眾人或是走 P2P 時,可以很方便進行分流,然而,若要把它弄成一個檔案,那就得花點功夫了,好家在用 ffmpeg 就可以搞定囉:How to concatenate (join, merge) media files

以 mp4 為例:

$ ffmpeg -i file1.mp4 -c copy -bsf:v h264_mp4toannexb -f mpegts '/tmp/tmp1'
$ ffmpeg -i file2.mp4 -c copy -bsf:v h264_mp4toannexb -f mpegts '/tmp/tmp2'
$ ffmpeg -i "concat:/tmp/tmp1|/tmp/tmp2" -c copy -bsf:a aac_adtstoasc output.mp4


接著,嫌太慢就寫個 script 來處理 XDD

$ python ffmpeg-concat-mp4-files.py --files file1.mp4 file2.mp4 --output out.mp4
$ python ffmpeg-concat-mp4-files.py --m3u /tmp/m3u.list --output out.mp4


其中 m3u 是支援 http 的描述,也就是會把網路上的東西用 wget 下載回 tmp 區。因此 ffmpeg-concat-mp4-files.py 需要有 ffmpeg 跟 wget 指令才能。

2014年1月25日 星期六

[Firefox] 把玩 Firefox 擴充套件 - 以 youku_enable_fx 為例

這周被派去研究如何取得對岸影片等問題,解法不就 Proxy、VPN 等,過程中有看到一個很特別的套件:lonelyeagle / youku_enable_fx ,這是 Firefox 擴充套件。

說到 Firefox 嘛,對我而言,很妙地也接近"退役"階段,大概我離開前端開發好一陣子,除了不需用 firebug 外,連現況 Google Chrome 的開發者工具已經非常夠用,所以 Firefox 就接近被我當作"測試用途"的瀏覽器,包含 cookie、history 都設定成不儲存,十分方便。

研究了一下 youku_enable_fx 的做法,其實概念就兩點:

  • 對特定 url requests 攔截
  • 特定 requests 導向指定的 proxy server

如此,就可能巧妙地"欣賞"對岸鎖 IP 的影片了。

至於製作 Firefox extension 的部分,這個文件寫的滿清楚的:如何製作 Firefox 擴充套件。因此,只需把 lonelyeagle / youku_enable_fx 取出後,進行 zip 壓縮即可。

$ cd /tmp
$ git clone https://github.com/lonelyeagle/youku_enable_fx.git
$ cd youku_enable_fx

$ zip -r youku_enable_fx.xpi install.rdf chrome.manifest defaults/* chrome/*
  adding: install.rdf (deflated 51%)
  adding: chrome.manifest (deflated 52%)
  adding: defaults/preferences/ (stored 0%)
  adding: defaults/preferences/prefs.js (deflated 50%)
  adding: chrome/content/ (stored 0%)
  adding: chrome/content/ff-overlay.js (deflated 64%)
  adding: chrome/content/ff-overlay.xul (deflated 46%)
  adding: chrome/locale/ (stored 0%)
  adding: chrome/locale/en-US/ (stored 0%)
  adding: chrome/locale/en-US/overlay.dtd (deflated 62%)
  adding: chrome/locale/en-US/overlay.properties (deflated 25%)
  adding: chrome/skin/ (stored 0%)
  adding: chrome/skin/overlay.css (deflated 57%)
  adding: chrome/skin/unblockPlayer.png (deflated 0%)


產出 youku_enable_fx.xpi 啦,把他拖進 firefox 即可安裝,安裝完記得重啟 firefox 才可以啟用。

enable_youku_fx

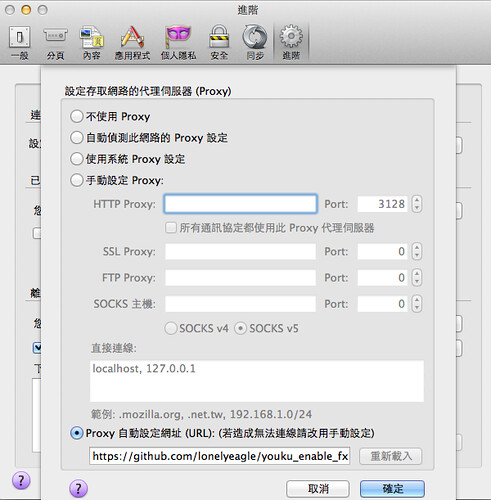
安裝完 youku_enable_fx.xpi 後,在調整 proxy 位置:

  • https://github.com/lonelyeagle/youku_enable_fx/raw/master/youku_enable.pac
  • http://yo.uku.im/proxy.pac

如此一來,就可以用了 :P

2014年1月24日 星期五

圓剛 H830M 三頻電視棒

H830M-01

準備回家過年了,剛好老鄉只有一台電視可用,想著想著,就乾脆買了一隻電視棒來用 XD 原本還想在 raspberry pi 架個 streaming server 的,也著手找尋有提供 Linux driver 的電視棒,但不知不覺發現有支援 Mac OS X 的,剛好有特價!?不知不覺手就滑了 XDDD

試了一下,這支電視棒的最大缺點可能是沒有遙控器 XD 但如果是重度的 Apple 派,或許可以用 Apple Remote ?

H830M-02

至於優點就是三頻(數位電視、有線電視、廣播)、體積小、支援 Mac OS X 吧!另外有送一隻小天線。哪天在外頭沒網路又想看電視、聽廣播時,可以拿出來用用吧!


H830M-04

[MongoDB] 使用 PyMongo 把玩 MapReduce @ Ubuntu 12.04

稍微接觸了一下 MongoDB 後,對此感到無比的興奮?與 Hadoop 相比,感覺上手度滿高的,不過,使用 PyMongo 的情況下,還是需要比較適合熟悉 Javascript 的人,因為 Mapper 跟 Reducer 的撰寫仍是用 Javascript 的,更正確來說是 BSON's JavaScript code type.

既然是 MapReduce,那就先來個 word count 吧!說真的,word count 也是我學 Hadoop 時跑的第一個範例。

簡單試了一下(文字來源:Taiwan wiki - Names):

$ python import.py -
{"field":"There are various names for the island of Taiwan in use today, derived from explorers or rulers by each particular period. The former name Formosa (福爾摩沙) dates from 1544, when Portuguese sailors sighted the main island of Taiwan and named it Ilha Formosa, which means \"Beautiful Island\".[21] In the early 17th century, the Dutch East India Company established a commercial post at Fort Zeelandia (modern Anping, Tainan) on a coastal islet called \"Tayouan\" in the local Siraya language; the name was later extended to the whole island as \"Taiwan\".[22] Historically, \"Taiwan\" has also been written as 大灣, 臺員, 大員, 臺圓, 大圓 and 臺窩灣."}
{"field":"The official name of the state is the \"Republic of China\"; it has also been known under various names throughout its existence. Shortly after the ROC's establishment in 1912, while it was still located on the Asian mainland, the government used the abbreviation \"China\" (\"Zhongguó\") to refer to itself. During the 1950s and 1960s, it was common to refer to it as \"Nationalist China\" (or \"Free China\") to differentiate it from \"Communist China\" (or \"Red China\").[23] It was present at the UN under the name \"China\" until 1971, when it lost its seat to the People's Republic of China. Since then, the name \"China\" has been commonly used internationally to refer only to the People's Republic of China.[24] Over subsequent decades, the Republic of China has become commonly known as \"Taiwan\", after the island that composes most of its territory. The Republic of China participates in most international forums and organizations under the name \"Chinese Taipei\" due to diplomatic pressure from the PRC. For instance, it is the name under which it has competed at the Olympic Games since 1984, and its name as an observer at the World Health Organization.[25]"}
Import:  2
[ObjectId('52e265a69c3fe514be2534fe'), ObjectId('52e265a69c3fe514be2534ff')]


$ python map-reduce-word-count.py --show-result --delete-result
Collection(Database(MongoClient('localhost', 27017), u'db'), u'tmp_2014-01-24_131025')
{u'_id': u'1544', u'value': {u'count': 1.0}}
{u'_id': u'17th', u'value': {u'count': 1.0}}
{u'_id': u'1912', u'value': {u'count': 1.0}}
{u'_id': u'1950s', u'value': {u'count': 1.0}}
{u'_id': u'1960s', u'value': {u'count': 1.0}}
{u'_id': u'1971', u'value': {u'count': 1.0}}
{u'_id': u'1984', u'value': {u'count': 1.0}}
{u'_id': u'21', u'value': {u'count': 1.0}}
{u'_id': u'22', u'value': {u'count': 1.0}}
{u'_id': u'23', u'value': {u'count': 1.0}}
{u'_id': u'24', u'value': {u'count': 1.0}}
{u'_id': u'25', u'value': {u'count': 1.0}}
{u'_id': u';', u'value': {u'count': 1.0}}
{u'_id': u'Anping', u'value': {u'count': 1.0}}
{u'_id': u'Asian', u'value': {u'count': 1.0}}
{u'_id': u'Beautiful', u'value': {u'count': 1.0}}
{u'_id': u'China', u'value': {u'count': 12.0}}
{u'_id': u'Chinese', u'value': {u'count': 1.0}}
{u'_id': u'Communist', u'value': {u'count': 1.0}}
{u'_id': u'Company', u'value': {u'count': 1.0}}
{u'_id': u'During', u'value': {u'count': 1.0}}
{u'_id': u'Dutch', u'value': {u'count': 1.0}}
{u'_id': u'East', u'value': {u'count': 1.0}}
{u'_id': u'For', u'value': {u'count': 1.0}}


其中 mongodb-study/blob/master/tools/import.py 只是把資料輸入到 mongodb 中,預設 database = db, collection = test。比較重要的 mapper, reducer 則是寫在 mongodb-study/blob/master/tools/map-reduce-word-count.py 程式中。

而 map-reduce-word-count.py 中,比較重要的則是 mapper 與 reducer 的定義,雖然是用 pymongo ,但這邊仍是用 Javascript 描述的,這大概是 pymongo 的最大缺點吧?印象中翻到 Java 版的 MongoDB 操作,可直接用 Java 來撰寫,這點影響還滿大的,簡言之,用 Pymongo 要撰寫 mapper、reducer 就是得先會一點 Javascript 才行。

使用 pymongo 撰寫 mapper 的方式,有一個小提醒就是 this.field 等於可以取到原先 input 的資料,但是,這邊的 this.field 需要強制轉型,這樣才能接著用 split 切字出來,另外,也可以自定 func 來呼叫使用,如此一來,就變成只剩字串處理的技巧了 :)

mapper = Code (
"""
function() {
var func = {
'author':function() {
return 'changyy';
}
};
(“”+this.field).split(/[\s\[\],\(\)"\.]+/).forEach(function(v){
//emit(func.author(), 1 );
if(v && v.length )
emit(v, {'count':1});
} );
}
"""
)


reducer = Code(
"""
function(key, value) {
var total = 0;
for(var i = 0 ; i < value.length ; ++i ) {
total += value[i].count;
}
return {'count':total};
}
"""
)

[Linux] Nginx 提供 localhost 不受 authorization 限制 @ Ubuntu 12.004

最近用 nginx 架設服務時,採用 HttpAuthBasicModule 限制存取時必須認證才行,然而,偶爾還是希望某些特定 IP 可以不受限制,研究一下是可行的:

http://nginx.org/en/docs/http/ngx_http_core_module.html#satisfy

syntax: satisfy all | any;
default:
satisfy all;
context: http, server, location

Allows access if all (all) or at least one (any) of the ngx_http_access_module, ngx_http_auth_basic_module or ngx_http_auth_request_module modules allow access.


因此,就只需在特定的 location 中,加上上述敘述即可:

location ^~ /service/ {
satisfy any;

# ngx_http_access_module
allow 127.0.0.1/32;
deny all;

# ngx_http_auth_basic_module
auth_basic "Restricted Area";
auth_basic_user_file    htpasswd;

# …
}

2014年1月23日 星期四

阿里雲初體驗

AYCloud00

中國發展快速,至今共有「阿里雲」、「騰訊雲」、「沃雲」等,先來試試阿里雲吧!目前可以申請五天免費試用,並且綁在淘寶帳號,當然,最重要的金流都弄妥了。

AYCloud10

AYCloud11

申請測試需要一點時間,過程中可能會有電話照會等,作業系統共有 Aliyun linux、CentOS 、Debian、Ubuntu、Windows Server 可以選擇,此例採用 Ubuntu 12.04 64Bit,最後建立起的機器 root 帳密會用簡訊通知,最便宜的一檯是一個月 55 RMB,更多細節可直接去逛逛 http://buy.aliyun.com/。未來就只需在阿里雲網站登入->我的阿里雲 -> 管理控制台:

AYCloud02

接著從「雲服務器ECS」進去:

AYCloud03

界面面跟 AWS EC2 的配置差不多,左邊選單,點一點可以看到目前運行列表:

AYCloud04

AYCloud05

接著會顯示"遠端登入"方式:

AYCloud06

顯示硬碟資訊:

AYCloud07

對硬碟進行 snapshot:

AYCloud08

顯示製作進度:

AYCloud09

disk snapshot 做完後,可以在做鏡像管理(開啟新機器時的選擇鏡像來源):

AYCloud10

AYCloud11

至於網路方面,從臺北 ping 青島的機器,晚上大概 290 ms 的反應時間,早上約 410ms。由於免費試用網路速度最高只能拉到 5Mbps ,若願意在測試的話,可以再加錢,最多調到 200Mbs。

AYCloud12

此外,阿里雲還有提供「雲盾」服務:

AYClod12

AYCloud13

AYCloud14

AYCloud15

以上就是簡單的把玩。

2014年1月22日 星期三

[Linux] MongoDB 與 PyMongo 初體驗 @ Ubuntu 12.04, Linode

架設:

http://docs.mongodb.org/manual/tutorial/install-mongodb-on-ubuntu/

$ sudo apt-key adv --keyserver hkp://keyserver.ubuntu.com:80 --recv 7F0CEB10
$ echo 'deb http://downloads-distro.mongodb.org/repo/ubuntu-upstart dist 10gen' | sudo tee /etc/apt/sources.list.d/mongodb.list
$ sudo apt-get update

http://www.mongodb.org/downloads
$ sudo apt-get install mongodb-10gen=2.4.9
$ echo "mongodb-10gen hold" | sudo dpkg --set-selections

$ sudo service mongodb restart
mongodb stop/waiting
mongodb start/running, process ######

$ mongo
MongoDB shell version: 2.4.9
connecting to: test
Welcome to the MongoDB shell.
For interactive help, type "help".
For more comprehensive documentation, see
        http://docs.mongodb.org/
Questions? Try the support group
        http://groups.google.com/group/mongodb-user


防火牆存取限制:

$ sudo iptables --list-rules
-P INPUT ACCEPT
-P FORWARD ACCEPT
-P OUTPUT ACCEPT

$ sudo vim /etc/init.d/iptables-rule.sh
#!/bin/sh

# BIN
BIN_IPTABLES=`which iptables`

# reset rules
$BIN_IPTABLES -F
$BIN_IPTABLES -X
$BIN_IPTABLES -Z

# init policies
#$BIN_IPTABLES -P INPUT DROP
#$BIN_IPTABLES -P OUTPUT ACCEPT
#$BIN_IPTABLES -P FORWARD ACCEPT

# mongo db
$BIN_IPTABLES -A INPUT -j ACCEPT -p tcp --destination-port 27017 -s 127.0.0.1,IP1,IP2,IP3
# mongo db drop all
$BIN_IPTABLES -A INPUT -j REJECT -p tcp --destination-port 27017

$ sudo chmod 775 /etc/init.d/iptables-rule.sh
$ sudo update-rc.d -f iptables-rule.sh defaults


一些 mongo 常用指令:

顯示所有的 databases (SQL: show databases)
> show dbs

使用指定 collection (SQL: use dbname)
> use dbname

顯示目前 databases 中的所有 collections (SQL: show tables)
> show collections

更多對照指令:
SQL to MongoDB Mapping Chart
PHP: SQL to Mongo Mapping Chart


安裝 pymongo 套件:

$ git clone git://github.com/mongodb/mongo-python-driver.git pymongo
$ cd pymongo
$ sudo python setup.py install


使用 pymongo 新增範例:

from pymongo import MongoClient

client = MongoClient()
database = client[‘dbname’] # SQL: Database Name
collection = database[‘table’]   # SQL: Table Name

item = {"author":"changyy"}
collection.insert(item)


[SQL] MySQL: Insert or update @ Ubuntu 12.04

最近把玩 MySQL 了一下,想要做一些 daily result snapshot 的部分,想說就把結果存到一張表中使用,這樣下去就真的變成純玩 SQL 的生活了 XD

此時就會碰到把新增及更新的需求,好家在 MySQL 真威,筆記一下:

http://dev.mysql.com/doc/refman/5.1/en/insert-on-duplicate.html

mysql> INSERT INTO TableName ( Filed1, Filed2 ) VALUES ( 'Value1', 'Value2' ) ON DUPLICATE KEY UPDATE Field1=VALUES(Field1);

不過這次玩的比較多一點:

mysql> INSERT INTO TableName ( Filed1, Filed2 ) 

 SELECT Field1, Field2 FROM TableName2 

 ON DUPLICATE KEY UPDATE Field1=VALUES(Field1);

2014年1月21日 星期二

[Linux] CodeIgniter on Nginx : site_url, base_url use https @ Ubuntu 12.04

在 nginx 上跑 CodeIgniter 時,使用 site_url 、 base_url 卻會產生 https 的連結出來,此現象是因為 CodeIgniter 是透過 $_SERVER['HTTPS'] 判斷所造成的,解法就是設定 Nginx PHP 的環境參數(fastcgi_param  HTTPS  off),在 /etc/nginx/fastcgi_params 可看到這樣的定義:

fastcgi_param  HTTPS  $https;

暫時偷懶解法 (/etc/nginx/sites-available/default):

location ~ \.php$ {
fastcgi_split_path_info ^(.+\.php)(/.+)$;
fastcgi_pass 127.0.0.1:9000;
fastcgi_index index.php;
include fastcgi_params;
fastcgi_param  HTTPS off;
}


2014年1月18日 星期六

iOS 開發筆記 - The app references non-public selectors in Payload/.app/: id

這次碰到的問題是使用 Facebook SDK 造成的 Orz 但很妙的事,一樣的 code 再 10 天前並沒有這個現象。

追了一下可能的問題是在於 Facebook SDK 的設計:

id<FBGraphUser> friend
id<FBGraphUserExtraFields> user


然後範例都教人使用:

user.id 或 [user id]

解法:

[user objectForKey:@"id"]

只要透過存取方式的修改,即可避開。

2014年1月12日 星期日

[Linux] Nginx + Auth + PHP + CodeIgniter @ Ubuntu 12.04

Nginx Authentication 可以參考官網 HttpAuthBasicModule / ngx_http_auth_basic_module 設定:

location ~^ /ci/  {
  auth_basic            "Restricted";
  auth_basic_user_file  htpasswd;
}


由於 nginx 用 apt-get 安裝,此例 htpasswd 則是位於 /etc/nginx/htpasswd ,若不確定的話,翻一下 nginx access/error logs 來看。

比較特別,如果保護的是一個 location 包含要運行 PHP 程式的話,裡頭需要把完整的 PHP 處理也定義好,據說是因為 nginx auth_basic module 不會繼續往下讀起 nginx.conf。

解法:

location ~^ /ci/  {
  auth_basic            "Restricted";
  auth_basic_user_file  htpasswd;

  # for codeigniter
  index  index.html index.htm index.php;
  try_files $uri $uri/ /ci/index.php;

  # for php
  location ~ \.php$ {
    fastcgi_split_path_info ^(.+\.php)(/.+)$;
    # NOTE: You should have "cgi.fix_pathinfo = 0;" in php.ini

    # With php5-cgi alone:
    fastcgi_pass 127.0.0.1:9000;

    # With php5-fpm:
    #fastcgi_pass unix:/var/run/php5-fpm.sock;

    fastcgi_index index.php;
    include fastcgi_params;
}

2014年1月11日 星期六

[電影] 真愛每一天 (About Time)


來源:About Time wiki

今日在二輪電影院看了這部電影,寓意滿深的小品,喜歡這般的呈述故事。

讓我想到在工程師總常講的 "過度最佳化" 或 "太早最佳化" 的含義,有興趣可以看這部片放鬆一下腳步,體驗、享受生命。人生不要一直都用數字、錢、考績衡量步伐,走錯路時,仍可看到另一片天空。


2014年1月8日 星期三

[Linux] 簡易的測試機 - Nginx + Codeigniter + PHP + MySQL + PhpMyAdmin @ Linode Ubuntu 12.04 TLS

有點久沒在 Linode 打滾了,記得...我的信用卡還因為 Linode 的事件花錢換了一張新的 Orz 這次著重在測試機,所以先偷懶不裝防火牆

更新系統:

$ apt-get update && apt-get upgrade && apt-get dist-upgrade

簡易管理員:

$ adduser userid
$ vim /etc/group
sudo:userid


更新 hostname (建議不要有 "-",過去的經驗是 Hadoop 會找不到機器):

$ vim /etc/hostname
$ hostname -F /etc/hostname
$ vim /etc/hosts
127.0.1.1 YourName


簡易資安管理:

$ apt-get install denyhosts
$ vim /etc/hosts.allow
# whilelist
sshd: MyIP : allow


設定開發環境:

$ apt-get install nginx php5-cli php5-fpm mysql-server phpmyadmin

$ nginx -v
nginx version: nginx/1.1.19
$ php -v
PHP 5.3.10-1ubuntu3.9 with Suhosin-Patch (cli) (built: Dec 12 2013 04:27:25)
$ php5-fpm -v
PHP 5.3.10-1ubuntu3.9 (fpm-fcgi) (built: Dec 12 2013 04:31:25)


設定 nginx + PHP + Codeigniter:

$ vim /etc/nginx/sites-available/default
server {
# …
index index.html index.htm index.php;
# …
        location ~ \.php$ {
                fastcgi_split_path_info ^(.+\.php)(/.+)$;
                # NOTE: You should have "cgi.fix_pathinfo = 0;" in php.ini
 
                # With php5-cgi alone:
                fastcgi_pass 127.0.0.1:9000;
                # With php5-fpm:
                #fastcgi_pass unix:/var/run/php5-fpm.sock;
                fastcgi_index index.php;
                include fastcgi_params;
        }
        # http://wiki.nginx.org/Codeigniter
        location /ci_proj/ {
               index index.html index.htm index.php;
               try_files $uri $uri/ /ci_proj/index.php;
        }
# …
}
$ service nginx restart


設定 nginx + PHPMyAdmin:

$ ln -s /usr/share/phpmyadmin/ /usr/share/nginx/www/phpmyadmin
$ sudo service php5-fpm restart


其中 /etc/phpmyadmin/config-db.php 有標記預設登入的帳蜜,當然,也可以用當初設定 mysql 的 root 登入,建議新增帳號後,把 root 登入關掉, 共有兩處:

$ vim /etc/phpmyadmin/config.inc.php
/* Authentication type */
$cfg['Servers'][$i]['AllowRoot'] = FALSE;


其他資料庫匯入:

$ mysql -u db_account -p -D db_name < db_backup.sql 

2014年1月1日 星期三

iOS 開發筆記 - 設定 UIButton 發動 Storyboard Segue 事件(performSegueWithIdentifier)

使用 Storyboard 處理多個 UIViewController 進行切換時,可以很簡單地透過按住 ctrl + 元件(如 UIButton),拖拉到指定的 UIViewController ,完成 UIViewController 切換工作。然而,有時希望按了元件後,做完一堆事才切換到指定的 UIViewController ,這時候就要稍微更改 Segue 發動的流程。

例如,目前共有 AUIViewController 跟 BUIViewController ,其中 AUIViewController 上頭有一個 AUIButton ,當點選完 AUIButton 時,做完一些要事,再切換到 BUIViewController。

開發上,在 Storyboard 上,先在 AUIViewController 點一下,並按住 AUIViewController + Ctrl 後(並非點 AUIButton),拉條線到 BUIViewController 上,以此建立一個 Storyboard Segue 叫做 "ChangeViewController",接著把 AUIButton 拉條線到 AUIViewController.m ,做個  IBAction ,代表點選 AUIButton 將發動的動作,剩下的程式碼:

AUIViewController:

- (IBAction)AUIButtonEvent:(id)sender {
// Step 1 : doing …

// Step N : fire a segue event
[self performSegueWithIdentifier:@"ChangeViewController" sender:sender];
}

- (void)prepareForSegue:(UIStoryboardSegue *)segue sender:(id)sender
{
    if ([segue.identifier isEqualToString:@"ChangeViewController"]) {
        UIViewController *target = segue.destinationViewController;
        if ([target isKindOfClass:[UINavigationController class]]) {
            target = [[(UINavigationController *)target viewControllers] lastObject];
        }
        if([target isKindOfClass:[BUIViewController class]]) {
            BUIViewController *v = (BUIViewController *)target;
            // … other setting …
        }
    }
}


如此一來,當點選 UIButton 時,可以先做完事再切過去指定的 UIViewController 了,當然,也可以讓一個 UIButton 依照事件條件,切換到多個 UIViewController 。