顯示具有 xcode 標籤的文章。 顯示所有文章

2021年1月22日 星期五

Flutter 開發文件之 iOS 與 Android 實作筆記 - 使用 Firebase 回報 App 使用人數


先說一下,有出類似文件教人怎樣使用 Firebase - Admob 部分,在此僅流水帳紀錄引用 firebase 的用法,體驗一下透過 Flutter 同時開發 ios 和 android app 時,並且使用額外函式庫的過程。

原理:

1. 使用 Android Studio + Flutter plugin 來建立 Flutter 專案
- 在此 package name 使用 org.changyy.study.flutter
- 自動產生 android Package Name = org.changyy.study.flutter_app
- 自動產生 iOS Bundle ID = org.changyy.study.flutterApp
- 假定專案位於 ~/AndroidStudioProjects/flutter_app

2. 建立 Firebase 專案
- 在此使用 org-changyy-study-flutter 作為 firebase project name

3. iOS app
- 使用 Xcode 置入 firebase 的設定檔案 GoogleService-Info.list
- 用指令打開專案 % open ~/AndroidStudioProjects/flutter_app/ios/Runner.xcworkspace/
- 使用 CocoaPods 添加 Firebase 函式庫
- 在 AppDelegate.swift 置入 Firebase 啟動程式碼

4. Android app
- 依照 Firebase 專案建置過程安置 google-service.json 檔案
- 在 <專案>/build.gradle 設置相依套件 com.google.gms:google-service:4.3.4
- 在 <專案>/app/build.gradle 添加 plugin 和引入 com.google.firebase:firebase-analytics

5. 回到 Flutter 專案,分別叫出 iOS simulator 跟 Android emulator 運行


若沒意外,就可以同時在這兩個模擬器上跑出來,並且在 Firebase 專案後臺,看到兩個使用者:


2018年5月14日 星期一

iOS App 開發筆記 - 關於 case sensitive 檔案系統與 CocoaPods 和 Ruby/Gems 的處理

某天重灌 macOS 時,把主硬碟弄成 case sensitive ,想說自己都很熟悉 linux server 的行為,殊不知替自己埋了很多坑。首先,如果用 CocoaPods 維護套件時,別人的程式碼不見得會依照此規範,同理在 Ruby/Gems 更是如此。

解法?先切一個 partition 不區分大小寫吧!在把 Xcode build code 的暫存區也移至該 partition 來解!

未來還是推薦用 case insensitive 的 partition 吧 Orz 想搞龜毛還是用另一區,千萬別要跟青春過意不去啊。

將 Xcode build 臨時區移走:

$ mv ~/Library/Developer/Xcode/DerivedData/ ~/Library/Developer/Xcode/DerivedData-bak/
$ mkdir /Volumes/Data/XcodeDerivedData
$ ln -s /Volumes/Data/XcodeDerivedData ~/Library/Developer/Xcode/DerivedData


如此一來,關於 Xcode 與 CocoaPods 的大小寫問題應當可以解了,但...如果 build code 過程還有搭配 ruby script 做事,很抱歉,請自己改 ruby 了 Orz 例如:

require 'CFPropertyList'

很抱歉,在 Ruby 的 CFPropertyList 套件中,他實際是小寫的 Orz 請看:

https://github.com/ckruse/CFPropertyList/tree/master/lib

最重要的,這類還可能搞壞 gem 的管理狀態,這時解法就有點痛苦了,絕對不是三兩句就解掉的。

2015年10月4日 星期日

iOS 開發筆記 - 修正 Launch Image 失效問題

LaunchImage
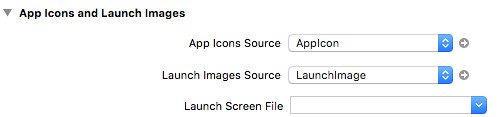
換了 Xcode 7.0.1 後,想說認真一下填滿 Images.xcassets 中的 LaunchImage,但始終沒有成功,總覺得一直讀取 Storyboard 的資料!

最後終於搞懂了,記得清空 Launch Screen File 欄位就沒問題啦。

若有碰到 ERROR ITMS-90475 iPad Multitasking support 的問題,再到 info.plist 塞入:

<key>UIRequiresFullScreen</key>
<string>YES</string>


即可解決。

2015年10月3日 星期六

iOS 開發筆記 - 下載舊版 Simulator,如 iOS 8 Simulator

Download iOS Simulator

記得很久以前,我還有把 Xcode 3,4 系列燒成光碟,為的就是舊版 simulator,後來不知不覺就都不需要,甚至把玩 app 都直接用最新版 iOS siumulator 跟 sdk 了。不過這次 iOS 9 跟 iOS 8 有一些 layout 問題,所以還是找一下舊版 simulator 吧!

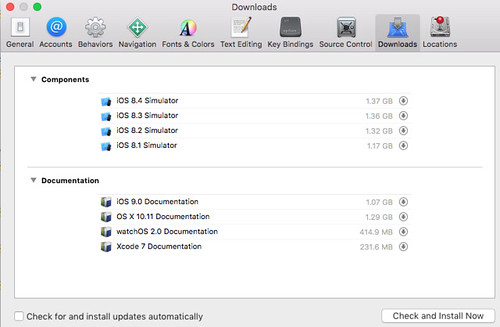
Xcode -> Preferences -> Downloads 或是 iOS Simulator -> Hardware -> Device -> Manage Devices -> 左下角 + -> iOS Version -> Download more simulators 。

此外,有人說在 OS X EI Capitan 已不支援 iOS 7 Simulator 了 :P 所以在此版本的作業系統下載不到。

另外一提,安裝 Simulator 需要用高級權限 Orz 不然會有以下訊息:

Cloud not download and install iOS 8.x Simulator.

高級權限的方式:

sudo /Applications/Xcode.app/Contents/MacOS/Xcode

2015年4月21日 星期二

iOS 開發筆記 - 製作 iOS Simulator app 版本送交給 Facebook 進行 review (creating-ios-simulator-build-for-review)

似乎...Facebook SDK 文件沒找到?只好隨意 Google 一些資料

$ cd /path/project
$ xcodebuild -showsdks
OS X SDKs:
OS X 10.9                     -sdk macosx10.9
OS X 10.10                     -sdk macosx10.10

iOS SDKs:
iOS 8.3                       -sdk iphoneos8.3

iOS Simulator SDKs:
Simulator - iOS 8.3           -sdk iphonesimulator8.3

$ xcodebuild -arch i386 -sdk iphonesimulator8.3


若用 CocoaPods (碰到 ld: library not found for -lPods-XXX ) 或 xcworkspace 維護的,需要多一點指令:

$ xcodebuild -arch i386 -sdk iphonesimulator8.3 -workspace YourName.xcworkspace -scheme YourName

接著,想執行看看:

$ ios-sim launch /Users/user/Library/Developer/Xcode/DerivedData/YourName-xxxxxx/Build/Products/Debug-iphonesimulator/YourName.app

其中 ios-sim 可以逛一下這邊:https://github.com/phonegap/ios-sim

2014年11月25日 星期二

iOS 開發筆記 - UIWebview loadData 以及 local resource 配置

很久以前把玩過 PhoneGap 後,就很久沒使用 UIWebview 來當作主要 UI。這次嘗試使用 Web UI 當作操作介面,於是乎就碰到使用 jQuery 的問題 XD 偷懶的解法就是用 remote resource,更佳的解法是用 local file。

使用方式:

// 記得要 Added folders 要採用 Create folder references
// web-resource/index.html
// web-resource/jquery.min.js
//
NSString *localWebPagePath = [[NSBundle mainBundle] pathForResource:@"index" ofType:@"html" inDirectory:@"web-resource"];

[self.webview loadData:[NSData dataWithContentsOfFile:localWebPagePath] MIMEType:@"text/html" textEncodingName:@"UTF-8" baseURL:[NSURL URLWithString:localWebPagePath]];


其中的 baseURL 只要填寫正確,在 index.html 裡頭就可以用相對路徑存取 local file 了。

例如:

<!DOCTYPE html>
<html lang="en">
<head>
<meta charset="utf-8">
<script src="jquery.min.js"></script>
</head>
<body>
...
</body>
</html>

2014年9月19日 星期五

[OSX] 使用 App Store 更新 Xcode 發生錯誤 @ Mac OS X 10.9.5, MBA


主因也有可能是空間太少了 :P
除了準備空間外,可以試看看 App Store Debug 界面:

$ defaults write com.apple.appstore ShowDebugMenu -bool true

接著重新打開 App Store 後,上方最右邊有 Debug 選項 -> Reset Application,大概多做幾次即可。如果很不幸的一直不幸,最終解法就是反安裝後,再下載。

2014年7月15日 星期二

iOS 開發筆記 - 使用 CocoaPods 管理第三方函式庫

記得前幾年都用 git 跟 git submodule 管理,一切都是手動處理,包含 Xcode 添加 include path 等,現在則是想要把一些把玩的東西 open 出來,就想到用 CocoaPods 來管理,畢竟不是每個人都那麼勤勞的 XD

在此以 CocoaAsyncSocket 和 facebook-ios-sdk 為例。

首先,先安裝 CocoaPods:

$ sudo gem install cocoapods
$ pod update


接著搜尋想要的套件:

$ pod search CocoaAsyncSocket

-> CocoaAsyncSocket (7.3.5)
   Asynchronous socket networking library for Mac and iOS.
   pod 'CocoaAsyncSocket', '~> 7.3.5'
   - Homepage: https://github.com/robbiehanson/CocoaAsyncSocket
   - Source:   https://github.com/robbiehanson/CocoaAsyncSocket.git
   - Versions: 7.3.5, 7.3.4, 7.3.3, 7.3.2, 7.3.1, 7.2.2, 7.0.3, 0.0.1 [master repo]

$ pod search facebook-ios-sdk

-> Facebook-iOS-SDK (3.15.1)
   The iOS SDK provides Facebook Platform support for iOS apps.
   pod 'Facebook-iOS-SDK', '~> 3.15.1'
   - Homepage: https://developers.facebook.com/docs/ios/
   - Source:   https://github.com/facebook/facebook-ios-sdk.git
   - Versions: 3.15.1, 3.15.0, 3.14.1, 3.14.0, 3.13.1, 3.13.0, 3.12.0, 3.11.1, 3.11.0, 3.10.0, 3.9.0, 3.8.0, 3.7.1, 3.7.0, 3.6.0, 3.5.3, 3.5.2, 3.5.1,
   3.5.0, 3.2.1, 3.2.0, 3.1.1, 3.1.0, 3.0.8, 3.0.7, 3.0.6.b, 3.0.5.b, 1.2, 1.last, 0.0.1 [master repo]


接著,開始透過 Xcode 新增一個 Project (HelloPods) 後,接著改用 Terminal 在 Project 目錄下新增 Podfile

$ cd ~/path/ios-project
$ vim Podfile
pod 'CocoaAsyncSocket'
pod 'Facebook-iOS-SDK'
$ pod install
Analyzing dependencies
Downloading dependencies
Installing Bolts (1.1.0)
Installing CocoaAsyncSocket (7.3.5)
Installing Facebook-iOS-SDK (3.15.1)
Generating Pods project
Integrating client project

[!] From now on use `HelloPods.xcworkspace`.


接著,就改用 HelloPods.xcworkspace 吧!

$ open HelloPods.xcworkspace

現況雖然可以輕鬆添加新增的函式庫 header files 了,但在 import 時沒有 autocomplete 的功能,若很在意的話,可在 Project (HelloPods) -> Target (HelloPods) -> Build Settings -> User Header Search Paths -> 增加 ${SRCROOT} 以及 recursive 屬性。(添加完出錯時,在把它刪掉吧)

如此一來,工作應該就跟平常沒什麼兩樣啦。未來,可以一樣可以用 pod update / pod outdated 更新套件最新資訊。

另外,目前 Project (HelloPods) 目錄結構:

$ ls ~/path/ios-project
HelloPods HelloPods.xcworkspace Podfile Pods
HelloPods.xcodeproj HelloPodsTests Podfile.lock


對於哪些目錄需要用 git 管理,可以參考一下官網介紹:Should I ignore the Pods directory in source control?

以上則是利用 CocoaPods 及其管理的第三方函式庫的用法,至於不再 CocoaPods 管理的套件呢?除了在 Podfile 中描述來源外,其套件也要撰寫 *.podspec 描述,請參考 CocoaAsyncSocket / CocoaAsyncSocket.podspec;對於 Podfile 的部分,則是直接指定 git 位置即可:

$ vim Podfile
pod 'AFNetworking', :git => 'https://github.com/gowalla/AFNetworking.git'

2014年7月3日 星期四

iOS 開發筆記 - 使用 C++ Source Code

最近把玩練習時,想說用一下 CPP 的,寫完後發現要整進 Xcode 卻發現 compile error,例如在 AppDelete.m 中:

#include "Test.h"

- (BOOL)application:(UIApplication *)application didFinishLaunchingWithOptions:(NSDictionary *)launchOptions
{
    // Override point for customization after application launch.
 
    Test *obj = new Test();
 
    return YES;
}


其中 Test.h:

#ifndef __Test__Test__
#define __Test__Test__

#include <iostream>

class Test {
public:
    int x;
};


#endif /* defined(__Test__Test__) */


編譯時就會顯示找不到 iostream 等訊息,解法?早期大概有指定 Compile 參數,現在還滿容易的,只要把用到 CPP 的 Objective-C 檔案,從 .m 改成 .mm 即可。

以此就是將 AppDelete.m 更名為 AppDelete.mm ,就可以編譯成功,真是太方便了!

2014年6月4日 星期三

iOS 開發筆記 - 初學 Swift 與 Storyboard 互動方式,以 UITableViewController 和 prepareForSegue 為例


WWDC 2014 讓 Swift 出世見人,想學習的可先看 Apple 官網 Swift 文件:The Swift Programming Language,大概只要看完 A Swift Tour 即可有基本功力,看完心得:簡潔有力。接著,就可以看看 Using Swift with Cocoa and Objective-C 這份了,也是此次筆記項目。

首先下載 Xcode 6 beta 下來用,新增 Project 時,選用 Swift 程式語言,這時的程式架構就是 Swift 語法,與 Objective-C 大同小異,初次看還滿清爽的。

AppDelegate:

import UIKit

@UIApplicationMain
class AppDelegate: UIResponder, UIApplicationDelegate {
                         
    var window: UIWindow?


    func application(application: UIApplication, didFinishLaunchingWithOptions launchOptions: NSDictionary?) -> Bool {
        // Override point for customization after application launch.
        return true
    }

    func applicationWillResignActive(application: UIApplication) {
        // Sent when the application is about to move from active to inactive state. This can occur for certain types of temporary interruptions (such as an incoming phone call or SMS message) or when the user quits the application and it begins the transition to the background state.
        // Use this method to pause ongoing tasks, disable timers, and throttle down OpenGL ES frame rates. Games should use this method to pause the game.
    }

    func applicationDidEnterBackground(application: UIApplication) {
        // Use this method to release shared resources, save user data, invalidate timers, and store enough application state information to restore your application to its current state in case it is terminated later.
        // If your application supports background execution, this method is called instead of applicationWillTerminate: when the user quits.
    }

    func applicationWillEnterForeground(application: UIApplication) {
        // Called as part of the transition from the background to the inactive state; here you can undo many of the changes made on entering the background.
    }

    func applicationDidBecomeActive(application: UIApplication) {
        // Restart any tasks that were paused (or not yet started) while the application was inactive. If the application was previously in the background, optionally refresh the user interface.
    }

    func applicationWillTerminate(application: UIApplication) {
        // Called when the application is about to terminate. Save data if appropriate. See also applicationDidEnterBackground:.
    }

}


ViewController:

import UIKit

class ViewController: UIViewController {
                         
    override func viewDidLoad() {
        super.viewDidLoad()
        // Do any additional setup after loading the view, typically from a nib.
    }

    override func didReceiveMemoryWarning() {
        super.didReceiveMemoryWarning()
        // Dispose of any resources that can be recreated.
    }

}


接著,則是使用 Storyboard,承襲之前用 Xcode 開發的模式,新增元件後,可以拖拉到對應的程式碼(此例為 ViewController),就可以填寫一些 Code 了。

例如 UIButton 行為:

    @IBOutlet var button : UIButton
 
    @IBAction func myClick(sender : AnyObject) {
        println("Click")
        button.setTitle("change", forState: UIControlState.Normal);
    }


例如 UITableViewController :

import UIKit

class MyTableViewController: UITableViewController {
    var dataList = String[]()
 
    override func numberOfSectionsInTableView(tableView: UITableView?) -> Int {
        return 1
    }
 
    override func tableView(tableView: UITableView?, numberOfRowsInSection section: Int) -> Int {
        return dataList.count
    }
 
    override func tableView(tableView: UITableView!, cellForRowAtIndexPath indexPath: NSIndexPath!) -> UITableViewCell! {
     
        var cell:UITableViewCell = UITableViewCell(style: UITableViewCellStyle.Default, reuseIdentifier: "Cell")
     
        cell.text = dataList[indexPath.row]
     
        return cell
    }
 
}


以及 prepareForSegue 的用法:

    override func prepareForSegue(segue: UIStoryboardSegue!, sender: AnyObject!) {
        if segue.identifier.compare("showTable") == 0 {
            if segue.destinationViewController.isKindOfClass(MyTableViewController) {
                // Type 'AnyObject!' cannot be implicitly downcast to 'UIViewController'
                // var vc:UIViewController = segue.destinationViewController

                var tvc:MyTableViewController = segue.destinationViewController as MyTableViewController
             
                tvc.dataList.append("Hello")
                tvc.dataList.append("World")
            }
        }
    }


以上的小練習,就可以用 Swift 跟 Storyboard 切換 ViewController 等行為,而 UITableViewController 也稍微用了一下。

最後一提,目前使用 Swift 開發的不習慣之處:AutoComplete ! 沒了這招就真的等於砍掉重練了,試用的結果,不是按了 "." 之後會彈跳出來,而是要打 "->" 才會出現 Orz 我想應該還有不少待釐清的用法。

2014年4月12日 星期六

iOS 開發筆記 - Improper Advertising identifier [IDFA] Usage. Your app contains the Advertising Identifier [IDFA] API but you have not indicated its usage on the prepare for Upload page in iTunes Connect.


在 2014-04-10 上傳 ipa 發現這這問題:
Improper Advertising identifier [IDFA] Usage. Your app contains the Advertising Identifier [IDFA] API but you have not indicated its usage on the prepare for Upload page in iTunes Connect.
解法有兩種:
  • 將程式內有用到 UUID/UDID 的部分去掉(如 Google Analytics Library 等),再重新上傳
  • 設法先退可簽署 IDFA 條約的狀態,重新上傳
其中要退回到簽署 IDFA 的部分,可以做的方式有兩種:
  • 將 app 內有用到跟 UUID/UDID 相關的移掉,進行重新上傳到 iTunes Connect,再把 reject 它,重新填寫跟 IDFA 相關的條款,再重新上傳 iTunes Connect
  • 建立 empty project ,將 Bundle Identifier 設成跟 app 一樣,上傳到 iTunes Connect,再 reject 它,重新填寫跟 IDFA 相關的條款,再重新上傳 iTunes Connect
後來,我選擇不用改 code 的部分,當然也要先把狀態改回到可以簽署 IDFA 流程,就選擇建立 empty project 來處理(此外,可以從原先的 app project 把Images.xcassets複製來用)。只是一樣的程式碼幾個禮拜前沒問題,為何這幾天出事?真是令人不解。

今早 2014-04-12 測試時,一樣的 code 發現又沒 IDFA 問題了 Orz 但還是把碰到這怪現象的解法記錄一下。

註 UDID/UUID 相關:

#import <AdSupport/ASIdentifierManager.h>

if (NSClassFromString(@"ASIdentifierManager")) {
    NSLog(@"ID: %@", [[[ASIdentifierManager sharedManager] advertisingIdentifier] UUIDString]);
} else {
    NSLog(@"ID: %@", [[UIDevice currentDevice] uniqueIdentifier]);
}


Updated @ 2014-05-02 : iOS 開發筆記 - 使用 AdMob 與 IDFA 的處理

2014年3月16日 星期日

[OSX] Xcode 5.1 - Unused Entity Issue: Unused Variable @ Mac OS X 10.9.2

Unused Entity Issue - Unused Variable

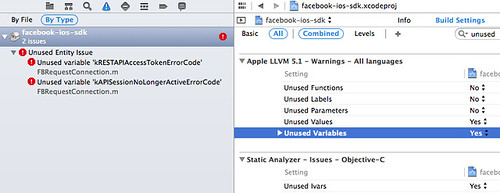
上次手滑更新 Xcode 後,發現新版 Facebook SDK 3.13 (2014/03/06 15:39:14) 編譯時會出現 Unused Entity Issue: Unused Variable 的錯誤,且看到有人提出了,暫時就先自己處理一下吧 :P

2014年3月12日 星期三

iOS 開發筆記 - 使用 Apple Push Notification service (APNs)

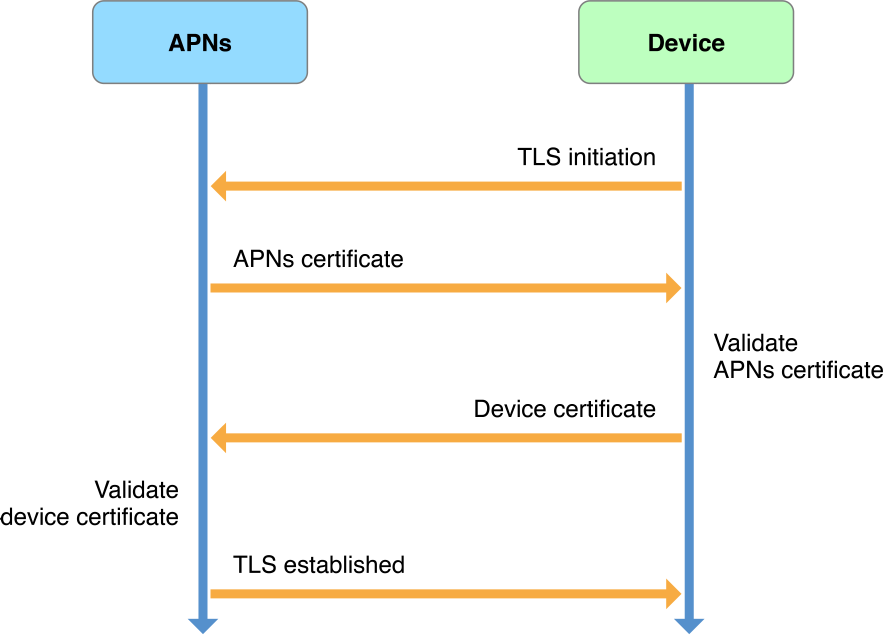
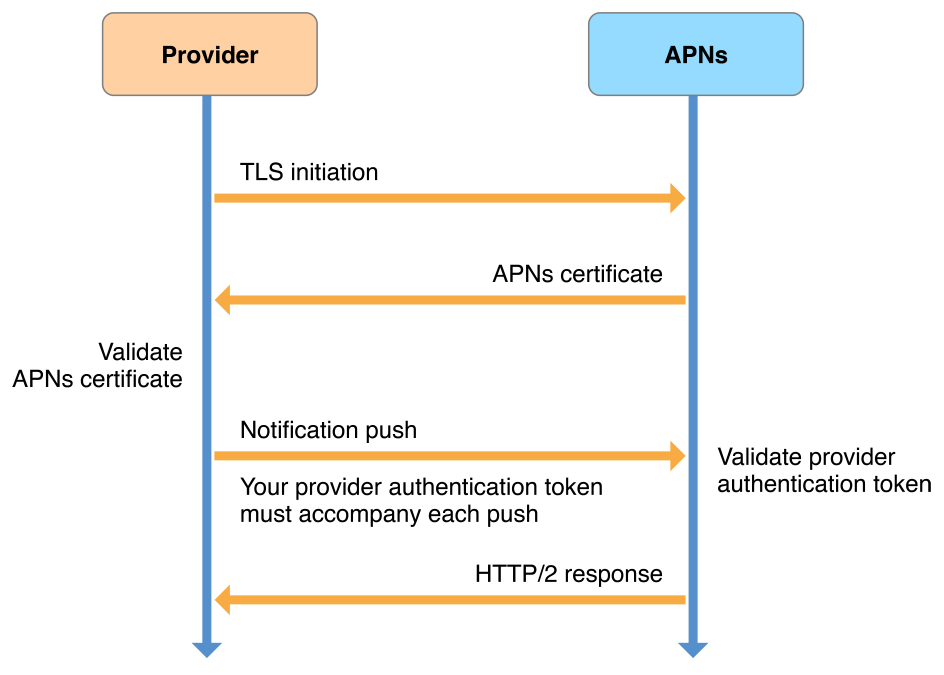
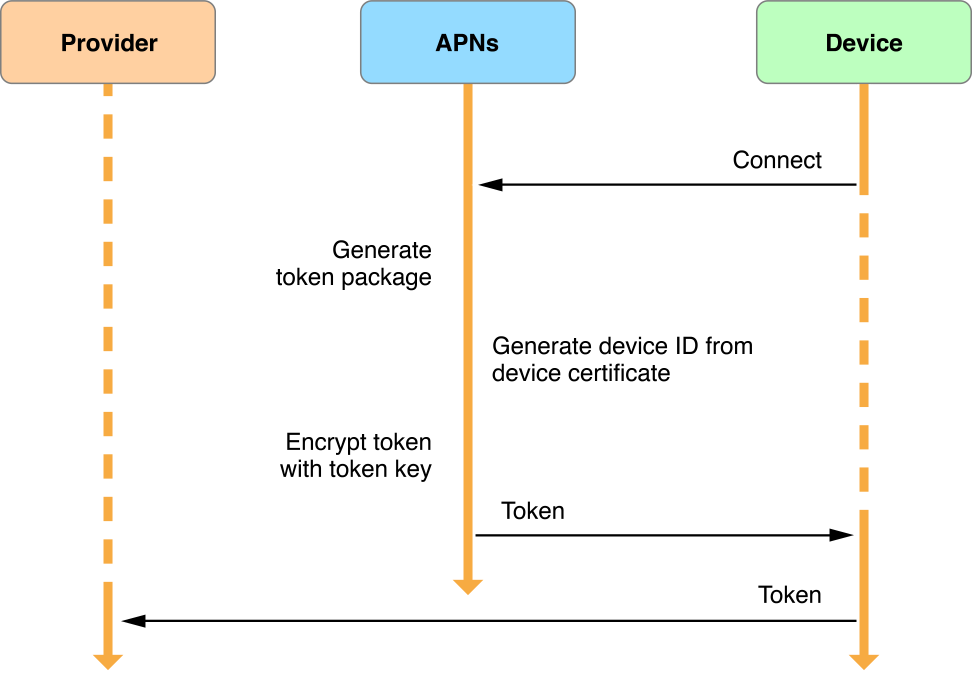
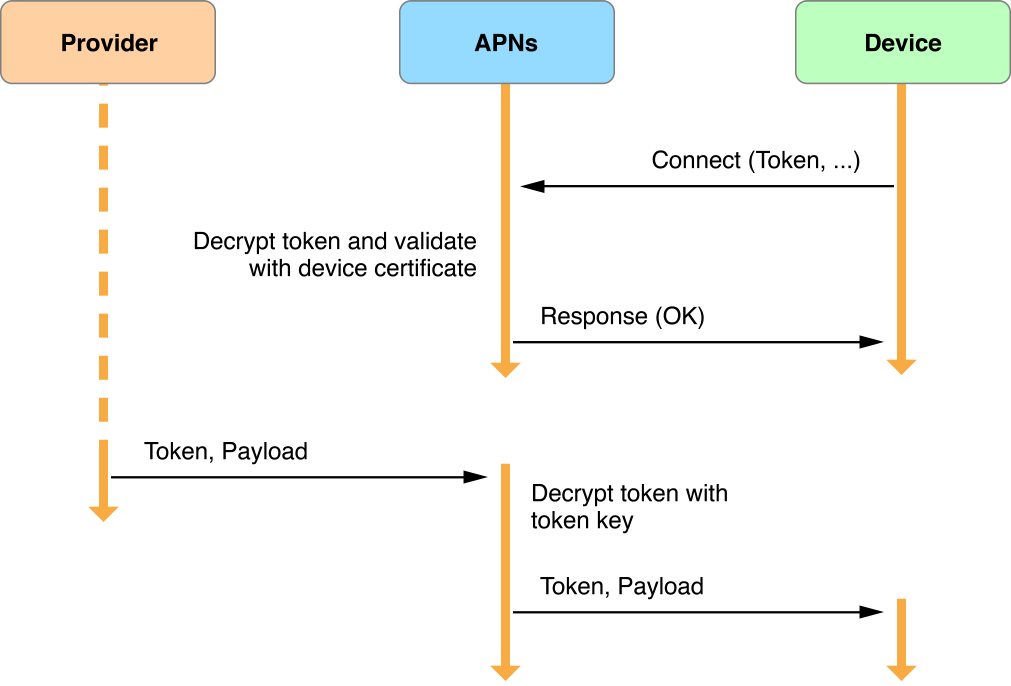
Apple 官方詳細的文件:Local Notifications and Push Notifications,漂亮的流程圖:

Service-to-Device Connection Trust:


Provider-to-Service Connection Trust:


Token Generation and Dispersal:

Token Trust (Notification):


心得:
  • 透過 Apple Push Notification service (APNs) 時,可以有提醒使用者來使用 app 的效果,無論使用者是否正在使用、背景使用、關閉使用都可以,就只要不要刪掉 app 都可以
  • APNs 只是讓 Service Provider 透過 Gateway 主動丟訊息給使用者,也不保證丟的到,除了訊息也可以設定 expiry date 外,也可以從 Feedback service 來取得傳送失敗的資訊
  • APNs 是單向傳訊息,所以,其實就像打聲招呼而已,等使用者使用 app 時,需額外處理連回自家 server 的部分,才能完成互動
Service Provider 進行 Push Notification 流程:
  1. 在 iOS Developer Center 對指定的 APP ID 設定好 Push Notifications 的憑證等
  2. 在 OSX 上,將憑證輸出成 P12 檔
  3. 透過 openssl 將 *.P12 檔轉成 PEM 格式
    $ openssl pkcs12 -in 憑證.p12 -out CertificateName.pem -nodes
    Enter Import Password:
    MAC verified OK
  4. Server 使用 PEM 檔案與 Apple server 進行 SSL/TLS 溝通
  5. 資料格式需依照 The Binary Interface and Notification Format 編碼,簡易程式:github.com/changyy/ios-apple-push-notification-service/php/send.php
iOS app 設定:
  1. 在程式啟動處,進行 APNs 註冊流程
  2. 判斷是否註冊成功,成功後要將 deviceToken 傳給 Service Provider
    - (NSString *)getHEX:(NSData *)data
    {
        const unsigned char *dataBytes = [data bytes];
        NSMutableString *ret = [NSMutableString stringWithCapacity:[data length] * 2];
        for (int i=0; i<[data length]; ++i)
            [ret appendFormat:@"%02X", (NSUInteger)dataBytes[i]];
        return ret;
    }
    - (void)application:(UIApplication *)app didRegisterForRemoteNotificationsWithDeviceToken:(NSData *)devToken {
        NSLog(@"didRegisterForRemoteNotificationsWithDeviceToken: %@", [self getHEX:devToken]);
    }

    - (void)application:(UIApplication *)app didFailToRegisterForRemoteNotificationsWithError:(NSError *)err {
        NSLog(@"didFailToRegisterForRemoteNotificationsWithError: %@", err);
    }
  3. 若程式在使用中,可以監控是否有通知
    - (void)application:(UIApplication *)application didReceiveRemoteNotification:(NSDictionary *)userInfo {
        NSLog(@"didReceiveRemoteNotification: %@",userInfo);
        if (application.applicationState == UIApplicationStateActive)
        {
            // use UIAlertView
        }
        else
        {
            //application.applicationIconBadgeNumber =[[[userInfo objectForKey:@"aps"] objectForKey: @"badge"] integerValue];
            //NSInteger badgeNumber = [application applicationIconBadgeNumber];
            //[application setApplicationIconBadgeNumber:++badgeNumber];
        }
    }

2014年2月13日 星期四

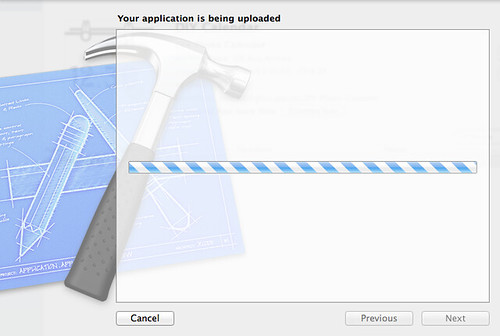
iOS 開發筆記 - Xcode: Your application is being uploaded: request timeout / Application loader: Authenticating with the iTunes Store

your application is being uploaded

重灌 OSX ,試了一下發現這種現象 Orz 參考以下資料:

搞了一陣子憑證外,也裝了 Java 等等,當然,連 Application loader 也試過一輪,仍還沒改善,最後看到這則:
看完比較釋懷,然後,再試試 Application loader (with https.proxyPort=80) 幾次時,就意外通過了 XD 

大概耗掉兩小時的生命啊...人生啊~