2012年12月31日 星期一

iOS 開發筆記 - 國曆轉農曆計算 (Chinese Lunar Calendar)

lunar-2013-06


把玩一下 NSCalendar ,發現他可以計算咱們華人常用的農曆日期耶!完整文件 iOS Developer Library - Date and Time Programming Guide


程式碼:


NSString *dateAt = @"2013/06/08";
NSDateFormatter *dateFormatter = [[[NSDateFormatter allocinit] autorelease];
[dateFormatter setDateFormat:@"yyyy/MM/dd"];
NSDateComponents *dateComps = [[[[NSCalendar alloc] initWithCalendarIdentifier:NSChineseCalendar] autorelease] components:(NSYearCalendarUnit | NSMonthCalendarUnit | NSDayCalendarUnit) fromDate:[dateFormatter dateFromString:dateAt]];
NSLog(@"%@ => Chinese calendar date (Lunar): %0.2d/%0.2d", dateAt, [dateComps month], [dateComps day]);


結果: 


2013/06/08 => Chinese calendar date (Lunar): 05/01


註:有的農民曆將 2013/06/08 定為農曆 04/30,故挑這天當做範例提醒算法的不同。


2012年12月30日 星期日

2012年的最後一天

Life & Sea


今年很特別,發生了不少事,體驗過交接離職同事待結案的案子(還一次三案 orz)、同公司換單位、跟同好分道揚鑣、Android、國外自助旅行、找房子、搬家、役畢、換公司、iOS、國內離島旅行、看顧、狂用悠遊卡等,想起來真的經歷不少事,記得役畢前還斤斤計較如何追求工作薪資的 CP 值,很奇妙地一役畢反而不在意,看著周邊親友工作上的來來往往,有的厭膩生態、有的追求夢想都好,都是踏出人生的下一步。難得 12/31 可以在老家休息,回老鄉走走,從火車站步行回家,看看許久未見的街景,可真是熟悉又陌生。


回顧這一年,收獲不少,但開始會想想是不是該多充實生活化的記事,例如遊記、聚餐、拍照、音樂、遊戲、語文呢?說真的我還滿高興自己亂寫的一些旅遊或遊戲筆記的瀏覽次數高於一些技術筆記,新年一年應該可以多想想,學一些語文、文化勝於新的程式語言,多走一些景點勝於多開幾個專案。


只是,年都還沒跨過去,又馬上收到新的一年的工作計畫,看來明年一開始又得忙了,越來越多的新事物、挑戰跟角色,年輕就該多衝刺嘛,這大概就是所謂的人生吧!


總之,新年快樂!


2012年12月26日 星期三

[Linux] 強制使用 SSH Keys (key pair) 登入認證 @ Ubuntu 12.04

use-pubkey-only


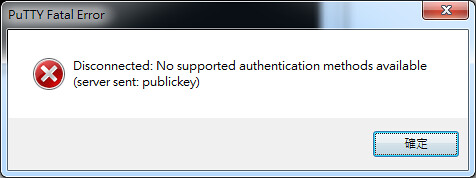
最近常建一些 VM 來把玩,想到除了用 key-pair 管理登入認證外,還想了一些資安問題,就參考過去把玩 Amazon EC2 的概念,把登入機制強制使用 public key 的方式,如此一來可以安全一點點吧!?(上圖是用 Putty 透過 account/password 登入時的錯誤訊息)


設定:


$ vim /etc/sshd_config
PubkeyAuthentication yes
PasswordAuthentication no


$ /etc/init.d/ssh restart


其他:


$ ssh-keygen -t rsa -P ''
$ scp ~/.ssh/id_rsa.pub account@TargetServer:~/.ssh/authorized_keys


2012年12月20日 星期四

Android 開發筆記 - 使用 keytool 處理 keystore 匯入、合併、更改密碼、更改 alias name

接近半年前幫公司上架一支 Android app ,結果兩個月前想要更新程式時,卻發現自己想也想不起來 keystore 的密碼 XD 當時起就一直抱著砍掉重練的精神,遲遲未更新程式,沒想到今天再次要更新程式時,竟然矇對 keystore 的密碼了!當下想到的第一件事就是更新密碼,把密碼改簡單一點 :P 此外,以前認為一支 Android app 就要獨立一個 keystore 來管理,反而造成管理上的困擾,因此查了一下果真還有可以合併 keystore 的方式 :-) 真是太讚啦


更改 keystore alias name:


$ keytool -changealias -alias "OldAliasName" -destalias "NewAliasName" -keypass YourAliasKeyPassword -keystore your.keystore -storepass YourKeyStorePassword


更改 alias password:


$ keytool -keystore your.keystore -keypasswd -alias AliasName


更改 keystore password:


$ keytool -storepasswd -keystore your.keystore


合併 keystore:


$ keytool -importkeystore -srckeystore SourceKeyStore.keystore -srcstorepass SourceKeyStorePassword -destkeystore DestinationKeystore.keystore -deststorepass DestinationKeyStorePassword


2012年12月17日 星期一

iOS 開發筆記 - 使用 XCode Subprojects 與 Git Submodule

xocde_subproj


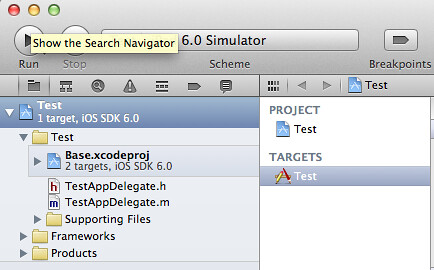
雖然 Objective C 的經驗不多,但漸漸地會想把一些共用的程式碼弄成 library 來使用,在加上 git 來管理,這時候就會想到 git submodule 的使用。原先以為把 xcode project 拖拉進來就可以了,後來發現這一切都只是幻想 XD 整體上的概念:編譯時要能找到(header search path),連結時要能找到(link binary)。原本以為拖拉其他 project 進來就能自動化搞動,最後發現還是要手動設定一些環境,所以就來筆記一下。


例如有 Base.xcodeproj 和 Test.xcodeproj,先把常用的程式碼都寫在 Base.xcodeproj:


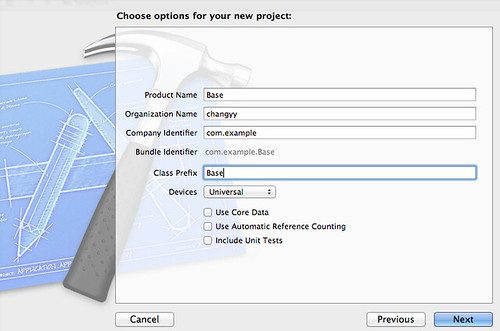
建立 Xcode Project:


create_base_xcodeproj


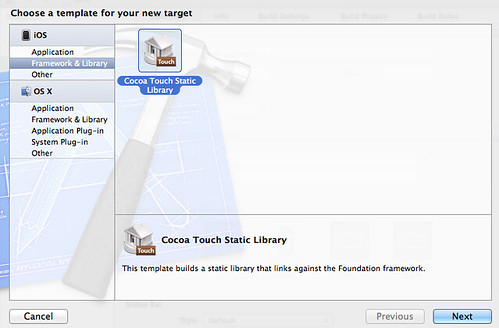
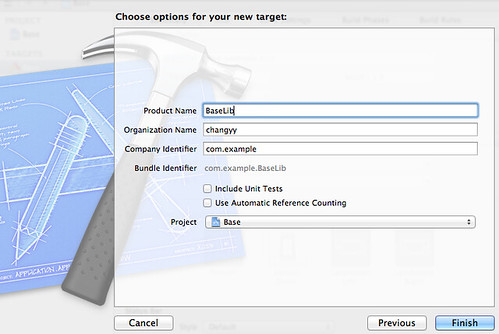
新增 TARGETS -> Add Target:


add_target_static_lib


add_target_static_lib_name 


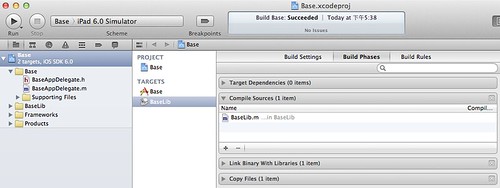
把想要編成 static library 的程式碼擺進 Compile Sources:


create_static_library


add_other_source


使用 git 管理(假設在 /tmp/base.git):


$ mkdir /tmp/base.git
$ cd /tmp/base.git
$ git init --bare
$ cd /path/Base
$ ls
Base  Base.xcodeproj  BaseLib
$ git init
Initialized empty Git repository in /path/Base/.git/
$ git remote add origin /tmp/base.git
$ git add .
$ git commit -am 'init'
$ git push origin master


在 Test.xcodeproj 裡使用 Base.xcodeproj:


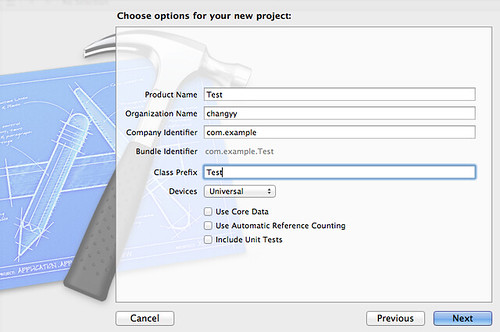
建立 Test xcodeproj:


create_test_xcodeproj


使用 git 管理(假設在 /tmp/test.git):


$ mkdir /tmp/test.git
$ cd /tmp/test.git
$ git init --bare
$ cd /path/Test
$ ls
Test  Test.xcodeproj
$ git init
Initialized empty Git repository in /path/Test/.git/
$ git remote add origin /tmp/test.git
$ git add .
$ git commit -am 'init'
$ git push origin master


使用 git submodule 管理 Base library:


$ cd /path/Test
$ ls
Test  Test.xcodeproj
$ git submodule add /tmp/base.git libbase
Cloning into 'libbase'...
done.
$ ls -a
.   .git               Test  libbase
..  .gitmodules  Test.xcodeproj
$ cat .gitmodules
[submodule "libbase"]
  path = libbase
  url = /tmp/base.git
$ git commit -am 'add libbase'
[master 5f69c71] add libbase
  2 files changed, 4 insertions(+)
  create mode 100644 .gitmodules
  create mode 160000 libbase
$ git push origin master


設定 Text.xcodeproj:


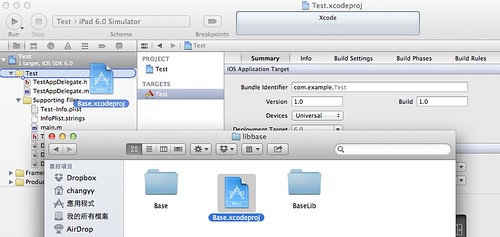
拖拉 Base.xcodeproj 進來(從 /path/Test/libbase):


drag_base_xcodeproj


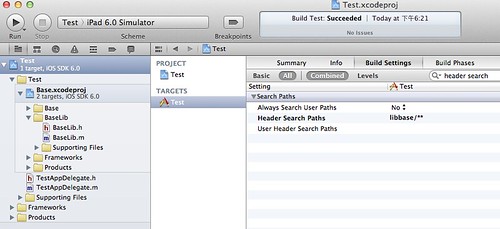
設定 Header Search (/path/Test/libbase):


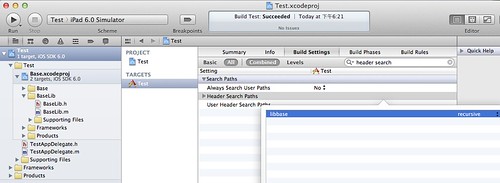
add_header_search


header_search_path


設定 Other Linker Flags:


-all_load  (如果 library 中有 categories)


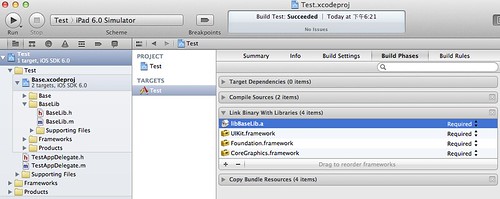
設定 Link Binary With Libraries:


link_binary


更新 git:


$ cd /path/Test
$ git add .
$ git commit -am 'add libbase'
$ git push origin master


如此一來,未來在取 Test 的時候,就可以這樣用:


$ git clone --recursive /tmp/test.git testxcode
Cloning into 'testxcode'...
done.
Submodule 'libbase' (/tmp/base.git) registered for path 'libbase'
Cloning into 'libbase'...
done.
Submodule path 'libbase': checked out '920380a7c727d7fb42e38e89bd2eac7a3d2ef72f'
$ ls -a testxcode
.     .git                Test               libbase
..    .gitmodules   Test.xcodeproj


此外,其他時候可能會需要以下指令:


$ git submodule update --init --recursive


iOS 開發筆記 - iOS 6 UIViewController shouldAutorotateToInterfaceOrientation 失效 (orientation bug?)

複習一下 UIViewCnotroller ,在一樣的程式碼,在 iOS 6 不能做 Device Autorotate ,測試了一下是之前用法使用 UIViewController 的方式要更新一下。


以前在 AppDelegate.m 中,使用 [self.windows addSubview:my.view]; 的用法,需更新為 [self.windows setRootViewController:my]; ,如此一來在 iOS 5 跟 iOS 6 都可以正常使用了。


AppDelegate.m:


- (BOOL)application:(UIApplication *)application didFinishLaunchingWithOptions:(NSDictionary *)launchOptions
{
    self.window = [[[UIWindow alloc] initWithFrame:[[UIScreen mainScreen] bounds]] autorelease];
    // Override point for customization after application launch.

   UINavigationController *nav = [[UINavigationController alloc] init];

   [self.window setRootViewController:nav];
   //[self.window addSubview:nav.view];

   self.window.backgroundColor = [UIColor whiteColor];
   [self.window makeKeyAndVisible];
   return YES;
}


2012年12月6日 星期四

[MSN] 線上編輯、刪除、還原、匯出聯絡人清單


前陣子微軟公布之後要將 MSN 合併至 Skype 帳號,有點半放棄 MSN 吧?總之 Skype 已經可以提供使用 MSN 帳號登入了,為了在 Mobile (Android) 上可以使用官方的 MSN client,我就把 MSN 跟 Skype 整合了。然而,整合後一個禮拜左右,開始發現用 MSN 登入 Skype 時,看不到 MSN 聯絡人,甚至切換到 Windows XP 用 MSN 軟體登入,一樣也看不到聯絡人,開始產生聯絡人消失的奇怪 bug!雖然可以從其他地方找到聯絡人,但似乎不太方便。


幸運的,可以從 http://people.live.com/ 進去管理自己的 MSN 帳號,包括管理群組、刪除和還原聯絡人,最重要的則是有匯出功能,包括可以備份自己取的代稱等,實在便利。而 MSN 聯絡人不見得問題,則是去還原即可,需留意刪除的聯絡人只保留 30 天喔。


2012年11月26日 星期一

台灣免費網路電視清單 @ Mac OS X、iPad、iPhone

因為一些因素,需要免費的網路電視(直播電視)來解悶,一開始看到"壹電視"網路新聞台還滿黑皮的,只是看久了就發現台灣的新聞播報方式幾乎憂多於喜,看久了會不爽快,漸漸地又想找一些其他台來看看,最後才想起偉大的中華電信 hichannel 頻道,但 hichannel 多只能用 Windows 平台配 IE 瀏覽器 + Windows Media Player 才能觀看,頓時又讓人倒退幾步。


慶幸的找了一會兒,終於找到 iPad 版 XD 看來台灣廠商都對 iPad 比較有愛,像壹電視、Hinet Hichannel 部分頻道有支援 iPad (Safari瀏覽器),但在 Android 上,點開不是不支援,不然就是要用 Flash player (手機 Flash player 已經在 2012.08 月份被 Adboe 拋棄了),真不知該說什麼。


總結一下,免費的網路電視及頻道:


簡單來說,若你是用 Windows 作業系統,那網路上免費的正版網路電視都可以觀看(壹電視+hichannel),若你是用 iPad 的話,那有部分可以觀看(壹電視+部分hichanel,且必須先從hichannel ipad 版廣播進去,不能直接連[須有 http reference 的機制]),最後,若你是用 Mac OS X 系統,用 Safari 則可以透過 iPad 網頁可以看的節目。至於 Linux 的系統就沒研究了 XD 不知裝一下 Safari 瀏覽器行不行。我個人是新聞播膩了,就播播東森亞洲衛視,偶爾有娛樂性質。


至於其他非正統版權的來源,則可以逛逛 justin.tv -> Live Channel > Language (繁體中文) 找找了 :P


2012年11月15日 星期四

[Linux] 快速架設 IMAP/IMAPs/POP3/POP3s - 使用 Dovecot @ Ubuntu 12.04

之前都寫漏漏長的 FreeBSD 架設方式,這次用 Ubuntu 12.04 架一下,果真快上許多(以下設定應該沒有符合 Ubuntu /etc/* 的規範 XD)。


$ sudo apt-get install dovecot-imapd dovecot-pop3d
$ sudo vim /etc/dovecot/dovecot.conf
protocols = pop3 pop3s imap imaps
mail_location = mbox:~/mail:INBOX=/var/mail/%u
$ sudo /etc/init.d/dovecot restart 


 可以用 telnet 和 openssl 測試自家機器:


測試 POP3:


$ telnet localhost 110   (或 openssl s_client -connect localhost:995)
...
+OK Dovecot ready
user username 
+OK
pass password
+OK Logged in.
list
+OK 1 messages:
1  ###
.
quit
+OK Loggin out. 


測試 IMAP:


$ telnet localhost 143 (或 openssl s_client -connect localhost:993)
* OK ... Dovecot ready.
- login username password
- OK .... Logged in
- select INBOX
...
* OK
* 1 EXISTS
...
- OK ... Select completed.
- logout
* BYE Logging out
- OK Logout completed. 


此外,有可能一開始剛裝完後,使用上述指令測試時出現錯誤訊息,這樣的現象是因為使用的帳號尚未有信件進來,以致於 /var/mail/username 並未建立,故只需先寄信給 username 後,系統就會幫你建立對應的 mail service 資料,如此就可以測試了。


[Linux] 設定 static ip @ Ubuntu 12.04

每次要用都又查了一次 Orz 筆記一下吧


$ sudo vim /etc/network/interfaces


auto eth0
#iface eth0 inet dhcp
iface eth0 inet static
address 10.0.0.180
netmask 255.255.255.0
network 10.0.0.0
broadcast 10.0.0.255
gateway 10.0.0.1
dns-nameservers 8.8.8.8


$ sudo /etc/init.d/networking restart


最後一行 dns-nameservers 若不加的話,從開機時 /etc/resolv.conf 會被清空。


2012年11月10日 星期六

iOS 開發筆記 - 使用 Xcode 4 編譯 facebook-ios-sdk 3.1

buildfbsdk01


最近摸摸 facebook-ios-sdk,發現它已經更新到 3.1,且從 3.0 開始架構有不少的變化,像是要求權限時,開始分 read 跟 write 的要求,例如登入時只能要求 read 或 write 類權限,而不能一次要求 read + write 權限,接著要再要求另一類權限時,可以在用 reauthorizeWithPermissions:defaultAudience:completionHandler: 再繼續要求。雖然 Facebook 有打包好一份 FacebookSDK 可下載到 Mac OS X 安裝使用,但有些好玩的架構 hack 則需要 source code (不見得要改 source code,可能是擴充架構時需要參考),所以就來編譯吧!編譯的概念很簡單,一種是編 app 時,要能夠找到 FacebookSDK header,另一種則是 link 時要能找到 FacebookSDK。


[Xcode] -> [Project] -> [iOS Application] -> [Empty Application] -> 隨便一個名字(此例StudyBuildFBSDK(由於個人習慣自己管記憶體,所以我就取消 Automatic Reference Counting)


接著從 github.com 下載 facebook-ios-sdk.git 回來,在此擺在 ~/facebook-ios-sdk-3.1


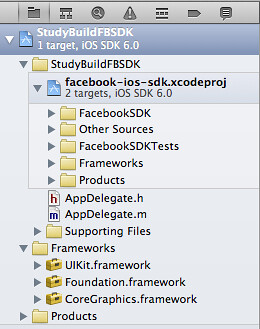
接著就用 Finder 開起 facebook-ios-sdk-3.1 後,把 src/facebook-ios-sdk.xcodeproj 拖到 StudyBuildFBSDK 裡頭


buildfbsdk01


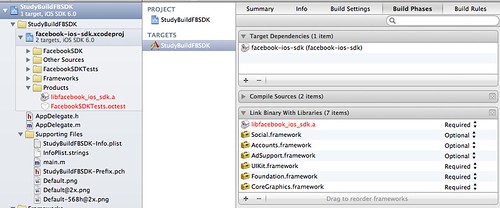
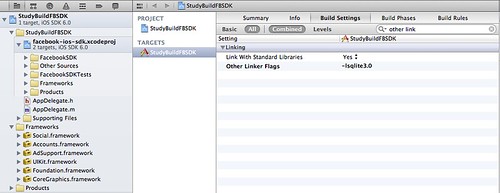
接著依照 Facebook 的教學,點選 TARGETS-> StudyBuildFBSDK -> Build Phases -> Link Binrary With Libraries 中,在把需要的系統函式庫選一選(AdSupport, Accounts, Social 和 libfacebook_ios_sdk.a),接著再到 TARGETS-> StudyBuildFBSDK -> Build Settings 搜尋 other link -> 新增 -lsqlite3.0


buildfbsdk02


buildfbsdk03


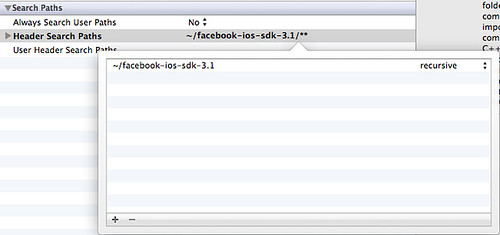
接下來則是新增 header search 位置,即 ~/facebook-ios-sdk-3.1,TARGETS-> StudyBuildFBSDK -> Build Settings 搜尋 header search -> 新增 ~/facebook-ios-sdk-3.1 並設為 recursive


buildfbsdk04


如此一來應該就可以編譯成功了 :P 例如在 AppDelegate.m 中添加 FacebookSDK 相關程式碼:


#import "facebook.h"
...
- (BOOL)application:(UIApplication *)application didFinishLaunchingWithOptions:(NSDictionary *)launchOptions
{
   self.window = [[[UIWindow alloc] initWithFrame:[[UIScreen mainScreen] bounds]] autorelease];


   if( [[FBSession activeSession] state] == FBSessionStateCreatedTokenLoaded ) {
      NSLog(@"test in");
   }

   // Override point for customization after application launch.
   self.window.backgroundColor = [UIColor whiteColor];
   [self.window makeKeyAndVisible];
   return YES;
}


此外,執行還是會出錯,因為還要去 Supporting Files -> SutdyBuildFBSDK-info.plist 中,新增 FacebookAppID 後才能確保程式可以跑,只是還要補上額外的東西才能正式使用囉(參考 Facebook 教學)。


buildfbsdk05


2012年11月9日 星期五

Android 開發筆記 - 使用 Canvas 畫圖

android_canvas


一年前,我的好同事就一直在用 HTML5 Canvas 做出很多很讚的作品,但那時我的方向不一樣,一直沒有接觸。最近則開始想要在 android 畫畫圖,除了很底層的 OpenGL ES 外,就想到 Canvas 啦。


在這邊簡單筆記 Android 上 Canvas 的使用(最偷懶的使用方式):


public class MainActivity extends Activity {


   @Override
   public void onCreate(Bundle savedInstanceState) {
      super.onCreate(savedInstanceState);
      //setContentView(R.layout.activity_main);
      setContentView( new View(this) {
         Paint mPaint = new Paint();
         Path mPath = new Path();


         @Override
         protected void onDraw(Canvas canvas) {
            // TODO Auto-generated method stub
            super.onDraw(canvas);


            // env init
            int width = this.getWidth();
            int height = this.getHeight();
            int radius = width > height ? height/2 : width/2;
            int center_x = width/2;
            int center_y = height/2;


            // prepare a paint
            mPaint.setColor(Color.BLACK);
            mPaint.setStyle(Paint.Style.STROKE);
            mPaint.setStrokeWidth(5);
            mPaint.setAntiAlias(true);

            // draw a circle
            canvas.drawCircle(center_x, center_y, radius, mPaint);

            // draw a rectangle
            mPaint.setColor(Color.GREEN);
            canvas.drawRect(center_x - radius, center_y - radius, center_x + radius, center_y + radius, mPaint);

            // draw a triangle
            mPaint.setColor(Color.MAGENTA);
            mPath.moveTo(center_x, center_y - radius);
            mPath.lineTo(center_x - radius, center_y);
            mPath.lineTo(center_x + radius, center_y);
            mPath.lineTo(center_x, center_y - radius);
            canvas.drawPath(mPath, mPaint);

            // draw some text and rotation
            mPaint.setTextSize(50);
            mPaint.setTextAlign(Paint.Align.CENTER);
            mPaint.setTypeface(Typeface.create(Typeface.SERIF, Typeface.ITALIC));
            mPaint.setColor(Color.RED);


            canvas.save();
            canvas.rotate(45, center_x, center_y);
            canvas.drawText( "Android Canvas" , center_x , center_y, mPaint);
            canvas.restore();


            mPaint.setColor(Color.BLUE);
            canvas.drawText( "changyy.pixnet.net" , center_x , center_y + 70, mPaint);
         }
      });
    }
}


2012年11月6日 星期二

[Python] 讀取 Shapefile 格式(*.dbf, *.prj, *.shp, *.shx, *.sbn, *.sbx) 以臺北市公車站牌位置圖為例

前陣子參加 2012 Yahoo! Open Hack 時,終於有空把玩台北市政府公開資料,碰到了之前一直想解卻沒空解的問題,以 臺北市公車站牌位置圖 為例,其資料格式:


$ ls bus
busstop.dbf busstop.shx 公車站牌匯入.sbx
busstop.prj 公車站牌匯入.dbf 公車站牌匯入.shp
busstop.shp 公車站牌匯入.sbn 公車站牌匯入.shx


一堆很奇妙的格式,感覺就像給你一個加密過的資料,讓人十分不解,這大概就是門外漢的滋味 Orz 回想起來,這種感觸還真像當年自己去刻圖書館 MARC 格式的心情 XD


所幸參加 Open hack 才有時間把玩,當下不知哪根筋被打通,忽然間明瞭這種 *.shp 格式就叫 Shapefile ,如此一來有關鍵字就能解了,馬上找到 pyshp - Python Shapefile Library


廢話不多,用法:


#!/usr/bin/env python
# -*- coding: utf8 -*-
import shapefile
import sys
reload(sys)
sys.setdefaultencoding('utf-8')


#sf = shapefile.Reader("bus/公車站牌匯入") # big5 & TWD67 format
sf = shapefile.Reader("bus/busstop") # utf8 & WGS84 format
#fields = sf.fields
print sf.fields 


records = sf.records()
shapeRecs = sf.shapeRecords()
print "Total: ",len(shapeRecs)
bushash = {}
for i in range(len(shapeRecs)):
   #busstop = records[i][1].decode('big5', 'ignore') # decode from big5
   busstop = records[i][1].decode('utf8', 'ignore') # decode from utf8
   if busstop in bushash:
      continue
   else:
      bushash[busstop] = ''


   print busstop
   print shapeRecs[i].shape.points[0]
   #print = FromTWD67TM2ToWGS84( shapeRecs[i].shape.points[0][0], shapeRecs[i].shape.points[0][1] )


成果:


[('DeletionFlag', 'C', 1, 0), ['SATOPID', 'N', 20, 0], ['STOPNAME', 'C', 20, 0], ['CITYNAME', 'C', 5, 0]]
Total: 5540
101國際購物中
[121.56524, 25.03415]
101購物中心
[121.565389, 25.034183]
8號水門
[121.53166335449, 25.072300254772]
一女中
[121.51507, 25.03828]
二二八和平公
[121.51303, 25.04215]
二二八紀念館
[121.513913, 25.030761]
....


眼尖的大概可以看到,第一筆有漏字,資料原始為 "101國際購物中<E5><BF>",不知是不是 pyshp 讀取錯誤還是原始資料有誤。此外,同一個站名會有多個座標點,在此僅先過濾掉,有興趣的在自行把玩吧!


其他補充:


安裝 GDAL (MacPorts: $ sudo port install gdal)
$ ogr2ogr -f geojson /tmp/output.json busstop.shp
$ enca /tmp/output.json
Unrecognized encoding
$ cat /tmp/output.json


{
"type": "FeatureCollection",

"features": [
{ "type": "Feature", "properties": { "SATOPID": 2028.0, "STOPNAME": "101å<9c><8b>é<9a><9b>è³¼ç<89>©ä¸­å¿", "CITYNAME": "å<8f>°å<8c>" }, "geometry": { "type": "Point", "coordinates": [ 121.56524, 25.03415 ] } }
,
...
]


$ ogr2ogr -f geojson /tmp/output2.json 公車站牌匯入.shp
$ enca /tmp/output2.json
Universal transformation format 8 bits; UTF-8
$ cat /tmp/output2.json


{
"type": "FeatureCollection",

"features": [
{ "type": "Feature", "properties": { "SATOPID": 2028.0, "STOPNAME": "101國際購物中??", "CITYNAME": "台??", "stopNAMEB5": null }, "geometry": { "type": "Point", "coordinates": [ 306245.046938922838308, 2769874.23026815475896 ] } }
,
...
]


2012年11月4日 星期日

常用的座標轉換筆記(TWD67, TWD97, WGS84)

台灣現在常看到的座標系統有三種,分別是 TWD67、TWD97 和 WGS84,其中 WGS84 就是網路應用上常用的 GPS (lat, lon) 格式(歐洲近幾年有在推另一個座標系統)。至於為啥會接觸到呢?實在是這幾年 ITS 的服務越來越興盛,而台灣區的資料慢慢地釋出(如 Taipei Open Data、交通部運輸研究所等),然而就開始碰到資料格式問題,那就是台灣不少資料採用的地理座標系統不是 GPS 格式。如果你不是 ITS 領域,那大概就跟我一樣從摸 Google Maps 而接觸 GPS 座標系統,例如只要在 Google Maps 上打上 25.033661, 121.564815 後,顯示的就是 Taipei 101,但從台灣區取得的地理座標系統,丟到 Google Maps 卻行不通 :P


這幾年都有接觸 ITS 應用,但一直很懶得整理導致每次都花差不多的時間去處理,所以打算來寫篇筆記


目前碰過的座標格式:


  • TWD67 (TM: 2-degree Transverse Mercator, 二度分帶)


    • 採用 1967年國際地球原子參數(Geodetic Reference System 1967,GRS67),早期還未有衛星時,透過天文觀測、三角定位量測,埔里虎子山為測量原點,而 TWD 全名為 Taiwan Datums


  • TWD97


    • 採用 1980年國際地球原子參數(Geodetic Reference System 1980, GRS80),以 GPS 衛星定位重新測量,國內是在 1997 年啟用,所以稱作 TWD97


  • WGS84


TWD67 與 TWD97 轉換:


  • 從 TWD97 轉 TWD67


    • X67=X97-807.8-A*X97-B*Y97
      Y67=Y97+248.6-A*Y97-B*X97
      A=0.00001549, B=0.000006521 


  • 從 TWD67 轉 TWD97


    • X97=X67+807.8+A*X67+B*Y67
      Y97=Y67-248.6+A*Y67+B*X67
      A=0.00001549, B=0.000006521 


TWD67 轉 WGS84 (GPS):


$ echo TWD67_X TWD67_Y | proj -I +proj=tmerc +ellps=aust_SA +lon_0=121 +x_0=250000 +k=0.9999


TWD97 轉 WGS84 (GPS):


$ echo TWD97_X TWD97_Y | proj -I +proj=tmerc +ellps=GRS80 +lon_0=121 +x_0=250000 +k=0.9999


目前測試的心得:


先把 TWD67 轉 TWD97 後,在用 TWD97 轉 WGS84 的成果跟 Google Maps 的標記就接近了不少,但仍差大概約25m的距離,也還有一條街的距離。


Python Code:


def WGS84FromTWD67TM2(x,y):
   out = {'status':False}
   lat = None
   lon = None
   
   # TWD67 to TWD97
   A = 0.00001549
   B = 0.000006521
   x = float(x)
   y = float(y)
   x = x + 807.8 + A * x + B * y
   y = y - 248.6 + A * y + B * x

   # TWD97 to WGS84
   result = os.popen('echo '+str(x)+' '+str(y)+' | proj -I +proj=tmerc +ellps=GRS80 +lon_0=121 +x_0=250000 +k=0.9999 -f "%.8f"').read().strip() # lat, lng 格式, 不必再轉換
   process = re.compile( '([0-9]+\.[0-9]+)', re.DOTALL )
   for item in process.findall(result):
      if lon == None:
         lon = float(item)
      elif lat == None:
         lat = float(item)
      else:
         break


   # result = os.popen('echo '+str(x)+' '+str(y)+' | proj -I +proj=tmerc +ellps=GRS80 +lon_0=121 +x_0=250000 +k=0.9999').read().strip() # 分度秒格式


   # 分度秒格式轉換
   #process = re.compile( "([0-9]+)d([0-9]+)'([0-9\.]+)\"E\t([0-9]+)d([0-9]+)'([0-9\.]+)", re.DOTALL )
   #for item in process.findall(result):
   #    lon = float(item[0]) + ( float(item[1]) + float(item[2])/60 )/60
   #    lat = float(item[3]) + ( float(item[4]) + float(item[5])/60 )/60
   #    break
   if lat == None or lon == None:
      return out
   out['lat'] = lat
   out['lng'] = lon
   out['status'] = True
   return out


更多 proj 資訊:


$ proj -le
MERIT a=6378137.0 rf=298.257 MERIT 1983
SGS85 a=6378136.0 rf=298.257 Soviet Geodetic System 85
GRS80 a=6378137.0 rf=298.257222101 GRS 1980(IUGG, 1980)
IAU76 a=6378140.0 rf=298.257 IAU 1976
airy a=6377563.396 b=6356256.910 Airy 1830
APL4.9 a=6378137.0. rf=298.25 Appl. Physics. 1965
NWL9D a=6378145.0. rf=298.25 Naval Weapons Lab., 1965
mod_airy a=6377340.189 b=6356034.446 Modified Airy
andrae a=6377104.43 rf=300.0 Andrae 1876 (Den., Iclnd.)
aust_SA a=6378160.0 rf=298.25 Australian Natl & S. Amer. 1969
GRS67 a=6378160.0 rf=298.2471674270 GRS 67(IUGG 1967)
bessel a=6377397.155 rf=299.1528128 Bessel 1841
bess_nam a=6377483.865 rf=299.1528128 Bessel 1841 (Namibia)
clrk66 a=6378206.4 b=6356583.8 Clarke 1866
clrk80 a=6378249.145 rf=293.4663 Clarke 1880 mod.
CPM a=6375738.7 rf=334.29 Comm. des Poids et Mesures 1799
delmbr a=6376428. rf=311.5 Delambre 1810 (Belgium)
engelis a=6378136.05 rf=298.2566 Engelis 1985
evrst30 a=6377276.345 rf=300.8017 Everest 1830
evrst48 a=6377304.063 rf=300.8017 Everest 1948
evrst56 a=6377301.243 rf=300.8017 Everest 1956
evrst69 a=6377295.664 rf=300.8017 Everest 1969
evrstSS a=6377298.556 rf=300.8017 Everest (Sabah & Sarawak)
fschr60 a=6378166. rf=298.3 Fischer (Mercury Datum) 1960
fschr60m a=6378155. rf=298.3 Modified Fischer 1960
fschr68 a=6378150. rf=298.3 Fischer 1968
helmert a=6378200. rf=298.3 Helmert 1906
hough a=6378270.0 rf=297. Hough
intl a=6378388.0 rf=297. International 1909 (Hayford)
krass a=6378245.0 rf=298.3 Krassovsky, 1942
kaula a=6378163. rf=298.24 Kaula 1961
lerch a=6378139. rf=298.257 Lerch 1979
mprts a=6397300. rf=191. Maupertius 1738
new_intl a=6378157.5 b=6356772.2 New International 1967
plessis a=6376523. b=6355863. Plessis 1817 (France)
SEasia a=6378155.0 b=6356773.3205 Southeast Asia
walbeck a=6376896.0 b=6355834.8467 Walbeck
WGS60 a=6378165.0 rf=298.3 WGS 60
WGS66 a=6378145.0 rf=298.25 WGS 66
WGS72 a=6378135.0 rf=298.26 WGS 72
WGS84 a=6378137.0 rf=298.257223563 WGS 84
sphere a=6370997.0 b=6370997.0 Normal Sphere (r=6370997)


網路資源:


2012年10月5日 星期五

Android 開發筆記 - Unable to resume activity : android.database.StaleDataException: Attempted to access a cursor after it has been closed.

以前常在操作 DBHelper 時,常常因為沒有把 mCursor.close() 而常常出現一些錯誤訊息,後來就很習慣每次取一個 mCursor 出來,用完後就執行 mCursor.close() 來當做完整的收尾,結果開始出現這種訊息並且完全不知道是自己哪一行程式出錯:


FATAL EXCEPTION: main
java.lang.RuntimeException: Unable to resume activity {com.example/com.example.YourActivity}: android.database.StaleDataException: Attempted to access a cursor after it has been closed.
       at android.app.ActivityThread.performResumeActivity(ActivityThread.java:2444)
       at android.app.ActivityThread.handleResumeActivity(ActivityThread.java:2472)
       at android.app.ActivityThread$H.handleMessage(ActivityThread.java:1173)
       at android.os.Handler.dispatchMessage(Handler.java:99)
       at android.os.Looper.loop(Looper.java:137)
       at android.app.ActivityThread.main(ActivityThread.java:4424)
       at java.lang.reflect.Method.invokeNative(Native Method)
       at java.lang.reflect.Method.invoke(Method.java:511)
       at com.android.internal.os.ZygoteInit$MethodAndArgsCaller.run(ZygoteInit.java:784)
       at com.android.internal.os.ZygoteInit.main(ZygoteInit.java:551)
       at dalvik.system.NativeStart.main(Native Method)
 Caused by: android.database.StaleDataException: Attempted to access a cursor after it has been closed.
        at android.database.BulkCursorToCursorAdaptor.throwIfCursorIsClosed(BulkCursorToCursorAdaptor.java:75)
        at android.database.BulkCursorToCursorAdaptor.requery(BulkCursorToCursorAdaptor.java:144)
        at android.database.CursorWrapper.requery(CursorWrapper.java:186)
        at android.app.Activity.performRestart(Activity.java:4505)
        at android.app.ActivityThread.performRestartActivity(ActivityThread.java:2875)
        at android.app.LocalActivityManager.moveToState(LocalActivityManager.java:168)
        at android.app.LocalActivityManager.dispatchResume(LocalActivityManager.java:523)
        at android.app.ActivityGroup.onResume(ActivityGroup.java:61)
        at android.app.Instrumentation.callActivityOnResume(Instrumentation.java:1154)
        at android.app.Activity.performResume(Activity.java:4539)
        at android.app.ActivityThread.performResumeActivity(ActivityThread.java:2434)
        ... 10 more


追到最後,終於發現問題的所在點了,因為我的 mCursor 是從 Activity.managedQuery 產生的,在 Activity.managedQuery 有提到:


Warning: Do not call close() on a cursor obtained using this method, because the activity will do that for you at the appropriate time. However, if you call stopManagingCursor(Cursor) on a cursor from a managed query, the system will not automatically close the cursor and, in that case, you must call close().


這應該就是不懂 Android 架構的關係 Orz 果真懂一點不如不懂 XDD


2012年10月4日 星期四

GPS 座標轉換 NE 常用格式與度分秒

找旅遊資料之餘,發現官方單位給的資料都是類似 N25 02 1.25 E121 33 53.01 這種座標型態,查了一下資料才知道這是度分秒單位。


可以把上述那串丟進 Google Maps 一樣可以通啦。


例如台北 101 GPS 座標為 25.033681,121.564726:


25.033681:


25 度


02 分 = 0.33681 * 60 的整數位 = 2.02086


1.25 秒 = 0.02086 * 60 = 1.2516


121.564726:


121 度


33 分 = 0.564726 * 60 的整數位 = 33.88356


53.01 秒 = 0.88356 * 60 = 53.0136


同理,要從分度秒變成常用的 GPS 座標:


25 度 02 分 1.25 秒:


25 + ( 2 + 1.25 / 60 ) / 60 = 25.0336806


121 度 33 分 53.01 秒:


121 + ( 33 + 53.01 / 60 ) / 60 = 121.564725


後來,大學同學的前東家在做導航機,就說這就像 10進位跟 60 進位的單位轉換囉 :D


[OSX] Adium - 因為 Switchboard 發生錯誤,所以訊息無法送出 @ Mac OS X 10.8

adium

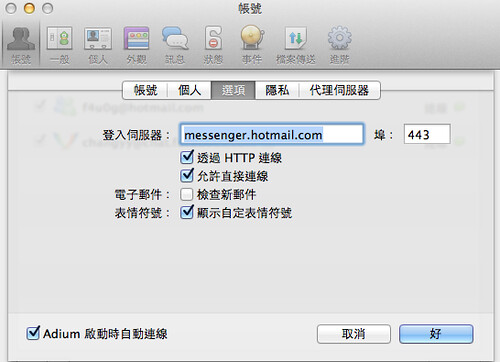
網路上還滿常看到 MAC 上使用 MSN 問題的,在 Mac OS X 上頭,雖然微軟有出 Messenger for Mac,但是我還是滿常碰到 Switchboard 的問題。此問題本身應該是傳訊雙方的網路狀態,例如公司有擋 msn 、防火牆等等,則會常出現這類的問題。

網路上的解法很多是調整 msn 設定,如 "透過HTTP連線" 、 "允許直接連線" 、"連線埠" 等等,這些都可以在微軟的官網也能查到對應的資訊 Windows Live Messenger 使用的網路連接埠與 URL

然而,怎樣設定也解決不了問題 Orz 連改用 Messenger for Mac 也都一樣,最後就換回好用的 Adium ,暫時的解法是…一旦出現 "因為 Switchboard 發生錯誤,所以訊息無法送出" 時,就重新登入,一登入完時可以正常發送訊息。只是每次重新登入也很麻煩,最後想到一招可以 reset Switchboard 了,那就是封鎖對方後,再解除封鎖,也能短暫解除這種問題囉。

Updated: 現在 Skype 6.0 for Mac 已經可以支援 MSN 登入囉!用 Skype 後沒有在碰到這種問題了!

2012年9月30日 星期日

Android 開發筆記 - 簡易 手電筒(閃光燈) app 實作

返家過節,家人分享了 android app 手電筒給我把玩,說真的偶爾還挺實用的,甚至一些 feature phone 都也有這種設計(基本上是真的裝了一個燈)。但我仔細看了一下該 app 的權限,卻開了一堆有的沒有的權限,假設把這個行為丟給國內知名防毒大廠的偵測系統進行偵測,那應該就會被判斷成病毒了。所以我就順手練習一下了 XD


而 android app 的概念則是使用相機的閃光燈,讓閃光燈的狀態停留在 FLASH_MODE_TORCH 時,就可以當做手電筒使用了。然而真正實作上的細節,則必須先開啟相機才能使用閃光燈,也就是用閃光燈之前必須開啟鏡頭並且也會開始把鏡頭收到的影像傳給系統了。簡言之,使用閃光燈其實會操到鏡頭跟系統資料,等同於有資料不停地從鏡頭收進來。


簡單的實作:


layout/main.xml:


<RelativeLayout xmlns:android="http://schemas.android.com/apk/res/android"
       android:id="@+id/background"
       xmlns:tools="http://schemas.android.com/tools"
       android:layout_width="match_parent"
       android:layout_height="match_parent">
       <SurfaceView
              android:id="@+id/camera_preview"
              android:layout_width="1dip"
              android:layout_height="1dip"/>


       <TextView
              android:layout_width="150dp"
              android:layout_height="150dp"
              android:layout_centerHorizontal="true"
              android:layout_centerVertical="true"
              android:gravity="center"
              android:text="@string/light"
              android:textColor="#AAA"
              android:textSize="50dp" />


</RelativeLayout>


AndroidManifest.xml:(事實上可以只需android.permission.CAMERA即可,其他只是最佳化的效果)


<uses-permission android:name="android.permission.CAMERA"/>
<uses-permission android:name="android.permission.WAKE_LOCK"/>
<uses-feature android:name="android.hardware.camera" android:required="false"/>
<uses-feature android:name="android.hardware.touchscreen" android:required="false"/>


Code:


import java.io.IOException;


import android.graphics.Color;
import android.hardware.Camera;
import android.hardware.Camera.Parameters;
import android.os.Bundle;
import android.os.PowerManager;
import android.os.PowerManager.WakeLock;
import android.app.Activity;
import android.content.Context;
import android.content.pm.PackageManager;
import android.view.Menu;
import android.view.SurfaceHolder;
import android.view.SurfaceView;
import android.widget.RelativeLayout;


public class MyFlashLightActivity extends Activity implements SurfaceHolder.Callback {
       boolean have_light = false;


       Camera mCamera = null;
       SurfaceView mSurfaceView;
       SurfaceHolder mSurfaceHolder;
       WakeLock mWakeLock;

       @Override
       public void onCreate(Bundle savedInstanceState) {
              super.onCreate(savedInstanceState);
              setContentView(R.layout.activity_my_flash_light);

              if( ( have_light = getPackageManager().hasSystemFeature(PackageManager.FEATURE_CAMERA_FLASH) ) ) {
                     try {
                            mCamera = Camera.open();
                            mSurfaceView = (SurfaceView) findViewById(R.id.PREVIEW);
                            if(mSurfaceView!= null) {
                                   mSurfaceHolder = mSurfaceView.getHolder();
                                   mSurfaceHolder.addCallback(this);
                                   mSurfaceHolder.setType(SurfaceHolder.SURFACE_TYPE_PUSH_BUFFERS);

                                   Parameters mParameters = mCamera.getParameters();
                                   mParameters.setFlashMode(Parameters.FLASH_MODE_TORCH);
                                   mCamera.setParameters(mParameters);
                                   mCamera.startPreview();


                            }
                     } catch( Exception e ) {
                            e.printStackTrace();
                     }
              } else {
                     RelativeLayout mRelativeLayout = (RelativeLayout)findViewById(R.id.background);
                     if(mRelativeLayout!=null)
                            mRelativeLayout.setBackgroundColor(Color.WHITE);
              }
       }


       @Override
       protected void onDestroy() {
              // TODO Auto-generated method stub
              super.onDestroy();
              if( have_light ) {
                     mCamera.stopPreview();
                     mCamera.release();
              }
              System.out.println("[D] finish");
       }


       @Override
       protected void onPause() {
              // TODO Auto-generated method stub
              super.onPause();
              if( mWakeLock != null )
                     mWakeLock.release();
       }


       @Override
       protected void onResume() {
              // TODO Auto-generated method stub
              super.onResume();
              if( mWakeLock == null ) {
                     PowerManager pm = (PowerManager) getSystemService(Context.POWER_SERVICE);
                     mWakeLock = pm.newWakeLock(PowerManager.PARTIAL_WAKE_LOCK, "WAKE_LOCK_TAG");
              }
              mWakeLock.acquire();
       }


       @Override
       public void surfaceChanged(SurfaceHolder holder, int format, int width, int height) {


              // TODO Auto-generated method stub
              System.out.println("[i] surfaceChanged");
       }


       @Override
       public void surfaceCreated(SurfaceHolder holder) {
              System.out.println("[i] surfaceCreated");
              try {
                     mCamera.setPreviewDisplay(holder);
                     holder.addCallback(MyFlashLightActivity.this);
              } catch (IOException e) {
                     e.printStackTrace();
              }
       }


       @Override
       public void surfaceDestroyed(SurfaceHolder holder) {
              // TODO Auto-generated method stub
              System.out.println("[i] surfaceDestroyed");


              mCamera.stopPreview();
              mSurfaceHolder = null;
       }
}


此外,有興趣的人,強烈建議去翻一下 Torch, an Android flashlight application 這個 open source ,算是找資料驗證時無意間發現的好物。


2012年9月29日 星期六

找尋支援 Apple NB 記憶體資訊

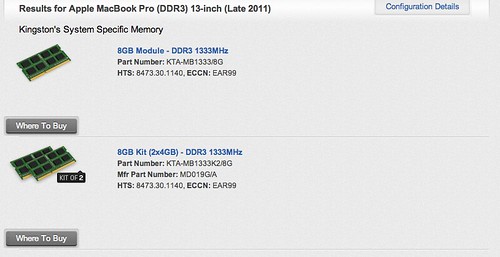
KTA-MB 1333


最近常看到 MBP 運作的很緩慢,查看記憶體使用量才發現,原先 4GB 的空間已經被用到不到 100MB 了。網路上隨意打滾一下,有的在露天賣 NB 記憶體,說啥有 Apple 認證,或是可以支援等小道消息,抑或看到網路購物直接打出 "Apple認證" 的關鍵字,但一條記憶體硬是比別人多 50%~100% 的價格啊(例如 NB DDR3-1333 8GB 一條現今約台幣1k,但有的主打 Apple 認證賣到一條 2k 左右,更誇張的還有一次賣兩條要價 4.5k 等等 )...


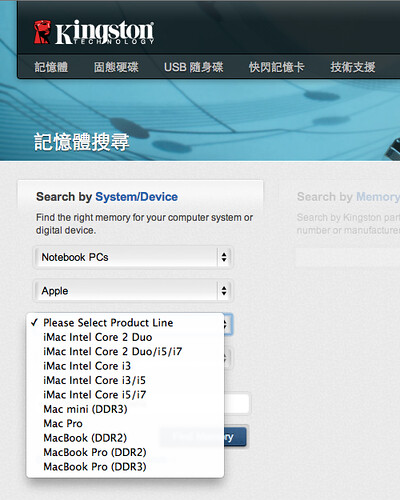
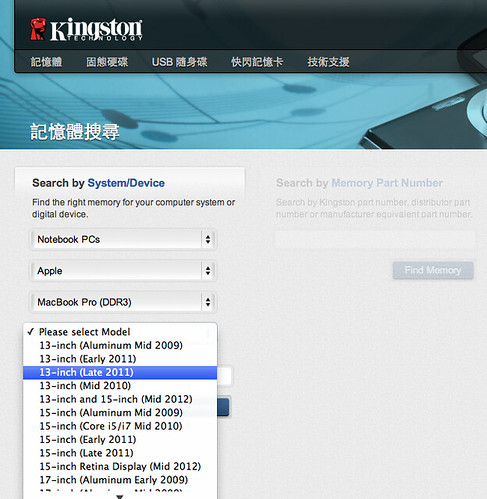
目前正在考慮 金士頓 記憶體,所幸從官網上可以搜尋:


search_ram_01


search_ram_02


如此一來,至少可以先驗證一下,那些露天賣家說的是真是假啦。


註:此例以 Macbook pro 13" late 2011 版本,在 Apple 官網上規格描述 MacBook Pro (13-inch, Late 2011) - Technical Specifications 所述,記憶體規格為 4GB (two 2GB SO-DIMMs) of 1333MHz DDR3 memory; two SO-DIMM slots support up to 8GB。網路上滿多人說可以插到 16GB (8GBx2) 來用,雖然金士頓官網有說 8GB 記憶體可以使用,但並沒有說 2條 8GB 記憶體可以跑 XD 所以...只能看網友測試或是自己親自下海囉...


2012年9月28日 星期五

Android 開發筆記 - 解決 HttpUriRequest/HttpGet/HttpPost 之 Host name may not be null

最近碰到一個 bug 卡關,那就是當我 new HttpGet("http://aaa_bbb.ccc.dddd") 出來,交由 HttpClient 執行時,卻會看到以下訊息:


java.lang.IllegalArgumentException: Host name may not be null
org.apache.http.HttpHost.<init>(HttpHost.java:83)
org.apache.http.impl.client.AbstractHttpClient.determineTarget(AbstractHttpClient.java:497)
org.apache.http.impl.client.AbstractHttpClient.execute(AbstractHttpClient.java:487)


當下讓我連問隔壁的同事幾次...難道 hostname 不能有底線?改成 new HttpGet("aaa_bbb.ccc.dddd") 則是:


java.lang.IllegalStateException: Target host must not be null, or set in parameters.
org.apache.http.impl.client.DefaultRequestDirector.determineRoute(DefaultRequestDirector.java:561)
org.apache.http.impl.client.DefaultRequestDirector.execute(DefaultRequestDirector.java:292)
org.apache.http.impl.client.AbstractHttpClient.execute(AbstractHttpClient.java:555)
org.apache.http.impl.client.AbstractHttpClient.execute(AbstractHttpClient.java:487)


原始程式碼:


String target = "http://aaa_bbb.ccc.dddd";


HttpClient mClient = new DefaultHttpClient();
HttpContext mHttpContext = new BasicHttpContext();
HttpUriRequest mHttpUriRequest = new HttpGet(target);
response = mClient.execute(mHttpUriRequest, mHttpContext);


解法:


String hostname = "aaa_bbb.ccc.dddd";
String target = "http://"+hostname;


HttpClient mClient = new DefaultHttpClient();
HttpContext mHttpContext = new BasicHttpContext();
HttpUriRequest mHttpUriRequest = new HttpGet(target);
response = mClient.execute(new HttpHost(hostname), mHttpUriRequest, mHttpContext);


不曉得這是不是一個 framework 的 bug?還是單純我操作錯誤呢...暫時先這樣解掉吧。


Android 開發筆記 - 解決/取消 EditText 自動 focus 問題

想必還滿常碰到一個 Activity 中,擺幾個 EditText 讓人輸入帳密來送出的表單吧!然而,當送出表單成功後,偶時會很偷懶直接把 mEditText.setText("Info") 且 mEditText.setEnable(false) 來處理,想說這樣又可以重複利用 XD 結果就會碰到開啟 Activity 後,自動 focus 在 EditText 並彈跳出 keyboard 的窘境了。如果動態進行 mEditText.setFocusable(false) 的方式,的確可以避開 focus 的問題,但很奇妙地再動態 mEditText.setFocusable(true) 時,卻會出錯而無法點選該欄位 Orz


最後,找到一些很折衷的辦法...那就是在 EditText 前,先讓某個處的 layout 可以被 focusable 就好 XD 這樣的解法真的是 It just works! 的狀態。


<LinearLayout xmlns:android="http://schemas.android.com/apk/res/android"
       android:layout_width="match_parent"
       android:layout_height="match_parent"
       android:orientation="vertical" >

       <LinearLayout
              android:layout_width="fill_parent"
              android:layout_height="wrap_content"
              android:focusable="true"
              android:focusableInTouchMode="true"
              android:gravity="center_vertical">
              <TextView
                     android:layout_margin="5dp"
                     android:layout_width="120dp"
                     android:layout_height="wrap_content"
                     android:text="@string/title_account"
                     android:textAppearance="?android:attr/textAppearanceLarge">
              </TextView>
              <EditText
                     android:id="@+id/edittext_account"
                     android:layout_width="wrap_content"
                     android:layout_height="wrap_content"
                     android:hint="@string/account_hint"
                     android:ems="10" >
              </EditText>
       </LinearLayout>
       <LinearLayout
              android:id="@+id/linearlayout_password"
              android:layout_width="fill_parent"
              android:layout_height="wrap_content"
              android:focusable="true"
              android:focusableInTouchMode="true"
              android:gravity="center_vertical">
              <TextView
                     android:layout_margin="5dp"
                     android:layout_width="120dp"
                     android:layout_height="wrap_content"
                     android:text="@string/title_password"
                     android:textAppearance="?android:attr/textAppearanceLarge">
              </TextView>


              <EditText
                     android:id="@+id/edittext_password"
                     android:layout_width="wrap_content"
                     android:layout_height="wrap_content"
                     android:ems="10"
                     android:hint="@string/password_hint"
                     android:inputType="textPassword" >
              </EditText>
       </LinearLayout>
</LinearLayout>


2012年9月26日 星期三

Android 開發筆記 - 處理 API 回應 XML 資料的通用解法

如果 API 不是定義的很好,回應得資料格式不依,但至少有符合簡易的 XML 雛形,如:


<name>changyy</name>
<url>http://changyy.pixnet.net</url>
<style>blog</style>


並且很多支 API 格式都不一樣時,就會讓人想看看有沒統一解法,不小心就想到 Javascript property 的用法,可惜我對 Java 不熟,暫時就先用個 map 來處理了:


import java.io.IOException;
import java.io.StringReader;
import java.util.HashMap;
import java.util.Iterator;
import java.util.Map;
import java.util.Map.Entry;


import org.xmlpull.v1.XmlPullParser;
import org.xmlpull.v1.XmlPullParserException;
import org.xmlpull.v1.XmlPullParserFactory;


public class QueryReturnObject {
       private Map<String,String> properties = new HashMap<String,String>();
       public QueryReturnObject(String xml) {
              parsing(xml);
       }
       public String getProperty(String key) {
              if( key == null || !properties.containsKey(key) )
                     return null;
              return properties.get(key);
       }
       public String toString() {
              if( properties.size() == 0 )
                     return "No Properties";
              String out = "";
              for( Iterator<Entry<String, String>> it = properties.entrySet().iterator() ; it.hasNext() ; ) {
                     Entry<String, String> item = it.next();
                     out += "Key=["+item.getKey()+"], Value=["+item.getValue()+"]\n";
              }
              return out;
       }
       void parsing(String raw) {
              properties.clear();
              try {
                     XmlPullParserFactory factory = XmlPullParserFactory.newInstance();
                     XmlPullParser parser = factory.newPullParser();
                     parser.setInput( new StringReader ( raw ) );
                     int eventType = parser.getEventType();
                     String fieldName = null;
                     while( eventType != XmlPullParser.END_DOCUMENT ) {
                            switch(eventType) {
                                   case XmlPullParser.START_DOCUMENT:
                                          break;
                                   case XmlPullParser.START_TAG:
                                          fieldName = parser.getName();
                                          break;
                                   case XmlPullParser.END_TAG:
                                          fieldName = null;
                                          break;
                                   case XmlPullParser.TEXT:
                                          if( fieldName != null )
                                                 properties.put(fieldName, parser.getText());
                                          break;
                            }
                            eventType = parser.next();
                     }
              } catch (XmlPullParserException e) {
                     e.printStackTrace();
              } catch (IOException e) {
                     e.printStackTrace();
              }
       }
}


如此一來,任何 API 回應的資料,就直接用 data = new QueryReturnObject(response) 來使用,接著就可以用 data.getProperty("Key") 的方式來存取囉。


2012年9月24日 星期一

Android 開發筆記 - HTTP Post (File Uploading) Progress Report

之前研究 HTTP Post 的方法時,順手實作了支援 Cookie 等功能,久了之後就會想到如何監控上傳進度的部分,原理都很簡單,但要熟整各個 framework 才能方便進行。所幸網路上好心人士非常多,找到這篇 Android Multipart POST with Progress Bar 真的超佛心的,就順手修改一下一點架構。


實作概念:


繼承 org.apache.http.entity.mime.MultipartEntity 物件後,當寫出資料時,記錄已累積的寫出量,在搭配總共要送出的資料量,簡易的除法就能得知目前所進行的進度了。


我自己的粗略使用:


@ HttpPostMultipartEntity.java:


// 九成九一樣,單純改一些變數名稱
// src: http://toolongdidntread.com/android/android-multipart-post-with-progress-bar/
import java.io.FilterOutputStream;
import java.io.IOException;
import java.io.OutputStream;
import java.nio.charset.Charset;


import org.apache.http.entity.mime.HttpMultipartMode;
import org.apache.http.entity.mime.MultipartEntity;


public class HttpPostMultipartEntity extends MultipartEntity {
       private final HttpPostProgressHandler handler;
       public HttpPostMultipartEntity(final HttpPostProgressHandler handler) {
              super();
              this.handler = handler;
       }
       public HttpPostMultipartEntity(final HttpMultipartMode mode, final HttpPostProgressHandler handler) {
              super(mode);
              this.handler = handler;
       }
       public HttpPostMultipartEntity(final HttpMultipartMode mode, final String boundary, final Charset charset, final HttpPostProgressHandler handler) {
              super(mode,boundary,charset);
              this.handler = handler;
       }

       @Override
       public void writeTo(final OutputStream outstream) throws IOException {
              super.writeTo(new HttpPostOutputStream(outstream, this.handler));
       }

       public static class HttpPostOutputStream extends FilterOutputStream {
              private final HttpPostProgressHandler handler;
              private long transferred;

              public HttpPostOutputStream(final OutputStream out, final HttpPostProgressHandler handler) {
                     super(out);
                     this.handler = handler;
                     this.transferred = 0;
              }

              public void write(byte[] b, int off, int len) throws IOException {
                     out.write(b, off, len);
                     this.transferred += len;
                     if( this.handler != null )
                             this.handler.postStatusReport(this.transferred);

              }

              public void write(int b) throws IOException {
                     out.write(b);
                     this.transferred ++;
                     if( this.handler != null )

                            this.handler.postStatusReport(this.transferred);
              }
       }
}


@ HttpPostProgressHandler.java:


public interface HttpPostProgressHandler {
       void setPostDataSize(long size);
       void postStatusReport(long transferred);
}


HTTP POST Usage:


void doPost( String api_url, String file_path, HttpPostProgressHandler reporter ) {
       List<NameValuePair> mParams = new ArrayList<NameValuePair>();
       mParams.add( new BasicNameValuePair( "path", remote_path ) );
       mParams.add( new BasicNameValuePair( "mode", "upload_file") );
       mParams.add( new BasicNameValuePair( "name", filename) );
       mParams.add( new BasicNameValuePair( "code", edit_code ) );


       // multipart with args
       //MultipartEntity entity=new MultipartEntity(HttpMultipartMode.BROWSER_COMPATIBLE);
       HttpPostMultipartEntity entity = new HttpPostMultipartEntity(HttpMultipartMode.BROWSER_COMPATIBLE, reporter);
       for( NameValuePair mItem : mParams )
              try {
                     entity.addPart(item.getName(),new StringBody(mItem.getValue(), Charset.forName("UTF-8")));
              } catch (UnsupportedEncodingException e) {
                     e.printStackTrace();
              }

       File mFile = new File(file_path);
       if( ! mFile.exists() ) {
              System.out.println("File not found:"+local_path);
              return;
       }

       // add cookie
       CookieStore mCookieStore = BasicCookieStore()
       Cookie x = new BasicClientCookie("MyCookie", "MyCookieValue");
       ((BasicClientCookie)x).setPath("/");
       ((BasicClientCookie)x).setDomain("ServerDomain");
       cookieStore.addCookie( x );


       // add file
       entity.addPart( "file", new FileBody( mFile ) );


       // upload api
       HttpPost mHttpPost = new HttpPost(api_url);
       mHttpPost.setEntity(entity);


       // set post data total size
       if( reporter != null )
              reporter.setPostDataSize(entity.getContentLength());


       // use cookie
       HttpClient mHttpClient = new DefaultHttpClient();
       HttpContext mHttpContext = new BasicHttpContext();
       mHttpContext.setAttribute(ClientContext.COOKIE_STORE, cookieStore);

       try {
              HttpResponse response = mHttpClient.execute( mHttpPost, mHttpContext );
              HttpEntity result = response.getEntity();
              System.out.println( "Result:" + EntityUtils.toString(result) );
       } catch (Exception e) {
              e.printStackTrace();
       }
}


Main:


new Thread( new Runnable() {
       @Override
       public void run() {
              doPost(
                     "http://mytest/api/upload.php" ,
                     "/mnt/sdcard/test.png",
                     new HttpPostProgressHandler() {
                            long total_size = 0;


                            @Override
                            public void setPostDataSize(long size) {
                                   total_size = size;
                            }


                            @Override
                            public void postStatusReport(long transferred) {
                                   if(total_size == 0)
                                          return;
                                   System.out.println("Status:"+(float)transferred/total_size);
                            }
                     }
              );
       }
} ).start();


Others:


import java.io.File;
import java.io.IOException;
import java.io.UnsupportedEncodingException;
import java.nio.charset.Charset;
import java.util.ArrayList;
import java.util.List;


import org.apache.http.HttpEntity;
import org.apache.http.HttpResponse;
import org.apache.http.NameValuePair;
import org.apache.http.client.ClientProtocolException;
import org.apache.http.client.CookieStore;
import org.apache.http.client.HttpClient;
import org.apache.http.client.methods.HttpGet;
import org.apache.http.client.methods.HttpPost;
import org.apache.http.client.methods.HttpUriRequest;
import org.apache.http.client.protocol.ClientContext;
import org.apache.http.client.utils.URLEncodedUtils;
import org.apache.http.cookie.Cookie;
import org.apache.http.entity.mime.HttpMultipartMode;
import org.apache.http.entity.mime.MultipartEntity;
import org.apache.http.entity.mime.content.FileBody;
import org.apache.http.entity.mime.content.StringBody;
import org.apache.http.impl.client.BasicCookieStore;
import org.apache.http.impl.client.DefaultHttpClient;
import org.apache.http.message.BasicNameValuePair;
import org.apache.http.protocol.BasicHttpContext;
import org.apache.http.protocol.HttpContext;
import org.apache.http.util.EntityUtils;


public class HttpQueryUsage {
       public static HttpPost createHttpPost(String url, List<NameValuePair> params, List<NameValuePair> files, HttpPostProgressHandler handler) {
              if( url == null )
                     return null;


              MultipartEntity entity=new MultipartEntity(HttpMultipartMode.BROWSER_COMPATIBLE);
              if( params != null && params.size() > 0)
                     for( NameValuePair item : params )
                            try {
                                   entity.addPart(item.getName(),new StringBody(item.getValue(), Charset.forName("UTF-8")));
                            } catch (UnsupportedEncodingException e) {
                                   e.printStackTrace();
                            }


              if( files != null && files.size() > 0 )
                     for( NameValuePair file : files ) {
                            try {
                                   File src = new File(file.getValue());
                                   if(!src.exists())
                                          continue;
                                   entity.addPart( file.getName(), new FileBody( src ) );
                            } catch (Exception e) {
                                   e.printStackTrace();
                            }
                     }

              HttpPost post = new HttpPost(url);
              post.setEntity(entity);


              if(handler!=null)
                     handler.setPostDataSize(entity.getContentLength());

              return post;
       }
       public static HttpGet createHttpGet(String url, List<NameValuePair> params) {
              if( url != null )
                     return new HttpGet( params == null || params.size() == 0 ? url : url + "?" + URLEncodedUtils.format(params, "utf-8") );
              return null;
       }
       public static HttpResponse executeQuery(HttpUriRequest request, CookieStore cookie_store) throws ClientProtocolException, IOException {
              HttpClient mClient = new DefaultHttpClient();
              if( cookie_store == null )
                     return mClient.execute(request);
              HttpContext mHttpContext = new BasicHttpContext();
              mHttpContext.setAttribute(ClientContext.COOKIE_STORE, cookie_store);
              return mClient.execute(request, mHttpContext);
       }
       public static void exampleGetUsage() {
              String url = "http://localhost/login.php";
              List<NameValuePair> params = new ArrayList<NameValuePair>();
              params.add( new BasicNameValuePair("user","username") );
              params.add( new BasicNameValuePair("passwd","password") );
              try {
                     CookieStore cookie_store = new BasicCookieStore();
                     HttpEntity result = HttpQueryUsage.executeQuery(HttpQueryUsage.createHttpGet(url, params), cookie_store).getEntity();
                     for( Cookie item : cookie_store.getCookies() )
                            System.out.println("CookieName: "+item.getName()+",CookieValue: "+item.getValue() );
                     if( result != null )
                            System.out.println("PageResult:"+EntityUtils.toString(result));
              } catch (Exception e) {
                     e.printStackTrace();
              }
       }
       public static void examplePostUsage() {
              String url = "http://localhost/login.php";
              List<NameValuePair> params = new ArrayList<NameValuePair>();
              params.add( new BasicNameValuePair("user","username") );
              params.add( new BasicNameValuePair("passwd","password") );
              try {
                     CookieStore cookie_store = new BasicCookieStore();
                     HttpEntity result = HttpQueryUsage.executeQuery(HttpQueryUsage.createHttpPost(url, params, null, null), cookie_store).getEntity();
                     for( Cookie item : cookie_store.getCookies() )
                            System.out.println("CookieName: "+item.getName()+",CookieValue: "+item.getValue() );
                     if( result != null )
                            System.out.println("PageResult:"+EntityUtils.toString(result));
              } catch (Exception e) {
                     e.printStackTrace();
              }
       }
       public static void examplePostFileUploadingUsage() {
              String url = "http://localhost/login.php";
              List<NameValuePair> files = new ArrayList<NameValuePair>();
              files.add( new BasicNameValuePair("file1","/mnt/sdcard/test.png") );
              try {
                     CookieStore cookie_store = new BasicCookieStore();
                     HttpEntity result = HttpQueryUsage.executeQuery(HttpQueryUsage.createHttpPost(url, null, files, null), cookie_store).getEntity();
                     for( Cookie item : cookie_store.getCookies() )
                            System.out.println("CookieName: "+item.getName()+",CookieValue: "+item.getValue() );
                     if( result != null )
                            System.out.println("PageResult:"+EntityUtils.toString(result));
              } catch (Exception e) {
                     e.printStackTrace();
              }
       }
}


2012年9月20日 星期四

Android 開發筆記 - 簡易 Java AES 加解密與 SHA1 筆記

寫 Mobile app 有時需要存一些敏感的資訊,如果只是當做一個認證用途,大概就用 MD5 或 SHA1 來使用,但如果需要保留的,大概就需要能夠加密後又解密的,這時候就可以考慮拿一把 key 進行 AES Encryption/Decryption 動作。


簡易 SHA1:


import java.security.MessageDigest;


public static String sha1(String input) {
       try {
              MessageDigest digest = MessageDigest.getInstance("SHA-1");
              digest.reset();
              byte[] out = digest.digest(input.getBytes("UTF-8"));
              return android.util.Base64.encodeToString(out, android.util.Base64.NO_WRAP);
       } catch (Exception e) {
              e.printStackTrace();
       }
       return null;
}


簡易 AES Encryption/Decryption (使用自製的 key):


import javax.crypto.Cipher;
import javax.crypto.spec.SecretKeySpec;
import android.util.Base64;


public static String selfKey(String key) {   // key.length() must be 16, 24 or 32
       int length = key.length();
       if( length < 16 ) {
              for( int i=length ;i<16; ++i )
                     key += i%10;
              return key;
       } else if ( length < 24 ) {
              for( int i=length ;i<24; ++i )
                     key += i%10;
              return key;
       } else if ( length < 32 ) {
              for( int i=length ;i<32; ++i )
                     key += i%10;
              return key;
       }
       return key.substring(0, 32);
}


public static String selfEncode(String key, String value) {
       SecretKeySpec spec = new SecretKeySpec(selfKey(key).getBytes(), "AES");
       Cipher cipher;
       try {
              cipher = Cipher.getInstance("AES");
              cipher.init(Cipher.ENCRYPT_MODE, spec);
              return Base64.encodeToString(cipher.doFinal(value.getBytes()), android.util.Base64.NO_WRAP);
       } catch (Exception e) {
              e.printStackTrace();
       }
       return null;
}


public static String selfDecode(String key, String value) {
       SecretKeySpec spec = new SecretKeySpec(selfKey(key).getBytes(), "AES");
       Cipher cipher;
       try {
              cipher = Cipher.getInstance("AES");
              cipher.init(Cipher.DECRYPT_MODE, spec);
              return new String( cipher.doFinal(Base64.decode(value, android.util.Base64.NO_WRAP)) );
       } catch (Exception e) {
              e.printStackTrace();
       }
       return null;
}