顯示具有 mongodb 標籤的文章。 顯示所有文章

2015年1月2日 星期五

MongoDB 開發筆記 - 替 Mongoose (Node.js MongoDB Driver) 送 patch 的經驗

大概 2014 年 11 月附近,下了班仍會抽空把玩 MongoDB ,當時就決定搭配 node.js 來把玩 :P 當時在挑選 Node.js MongoDB Driver 時,看到官方文件提到了 Mongoose ,就順勢把玩了幾下。

對於 nodejs - mongoose 跟 nodejs - mongodb 的差異點在於 mongoose 做了滿多整合方式,例如 QueryStreams 的效果,在處理大量資料時,非常便利!

除了適應 node.js 的 async 架構外,又發現 mongoose 跟原生 mongodb 設計上已經有些 out of date,在 Stack Overflow 和 mongoose issue 有不少抱怨,就試著 trace mongoose 架構,再送看看 patch,很幸運地被接受了 :P 而且只多寫了 2~3 行 code,果真好的 framework 都已經設計的很好,可能花了 15 分鐘了解架構,而 testing 花了 30 分鐘,結果 coding 才 3 分鐘 XDD

只是送 patch 的過程並沒有很順利,包含未先讀 mongoose / CONTRIBUTING.md 的描述就直接上 code,被挑了 coding style 問題,另外,還沒有跑 unit test XDDD 就碰到 CI 回報錯誤 Orz 接著才發現補上的那段 code 並不嚴謹。把 code 嚴謹化後,CI 也直接回報可以 merge :) 就這樣非常快地 2 天內就被 merge 進 master 了。

這次 patch 經驗:

  • 開發上碰到需求不被滿足,接著搜尋 Stack Overflow 及該專案的 issue tracking,發現問題一直沒被解決時,就可以著手看看要不要抽時間來貢獻
  • 接著發現解法後,一定要先看專案的 CONTRIBUTING 規定
  • 不錯的專案一定都有 unit test,記得跑一下
  • 提供簡單的 testing 程式碼跟預期結果,可以加速 commiter 閱讀及提升認同感

剩下的就只要花時間等待了 Orz 例如這次的 commiter 是 MongoDB New York RD,作息剛好日夜顛倒,因此每一次完整的互動大概都花了 2 天。

2014年12月29日 星期一

MongoDB 開發筆記 - 使用 MapReduce 進行 Matrix Multiplication (矩陣乘法) 運算

最近下了班有空時都會繼續專研 MongoDB 分析資料的部分,一開始完全都用 Aggregation ,實在是有一些實測的效能比 MapReduce 好很多,但對於一些較複雜的計算方式,一直用 Aggregation 反而會卡住或是增加資料結構的複雜度 Orz 總之,開始正式去寫一些簡單的 MongoDB MapReduce 程式。

把玩的過程中,發現先前設計的 Sparse Matrix 結構,在計算矩陣相乘時,花了不少步驟並且效果變成永遠只能有一隻 Mapper 在進行 Orz 完全不能平行處理,因此開始研究一下如何用 MapReduce 進行矩陣運算。

網路上資源果然豐富,找到一篇:Programming Puzzle: Multiply Matrixes with MongoDB,概念解釋得很清楚。簡言之,當矩陣相乘時,以 A x B = C 為例,在組成 C 矩陣內的元素過程中,會採用 A 跟 B 矩陣內的部分元素相乘,那麼試著找個關係式子,讓這些元素最後在 Reducer 裡撞在一起,撞在一起時再相乘即可。

原來如此簡單的想法就可以讓 MapReduce 架構處理矩陣相乘了!有興趣可以再參考一下:changyy/node-mongodb-matrix-multiplication

2014年12月28日 星期日

MongoDB 開發筆記 - 在 MapReduce 進行 debug 的一些心得

有點久沒寫 blog 了!最近有空時就是把玩 MongoDB 或是嘗試送一些 patch ,所以反而就少寫一些筆記,因為都改成用 Code 啦 :P

最近玩 Mongodb MapReduce 時,碰到幾個問題跟需求:
  • 碰到 mongod Out of memory
  • 想要在 Mapper 跟 Reducer 輸出一些 console 訊息
其中 out of memory 的部分,經過 trace 後發現是內部 Mapper 實作的架構採用 C++ Map Structure 紀錄結果,累計處理完一百筆資料會輸出,但如果單一個筆 input 會產生極大數量的結果時,就會出現 out of memory,已經送了個鳥鳥的 patch 出去,就看 MongoDB Reviewer 決定如何 :P 畢竟這種現象也可以歸屬在使用者資料設計問題,為何讓一筆 input 產生巨量資料 XD

至於現況怎樣解套?若碰到 mongod crash 問題,先試試把 jsMode 打開吧!因為 jsMode = true 時,將採用 v8 engine 處理 mapper function,並且資料是直接輸出到 temp collection 的,可避開 out of memory 問題。

對於前期開發時,想在 Mapper 跟 Reducer 印出一些訊息時,此時不能直接用 console.log(obj),要改用 print(JSON.stringify(obj)) ,並且去翻一下 

/var/log/mongodb/mongod.log 吧!

2014年11月3日 星期一

[Linux] 架設 MongoDB Sharded Cluster 與驗證資料分散性 @ Ubuntu 14.04

今年年初時,把玩過 MongoDB Replica Set ,也試過一些 Map-Reduce 計算等,最近終於又開始抽空實驗了 :P 當時看到不少 Sharded Cluster 搭建在 MongoDB Replica Set 身上,深感 process (server) 的數量不低,就遲遲沒跳下去玩,最近才發現就算只是單一個 MongoDB Server 也可以當作 shared Cluster 一員,就方便啦!

此次 MongoDB Sharded Cluster 架構:
  • 跑兩個 MongoDB Server,分別在 port 10001, 10002
  • 跑一個 MongoDB Config Server - port 20001
  • 跑一個 MongoDB Routing Server - port 30001
以下操作全部都在一台 ubuntu 14.04 server:

$ rm -rf /tmp/mongo && mkdir -p /tmp/mongo/db/1 /tmp/mongo/db/2 /tmp/mongo/db/c /tmp/mongo/log

$ mongod --port 10001 --dbpath /tmp/mongo/db/1 --logpath /tmp/mongo/log/1 &
$ mongod --port 10002 --dbpath /tmp/mongo/db/2 --logpath /tmp/mongo/log/2 &
$ mongod --port 20001 --configsvr --dbpath /tmp/mongo/db/c --logpath /tmp/mongo/log/c &

$ mongos --port 30001 --configdb 127.0.0.1:20001 &


設定 partition 用法:

$ mongo --port 30001
mongos> sh.status()
--- Sharding Status ---
  sharding version: {
        "_id" : 1,
        "version" : 4,
        "minCompatibleVersion" : 4,
        "currentVersion" : 5,
        "clusterId" : ObjectId("###############")
}
  shards:
  databases:
        {  "_id" : "admin",  "partitioned" : false,  "primary" : "config" }
mongos> sh.addShard('127.0.0.1:10001')
{ "shardAdded" : "shard0000", "ok" : 1 }
mongos> sh.addShard('127.0.0.1:10002')
{ "shardAdded" : "shard0001", "ok" : 1 }
mongos> sh.status()
--- Sharding Status ---
  sharding version: {
        "_id" : 1,
        "version" : 4,
        "minCompatibleVersion" : 4,
        "currentVersion" : 5,
        "clusterId" : ObjectId("#####################")
}
  shards:
        {  "_id" : "shard0000",  "host" : "127.0.0.1:10001" }
        {  "_id" : "shard0001",  "host" : "127.0.0.1:10002" }
  databases:
        {  "_id" : "admin",  "partitioned" : false,  "primary" : "config" }
mongos> sh.enableSharding('ydb')
{ "ok" : 1 }
mongos> sh.status()
--- Sharding Status ---
  sharding version: {
        "_id" : 1,
        "version" : 4,
        "minCompatibleVersion" : 4,
        "currentVersion" : 5,
        "clusterId" : ObjectId("######################")
}
  shards:
        {  "_id" : "shard0000",  "host" : "127.0.0.1:10001" }
        {  "_id" : "shard0001",  "host" : "127.0.0.1:10002" }
  databases:
        {  "_id" : "admin",  "partitioned" : false,  "primary" : "config" }
        {  "_id" : "test",  "partitioned" : false,  "primary" : "shard0000" }
        {  "_id" : "ydb",  "partitioned" : true,  "primary" : "shard0000" }
mongos> use ydb
switched to db ydb
mongos> db.ycollection.ensureIndex( { _id : "hashed" } )
{
        "raw" : {
                "127.0.0.1:10001" : {
                        "createdCollectionAutomatically" : true,
                        "numIndexesBefore" : 1,
                        "numIndexesAfter" : 2,
                        "ok" : 1
                }
        },
        "ok" : 1
}
mongos> sh.shardCollection("ydb.ycollection", { "_id": "hashed" } )
{ "collectionsharded" : "ydb.ycollection", "ok" : 1 }
mongos> sh.status()
--- Sharding Status ---
  sharding version: {
        "_id" : 1,
        "version" : 4,
        "minCompatibleVersion" : 4,
        "currentVersion" : 5,
        "clusterId" : ObjectId("#####################")
}
  shards:
        {  "_id" : "shard0000",  "host" : "127.0.0.1:10001" }
        {  "_id" : "shard0001",  "host" : "127.0.0.1:10002" }
  databases:
        {  "_id" : "admin",  "partitioned" : false,  "primary" : "config" }
        {  "_id" : "test",  "partitioned" : false,  "primary" : "shard0000" }
        {  "_id" : "ydb",  "partitioned" : true,  "primary" : "shard0000" }
                ydb.ycollection
                        shard key: { "_id" : "hashed" }
                        chunks:
                                shard0000       2
                                shard0001       2
                        { "_id" : { "$minKey" : 1 } } -->> { "_id" : NumberLong("-4611686018427387902") } on : shard0000 Timestamp(2, 2)
                        { "_id" : NumberLong("-4611686018427387902") } -->> { "_id" : NumberLong(0) } on : shard0000 Timestamp(2, 3)
                        { "_id" : NumberLong(0) } -->> { "_id" : NumberLong("4611686018427387902") } on : shard0001 Timestamp(2, 4)
                        { "_id" : NumberLong("4611686018427387902") } -->> { "_id" : { "$maxKey" : 1 } } on : shard0001 Timestamp(2, 5)


簡易驗證資料分散性:

mongos>

db.ycollection.insert({user:"a", item: "1", rate: 0.3})
db.ycollection.insert({user:"a", item: "3", rate: 0.5})
db.ycollection.insert({user:"a", item: "4", rate: 0.9})
db.ycollection.insert({user:"b", item: "2", rate: 0.1})
db.ycollection.insert({user:"b", item: "3", rate: 0.6})
db.ycollection.insert({user:"b", item: "5", rate: 0.2})
db.ycollection.insert({user:"c", item: "3", rate: 0.2})
db.ycollection.insert({user:"c", item: "4", rate: 0.7})

mongos> db.ycollection.find()
{ "_id" : ObjectId("#################"), "user" : "a", "item" : "3", "rate" : 0.5 }
{ "_id" : ObjectId("#################"), "user" : "a", "item" : "1", "rate" : 0.3 }
{ "_id" : ObjectId("#################"), "user" : "a", "item" : "4", "rate" : 0.9 }
{ "_id" : ObjectId("#################"), "user" : "b", "item" : "2", "rate" : 0.1 }
{ "_id" : ObjectId("#################"), "user" : "b", "item" : "5", "rate" : 0.2 }
{ "_id" : ObjectId("#################"), "user" : "b", "item" : "3", "rate" : 0.6 }
{ "_id" : ObjectId("#################"), "user" : "c", "item" : "3", "rate" : 0.2 }
{ "_id" : ObjectId("#################"), "user" : "c", "item" : "4", "rate" : 0.7 }


接著,想要驗證資料的確是儲存在不同台 mongodb server ,作法就是把資料透過 mongodump 出來(bson),再用 bsondump 印出來驗證:

$ cd /tmp
$ mongodump --port 10001 -d ydb -c ycollection
$ bsondump dump/ydb/ycollection.bson
{ "_id" : ObjectId( "#############" ), "user" : "a", "item" : "1", "rate" : 0.3 }
{ "_id" : ObjectId( "#############" ), "user" : "b", "item" : "2", "rate" : 0.1 }
{ "_id" : ObjectId( "#############" ), "user" : "b", "item" : "3", "rate" : 0.6 }
{ "_id" : ObjectId( "#############" ), "user" : "c", "item" : "4", "rate" : 0.7 }
4 objects found

$ mongodump --port 10002 -d ydb -c ycollection
$ bsondump dump/ydb/ycollection.bson
{ "_id" : ObjectId( "#############" ), "user" : "a", "item" : "3", "rate" : 0.5 }
{ "_id" : ObjectId( "#############" ), "user" : "a", "item" : "4", "rate" : 0.9 }
{ "_id" : ObjectId( "#############" ), "user" : "b", "item" : "5", "rate" : 0.2 }
{ "_id" : ObjectId( "#############" ), "user" : "c", "item" : "3", "rate" : 0.2 }
4 objects found


因此可完成驗證,資料的確分在不同區!有興趣還可以用 MongoDB Aggregate (Map-Reduce) 實作共現矩陣(Co-Occurrence Matrix)及簡易的推薦系統 來驗證 partition 演算法的正確性。

2014年10月29日 星期三

[Linux] 使用 MongoDB Aggregate (Map-Reduce) 實作共現矩陣(Co-Occurrence Matrix)及簡易的推薦系統 @ Ubuntu 14.04


這陣子查閱了一些推薦系統的作法,發現早在 2012 年網路上就有非常多 Apache Mahout 的使用心得,這一套已經內含許多常見的演算法精華,故許多人都是採用 Apache Mahout 搭建推薦系統的。至於為何還要自己刻一個出來?單純練功啦,在此就練練 Partition、Sort 和 Merge (Map-Reduce) 的分析方式,但採用 MongoDB Aggregate 實作。

此例挑選 user, item 的關聯紀錄,例如 user1 買了 item1, item2, item5,而 user2 買了 item3, item4 等。在推薦系統中,大多就是將 input 前置處理,在挑恰當的演算法加以計算,接著處理 output。在此採用共現矩陣(Co-Occurrence Matrix) 的用法,以 user, item 的關聯紀錄,可以統計出一個 Item-based Co-Occurrence Matrix,簡言之就是各個 item 之間的關係,例如透過 item 1 跟 item 2 一起出現現象,整理成一個計算方式。

假設共有 a, b, c 三個使用者,而有 1, 2, 3, 4, 5,共有五種物品,其中 a, b, c 分別購買部分用品,並對各物品的評價(或價錢等意義)如下:

a, 1, 0.3
a, 3, 0.5
a, 4, 0.9

b, 2, 0.1
b, 3, 0.6
b, 5, 0.2

c, 3, 0.2
c, 4, 0.7


其中, 共現矩陣(Co-Occurrence Matrix) 如下:

\  1, 2, 3, 4, 5
1: 1, 0, 1, 1, 0
2: 0, 1, 1, 0, 1
3: 1, 1, 3, 2, 1
4: 1, 0, 2, 2, 0
5: 0, 1, 1, 0, 1


(1, 1) = 1, 代表 1 僅出現在 1 個使用者的清單
(4, 4) = 2, 代表 4 出現在 2 個使用者的清單
(3, 3) = 3, 代表 3 出現在 3 個使用者的清單
(4, 3) = 2, 代表 4 跟 3 同時出現的次數有兩次

接著,把使用者的購物清單也向量化(或矩陣):

\    a,   b,   c
1: 0.3,   0,   0,
2:   0, 0.1,   0,
3: 0.5, 0.6, 0.2,
4: 0.9,   0, 0.7,
5:   0, 0.2,   0,


當這兩個矩陣相成的結果,即為使用者與物品的關聯成果,且每個物品的分數即可當作使用者感興趣的分數。


以 MongoDB 為例,先將資料一筆筆新增至 db.rec 中:

db.rec.drop()
db.rec.insert({user:"a", item: "1", rate: 0.3})
db.rec.insert({user:"a", item: "3", rate: 0.5})
db.rec.insert({user:"a", item: "4", rate: 0.9})
db.rec.insert({user:"b", item: "2", rate: 0.1})
db.rec.insert({user:"b", item: "3", rate: 0.6})
db.rec.insert({user:"b", item: "5", rate: 0.2})
db.rec.insert({user:"c", item: "3", rate: 0.2})
db.rec.insert({user:"c", item: "4", rate: 0.7})

> db.rec.find()
{ "_id" : ObjectId("5450dedfbdfb5bad287c953c"), "user" : "a", "item" : "1", "rate" : 0.3 }
{ "_id" : ObjectId("5450dedfbdfb5bad287c953d"), "user" : "a", "item" : "3", "rate" : 0.5 }
{ "_id" : ObjectId("5450dedfbdfb5bad287c953e"), "user" : "a", "item" : "4", "rate" : 0.9 }
{ "_id" : ObjectId("5450dedfbdfb5bad287c953f"), "user" : "b", "item" : "2", "rate" : 0.1 }
{ "_id" : ObjectId("5450dedfbdfb5bad287c9540"), "user" : "b", "item" : "3", "rate" : 0.6 }
{ "_id" : ObjectId("5450dedfbdfb5bad287c9541"), "user" : "b", "item" : "5", "rate" : 0.2 }
{ "_id" : ObjectId("5450dedfbdfb5bad287c9542"), "user" : "c", "item" : "3", "rate" : 0.2 }
{ "_id" : ObjectId("5450dee0bdfb5bad287c9543"), "user" : "c", "item" : "4", "rate" : 0.7 }


接著分析 user 跟 item 的個數,分別儲存在 db.user 跟 db.item 中:

> db.item.drop()
true
> db.rec.aggregate([{$group: {_id: "$item"}}, {$sort: {_id: 1}}]).forEach(function(input) {
db.item.insert(input);
})
> db.item.find()
{ "_id" : "1" }
{ "_id" : "2" }
{ "_id" : "3" }
{ "_id" : "4" }
{ "_id" : "5" }

> db.user.drop()
> db.rec.aggregate([{$group: {_id: "$user"}}, {$sort: {_id: 1}}]).forEach(function(input) {
db.user.insert(input);
})
> db.user.find()
{ "_id" : "a" }
{ "_id" : "b" }
{ "_id" : "c" }


建立 Item-based Co-Occurrence Matrix(在此採用sparse matrix):

> db.user_item_list.drop();
> db.rec.aggregate({ $group: {_id: "$user", items: {$push: "$item"} }}).forEach(function(input){
db.user_item_list.insert(input);
})

> db.comatrix_input.drop()
> db.user_item_list.find().forEach(function(input){
for (var i in input.items){
var key = input.items[i]+"-"+input.items[i];
db.comatrix_input.insert( { key: key, value: 1} );
for (var j in input.items){
if (j>i) {
var key = input.items[i]+"-"+input.items[j];
db.comatrix_input.insert( { key: key, value: 1} );
key = input.items[j]+"-"+input.items[i];
db.comatrix_input.insert( { key: key, value: 1} );
}
}
}
});
> db.comatrix.drop()
> db.comatrix_input.aggregate({ $group: {_id: "$key", value: {$sum: "$value"}}}).forEach(function(input) {
db.comatrix.insert(input)
});
> db.comatrix.find()
{ "_id" : "1-3", "value" : 1 }
{ "_id" : "3-5", "value" : 1 }
{ "_id" : "5-2", "value" : 1 }
{ "_id" : "1-4", "value" : 1 }
{ "_id" : "3-1", "value" : 1 }
{ "_id" : "3-2", "value" : 1 }
{ "_id" : "2-5", "value" : 1 }
{ "_id" : "2-3", "value" : 1 }
{ "_id" : "1-1", "value" : 1 }
{ "_id" : "3-3", "value" : 3 }
{ "_id" : "5-3", "value" : 1 }
{ "_id" : "4-1", "value" : 1 }
{ "_id" : "4-3", "value" : 2 }
{ "_id" : "3-4", "value" : 2 }
{ "_id" : "5-5", "value" : 1 }
{ "_id" : "4-4", "value" : 2 }
{ "_id" : "2-2", "value" : 1 }


透過共現矩陣推算 user 對 item 的喜好程度:

> db.user_prefer.drop()
> db.item.find().forEach(function(in1) {
var value = 0;
db.item.find().forEach(function(in2) {
var key = in1._id+"-"+in2._id;
var factorInfo = db.comatrix.findOne( {_id : key} )
if (factorInfo && factorInfo.value) {
db.user.find().forEach(function(in3){
var user_id = in3._id
var get = db.rec.findOne({user: in3._id, item: in2._id})
if (get)
db.user_prefer.insert( {user: in3._id, item: in1._id, value: factorInfo.value * get.rate} )
})
}
})
})

> db.recommendation.drop()
> db.user_prefer.aggregate([{$group: {_id: { user: "$user", item:"$item"}, value: {$sum: "$value"}}}, {$sort: {_id: 1}}]).forEach(function(input){
db.recommendation.insert({_id: input._id, user: input._id.user, item: input._id.item, value: input.value})
})
> db.recommendation.find()
{ "_id" : { "user" : "a", "item" : "1" }, "user" : "a", "item" : "1", "value" : 1.7000000000000002 }
{ "_id" : { "user" : "a", "item" : "2" }, "user" : "a", "item" : "2", "value" : 0.5 }
{ "_id" : { "user" : "a", "item" : "3" }, "user" : "a", "item" : "3", "value" : 3.6 }
{ "_id" : { "user" : "a", "item" : "4" }, "user" : "a", "item" : "4", "value" : 3.1 }
{ "_id" : { "user" : "a", "item" : "5" }, "user" : "a", "item" : "5", "value" : 0.5 }
{ "_id" : { "user" : "b", "item" : "1" }, "user" : "b", "item" : "1", "value" : 0.6 }
{ "_id" : { "user" : "b", "item" : "2" }, "user" : "b", "item" : "2", "value" : 0.8999999999999999 }
{ "_id" : { "user" : "b", "item" : "3" }, "user" : "b", "item" : "3", "value" : 2.1 }
{ "_id" : { "user" : "b", "item" : "4" }, "user" : "b", "item" : "4", "value" : 1.2 }
{ "_id" : { "user" : "b", "item" : "5" }, "user" : "b", "item" : "5", "value" : 0.8999999999999999 }
{ "_id" : { "user" : "c", "item" : "1" }, "user" : "c", "item" : "1", "value" : 0.8999999999999999 }
{ "_id" : { "user" : "c", "item" : "2" }, "user" : "c", "item" : "2", "value" : 0.2 }
{ "_id" : { "user" : "c", "item" : "3" }, "user" : "c", "item" : "3", "value" : 2 }
{ "_id" : { "user" : "c", "item" : "4" }, "user" : "c", "item" : "4", "value" : 1.7999999999999998 }
{ "_id" : { "user" : "c", "item" : "5" }, "user" : "c", "item" : "5", "value" : 0.2 }


清掉 user 已擁有 items:

> db.rec.find().forEach(function(input){
var key = { "user": input.user, "item": input.item }
db.recommendation.remove( { _id : { $eq: key } } )
})

> db.recommendation.find()
{ "_id" : { "user" : "a", "item" : "2" }, "user" : "a", "item" : "2", "value" : 0.5 }
{ "_id" : { "user" : "a", "item" : "5" }, "user" : "a", "item" : "5", "value" : 0.5 }
{ "_id" : { "user" : "b", "item" : "1" }, "user" : "b", "item" : "1", "value" : 0.6 }
{ "_id" : { "user" : "b", "item" : "4" }, "user" : "b", "item" : "4", "value" : 1.2 }
{ "_id" : { "user" : "c", "item" : "1" }, "user" : "c", "item" : "1", "value" : 0.8999999999999999 }
{ "_id" : { "user" : "c", "item" : "2" }, "user" : "c", "item" : "2", "value" : 0.2 }
{ "_id" : { "user" : "c", "item" : "5" }, "user" : "c", "item" : "5", "value" : 0.2 }


收工!

2014年2月28日 星期五

MongoDB 開發筆記 - 使用 find / aggregate: $match 找尋必有或必無某屬性(property/element/field)的資料

話說 MongoDB 真是越用越順手,也唯有這樣才能體會大家為何對他驚歎 :P 在處理資料時,由於 schema free style,有時分析資料時,希望每筆資料都要有某個屬性才來處理,或是資料不能有某個屬性:

db.collection.find( { property: {$ne: null }} )
db.collection.find( { property: null} )


如果 property 的內容物是一個 array,如 { "property":[ ... ] } ,這時想要要求此 array 個數要大於 1 時,則可以改用 "$where" 語法(據說效率較慢,但 it's works !):

db.collection.find( { "$where": "this.property && this.property > 1" } )

然而,在 aggregate 的 $match 卻無法使用 "$where" 語法,可惜了點,會有以下錯誤訊息:

failed: exception: $where is not allowed inside of a $match aggregation expression

此外,就算分析出來,還是有要分析到 array 裡頭項目,又發現 aggregate 有 $unwind 的功能!效果就是幫你把 array 裡頭的資料一筆筆輸出:

db.collection.aggregate([
{
$match: {
property: { $ne : null }
}
},
{
$unwind: "$property"
},
{
$group: {
_id: "$property.name",
count: {
$sum: 1
}
}
}
])


單筆資料如:

{
"id": "client",
"date": "date",
"property":
[
{ "name": "ios", "version": 1 } ,
{ "name": "android", "version": 1 } ,
{ "name": "ios", "version": 2 }
]
}


假設資料就上述一筆,透過 aggregate $unwind 總輸出會是 property.length 個數:

{ "id": "client", "date": "date", "name": "ios", "version": 1 }
{ "id": "client", "date": "date", "name": "android", "version": 1 }
{ "id": "client", "date": "date", "name": "ios", "version": 2 }

2014年2月26日 星期三

MongoDB 開發筆記 - Aggregate 之 Group BY Timestamp / GROUP BY ObjectID getTimestamp @ MongoDB Server v2.4.9

上回看文件時,上頭說系統預設 ObjectID(_id) 中,已經有時間戳記了,並且建議不需要額外在儲存一個時間:
ObjectId is a 12-byte BSON type, constructed using:
a 4-byte value representing the seconds since the Unix epoch,
a 3-byte machine identifier,
a 2-byte process id, and
a 3-byte counter, starting with a random value.
開發環境:MongoDB Server v2.4.9
目標:SELECT `timestamp`, count(*) AS count FROM `test` GROUP BY `timestamp`;

儘管 ObjectID 有提供 _id.getTimestamp() 方式存取時間,但是在用 aggregate 時卻無法動態取用($year, $month, $dayOfMonth),如:

mongodb> db.test.aggregate({
$group:{
_id: {
year: { $year: "$_id.getTimestamp()" } ,
month: { $month: "$_id.getTimestamp()" } ,
day: { $dayOfMonth: "$_id.getTimestamp()" }
},
count: {
$sum:1
}
}
})
mongodb> aggregate failed: {
        "errmsg" : "exception: can't convert from BSON type EOO to Date",
        "code" : 16006,
        "ok" : 0
}


看來在 v2.4.9 版的應用時,還是需要建立一個 timestamp 出來,然而 db.collection.update 無法拿 document 自身資料來更新,例如從 ObjectID 抽出時間來用:

mongodb> db.test.update({timestamp: null }, { $set : { timestamp: _id.getTimestamp() } }, {multi:true})
ReferenceError: _id is not defined


需要改用 forEach 來一筆筆更新:

mongodb> db.test.find({timestamp:null}).snapshot().forEach(
function (item) {
item.timestamp = item._id.getTimestamp();
//db.test.save(item);
db.test.update(
# query
{
'_id': item['_id']
},
# update
{
'$set':
{
'timestamp': item['timestamp']
}
},
upsert=False, multi=False
);
}
)


接著終於可以 GROUP BY DATE 了 Orz

mongodb> db.test.aggregate(
{
$group:{
_id: {
year: { $year: "$timestamp" } ,
month: { $month: "$timestamp" } ,
day: { $dayOfMonth: "$timestamp" }
},
count: {
$sum:1
}
}
}
)
{
        "result" : [
                {
                        "_id" : {
                                "year" : 2014,
                                "month" : 2,
                                "day" : 22
                        },
                        "count" : 23
                },
                {
                        "_id" : {
                                "year" : 2014,
                                "month" : 2,
                                "day" : 21
                        },
                        "count" : 15
                },
                {
                        "_id" : {
                                "year" : 2014,
                                "month" : 2,
                                "day" : 20
                        },
                        "count" : 200
                }
        ],
        "ok" : 1
}

[Linux] 使用 Node.js 與 MongoDB 溝通與帳號認證 @ Ubuntu 12.04

透過 apt-get 安裝 node.js:

$ sudo apt-get install python-software-properties
$ sudo add-apt-repository ppa:chris-lea/node.js
$ sudo apt-get update
$ sudo apt-get install nodejs


建立 project:

$ cd project
$ npm install mongodb
$ vim test.js
var Db = require('mongodb').Db,
        MongoClient = require('mongodb').MongoClient;

var db_host = 'localhost';
var db_port = 27017;
var auth_db = 'admin';
var auth_name = 'account';
var auth_pass = 'password';

MongoClient.connect("mongodb://"+auth_name+":"+auth_pass+"@"+db_host+":"+db_port, function(err, db) {
        console.log(err);
        console.log(db.databaseName);
        db.close();
});

MongoClient.connect("mongodb://"+db_host+":"+db_port, function(err, db) {
        db.authenticate(auth_name, auth_pass, function(err, ret) {
                console.log(err);
       console.log(db.databaseName);
                console.log(ret);
       db.close();
        });
});
$ node test.js
Failed to load c++ bson extension, using pure JS version
null
admin
null
admin
true


以上為兩種跟 mongodb 進行認證的方式,一種是寫在 URI 中,另一種則是透過 db.authenticate 方式,至於這份程式的輸出不見得 "true" 是在最後一列,也有可能在第三列,這是因為 node.js async 架構關係,在這份 code 中不保證哪個 function 先跑。

如果 mongodb 本身要求認證,而未認證則會有錯誤訊息:

{ [MongoError: unauthorized] name: 'MongoError', ok: 0, errmsg: 'unauthorized' }

比較疑惑的地方是對於 auth_db 的部分,之前在用 pymongo 時,或是直接用 mongo 指令時,必須透過指定 authenticationDatabase 才能通過認證,但在 node.js 中,似乎沒有問題?再來摸看看好了。

2014年2月25日 星期二

[Linux] 從 MongoDB Standalone (Single-Noe) 到 MongoDB HA (Replica Set) 的線上轉移方式(without shutdown/offline) @ Ubuntu 12.04

不關機的轉換原理應該都差不多?例如把水管從 A 處改接到到 B 處,只是情境跟操作手法適不適用是需要考慮的重要因素,在此先敘述使用情境:
  • 一隻 PHP 定期收到資料後,把資料存在 /tmp 區,再透過 popen 在背景發動一隻 pymongo 程式讀取 /tmp  資料,由 pymongo client 連到 mongodb server 塞資料,塞完後就斷線的模式。所以 CGI 有自己的 PID,而 pymongo 寫的 tool 也有自己的 PID。
  • 資料的單純作 insert 為主,還沒有負責處理 query 的需求,故 mongodb 只要能確保資料有被記錄起來,沒有損失即可,但無法保證讓 Replica Set 的資料馬上就跟 Standalone 一致。
線上轉換原理:
  1. 架設 MongoDB Replica Set
  2. 將更改 pymongo 程式,將 mongodb server 位置改到 Replica Set 即可
  3. 將 Standalone MongoDB 用 mongoexport 匯出資料 table.json, table2.json, ...
  4. 將資料用 mongoimport 方式匯入到 Replica Set 之 PRIMARY node 即可
在上述的使用情境下,資料的收集就不會間斷,至於官方介紹的方式也可以參考一下,屬於把 mongod 關掉後重開:Convert a Standalone to a Replica Set

此外,一些心得:
  • 原先資料就使用系統 _id 管理,不覆蓋 _id ,而 _id 有時間資訊,匯入新的機器(Replica Set) 沒有問題
  • 匯入資料若碰到 _id 一樣時,會 skip 掉,所以不必擔心重複匯入的問題
  • 如果匯錯資料時,例如預計到 table 1,結果不小心匯到 table 2 時,假設兩種資料格式有關鍵的差異點,例如在 table 1 的 record 才有 {"helloworld":0} 的屬性,那就好辦,把這類 record 找出來刪掉即可

# 找尋 table2 中,record 裡 hellworld 屬性的資料筆數
firstset:PRIMARY> db.table2.find({helloworld: { $ne : null } }).count()
firstset:PRIMARY> db.table2.remove({helloworld: { $ne : null } })

2014年2月18日 星期二

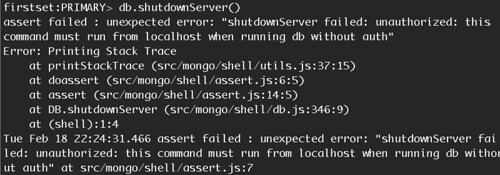
[Linux] MongoDB Replica Set with Auth & KeyFile @ Ubuntu 12.04

mongod shutdown error

建 cluster 不見得需要帳號管控,因為多數處在保護的網路環境,而 MongoDB 預設沒有帳密管控且帳密管控做的很簡單,分成 read-only 跟 read-write 模式。而使用認證的主因是為了遠端關掉機器,沒有認證機制的服務僅能透過 localhost 關掉服務,有一派說是透過 service mongodb stop 指令,又有一派說直接 kill process 即可,但有文章說如此容易造成問題?還是要用正式的關機流程比較妥( mongo> db.shutdownServer() )。

參考文件:
架設 Replica Set 的流程:
  1. 啟動多台 mongod --replSet set_name
  2. 挑選一台 mongod 登入
  3. 使用 rs.init() 初始化後,再用 rs.add() 加入其他 mongod 或是使用 db.runCommand({'replSetInitiate':{'members':[]}}) 一次新增
架設需要認證的 Replica Set 的流程:
  1. 用 default 模式啟動一台 mongod
  2. 建立帳號
  3. 建立 keyFile (檔案內容隨意,但需要多過6個字元)
  4. 關掉後以 --replSet set_name 與 --keyFile key_file_path 模式啟動多支 mongod
  5. 登入一台 mongod 以及完成帳號認證
  6. 使用 rs.init() 初始化後,再用 rs.add() 加入其他 mongod 或是使用 db.runCommand({'replSetInitiate':{'members':[]}}) 一次新增
上述兩者流程的差別在於後者要先建帳號後,再用 --replSet 跟 --keyFile 模式啟動。而後,為了測試就寫了隻 script 筆記一下:

未使用認證模式:

$ python replset_init.py --reset

Init DB(0), Port: 30000, Path: /home/id/data/mongodb-study/cluster/db/db-0
 $ mongod --dbpath /home/id/data/mongodb-study/cluster/db/db-0 --port 30000 --oplogSize 700 --logpath /home/id/data/mongodb-study/cluster/log/db-0.log --rest --replSet firstset

Init DB(1), Port: 30001, Path: /home/id/data/mongodb-study/cluster/db/db-1
 $ mongod --dbpath /home/id/data/mongodb-study/cluster/db/db-1 --port 30001 --oplogSize 700 --logpath /home/id/data/mongodb-study/cluster/log/db-1.log --rest --replSet firstset

Init DB(2), Port: 30002, Path: /home/id/data/mongodb-study/cluster/db/db-2
 $ mongod --dbpath /home/id/data/mongodb-study/cluster/db/db-2 --port 30002 --oplogSize 700 --logpath /home/id/data/mongodb-study/cluster/log/db-2.log --rest --replSet firstset

nohup: ignoring input and appending output to `nohup.out'

Waiting...
        localhost:30000: .....OK
        localhost:30001: OK
        localhost:30002: OK

Connect to localhost:30000

Initialize the First Replica Set:

$ monogo localhost:30000/admin
mongo> db.runCommand( {'replSetInitiate': {'_id': 'firstset', 'members': [{'host': 'localhost:30000', '_id': 1}, {'host': 'localhost:30001', '_id': 2}, {'host': 'localhost:30002', '_id': 3}]}} )

Result:
{u'info': u'Config now saved locally.  Should come online in about a minute.', u'ok': 1.0}

All is done.

server info:
 $ mongo localhost:30000/admin --eval 'printjson(rs.status())'

shutdown servers:
 $ mongo localhost:30000/admin --eval 'db.shutdownServer()'
 $ mongo localhost:30001/admin --eval 'db.shutdownServer()'
 $ mongo localhost:30002/admin --eval 'db.shutdownServer()'


使用認證模式:

$ python replset_init.py --reset --auth-key-file keyfile --auth-user account --auth-pass password

Init DB(0), Port: 30000, Path: /home/id/data/mongodb-study/cluster/db/db-0
 $ mongod --dbpath /home/id/data/mongodb-study/cluster/db/db-0 --port 30000 --oplogSize 700 --logpath /home/id/data/mongodb-study/cluster/log/db-0.log --rest
nohup: ignoring input and appending output to `nohup.out'

Waiting...
        localhost:30000: ..OK

Connect to localhost:30000

Initialize the First Replica Set:

$ monogo localhost:30000/admin
mongo> db.addUser( {user: "account", pwd:"password", roles:["userAdminAnyDatabase"] })

Add account done.

Restart the mongod:

Init DB(0), Port: 30000, Path: /home/id/data/mongodb-study/cluster/db/db-0
 $ mongod --dbpath /home/id/data/mongodb-study/cluster/db/db-0 --port 30000 --oplogSize 700 --logpath /home/id/data/mongodb-study/cluster/log/db-0.log --rest --replSet firstset --keyFile keyfile

Init DB(1), Port: 30001, Path: /home/id/data/mongodb-study/cluster/db/db-1
 $ mongod --dbpath /home/id/data/mongodb-study/cluster/db/db-1 --port 30001 --oplogSize 700 --logpath /home/id/data/mongodb-
study/cluster/log/db-1.log --rest --replSet firstset --keyFile keyfile

nohup: ignoring input and appending output to `nohup.out'
Init DB(2), Port: 30002, Path: /home/id/data/mongodb-study/cluster/db/db-2
 $ mongod --dbpath /home/id/data/mongodb-study/cluster/db/db-2 --port 30002 --oplogSize 700 --logpath /home/id/data/mongodb-
study/cluster/log/db-2.log --rest --replSet firstset --keyFile keyfile

nohup: ignoring input and appending output to `nohup.out'

Waiting...
        localhost:30000: .......OK
        localhost:30001: ...................................OK
        localhost:30002: .OK

Connect to localhost:30000

Initialize the First Replica Set:

$ monogo localhost:30000/admin
mongo> db.runCommand( {'replSetInitiate': {'_id': 'firstset', 'members': [{'host': 'localhost:30000', '_id': 1}, {'host': 'localhost:30001', '_id': 2}, {'host': 'localhost:30002', '_id': 3}]}} )

Result:
{u'info': u'Config now saved locally.  Should come online in about a minute.', u'ok': 1.0}

All is done.

server info:
 $ mongo localhost:30000/admin -u account -p password --eval 'printjson(rs.status())'

shutdown servers:
 $ mongo localhost:30000/admin -u account -p password --eval 'db.shutdownServer()'
 $ mongo localhost:30001/admin -u account -p password --eval 'db.shutdownServer()'
 $ mongo localhost:30002/admin -u account -p password --eval 'db.shutdownServer()'

2014年2月5日 星期三

[MongoDB] 透過 MapReduce 進行 Collections Join @ Ubuntu 12.04

使用 NOSQL 時,其先天設計無法提供像 MySQL Table Joins 等招數,此時的解法就是把兩個 tables 倒進一張 table 來解決。

以 MongoDB command line 操作,新增資料:

> use mydb
switched to db mydb
> db.t1.insert({"data":1, "data2":2, "data3":3})
> db.t1.insert({"data":4, "data2":5, "data3":6})
> db.t1.insert({"data":7, "data2":8, "data3":9})
> db.t1.find()
{ "_id" : ObjectId("52f1f9c7bf6317bb2615b216"), "data" : 1, "data2" : 2, "data3" : 3 }
{ "_id" : ObjectId("52f1f9cbbf6317bb2615b217"), "data" : 4, "data2" : 5, "data3" : 6 }
{ "_id" : ObjectId("52f1f9cebf6317bb2615b218"), "data" : 7, "data2" : 8, "data3" : 9 }
> db.t2.insert({"data4":3, "data5":2, "data6":1})
> db.t2.insert({"data4":6, "data5":5, "data6":4})
> db.t2.insert({"data4":9, "data5":8, "data6":7})
> db.t2.find()
{ "_id" : ObjectId("52f1f9d4bf6317bb2615b219"), "data4" : 3, "data5" : 2, "data6" : 1 }
{ "_id" : ObjectId("52f1f9d7bf6317bb2615b21a"), "data4" : 6, "data5" : 5, "data6" : 4 }
{ "_id" : ObjectId("52f1f9dbbf6317bb2615b21b"), "data4" : 9, "data5" : 8, "data6" : 7 }


定義 t1 跟 t2 的 mapper function:

> t1_map = function() {
emit(this.data3, { "data": this.data, "data2": this.data2, "data3": this.data3 });
}
> t2_map = function() {
emit(this.data4, { "data4": this.data4, "data5": this.data5, "data6": this.data6 });
}


定義 reducer function:

> reducer = function(key, values){
var result = {} ;
values.forEach( function(value){
var field;
for(field in value)
if( value.hasOwnProperty(field) )
result[field] = value[field];
});
return result;
}


進行 map-reduce:

> db.tmp.drop()
true
> db.t1.mapReduce(t1_map, reducer , {"out":{"reduce":"tmp"}} )
{
        "result" : "tmp",
        "timeMillis" : 10,
        "counts" : {
                "input" : 3,
                "emit" : 3,
                "reduce" : 0,
                "output" : 3
        },
        "ok" : 1,
}
> db.tmp.find()
{ "_id" : 3, "value" : { "data" : 1, "data2" : 2, "data3" : 3 } }
{ "_id" : 6, "value" : { "data" : 4, "data2" : 5, "data3" : 6 } }
{ "_id" : 9, "value" : { "data" : 7, "data2" : 8, "data3" : 9 } }
> db.t2.mapReduce(t2_map, reducer , {"out":{"reduce":"tmp"}} )
{
        "result" : "tmp",
        "timeMillis" : 6,
        "counts" : {
                "input" : 3,
                "emit" : 3,
                "reduce" : 0,
                "output" : 3
        },
        "ok" : 1,
}
> db.tmp.find()
{ "_id" : 3, "value" : { "data4" : 3, "data5" : 2, "data6" : 1, "data" : 1, "data2" : 2, "data3" : 3 } }
{ "_id" : 6, "value" : { "data4" : 6, "data5" : 5, "data6" : 4, "data" : 4, "data2" : 5, "data3" : 6 } }
{ "_id" : 9, "value" : { "data4" : 9, "data5" : 8, "data6" : 7, "data" : 7, "data2" : 8, "data3" : 9 } }


以上的概念就是 t1 採用 data3 作為 join key,而 t2 採用 data4 ,分別跑 map-reduce 後儲存在 tmp 這張表(collection),如此 tmp 即為常用的 SQL Join 結果。

以上須留意的是跑 map-reduce 時,要指定 out 為 reduce 形態,細節可以在 out Options 查看,可分成 replace, reduce, merge ,若沒指定為 reduce 的話,上述最後結果僅有 t2 的資料。

此外,在 pymongo 上也能達成,有興趣可以參考 map-reduce-join.py,寫的彈性一點,所以閱讀性較差,用法:

$ python map-reduce-join.py --host localhost --database mydb --reset-result --result tmp --show-result --select-out-1 data data2 data3 --join-key-1 data3 --select-out-2 data4 data5 data6 --join-key-2 data4

結果:

Mapper 1 Code:
                function() {
                        emit(this.data3, {"data": this.data, "data2": this.data2, "data3": this.data3});
                }

Reducer 1 Code:
                function(key, values) {
                        var out = {};
                        values.forEach( function(value) {
                                for ( field in value )
                                        if( value.hasOwnProperty(field) )
                                                out[field] = value[field];

                        });
                        return out
                }

{u'counts': {u'input': 3, u'reduce': 0, u'emit': 3, u'output': 3}, u'timeMillis': 34, u'ok': 1.0, u'result': u'tmp'}
{u'_id': 3.0, u'value': {u'data': 1.0, u'data3': 3.0, u'data2': 2.0}}
{u'_id': 6.0, u'value': {u'data': 4.0, u'data3': 6.0, u'data2': 5.0}}
{u'_id': 9.0, u'value': {u'data': 7.0, u'data3': 9.0, u'data2': 8.0}}
Mapper 2 Code:
                function() {
                        emit(this.data4, {"data4": this.data4, "data5": this.data5, "data6": this.data6});
                }

Reducer 2 Code:
                function(key, values) {
                        var out = {};
                        values.forEach( function(value) {
                                for ( field in value )
                                        if( value.hasOwnProperty(field) )
                                                out[field] = value[field];
                        });
                        return out
                }

{u'counts': {u'input': 3, u'reduce': 0, u'emit': 3, u'output': 3}, u'timeMillis': 5, u'ok': 1.0, u'result': u'tmp'}
{u'_id': 3.0, u'value': {u'data5': 2.0, u'data4': 3.0, u'data6': 1.0, u'data': 1.0, u'data3': 3.0, u'data2': 2.0}}
{u'_id': 6.0, u'value': {u'data5': 5.0, u'data4': 6.0, u'data6': 4.0, u'data': 4.0, u'data3': 6.0, u'data2': 5.0}}
{u'_id': 9.0, u'value': {u'data5': 8.0, u'data4': 9.0, u'data6': 7.0, u'data': 7.0, u'data3': 9.0, u'data2': 8.0}}

2014年1月24日 星期五

[MongoDB] 使用 PyMongo 把玩 MapReduce @ Ubuntu 12.04

稍微接觸了一下 MongoDB 後,對此感到無比的興奮?與 Hadoop 相比,感覺上手度滿高的,不過,使用 PyMongo 的情況下,還是需要比較適合熟悉 Javascript 的人,因為 Mapper 跟 Reducer 的撰寫仍是用 Javascript 的,更正確來說是 BSON's JavaScript code type.

既然是 MapReduce,那就先來個 word count 吧!說真的,word count 也是我學 Hadoop 時跑的第一個範例。

簡單試了一下(文字來源:Taiwan wiki - Names):

$ python import.py -
{"field":"There are various names for the island of Taiwan in use today, derived from explorers or rulers by each particular period. The former name Formosa (福爾摩沙) dates from 1544, when Portuguese sailors sighted the main island of Taiwan and named it Ilha Formosa, which means \"Beautiful Island\".[21] In the early 17th century, the Dutch East India Company established a commercial post at Fort Zeelandia (modern Anping, Tainan) on a coastal islet called \"Tayouan\" in the local Siraya language; the name was later extended to the whole island as \"Taiwan\".[22] Historically, \"Taiwan\" has also been written as 大灣, 臺員, 大員, 臺圓, 大圓 and 臺窩灣."}
{"field":"The official name of the state is the \"Republic of China\"; it has also been known under various names throughout its existence. Shortly after the ROC's establishment in 1912, while it was still located on the Asian mainland, the government used the abbreviation \"China\" (\"Zhongguó\") to refer to itself. During the 1950s and 1960s, it was common to refer to it as \"Nationalist China\" (or \"Free China\") to differentiate it from \"Communist China\" (or \"Red China\").[23] It was present at the UN under the name \"China\" until 1971, when it lost its seat to the People's Republic of China. Since then, the name \"China\" has been commonly used internationally to refer only to the People's Republic of China.[24] Over subsequent decades, the Republic of China has become commonly known as \"Taiwan\", after the island that composes most of its territory. The Republic of China participates in most international forums and organizations under the name \"Chinese Taipei\" due to diplomatic pressure from the PRC. For instance, it is the name under which it has competed at the Olympic Games since 1984, and its name as an observer at the World Health Organization.[25]"}
Import:  2
[ObjectId('52e265a69c3fe514be2534fe'), ObjectId('52e265a69c3fe514be2534ff')]


$ python map-reduce-word-count.py --show-result --delete-result
Collection(Database(MongoClient('localhost', 27017), u'db'), u'tmp_2014-01-24_131025')
{u'_id': u'1544', u'value': {u'count': 1.0}}
{u'_id': u'17th', u'value': {u'count': 1.0}}
{u'_id': u'1912', u'value': {u'count': 1.0}}
{u'_id': u'1950s', u'value': {u'count': 1.0}}
{u'_id': u'1960s', u'value': {u'count': 1.0}}
{u'_id': u'1971', u'value': {u'count': 1.0}}
{u'_id': u'1984', u'value': {u'count': 1.0}}
{u'_id': u'21', u'value': {u'count': 1.0}}
{u'_id': u'22', u'value': {u'count': 1.0}}
{u'_id': u'23', u'value': {u'count': 1.0}}
{u'_id': u'24', u'value': {u'count': 1.0}}
{u'_id': u'25', u'value': {u'count': 1.0}}
{u'_id': u';', u'value': {u'count': 1.0}}
{u'_id': u'Anping', u'value': {u'count': 1.0}}
{u'_id': u'Asian', u'value': {u'count': 1.0}}
{u'_id': u'Beautiful', u'value': {u'count': 1.0}}
{u'_id': u'China', u'value': {u'count': 12.0}}
{u'_id': u'Chinese', u'value': {u'count': 1.0}}
{u'_id': u'Communist', u'value': {u'count': 1.0}}
{u'_id': u'Company', u'value': {u'count': 1.0}}
{u'_id': u'During', u'value': {u'count': 1.0}}
{u'_id': u'Dutch', u'value': {u'count': 1.0}}
{u'_id': u'East', u'value': {u'count': 1.0}}
{u'_id': u'For', u'value': {u'count': 1.0}}


其中 mongodb-study/blob/master/tools/import.py 只是把資料輸入到 mongodb 中,預設 database = db, collection = test。比較重要的 mapper, reducer 則是寫在 mongodb-study/blob/master/tools/map-reduce-word-count.py 程式中。

而 map-reduce-word-count.py 中,比較重要的則是 mapper 與 reducer 的定義,雖然是用 pymongo ,但這邊仍是用 Javascript 描述的,這大概是 pymongo 的最大缺點吧?印象中翻到 Java 版的 MongoDB 操作,可直接用 Java 來撰寫,這點影響還滿大的,簡言之,用 Pymongo 要撰寫 mapper、reducer 就是得先會一點 Javascript 才行。

使用 pymongo 撰寫 mapper 的方式,有一個小提醒就是 this.field 等於可以取到原先 input 的資料,但是,這邊的 this.field 需要強制轉型,這樣才能接著用 split 切字出來,另外,也可以自定 func 來呼叫使用,如此一來,就變成只剩字串處理的技巧了 :)

mapper = Code (
"""
function() {
var func = {
'author':function() {
return 'changyy';
}
};
(“”+this.field).split(/[\s\[\],\(\)"\.]+/).forEach(function(v){
//emit(func.author(), 1 );
if(v && v.length )
emit(v, {'count':1});
} );
}
"""
)


reducer = Code(
"""
function(key, value) {
var total = 0;
for(var i = 0 ; i < value.length ; ++i ) {
total += value[i].count;
}
return {'count':total};
}
"""
)

2014年1月22日 星期三

[Linux] MongoDB 與 PyMongo 初體驗 @ Ubuntu 12.04, Linode

架設:

http://docs.mongodb.org/manual/tutorial/install-mongodb-on-ubuntu/

$ sudo apt-key adv --keyserver hkp://keyserver.ubuntu.com:80 --recv 7F0CEB10
$ echo 'deb http://downloads-distro.mongodb.org/repo/ubuntu-upstart dist 10gen' | sudo tee /etc/apt/sources.list.d/mongodb.list
$ sudo apt-get update

http://www.mongodb.org/downloads
$ sudo apt-get install mongodb-10gen=2.4.9
$ echo "mongodb-10gen hold" | sudo dpkg --set-selections

$ sudo service mongodb restart
mongodb stop/waiting
mongodb start/running, process ######

$ mongo
MongoDB shell version: 2.4.9
connecting to: test
Welcome to the MongoDB shell.
For interactive help, type "help".
For more comprehensive documentation, see
        http://docs.mongodb.org/
Questions? Try the support group
        http://groups.google.com/group/mongodb-user


防火牆存取限制:

$ sudo iptables --list-rules
-P INPUT ACCEPT
-P FORWARD ACCEPT
-P OUTPUT ACCEPT

$ sudo vim /etc/init.d/iptables-rule.sh
#!/bin/sh

# BIN
BIN_IPTABLES=`which iptables`

# reset rules
$BIN_IPTABLES -F
$BIN_IPTABLES -X
$BIN_IPTABLES -Z

# init policies
#$BIN_IPTABLES -P INPUT DROP
#$BIN_IPTABLES -P OUTPUT ACCEPT
#$BIN_IPTABLES -P FORWARD ACCEPT

# mongo db
$BIN_IPTABLES -A INPUT -j ACCEPT -p tcp --destination-port 27017 -s 127.0.0.1,IP1,IP2,IP3
# mongo db drop all
$BIN_IPTABLES -A INPUT -j REJECT -p tcp --destination-port 27017

$ sudo chmod 775 /etc/init.d/iptables-rule.sh
$ sudo update-rc.d -f iptables-rule.sh defaults


一些 mongo 常用指令:

顯示所有的 databases (SQL: show databases)
> show dbs

使用指定 collection (SQL: use dbname)
> use dbname

顯示目前 databases 中的所有 collections (SQL: show tables)
> show collections

更多對照指令:
SQL to MongoDB Mapping Chart
PHP: SQL to Mongo Mapping Chart


安裝 pymongo 套件:

$ git clone git://github.com/mongodb/mongo-python-driver.git pymongo
$ cd pymongo
$ sudo python setup.py install


使用 pymongo 新增範例:

from pymongo import MongoClient

client = MongoClient()
database = client[‘dbname’] # SQL: Database Name
collection = database[‘table’]   # SQL: Table Name

item = {"author":"changyy"}
collection.insert(item)