顯示具有 apple 標籤的文章。 顯示所有文章

2024年7月25日 星期四

AI 開發筆記 - 透過 llama.cpp 使用 Meta Llama 3.1 8B,過程包括資料格式轉換 @ MacBook Pro M1 32GB RAM


首先,下載 Meta llama3.1 8B 方式都寫在網站上,先到 llama.meta.com/llama-downloads 填單,填完單就會顯示下載網址,例如這種格式:

https://llama3-1.llamameta.net/*?Policy=XXX&Key-Pair-Id=XXX&Download-Request-ID=XXX

然後下載方式不是直接瀏覽他,要依照指定方式,透過 download.sh 下載,下載資訊:


連續動作:

```
% git clone https://github.com/meta-llama/llama-models
% bash llama-models/models/llama3_1/download.sh
Enter the URL from email:  https://llama3-1.llamameta.net/*?Policy=XXX&Key-Pair-Id=XXX&Download-Request-ID=XXX

 **** Model list ***
 -  meta-llama-3.1-405b
 -  meta-llama-3.1-70b
 -  meta-llama-3.1-8b
 -  meta-llama-guard-3-8b
 -  prompt-guard
Choose the model to download: meta-llama-3.1-8b

**** Available models to download: *** 
 -  meta-llama-3.1-8b-instruct
 -  meta-llama-3.1-8b

Enter the list of models to download without spaces or press Enter for all: meta-llama-3.1-8b
Downloading LICENSE and Acceptable Usage Policy
...
```

資料量大小:

```
% du -hd1 Meta-Llama-3.1-8B 
 15G    Meta-Llama-3.1-8B

% tree Meta-Llama-3.1-8B 
Meta-Llama-3.1-8B
├── consolidated.00.pth
├── params.json
└── tokenizer.model

1 directory, 3 files
```

接著就可以享受 Meta 釋出給全世界的 AI 模型了,萬分感謝 Orz 省去自己掏錢買機器訓練,據說這版 llama3.1 號稱可以跟 ChatGPT-4o 或 Claude 3.5 Sonnet 抗衡。但基於家裡的算力不足,純試試 8B 吧!

接下來使用 llama.cpp 體驗,除了程式碼編譯外,還要做資料格式的轉換:

```
% wget https://raw.githubusercontent.com/huggingface/transformers/main/src/transformers/models/llama/convert_llama_weights_to_hf.py
% python3 -m venv venv
% source venv/bin/activate
(venv) % pip install transformers torch huggingface_hub tiktoken blobfile accelerate
(venv) % python3 convert_llama_weights_to_hf.py --input_dir Meta-Llama-3.1-8B --model_size 8B --output_dir llama3_1_hf --llama_version 3.1

(venv) % du -hd1 llama3_1_hf
 15G    llama3_1_hf
(venv) % tree llama3_1_hf
llama3_1_hf
├── config.json
├── generation_config.json
├── model-00001-of-00004.safetensors
├── model-00002-of-00004.safetensors
├── model-00003-of-00004.safetensors
├── model-00004-of-00004.safetensors
├── model.safetensors.index.json
├── special_tokens_map.json
├── tokenizer.json
└── tokenizer_config.json

1 directory, 10 files
```

編譯及使用 llama.cpp:

```
(venv) % git clone https://github.com/ggerganov/llama.cpp
(venv) % cd llama.cpp
(venv) llama.cpp % LLAMA_METAL=1 make  
(venv) llama.cpp % pip install -r requirements.txt
(venv) llama.cpp % time python3 convert_hf_to_gguf.py ../llama3_1_hf/ --outfile llama3_1-8B.gguf
(venv) llama.cpp % 
(venv) llama.cpp % du -hd1 llama3_1-8B.gguf
 15G    llama3_1-8B.gguf
(venv) llama.cpp % ./llama-server -m ./llama3_1-8B.gguf
...
error: Insufficient Memory (00000008:kIOGPUCommandBufferCallbackErrorOutOfMemory)
...
llama_new_context_with_model: n_ctx      = 131072
llama_new_context_with_model: n_batch    = 2048
llama_new_context_with_model: n_ubatch   = 512
llama_new_context_with_model: flash_attn = 0
llama_new_context_with_model: freq_base  = 500000.0
llama_new_context_with_model: freq_scale = 1
ggml_metal_init: allocating
ggml_metal_init: found device: Apple M1 Pro
ggml_metal_init: picking default device: Apple M1 Pro
ggml_metal_init: using embedded metal library
ggml_metal_init: GPU name:   Apple M1 Pro
ggml_metal_init: GPU family: MTLGPUFamilyApple7  (1007)
ggml_metal_init: GPU family: MTLGPUFamilyCommon3 (3003)
ggml_metal_init: GPU family: MTLGPUFamilyMetal3  (5001)
ggml_metal_init: simdgroup reduction support   = true
ggml_metal_init: simdgroup matrix mul. support = true
ggml_metal_init: hasUnifiedMemory              = true
ggml_metal_init: recommendedMaxWorkingSetSize  = 22906.50 MB
llama_kv_cache_init:      Metal KV buffer size = 16384.00 MiB
llama_new_context_with_model: KV self size  = 16384.00 MiB, K (f16): 8192.00 MiB, V (f16): 8192.00 MiB
llama_new_context_with_model:        CPU  output buffer size =     0.98 MiB
llama_new_context_with_model:      Metal compute buffer size =  8480.00 MiB
llama_new_context_with_model:        CPU compute buffer size =   264.01 MiB
llama_new_context_with_model: graph nodes  = 1030
llama_new_context_with_model: graph splits = 2
...
^Cggml_metal_free: deallocating
```

預設環境會碰到 Aplpe MacBook Pro 筆電資源的限制,多使用了 -c 31072 來跑,整個 llama-server 在 macOS 活動監視器上,可以看到使用記憶體不到 4GB,看起來有穩定下來:

```
(venv) llama.cpp % ./llama-server -m ./llama3_1-8B.gguf -c 31072
...
.........................................................................................
llama_new_context_with_model: n_ctx      = 31072
llama_new_context_with_model: n_batch    = 2048
llama_new_context_with_model: n_ubatch   = 512
llama_new_context_with_model: flash_attn = 0
llama_new_context_with_model: freq_base  = 500000.0
llama_new_context_with_model: freq_scale = 1
ggml_metal_init: allocating
ggml_metal_init: found device: Apple M1 Pro
ggml_metal_init: picking default device: Apple M1 Pro
ggml_metal_init: using embedded metal library
ggml_metal_init: GPU name:   Apple M1 Pro
ggml_metal_init: GPU family: MTLGPUFamilyApple7  (1007)
ggml_metal_init: GPU family: MTLGPUFamilyCommon3 (3003)
ggml_metal_init: GPU family: MTLGPUFamilyMetal3  (5001)
ggml_metal_init: simdgroup reduction support   = true
ggml_metal_init: simdgroup matrix mul. support = true
ggml_metal_init: hasUnifiedMemory              = true
ggml_metal_init: recommendedMaxWorkingSetSize  = 22906.50 MB
llama_kv_cache_init:      Metal KV buffer size =  3884.00 MiB
llama_new_context_with_model: KV self size  = 3884.00 MiB, K (f16): 1942.00 MiB, V (f16): 1942.00 MiB
llama_new_context_with_model:        CPU  output buffer size =     0.98 MiB
llama_new_context_with_model:      Metal compute buffer size =  2034.69 MiB
llama_new_context_with_model:        CPU compute buffer size =    68.69 MiB
llama_new_context_with_model: graph nodes  = 1030
llama_new_context_with_model: graph splits = 2

INFO [                    init] initializing slots | tid="0x1f3b34c00" timestamp=1721895109 n_slots=1
INFO [                    init] new slot | tid="0x1f3b34c00" timestamp=1721895109 id_slot=0 n_ctx_slot=31072
INFO [                    main] model loaded | tid="0x1f3b34c00" timestamp=1721895109
INFO [                    main] chat template | tid="0x1f3b34c00" timestamp=1721895109 chat_example="<|im_start|>system\nYou are a helpful assistant<|im_end|>\n<|im_start|>user\nHello<|im_end|>\n<|im_start|>assistant\nHi there<|im_end|>\n<|im_start|>user\nHow are you?<|im_end|>\n<|im_start|>assistant\n" built_in=true
INFO [                    main] HTTP server listening | tid="0x1f3b34c00" timestamp=1721895109 port="8080" n_threads_http="9" hostname="127.0.0.1"
INFO [            update_slots] all slots are idle | tid="0x1f3b34c00" timestamp=1721895109
...
```

如此就可以用 http://localhost:8080 來體驗 llama3.1 8B 的資料了

2023年9月3日 星期日

Kubernetes/k8s 開發筆記 - 在 Macbook M1 Pro 安裝 minikube, qemu, socket_vmnet @ macOS 13.5.1


之前略知 Apple M1 架構,對於使用一些軟體服務會卡卡,終於來體驗一下。原先在考慮依照官網的簡介:


後來決定都靠 Homebrew 來管理,安裝流程:

% sw_vers
ProductName: macOS
ProductVersion: 13.5.1
BuildVersion: 22G90

% brew --version
Homebrew 4.1.7

% brew install qemu socket_vmnet minikube
Error: Cannot install in Homebrew on ARM processor in Intel default prefix (/usr/local)!
Please create a new installation in /opt/homebrew using one of the
"Alternative Installs" from:
  https://docs.brew.sh/Installation
You can migrate your previously installed formula list with:
  brew bundle dump

% eval "$(/opt/homebrew/bin/brew shellenv)"

% brew install qemu socket_vmnet  minikube

...
socket_vmnet requires root privileges so you will need to run
  `sudo /opt/homebrew/opt/socket_vmnet/socket_vmnet` or `sudo brew services start socket_vmnet`.
You should be certain that you trust any software you grant root privileges.

socket_vmnet is keg-only, which means it was not symlinked into /opt/homebrew,
because Homebrew's bin directory is often writable by a non-admin user.

If you need to have socket_vmnet first in your PATH, run:
  echo 'export PATH="/opt/homebrew/opt/socket_vmnet/bin:$PATH"' >> ~/.zshrc

To start socket_vmnet now and restart at startup:
  sudo brew services start socket_vmnet
Or, if you don't want/need a background service you can just run:
  /opt/homebrew/opt/socket_vmnet/bin/socket_vmnet --vmnet-gateway\=192.168.105.1 /opt/homebrew/var/run/socket_vmnet
...

% sudo brew services start socket_vmnet
Service `socket_vmnet` already started, use `brew services restart socket_vmnet` to restart.

% minikube start --driver=qemu --network socket_vmnet
😄  minikube v1.31.2 on Darwin 13.5.1 (arm64)
✨  Using the qemu2 driver based on user configuration
👍  Starting control plane node minikube in cluster minikube
🔥  Creating qemu2 VM (CPUs=2, Memory=6000MB, Disk=20000MB) ...
🐳  Preparing Kubernetes v1.27.4 on Docker 24.0.4 ...
    ▪ Generating certificates and keys ...
    ▪ Booting up control plane ...
    ▪ Configuring RBAC rules ...
🔗  Configuring bridge CNI (Container Networking Interface) ...
    ▪ Using image gcr.io/k8s-minikube/storage-provisioner:v5
🔎  Verifying Kubernetes components...
🌟  Enabled addons: default-storageclass, storage-provisioner
🏄  Done! kubectl is now configured to use "minikube" cluster and "default" namespace by default

% minikube status
minikube
type: Control Plane
host: Running
kubelet: Running
apiserver: Running
kubeconfig: Configured

% minikube stop  
✋  Stopping node "minikube"  ...
🛑  1 node stopped.

% minikube status
minikube
type: Control Plane
host: Stopped
kubelet: Stopped
apiserver: Stopped
kubeconfig: Stopped

然後重開機後,進入 zsh 環境時,需要重新做一點設定,就看個人的習慣要不要安置自動化了:

% minikube status
zsh: command not found: minikube
% eval "$(/opt/homebrew/bin/brew shellenv)"
% minikube status
🤷  Profile "minikube" not found. Run "minikube profile list" to view all profiles.
👉  To start a cluster, run: "minikube start"

% minikube start --driver=qemu --network socket_vmnet
😄  minikube v1.31.2 on Darwin 13.5.1 (arm64)
✨  Using the qemu2 driver based on user configuration
👍  Starting control plane node minikube in cluster minikube
🔥  Creating qemu2 VM (CPUs=2, Memory=6000MB, Disk=20000MB) ...\ OUTPUT: 
ERROR: Failed to connect to "/opt/homebrew/var/run/socket_vmnet": Connection refused


🔥  Deleting "minikube" in qemu2 ...
🤦  StartHost failed, but will try again: creating host: create: creating: Failed to connect to "/opt/homebrew/var/run/socket_vmnet": Connection refused: exit status 1
🔥  Creating qemu2 VM (CPUs=2, Memory=6000MB, Disk=20000MB) ...\ OUTPUT: 
ERROR: Failed to connect to "/opt/homebrew/var/run/socket_vmnet": Connection refused


😿  Failed to start qemu2 VM. Running "minikube delete" may fix it: creating host: create: creating: Failed to connect to "/opt/homebrew/var/run/socket_vmnet": Connection refused: exit status 1

❌  Exiting due to GUEST_PROVISION: error provisioning guest: Failed to start host: creating host: create: creating: Failed to connect to "/opt/homebrew/var/run/socket_vmnet": Connection refused: exit status 1

╭───────────────────────────────────────────────────────────────────────────────────────────╮
│                                                                                           │
│    😿  If the above advice does not help, please let us know:                             │
│    👉  https://github.com/kubernetes/minikube/issues/new/choose                           │
│                                                                                           │
│    Please run `minikube logs --file=logs.txt` and attach logs.txt to the GitHub issue.    │
│                                                                                           │
╰───────────────────────────────────────────────────────────────────────────────────────────╯

% sudo brew services restart socket_vmnet
Password:
Stopping `socket_vmnet`... (might take a while)
==> Successfully stopped `socket_vmnet` (label: homebrew.mxcl.socket_vmnet)
Warning: Taking root:admin ownership of some socket_vmnet paths:
  /opt/homebrew/Cellar/socket_vmnet/1.1.2/bin
  /opt/homebrew/Cellar/socket_vmnet/1.1.2/bin/socket_vmnet
  /opt/homebrew/opt/socket_vmnet
  /opt/homebrew/opt/socket_vmnet/bin
This will require manual removal of these paths using `sudo rm` on
brew upgrade/reinstall/uninstall.
==> Successfully started `socket_vmnet` (label: homebrew.mxcl.socket_vmnet)

% minikube delete

% minikube start --driver=qemu --network socket_vmnet
😄  minikube v1.31.2 on Darwin 13.5.1 (arm64)
✨  Using the qemu2 driver based on user configuration
👍  Starting control plane node minikube in cluster minikube
🔥  Creating qemu2 VM (CPUs=2, Memory=6000MB, Disk=20000MB) ...
🐳  Preparing Kubernetes v1.27.4 on Docker 24.0.4 ...
    ▪ Generating certificates and keys ...
    ▪ Booting up control plane ...
    ▪ Configuring RBAC rules ...
🔗  Configuring bridge CNI (Container Networking Interface) ...
    ▪ Using image gcr.io/k8s-minikube/storage-provisioner:v5
🔎  Verifying Kubernetes components...
🌟  Enabled addons: storage-provisioner, default-storageclass
🏄  Done! kubectl is now configured to use "minikube" cluster and "default" namespace by default

% minikube status
minikube
type: Control Plane
host: Running
kubelet: Running
apiserver: Running
kubeconfig: Configured

上述是因為筆電重啟後時,碰到 socket_vmnet 問題,最後就先試著把整套環境刪除 (minikube delete) 而重來,而後續常規的用法:

% eval "$(/opt/homebrew/bin/brew shellenv)"

% sudo brew services restart socket_vmnet  
Warning: Taking root:admin ownership of some socket_vmnet paths:
  /opt/homebrew/Cellar/socket_vmnet/1.1.2/bin
  /opt/homebrew/Cellar/socket_vmnet/1.1.2/bin/socket_vmnet
  /opt/homebrew/opt/socket_vmnet
  /opt/homebrew/opt/socket_vmnet/bin
This will require manual removal of these paths using `sudo rm` on
brew upgrade/reinstall/uninstall.
==> Successfully started `socket_vmnet` (label: homebrew.mxcl.socket_vmnet)

% minikube start --driver=qemu --network socket_vmnet
😄  minikube v1.31.2 on Darwin 13.5.1 (arm64)
✨  Using the qemu2 driver based on existing profile
👍  Starting control plane node minikube in cluster minikube
🔄  Restarting existing qemu2 VM for "minikube" ...
🐳  Preparing Kubernetes v1.27.4 on Docker 24.0.4 ...
🔗  Configuring bridge CNI (Container Networking Interface) ...
🔎  Verifying Kubernetes components...
    ▪ Using image gcr.io/k8s-minikube/storage-provisioner:v5
🌟  Enabled addons: storage-provisioner, default-storageclass
🏄  Done! kubectl is now configured to use "minikube" cluster and "default" namespace by default

% minikube status
minikube
type: Control Plane
host: Running
kubelet: Running
apiserver: Running
kubeconfig: Configured

2019年11月20日 星期三

[PHP] OAuth / Sign in with Apple JS - 使用 Apple JS SDK 讓網站支援 Apple ID 登入

SignInWithApple00

最近幫看同事串 Sign In with Apple 好像有很多不順的地方,拿自己的 Apple developer 帳號試試 :P 相關文件:
首先就來闖關吧,先進行 Sign In with Apple 設定,需要指定某個 email domain 給 Apple 跟用戶溝通,此例用 appid.changyy.org 網域為例:

Certificates, Identifiers & Profiles -> More -> Sign In with Apple -> Configure

SignInWithApple03

在添加網域進去之前,請記得先設定 SPF DNS Record,不然 Apple 一驗證不合 SPF 時,又得等 DNS Cache 更新等到天荒地老 Orz

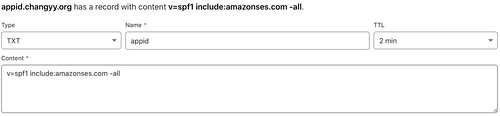
在此先添加 Type=TXT 的 DNS Record 吧!

v=spf1 include:amazonses.com -all

SignInWithApple02

接著用 dig 驗一下:

% dig -t txt appid.changyy.org

; <<>> DiG 9.10.6 <<>> -t txt appid.changyy.org
;; global options: +cmd
;; Got answer:
;; ->>HEADER<<- opcode: QUERY, status: NOERROR, id: 47410
;; flags: qr rd ra; QUERY: 1, ANSWER: 1, AUTHORITY: 0, ADDITIONAL: 1

;; OPT PSEUDOSECTION:
; EDNS: version: 0, flags:; udp: 512
;; QUESTION SECTION:
;appid.changyy.org. IN TXT

;; ANSWER SECTION:
appid.changyy.org. 119 IN TXT "v=spf1 include:amazonses.com -all"

;; Query time: 56 msec
;; SERVER: 8.8.8.8#53(8.8.8.8)
;; WHEN: Wed Nov 20 00:48:09 CST 2019
;; MSG SIZE  rcvd: 92


添加 appid.changyy.org 網域,按下 Register 時,接著努力驗證通過即可。如果沒有先添加 SPF 就會出現類似訊息:The domain 'appid.changyy.org' is not SPF compliant.

接著再回到 Apple Developer 網站繼續按 Register (不是立刻通過,要等 DNS Cache 過期),就可以進行後續的認證了,如 https://appid.changyy.org/.well-known/apple-developer-domain-association.txt 配置等。接著又得搞 https 連線,又進入了 免費SSL/TLS憑證 - Let's Encrypt 與 NGINX 的設定 XD 在此不贅述。

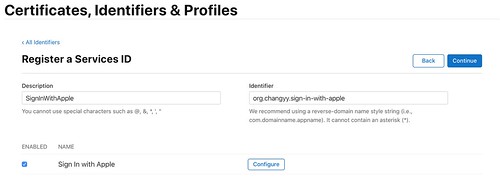
終於可以進入 Apple Developer Account 其他設定了,首先要建立 Services IDs 時,會要求有一個 App ID 為 primary App ID ,這件事也代表 Sign In with Apple 的核心還是 App ,此例新建一個 App ID = org.changyy.apple.app-id 為例,並且在下方勾選 Sign In with Apple 且 Enable as a primary App ID。

接著,建立 Services IDs :

Certificates, Identifiers & Profiles -> Identifiers -> Add -> Services IDs -> 建立一個 org.changyy.sign-in-with-apple 並啟用 Sign In with Apple -> Configure -> Web Domain = appid.changyy.org 而 Return URLs = https://appid.changyy.org/callback.php 並按 Add 和 Save -> 再按 Continue 完成

SignInWithApple08

最後,再來建立一組 Key 用來溝通:

Certificates, Identifiers & Profiles ->  Keys -> 添加一組 Key Name = SignInWithAppleKey,記得勾選 Sign In With Apple -> 點擊 Configure 挑選完 App ID 按 Save -> 最後會下載一個 AuthKey_KeyID.p8 檔案,就是後續溝通的項目。

SignInWithApple10

SignInWithApple11

如此一來,在上述的過程中可以得到以下關鍵物:

  • Service ID Identifier = org.changyy.sign-in-with-apple (後續是 OAuth 的 Client_ID)
  • Key ID = 在 *.p8 的檔名上,或是在 Certificates, Identifiers & Profiles -> Keys -> SignInWithAppleKey 瀏覽可看到
  • Team ID = 在 Apple Developer 登入後右上角可看見,或是在 Certificates, Identifiers & Profiles -> Identifiers -> 隨意一組 App ID -> App ID Prefix 就有標記 (Team ID) 資訊
  • Return URLs = 在 Service ID 內編輯的,如 https://appid.changyy.org/callback.php

把這些資訊弄個 JSON 紀錄:

$ cat settings.json
{
        "CLIENT_ID": "org.changyy.sign-in-with-apple",
        "SCOPES": "name email",
        "REDIRECT_URI": "https://appid.changyy.org/callback.php",
        "STATE": "",
        "TEAM_ID": "YourTeamID",
        "KID" : "YourKeyID",
        "Key_P8_PATH" :"../keystore/AuthKey_YourKeyID.p8",
        "" : ""
}


最後把 https://github.com/changyy/sign-in-with-apple-js 拿來用,在根目錄建立 keystore 並擺放 AuthKey_YourKeyID.p8 以及上述 settings.json 擺在 /path/sign-in-with-apple-js/php/settings.json ,在把 https://appid.changyy.org/ Document_Root 設定在此專案的 /path/sign-in-with-apple-js/php 目錄上,如此用 https://appid.changyy.org/ 時,就會有以下畫面:

SignInWithApple12

點擊後就會被引導完成 Apple 登入,登入後會導向到 https://appid.changyy.org/callback.php 並且看到簡單的 OAUTH code 的使用:
oepnssl = OpenSSL 1.1.1  11 Sep 2018
jwt_header = Array
(
    [typ] => JWT
    [alg] => ES256
    [kid] => YourKeyID
)

jwt_payload = Array
(
    [iss] => YourTeamID
    [iat] => 1574184061
    [exp] => 1574187661
    [aud] => https://appleid.apple.com
    [sub] => YourServiceID
)

apple_public_keys = Array
(
    [keys] => Array
        (
            [0] => Array
                (
                    [kty] => RSA
                    [kid] => AIDOPK1
                    [use] => sig
                    [alg] => RS256
                    [n] => lxrwmuYSAsTfn-lUu4goZSXBD9ackM9OJuwUVQHmbZo6GW4Fu_auUdN5zI7Y1dEDfgt7m7QXWbHuMD01HLnD4eRtY-RNwCWdjNfEaY_esUPY3OVMrNDI15Ns13xspWS3q-13kdGv9jHI28P87RvMpjz_JCpQ5IM44oSyRnYtVJO-320SB8E2Bw92pmrenbp67KRUzTEVfGU4-obP5RZ09OxvCr1io4KJvEOjDJuuoClF66AT72WymtoMdwzUmhINjR0XSqK6H0MdWsjw7ysyd_JhmqX5CAaT9Pgi0J8lU_pcl215oANqjy7Ob-VMhug9eGyxAWVfu_1u6QJKePlE-w
                    [e] => AQAB
                )

        )

)

apple_public_key_pem = 

-----BEGIN PUBLIC KEY-----
MIIBIjANBgkqhkiG9w0BAQEFAAOCAQ8AMIIBCgKCAQEAlxrwmuYSAsTfn+lUu4go
ZSXBD9ackM9OJuwUVQHmbZo6GW4Fu/auUdN5zI7Y1dEDfgt7m7QXWbHuMD01HLnD
4eRtY+RNwCWdjNfEaY/esUPY3OVMrNDI15Ns13xspWS3q+13kdGv9jHI28P87RvM
pjz/JCpQ5IM44oSyRnYtVJO+320SB8E2Bw92pmrenbp67KRUzTEVfGU4+obP5RZ0
9OxvCr1io4KJvEOjDJuuoClF66AT72WymtoMdwzUmhINjR0XSqK6H0MdWsjw7ysy
d/JhmqX5CAaT9Pgi0J8lU/pcl215oANqjy7Ob+VMhug9eGyxAWVfu/1u6QJKePlE
+wIDAQAB
-----END PUBLIC KEY-----


apple_public_key_alg = RS256


[Lcobucci\JWT]
request data = Array
(
    [client_id] => YourServiceID
    [client_secret] => A.B.C1
    [code] => c
    [grant_type] => authorization_code
    [redirect_uri] => https://YourServiceIDReturnURL
)


response = Array
(
    [access_token] => a
    [token_type] => Bearer
    [expires_in] => 3600
    [refresh_token] => r
    [id_token] => id_token
)


[Firebase\JWT]
request data = Array
(
    [client_id] => YourServiceID
    [client_secret] => A.B.C2
    [code] => c
    [grant_type] => authorization_code
    [redirect_uri] => https://YourServiceIDReturnURL
)


response = Array
(
    [error] => invalid_client
)


[Firebase\JWT and \Lcobucci\JWT\Signer\Ecdsa\MultibyteStringConverter]
request data = Array
(
    [client_id] => YourServiceID
    [client_secret] => A.B.C3
    [code] => c
    [grant_type] => authorization_code
    [redirect_uri] => https://YourServiceIDReturnURL
)


response = Array
(
    [error] => invalid_grant
)


[Firebase\JWT without openssl_pkey_get_private and \Lcobucci\JWT\Signer\Ecdsa\MultibyteStringConverter]
request data = Array
(
    [client_id] => YourServiceID
    [client_secret] => A.B.C4
    [code] => c
    [grant_type] => authorization_code
    [redirect_uri] => https://YourServiceIDReturnURL
)


response = Array
(
    [error] => invalid_grant
)
網路上滿多人在討論 firebase/jwt 的用法,但其實在 2019/11/20 來看,firebase/jwt 仍就沒有完整 Sign In with Apple 所需的 JWT 編碼格式,我則是靠 Lcobucci/JWT 套件完成打通  Sign In with Apple 的,並且看懂為何 firebase/jwt 還不能打通 :P 拿著 Lcobucci/JWT 內的 MultibyteStringConverter 來小試身手果真就通了。再找個時間貢獻 firebase/jwt 來修正好了,這次為了檢驗 firebase/jwt 失敗問題,大概至少看了 5套 php-jwt 的寫法,結果大多都是從 luciferous/jwt fork 擴充的,這可是 2011 的程式呢。

而跟 Apple Auth API 溝通的結果,若本身 JWT 製作踩到演算法等問題只會收到 {"error":"invalid_client"},但這也包含 OAUTH REDIRECT_URI 不合法等等,如果演算法打通了,而 Code 過期或是被重複使用時,會收到 {"error":"invalid_grant"} 資訊。

2018年7月29日 星期日

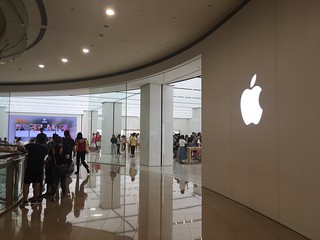
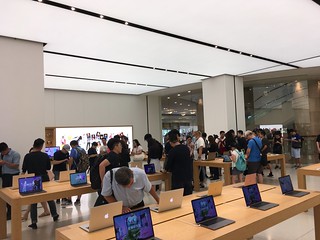
[Apple] MacBook Pro 脫膜,在 Apple 台北101 Genius Bar 單日完成維修體驗 (Retina, 13-inch, Early 2015)

Apple 台北101 Apple 台北 101 維修人潮

我習慣買前一代的 Mac 產品,在 2016 年底買了這台 2015 年的產品(直到查詢脫膜才發現自己是 Early 2015 版),以為脫膜跟我無關了 XD 殊不知還是中獎,隨著使用時間開始出現跡象了,剛好這週得閒,就行動衝一發了 XD 不然有了家庭跟小孩,親自送修這種事真的太殺時間了!

整體上,我先打了電話到 Studio A ,得知評估脫膜還得把筆電放在那邊 7-14 天,當下就很三條線,立刻就改打電話去 Apple 台北101 ,看看直營店有沒有什麼差別。只是整個過程我去了三趟 台北 101 ,第一趟誤被台北101接電話的服務員給誤導,我在中午播電話過去,詢問可否現場排隊維修 Mac ,服務員說現在人很少可以試試,直到我到了現場才知道 Mac 維修是最夯的,通常只能預約,不然就排現場(11:00開門),排現場也只是看看有沒有預約取消的額度,並不確定一定可以修到。

隔天吃完早餐報備後,就出發去 101 了,約 10:30 到了,跟著陸客就莫名到了 Apple 台北101 的門口排隊了 (台北購物中心11:00才開門),大概排前五名,就這樣等個30分鐘就可入場維修!等到自己登記完維修後,才發現後排大概至少排了30人在等維修。

這大概就是 Apple Support app 上有維修預約服務,但實際上根本都搶不到只能排現場的現象,不知是不是暑假的關係?為了維修只能排現場了。

後來很順利得知有備料,交完筆電後,很有機會就在當日拿到!至於網路上有的人說可以先去評估維修,接著再等料來再拿去,這件事並不對的,脫膜換螢幕一律要把筆電放在店內等維修,有料無料都還跑會基本的 SOP 做整機檢驗。

所以,脫膜維修要有心理準備,沒筆電就是得停工一陣子。

心得:
  • 脫膜維修流程是會先判斷是否為人員問題,維修不管怎樣都得要與筆電分開一陣子,最慘的是 7-14天,如 Studio A 據說要把螢幕寄回去給原廠評估是否為人為。因此,去直營店好處好上不少,運氣好可以一早進去晚上就拿貨。
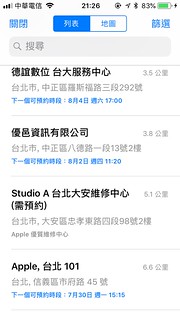
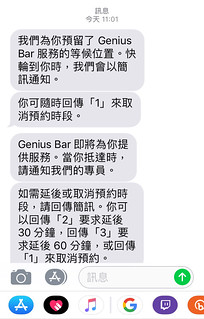
  • 下載 "Apple 支援" 或是網頁申請支援,都可以有專人電話服務(2分鐘內播來),但對於 Mac 維修還是走預約制度(且各間店頂多八天內可以選時段),結果台北夏天人多,預約根本選不到,等同只能排現場。排現場會先登記,後續簡訊通知是否輪到你

    Apple 支援 app Apple 台北101 簡訊服務
  • Apple 台北 101 ,建議有需要還是排一早前幾名,投資報酬率高,不然還是等預約

2016年10月9日 星期日

iOS 開發筆記 - 建立/更新 Apple Push Notification Service (APNs) 憑證、P12轉PEM、驗證 PEM、PHP 範例程式

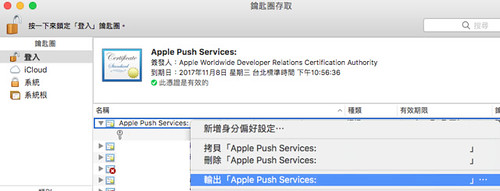
APNs_export_key

以前寫過幾篇 APNs 筆記,但好像都沒很完整,結果每年要更新憑證時,都要再找資料複習一次 Orz 所以就把它筆記下來吧!
首先,在 iOS Developer 網站上可以維護 APNs 憑證,然而,一旦過期,其實會自動消失 Orz 而 APNs 這服務滿像開發一次後就一直擺在那,沒用行事曆紀錄肯定忘掉。

如果,當初的 Certificate Signing Request (CSR) 以及 private key(.p12) 還留著的話,可以繼續拿來用,若沒有的話,就重新建立。整個就像第一次建立一樣 :P

Step 1:

iOS Developer Website -> Certificate -> All -> [+] -> Production -> Apple Push Notification service SSL (Sandbox & Production) -> App ID: -> Your App ID -> About Creating a Certificate Signing Request (CSR) -> Upload CRS file

若之前的 CSR 跟 p12 都還在,就可以省去製作 CSR,直接拿舊的上傳;若要新建立就從 Keychain -> 憑證輔助程式 -> 從憑證授權要求憑證 -> 輸入 email -> 預設將產生 CertificateSigningRequest.certSigningRequest 檔案,把他拿去上傳吧。另外,記得要把下載到的 aps.cer 點擊匯入至 keychain 中。

Step 2:

在 keychain -> 類別 -> 我的憑證 -> 可以看到 Apple Push Service 資訊,展開後,點擊專用密鑰,在點擊上方的憑證後,可以以憑證為單位輸出 p12 資料,這是跟 APN server 溝通的通行證。

Step 3:

使用 openssl 將通行證轉檔,從 p12 成 pem 檔

$ openssl pkcs12 -in App.p12 -out App.pem -nodes

轉換後,可以用文字編輯器打開 App.pem 檔案,會看到兩段:

-----BEGIN CERTIFICATE-----
...
-----END CERTIFICATE-----
-----BEGIN PRIVATE KEY-----
...
-----END PRIVATE KEY-----


而 CERTIFICATE 上頭也會標記是哪個 App ID 的,未來忘記都可以翻來看

Step 4:

做簡單的 pem 驗證即可。

Production:

$ openssl s_client -connect gateway.push.apple.com:2195 -cert App.pem

Sandbox:

$ openssl s_client -connect gateway.sandbox.push.apple.com:2195 -cert App.pem

若 pem 是正常的,應該連線完就停在那邊:

...
---
SSL handshake has read 3385 bytes and written 2515 bytes
---
New, TLSv1/SSLv3, Cipher is AES256-SHA
Server public key is 2048 bit
Secure Renegotiation IS supported
Compression: NONE
Expansion: NONE
No ALPN negotiated
SSL-Session:
    Protocol  : TLSv1.2
    Cipher    : AES256-SHA
    Session-ID:
    Session-ID-ctx:
    Master-Key: #######
    Key-Arg   : None
    PSK identity: None
    PSK identity hint: None
    SRP username: None
    Start Time: 1476026971
    Timeout   : 300 (sec)
    Verify return code: 0 (ok)
---
^C


Step 5:

可以拿 pem 跟 APNs 互動了!以下是片段 PHP 程式碼,有興趣可再試試 changyy/codeigniter-library-notification 包好的 library。

<?php

$ssl_ctx = stream_context_create();
stream_context_set_option($ssl_ctx, 'ssl', 'local_cert', $pem_file_path);

if( is_resource( $fp = stream_socket_client(
$use_sansbox ? 'ssl://gateway.sandbox.push.apple.com:2195' : 'ssl://gateway.push.apple.com:2195',
$err,
$errstr,
60,
STREAM_CLIENT_CONNECT|STREAM_CLIENT_PERSISTENT,
$ssl_ctx
) ) ) {

//$payload = array(
// 'aps' => array(
// 'alert' => array(
// 'title' => $title,
// 'body' => $message,
// )
// )
//);

$packed_data =
// Command (Simple Notification Format)
chr(0)
// device token
. pack('n', 32) . pack('H*', $notification_token)
// payload
//. pack('n', strlen($raw_cmd)) . $raw_cmd;
. $raw_data;

if( @fwrite($fp, $packed_data, strlen($packed_data)) !== false ) {
echo "SUCCESS";
} else {
echo "FAILURE";
}

fclose($fp);
}

2014年9月18日 星期四

iOS 開發筆記 - 驗證 Apple Push Notification PEM File 以及 Remove PEM Password

半年前曾開發過: 使用 Apple Push Notification service (APNs),最近更新 PEM  後,要驗證一下 PEM 是否正確。

驗證還滿簡單的,單純用 openssl 進行,假設是 dev 模式,對象就是 snadbox:

$ openssl s_client -connect gateway.sandbox.push.apple.com:2195 -cert cert.pem -key key.pem

其中 cert.pem 跟 key.pem 也可以合在一起:

$ cat cert.pem key.pem > out.pem
$ openssl s_client -connect gateway.sandbox.push.apple.com:2195 -cert out.pem


假設產出的 key.pem 有密碼保護,為了圖方便想要去密碼的話,可以用:

$ openssl rsa -in key.pem -out nopass.pem

如此一來就搞定了,若測試的是 Production PEM ,記得改用 gateway.push.apple.com:2195 即可。

$ openssl s_client -connect gateway.push.apple.com:2195 -cert cert.pem -key key.pem

2014年6月1日 星期日

Apple TV 3 以及觀看大陸頻道的原理


前陣子在 PCHOME 特價時下標了 XD 其實觀望許久,甚至在露天也時時觀望著,總之,家裡就又多了一台 Apple Device 了 :P

這陣子一直都只使用 AirPlay 的方式,記得曾聽別人說可以直接觀看大陸影音網站,就隨意找了一下,使用之後,大概猜測的 Hack 原理:
  • 原先 Apple TV 有提供"預告片"的機制,既然這是個動態內容,猜大概是要透過 API 到遠端 Server 要資料,因此,透過這個管道替換掉 "預告片" 的內容
  • 透過 DNS 的方式,讓 API 查詢對象從 Apple Server 換到私人機器
然而,在 2013 年中之後,Apple TV 稍作修正,查詢的 API 都改走 HTTPS 方式,導致透過 DNS 更換 API 查詢對象失敗,但解法仍有:
  • 更換 Apple TV 內,對 Apple Server 的憑證內容,以此又破壞掉 HTTPS 保護
這場路一直走下去,只要硬體沒有被保護,那應該就可以一直玩下去了,此次 Apple TV 硬體方面,其實是透過 Apple OSX App Store 的官方工具修改的,如憑證資訊。

此外,在台灣若要觀看大陸內影音網站,則必須透過 Proxy 的機制,而影音網站大多的保護方式在於"取得影片播放清單m3u8"的那個步驟做 IP 管制,而非 video binary data 的取得,所以,網路上就有一些解法讓 Chrome/Firefox 就可以觀看到大陸影音。


測試流程:
  1. 更改 DNS (180.153.225.136)
  2. 更改 Apple TV HTTPS 憑證
    1. 下載 appletv-fix.mobileconfig
    2. 使用 Apple Configurator 使用全域 HTTP 代理伺服器 (http://yo.uku.im/proxy.pac)
  3. 當 Apple TV 開機好後,透過 MicroUSB 線連接
  4. 透過 Apple Configurator 將設定新增至 Apple TV
如此一來,點選"預告片"時,就可以看到對岸客製化的服務:


最後一提,因為上述流程改變了 Apple HTTPS 憑證資訊(其實 Proxy server 也能做到一些),因此,建議不要再登入 iTunes Store了,畢竟已經無法保證你是否是跟真正 Apple Service 連結,還是跟大陸的私人機器溝通,會有帳密安全性問題。

相關資料:

2014年5月2日 星期五

iOS 開發筆記 - 使用 AdMob 與 IDFA 的處理


查詢 Admob 的 iOS release notes 可知 Admob 6.5.0 (2013/07/16) 時已經有用到 IDFA 了。但很妙地,上回上傳時沒碰到,但這次更新時又會碰到?這次就試著勾選處理了。

如果在一開始上傳 binary 前選 Dose this app use the Advertising Identifier (No) 時,上傳 binary 時,驗證過程會看到類似的訊息:
Improper Advertising Identifier IDFA Usage. Your app contains the Advertising Identifier IDFA API ...
解法在此刻只能遞交一份空專案,接著在 Reject by developer 後,才能再重新填這張單子。

簡言之,在 Admob 而言,就是勾選三項:
  • Does this app use the Advertising Identifier (Yes)
  • Serve advertisements within the app (checked)
  • Limit Ad Tracking setting in iOS (checked)
不過,話說那最後一條真的是背書啊 Orz 亂用第三方 libraries 挺抖的。

2013年12月3日 星期二

iOS 開發筆記 - iOS app 狀態為 Pending Contract 的處理

通常看到這樣的問題,都是忘了填寫銀行等資訊,不過,若發生在免費的 iOS app 時,這時就請打電話給客服聊聊天吧(Worldwide Telephone Support,台灣打 0800-022-237 )

此例是登入 iTunesConnect 後,上頭一直顯示 program membership expired 訊息,但明明我幾個月前已經 renew 過了 :P 同理切換到 Contracts, Tax, Banking 裡頭,也叫我去 re-new 開發者帳號...打電話問客服...報一下 Apple ID (Email address) 後,得知是當初 re-new 時少完成一個流程(可能是少了某表單的同意,但現況又看不到表單),導致在 iOS Developer Center 是 OK ,但在 iTunesConnect 是不 OK 的現象,解法就是聊個天就解掉了...