顯示具有 javascript 標籤的文章。 顯示所有文章

2024年8月2日 星期五

Node.js 開發筆記 - 分別透過 Pyodide, Brython, WebAssembly 在 node.js 呼叫 Python Code @ node.js v20, python3.11

一時興起研究一下 node.js 呼叫 python code 的方式,當然,都在 linux server 可以直接用 child_process 直接呼叫 python 去運行,例如 nodejs.org/api/child_process.html 的範例

```
const { spawn } = require('node:child_process');
const ls = spawn('ls', ['-lh', '/usr']);

ls.stdout.on('data', (data) => {
  console.log(`stdout: ${data}`);
});

ls.stderr.on('data', (data) => {
  console.error(`stderr: ${data}`);
});

ls.on('close', (code) => {
  console.log(`child process exited with code ${code}`);
}); 
```

然而,有沒有可能在 node.js 內,直接做 python 直譯的過程等方式?當個樂子,找了一下,還真的有,這樣搞的優勢是降低環境部署的變因,當然,效率上不見得是好辦法,但可以讓不同語言的開發者進行融合(誤),目前看到兩種整合方式:
其中 Brython 屬於設計在 Web Browser 下運行(需要 DOM 資源),而 Pyodide 則不需要。分別筆記一下用法。

首先是要執行的 python code 內有 python 的 re 跟 json 模組的使用:

```
% cat script.py 
import re
import json

def runTest(inputData):
    output = {}
    flags = 0
    pattern = r'''(?x)
      (?:
        \.get\("n"\)\)&&\(b=|
        (?:
          b=String\.fromCharCode\(110\)|
          (?P<str_idx>[a-zA-Z0-9_$.]+)&&\(b="nn"\[\+(?P=str_idx)\]
        ),c=a\.get\(b\)\)&&\(c=|
        \b(?P<var>[a-zA-Z0-9_$]+)=
      )(?P<nfunc>[a-zA-Z0-9_$]+)(?:\[(?P<idx>\d+)\])?\([a-zA-Z]\)
      (?(var),[a-zA-Z0-9_$]+\.set\("n"\,(?P=var)\),(?P=nfunc)\.length)'''

    try:
        result = re.search(pattern, inputData, flags)
        if result:
            output["status"] = True
            output["data"] = result.groupdict()
    except Exception as e:
        output["error"] = str(e)
    return json.dumps(output, indent=4)

runTest(data)
```

Pyodide 用法:

```
% nvm use v20
Now using node v20.10.0 (npm v10.2.3)
% npm install pyodide
% cat package.json 
{
  "dependencies": {
    "pyodide": "^0.26.2"
  }
}

% cat run.js
const fs = require('fs').promises;
const { loadPyodide } = require("pyodide");

async function main() {
  const fileContent = await fs.readFile('mydata.bin', 'utf8');
  let pyodide = await loadPyodide();
  pyodide.globals.set("data", pyodide.toPy(fileContent));
  const pythonCode = await fs.readFile('script.py', 'utf8');
  let result = pyodide.runPython(pythonCode);
  console.log(result);
}

main();

% echo "Hello World" > mydata.bin

% node run.js
{}
```

上述使用過程算直觀,但偷懶把要傳遞的資料設定在全域變數,在用 node.js 環境接住 python 運算的結果,看來這個效果是很 OK ,有正常運行得到期待的結果。

接著研究 Brython 用法,他設計上需要 Browser 環境做事:

% head -n 9 brython.js
// brython.js brython.info
// version [3, 11, 0, 'final', 0]
// implementation [3, 11, 3, 'dev', 0]
// version compiled from commented, indented source files at
// github.com/brython-dev/brython
var __BRYTHON__=__BRYTHON__ ||{}
try{
eval("async function* f(){}")}catch(err){console.warn("Your browser is not fully supported. If you are using "+
"Microsoft Edge, please upgrade to the latest version")}

在 node.js 需要 jsdom 模擬一些環境,而下載 brython.js 和 brython_stdlib.js 則參考官網文件,透過 pip install brython 工具出來使用,所以這邊的流程會多了 python 工具的安裝,且現況用 python 3.12 會顯示有些問題,就先定在 3.11 版。此外 brython.js 運行環境,也是可以用最新版 node.js v22 ,但是會看到 [DEP0040] DeprecationWarning: The `punycode` module is deprecated. Please use a userland alternative instead. 訊息,所以先退到 node.js v20 避免額外的訊息

連續動作:

```
% python3.11 -m venv venv
% source venv/bin/activate
(venv) % pip install brython
Collecting brython
  Using cached brython-3.11.3-py3-none-any.whl.metadata (1.0 kB)
Using cached brython-3.11.3-py3-none-any.whl (1.6 MB)
Installing collected packages: brython
Successfully installed brython
(venv) % brython-cli install
Installing Brython 3.11.3
done
(venv) % ls
README.txt brython_stdlib.js index.html venv
brython.js demo.html unicode.txt
```

接著回到 node.js 主場:

```
% nvm use v20
Now using node v20.10.0 (npm v10.2.3)
% cat package.json 
{
  "dependencies": {
    "jsdom": "^24.1.1"
  }
}
% cat run-via-dom.js 
const { JSDOM } = require('jsdom');
const fs = require('fs');
const path = require('path');

const dom = new JSDOM(`<!DOCTYPE html>
<html>
    <head></head>
    <body>
        <script></script>
    </body>
</html>`, {
    runScripts: "dangerously", 
    resources: "usable"
});

const brythonJsPath = path.join(__dirname, 'brython.js');
const brythonStdlibJsPath = path.join(__dirname, 'brython_stdlib.js');

const brythonJs = fs.readFileSync(brythonJsPath, 'utf8');
const brythonStdlibJs = fs.readFileSync(brythonStdlibJsPath, 'utf8');

try {
    dom.window.eval(brythonJs);
    dom.window.eval(brythonStdlibJs);
} catch (error) {
    console.error('Error executing brython.js:', error);
}

const scriptPath = path.join(__dirname, 'script.py');
const pythonScript = fs.readFileSync(scriptPath, 'utf8');

const dataPath = path.join(__dirname, 'mydata.bin');
const binaryData = fs.readFileSync(dataPath, 'utf8');
const base64Data = Buffer.from(binaryData).toString('base64');

const scriptElement = dom.window.document.createElement('script');
scriptElement.type = 'text/python';
scriptElement.textContent = `
import base64
data = base64.b64decode("""${base64Data}""")

${pythonScript}

from browser import document
document.output = runTest(data)
`
dom.window.document.body.appendChild(scriptElement);
try {
    dom.window.brython({debug: 1, pythonpath: ['.']})
    console.log(dom.window.document.output);
} catch (error) {
    console.error('Error executing dom.window.brython:', error);
}
console.log('Python script execution completed.');

% echo "Hello World" > mydata.bin

% node run-via-dom.js 
{"status": false, "data": {}, "error": "not the same type for string and pattern"}
Python script execution completed.
```

很可惜的,剛好要實驗複雜的 python regular expression,在 brython.js + node.js v20 + jsdom 環境上失敗了,甚至小改 index.html 搭配 python3 -m http.server 用 Chrome browser 執行(給予他完整的 Chrome 瀏覽器環境)還是有一樣的錯誤訊息,這邊就暫時推論失敗了,而上述的範例已經包括從 node.js 傳資料到 python code ,以及運行完如何把回傳資料傳到 node.js 使用,眼尖的人,應該會發現在 brython 用法內,使用了 `document.output = runTest(data)` ,其實是多呼叫了一次 runTest(data),因為原先 `${pythonScript}` 也有做,但沒在細追怎樣接運算結果,剛好不合預期就放棄研究。

最後,就是 WebAssembly 領域(一開始寫這篇筆記就是要研究 WebAssembly ,不小心走偏),把某一種 python code 轉成 wasm 格式,接著用 wasmer 運行,或是在其他語言(如 node.js)運行 wasm code。

先透過 MacPorts 安裝 wasmer:

% port search wasmer
wasmer @4.3.5 (lang, devel)
    The leading WebAssembly Runtime supporting WASI and Emscripten
% sudo port install wasmer

接著試著用 py2wasm 把 script-main.py 轉成 script-main.wasm,其中 py2wasm 官網有提到目前僅支援 python3.11:

% python3.11 -m venv venv
% source venv/bin/activate
(venv) % pip install py2wasm
(venv) % py2wasm script-main.py -o script-main.wasm

程式碼:

```
% cat script-main.py
import re
import json

def runTest(inputData):
    output = { "status": False, "data": {}, "error": None}
    flags = 0
    pattern = r'''(?x)
      (?:
        \.get\("n"\)\)&&\(b=|
        (?:
          b=String\.fromCharCode\(110\)|
          (?P<str_idx>[a-zA-Z0-9_$.]+)&&\(b="nn"\[\+(?P=str_idx)\]
        ),c=a\.get\(b\)\)&&\(c=|
        \b(?P<var>[a-zA-Z0-9_$]+)=
      )(?P<nfunc>[a-zA-Z0-9_$]+)(?:\[(?P<idx>\d+)\])?\([a-zA-Z]\)
      (?(var),[a-zA-Z0-9_$]+\.set\("n"\,(?P=var)\),(?P=nfunc)\.length)'''

    try:
        result = re.search(pattern, inputData, flags)
        if result:
            output["status"] = True
            output["data"] = result.groupdict()
    except Exception as e:
        output["error"] = str(e)
    return json.dumps(output, indent=4)

if __name__ == "__main__":
    import sys
    if len(sys.argv) < 2:
        print("Usage: python script-main.py <inputData>")
    else:
        print(runTest(sys.argv[1]))

% python3 script-main.py 
Usage: python script-main.py <inputData>

% python3 script-main.py "Hello World"
{
    "status": false,
    "data": {},
    "error": null
}
```

wasmer 實測:

```
% wasmer run script-main.wasm 
Usage: python script-main.py <inputData>

% wasmer run script-main.wasm "Hello World"
{
    "status": false,
    "data": {},
    "error": null
}
```

接著讓 Node.JS 來運行,這邊就來煩 ChatGPT 並小改一下,有了一個比較堪用的版本:

```
% cat run.js 
const fs = require('fs');
const { WASI } = require('wasi');
const path = require('path');
const { TextDecoder } = require('util');

const runWasm = async (inputData) => {
    const wasmPath = path.resolve('./script-main.wasm');
    const wasmBinary = fs.readFileSync(wasmPath);

    // Setup a WASI instance
    const wasi = new WASI({
        args: inputData ? ['script-main.wasm', inputData] : ['script-main.wasm'],
        env: {},
        version: 'preview1'
    });

    // Create a memory buffer for the stdout
    const memory = new WebAssembly.Memory({ initial: 1 });

    // Compile and instantiate the WebAssembly module
    const { instance } = await WebAssembly.instantiate(wasmBinary, {
        wasi_snapshot_preview1: wasi.wasiImport,
        env: { memory }
    });

    // Start the WASI instance
    wasi.start(instance);

    // Read and decode the stdout data
    const stdout = new Uint8Array(memory.buffer);
    const decoder = new TextDecoder('utf8');
    const output = decoder.decode(stdout);
    console.log(output.trim());
};

// Get the inputData from the command line arguments
runWasm(process.argv[2] || null).catch(console.error);

% nvm use v20
Now using node v20.10.0 (npm v10.2.3)

% node run.js 
(node:22046) ExperimentalWarning: WASI is an experimental feature and might change at any time
(Use `node --trace-warnings ...` to show where the warning was created)
Usage: python script-main.py <inputData>

% node run.js "Hello World"
(node:22050) ExperimentalWarning: WASI is an experimental feature and might change at any time
(Use `node --trace-warnings ...` to show where the warning was created)
{
    "status": false,
    "data": {},
    "error": null
}
```

回過頭來,故事起源是想善用一些 open source 甚至不同程式語言的整合架構,因此稍微研究一些跨語言的整合,很可惜的,最佳的路線應當還是各自跑在各自的 runtime 環境,以上就當趣味筆記一下。

2024年3月13日 星期三

Node.js 開發筆記 - 將 C structure 轉成 Javascript code 流程

在 C code 處理記憶體時,有些偷閒招數是強制型態轉換,這時要移植到 node.js 運行的 js code 有點繞,整個開發過程就不斷在 c code 輸出 structure 的資訊,跟 js code 那端交叉比對,理解後也沒什麼難,就是要計算記憶體位置

C code: 

// 宣告
typedef struct 
{
char flag[16];
unsigned int number1;
unsigned int number2;
unsigned int number3;
unsigned int number4;
} MyHeader;


// 用法:
{
    MyHeader *header;
    header = (MyHeader *)buffer;
}

接著在 js code 要對應處理稍微累了點,但也還行:

const buffer = ....;
const headerOffset = 0;
const headerData = buffer.slice(headerOffset, headerOffset + 32);

headerFlag = headerData.slice(0, 16).toString('ascii');
headerNumber1 = headerData.readUInt32LE(16);
headerNumber2 = headerData.readUInt32LE(20);
headerNumber3 = headerData.readUInt32LE(24);
headerNumber4 = headerData.readUInt32LE(28);

如此可以做簡單的 C Code 轉 node.js Javascript code。

建議移植時,要分別在 C & JS 輸出數值來比對,小步小步進行,避免程式碼很大包,最後出包了難 debug (大概稱得上 test-driven development 吧?)

2022年9月13日 星期二

Javascript 開發筆記 - 使用 Vue.js 和 Vite

規劃網頁開發時,引入一個框架是不錯的選項,讓團隊有共同溝通的語言,目前打算把以前接觸 Vue.js 部分複習一下,直接來用 Vue 3 以及 Vite ,其中 Vite 是一個很像 Webpack 的工具,號稱是下一代前端開發工具且運作效率高,看了一下是可以達成打包的程式碼任務,也能提供 dev web server + hot reload (hot module replacement/HMR) 服務。

文件資料:
這次主要接觸了 Vite ,才跑去看一下 Vue.JS 作者是誰 XD 我用了好一陣子都沒去認識一下。跑去看了一下 Vue.JS 作者的 twitter 跟 WIKI,發現人在新加坡且學經歷也滿有趣的,偶爾會分享跟小孩相處的經驗,並且也分享網路受訪又被辱罵等文,在 2022.08 剛和團隊產出了 Vue.JS 3 中文文檔,年紀相仿,滿有趣的生活。

快速上手法:

% nvm use v16
Now using node v16.13.0 (npm v8.1.0)
% npm -v
8.1.0
% npm create vite@latest my-vue-app --template vue
Need to install the following packages:
  create-vite@latest
Ok to proceed? (y) y
✔ Select a framework: › Vue
✔ Select a variant: › JavaScript

Scaffolding project in /private/tmp/my-vue-app...

Done. Now run:

  cd my-vue-app
  npm install
  npm run dev
% cd my-vue-app 
% cat package.json 
{
  "name": "my-vue-app",
  "private": true,
  "version": "0.0.0",
  "type": "module",
  "scripts": {
    "dev": "vite",
    "build": "vite build",
    "preview": "vite preview"
  },
  "dependencies": {
    "vue": "^3.2.37"
  },
  "devDependencies": {
    "@vitejs/plugin-vue": "^3.1.0",
    "vite": "^3.1.0"
  }
}
% tree     
.
├── README.md
├── index.html
├── package.json
├── public
│   └── vite.svg
├── src
│   ├── App.vue
│   ├── assets
│   │   └── vue.svg
│   ├── components
│   │   └── HelloWorld.vue
│   ├── main.js
│   └── style.css
└── vite.config.js

4 directories, 10 files
% npm install
% npm run dev

  VITE v3.1.0  ready in 435 ms

  ➜  Local:   http://127.0.0.1:5173/
  ➜  Network: use --host to expose

接著去編輯 src/components/HelloWorld.vue 可以看到網頁內容立即改變。如此大概就可以窺見 Vite 的基本用法,接著是編譯:

% npm run build

> my-vue-app@0.0.0 build
> vite build

vite v3.1.0 building for production...
✓ 16 modules transformed.
dist/assets/vue.5532db34.svg     0.48 KiB
dist/index.html                  0.44 KiB
dist/assets/index.43cf8108.css   1.26 KiB / gzip: 0.65 KiB
dist/assets/index.795d9409.js    52.87 KiB / gzip: 21.33 KiB

% tree dist 
dist
├── assets
│   ├── index.43cf8108.css
│   ├── index.795d9409.js
│   └── vue.5532db34.svg
├── index.html
└── vite.svg

1 directory, 5 files

% cat dist/index.html 
<!DOCTYPE html>
<html lang="en">
  <head>
    <meta charset="UTF-8" />
    <link rel="icon" type="image/svg+xml" href="/vite.svg" />
    <meta name="viewport" content="width=device-width, initial-scale=1.0" />
    <title>Vite + Vue</title>
    <script type="module" crossorigin src="/assets/index.795d9409.js"></script>
    <link rel="stylesheet" href="/assets/index.43cf8108.css">
  </head>
  <body>
    <div id="app"></div>
    
  </body>
</html>

以上就簡單過一下常用的東西。

Javascript 開發筆記 - 使用 npm/npx degit 管理開發模板

當你把你習慣的部分都設置在 github 後,可以靠以下資料快速複製出來使用:

% npx degit changyy/study-node-electron-simple my-project 
> cloned changyy/study-node-electron-simple#HEAD to my-project
% cd my-project 
% source env_nvm.sh 
Now using node v16.13.0 (npm v8.1.0)
% npm install
% npm run start

> my-electron-app@1.0.0 start
> electron-forge start

✔ Checking your system
✔ Locating Application
✔ Preparing native dependencies
✔ Launching Application

其中 degit 套件還滿方便的,可以快速複製樣板出來並去除 git 相關結構。而使用 npx 的指令,他本身 man page 介紹是 Run a command from a local or remote npm package,可以用完就拋掉也不用安裝在本地。

相關資料:

2021年6月27日 星期日

Node.js 筆記 - 以 HTTP API 提供 ffmpeg 轉檔,以 jpg 轉成 png 為例 @ node.js v10.24.1, macOS 11.4

最近接獲一個任務研究了一下 Javascript 與 H264 的解決方案,首先會立馬想到 ffmpeg 方案,就研究了以下 JS 專案:
其中 ffmpeg.wasm 無法在 node.js v10 運行。在不考慮 node.js 升級的前提上,就來把玩其他三者,而 tinyh264 的源頭是 h264bsd 專案,在 h264bsd 專案中有 js solution 可以挖出來跑,包括裡頭有 github.com/oneam/h264bsd/blob/master/js/test_node.js 這隻程式很小巧美麗,可以欣賞一下。而裡頭把玩最多的是 ffmpeg.js 這專案,有興趣可以看看他的 Makefile ,很簡單清楚,比較特別是他分別產出 ffmpeg-webm.js 和 ffmpeg-mp4.js ,兩者不同的地方是 ffmpeg 支援的 encoder/muxer 不同,可能是為了精簡 js code size 因此就拆成 webm 跟 mp4 的用法。這邊把玩的是善用 ffmpeg.js Makefile 去重編 ffmpeg-*.js 增加 demuxer/decoder 和 encoder/muxer。

這邊滿適合看一下 ffmpeg 框架:


接著,工作上的任務是讓 input 支援 h264,而 output 支援 jpg/png 等。這邊把範圍限縮到 input 支援 jpg ,輸出支援 png 來筆記。最後包裝個 HTTP API 出來筆記一下,結果花最多時間是在確認如何從檔案系統讀出檔案資料,以及透過 http.request 將圖片資料下載回來 Orz 還派上 md5sum 來檔案內容是否正常。

而 ffmpeg.js 真的設計得不錯,用起來很方便,可以參考 local-file-cmd.js 用法:

const ffmpeg = require('./ffmpeg-20210624_1550/ffmpeg-mp4.js');
//const ffmpeg = require('./ffmpeg-default/ffmpeg-mp4.js');
const fs = require('fs');
const crypto = require('crypto');

let from_local_file = '/tmp/test.jpg';
let raw_data = fs.readFileSync(from_local_file);
let testData = Uint8Array.from(raw_data);
const md5sum = crypto.createHash('md5');
md5sum.update(raw_data);
console.log('[INFO][from_local_file][size:'+raw_data.length+'][md5:'+md5sum.digest('hex')+'][path:'+from_local_file+']');

const result = ffmpeg({
MEMFS: [{name: 'test.jpg', data: testData}],
arguments: ['-i', 'test.jpg', 'test.png']
})
const out = result.MEMFS[0];
const outputContent = Buffer.from(out.data);

console.log('[INFO] Done. Input size: ' + raw_data.length +', testData size: '+testData.length+', output size: '+outputContent.length);

更多資訊:changyy/study-wasm-ffmpeg-jpg-to-png

2021年6月12日 星期六

Node.js 筆記 - 使用 Puppeteer 監控瀏覽網頁的 Requests 跟 HTML Code @ macOS 11.4, node v14.14.0, npm 6.14.5

緣起於在追蹤網站架構時,每次都靠 chrome browser 開發人員工具去追蹤特定的 request 還好,若需要大量瀏覽找尋一些蛛絲馬跡時,就會很煩!以前很閒時,就會跳下去寫 chrome extension 或是熱衷於 C++ 時,就會寫一點點  Chromium Embedded Framework 來寫個小型瀏覽器,最後想起來試試看 Puppeteer 吧!

使用 Puppeteer 很輕鬆,除了是很常見的 Javascript 語言外,Puppeteer 套件提供了網頁端常見的事件偵測、所發的 Request 清單。就這樣拼拼湊湊即可完工:

(async () => {
const browser = await puppeteer.launch({headless: false});
//const page = await browser.newPage();
const context = await browser.createIncognitoBrowserContext();
const page = await context.newPage();
await page.emulate(device);
await page.setRequestInterception(true);

// https://pptr.dev/#?product=Puppeteer&version=v10.0.0&show=api-event-domcontentloaded
// https://developer.mozilla.org/en-US/docs/Web/API/Window/DOMContentLoaded_event
//
// The DOMContentLoaded event fires when the initial HTML document has been completely loaded and parsed, without waiting for stylesheets, images, and subframes to finish loading.
//
page.on('domcontentloaded', () => {
console.log('on.domcontentloaded');
});

// https://pptr.dev/#?product=Puppeteer&version=v10.0.0&show=api-event-domcontentloaded
// https://developer.mozilla.org/en-US/docs/Web/API/Window/load_event
//
// The load event is fired when the whole page has loaded, including all dependent resources such as stylesheets and images. This is in contrast to DOMContentLoaded, which is fired as soon as the page DOM has been loaded, without waiting for resources to finish loading.
//
page.on('load', async () => {
console.log('on.load');
watchTags(page, watch_tags);
});

// https://pptr.dev/#?product=Puppeteer&version=v10.0.0&show=api-event-framenavigated
// https://pptr.dev/#?product=Puppeteer&version=v10.0.0&show=api-class-frame
page.on('framenavigated', frame => {
console.log('on.framenavigated: '+frame.url());
});

// https://pptr.dev/#?product=Puppeteer&version=v10.0.0&show=api-event-request
// https://pptr.dev/#?product=Puppeteer&version=v10.0.0&show=api-class-httprequest
page.on('request', request => {
watchRequest(page.url(), request.url());
if (skip_resource_type[ request.resourceType() ])
request.abort();
else
request.continue();
});

// https://pptr.dev/#?product=Puppeteer&version=v10.0.0&show=api-event-response
// https://pptr.dev/#?product=Puppeteer&version=v10.0.0&show=api-class-httpresponse
page.on('response', response => {
//console.log('on.response: '+response.url());
});

while (true) {
if (url_init.length > 0) {
const target_url = url_init.shift();
await page.goto(target_url, {
waitUntil: 'networkidle0',
});
console.log('networkidle0');
}
if (url_init.length > 0)
await sleep(5000);
else
await sleep(50);
}
await browser.close();
})();

如此,搭配 command line 使用,就可很快的監控想要的 request 規則,或是 HTML DOM Tree 的變化,例如監控 <script> 的讀取位置在哪:

% node index.js -url "https://tw.yahoo.com" -tag "script.src"
...
on.load
[WATCH][TAG] script: src
Web URL: [https://tw.yahoo.com/]
[
  { src: 'https://s.yimg.com/wi/ytc.js' },
  {
    src: 'https://tw.mobi.yahoo.com/polyfill.min.js?features=array.isarray%2Carray.prototype.every%2Carray.prototype.foreach%2Carray.prototype.indexof%2Carray.prototype.map%2Cdate.now%2Cfunction.prototype.bind%2Cobject.keys%2Cstring.prototype.trim%2Cobject.defineproperty%2Cobject.defineproperties%2Cobject.create%2Cobject.freeze%2Carray.prototype.filter%2Carray.prototype.reduce%2Cobject.assign%2Cpromise%2Crequestanimationframe%2Carray.prototype.some%2Cobject.getownpropertynames%2Clocale-data-en-us%2Cintl%2Clocale-data-zh-hant-tw&version=2.1.23'
  },
  { src: 'https://s.yimg.com/aaq/yc/2.9.0/zh.js' },
  {
    src: 'https://s.yimg.com/ud/fp/js/vendor.174522d6d76b51858b93.min.js'
  },
  { src: 'https://s.yimg.com/ud/fp/js/common.js' },
  { src: 'https://s.yimg.com/oa/consent.js' },
  { src: 'https://consent.cmp.oath.com/cmpStub.min.js' },
  { src: 'https://consent.cmp.oath.com/cmp.js' },
  { src: 'https://s.yimg.com/ss/rapid3.js' },
  { src: 'https://s.yimg.com/rq/darla/boot.js' },
  {
    src: 'https://s.yimg.com/ud/fp/js/main.6622c6aeda051386afaa.min.js'
  },
  { src: 'https://mbp.yimg.com/sy/os/yaft/yaft-0.3.22.min.js' },
  {
    src: 'https://mbp.yimg.com/sy/os/yaft/yaft-plugin-aftnoad-0.1.3.min.js'
  },
  { src: 'https://s.yimg.com/aaq/vzm/perf-vitals_1.0.0.js' },
  {
    src: 'https://fc.yahoo.com/sdarla/php/client.php?dm=1&lang=zh-Hant-TW'
  },
  {
    src: 'https://s.yimg.com/aaq/c/e7fecc0.caas-abu_highlander.min.js'
  }
]
...

2021年1月14日 星期四

[Javascript] 複寫 XMLHttpRequest 來紀錄 Network Request URL @ Chrome Browser DevTools

最近 podcast 很夯,來研究 <audio> 。之前研究過 <video> 就有發現現在都用很夯 blob 的播放方式,透過 JS 片段下載資料交給 <video> 播放,以至於從 JS 調閱出 <video> 元件時,看不到真實的影片來源,而是一連串 blob (Binary Large Object) 記憶體位置。

原本想說在 Chrome DevTools 下,能不能靠 JS 取得 network request 發送清單來做應用,看著看著突然腦筋一轉,乾脆就用 XMLHttpRequest 好了,多包一層就可以收集了。

用法:

//
// https://stackoverflow.com/questions/7775767/javascript-overriding-xmlhttprequest-open
//
(function() {
var proxied = window.XMLHttpRequest.prototype.open;
window.XMLHttpRequest.prototype.open = function() {
// console.log( arguments );
//
// 只關注 m3u8 來源
//
if (arguments.length >= 2 && arguments[1].indexOf('.m3u8') > 0) {
console.log( arguments );
// return;
}
return proxied.apply(this, [].slice.call(arguments));
};
})();

2019年11月24日 星期日

[JS] Google Adsense 自動廣告 - 關閉 錨定廣告/重疊廣告 方式

前陣子跟 Google Adsense 的新加坡客戶經理聊過幾句,被她引導開啟了一些自動化廣告最佳化的項目。最近發現公司的網站出現 錨釘 廣告,想說是不是不小心誤上程式碼,最後想起應當是自動化廣告的機制。

對於一些頁面不想開啟置頂或置底的錨定廣告,可用以下方式關閉:

<script>
(adsbygoogle = window.adsbygoogle || []).push({
enable_page_level_ads: false
});
</script>


剛好去年是要手動靠 enable_page_level_ads: true 啟用的,一時之間還以為實驗的程式碼不小心發布了 :P 因為去年研究時感受到他很容易覆蓋掉一些網路應用的版面,如導覽功能,因此決議不讓他上線。

2019年5月19日 星期日

Javascript 開發筆記 - 強制 HTTPS 瀏覽機制

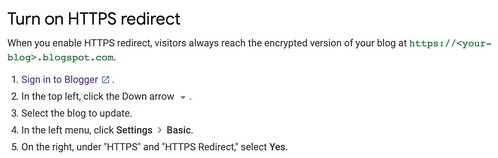
HTTPS redirect

用 Blogger 搭配自訂網域時,可以靠 cloudflare 提供免費的 SSL 憑證,以此提供免費的 HTTPS 加密瀏覽體驗,然而,在 Blogger.com 使用 HTTPS 時,有個選項詢問是否開啟 HTTPS 重新導向,若採用 blogspot.com 網域是可以打開的,但使用自訂網域則不適合導向,會產生 loop。

這時就靠 javascript 躲在 <HEAD> 來做事吧

<script>

if (location.protocol != 'https:') {
location.href = 'https:' + window.location.href.substring(window.location.protocol.length);
}

</script>

2017年12月30日 星期六

[Javascript] Google Sheets 與 Google app script - 處理 JSON API data

之前看到別人用 Google docs - sheets 與表單製作點飲料的功能(有點年紀的大概都會想到訂便當系統?),才發現 Google Sheets 其實有提供像 Excel - VBA 這種制定功能的架構,真是相見恨晚!最近幾年都改用Google docs做了很多事,面對數據整理也都在透過 Google sheets API 匯出後再整理回去,若有些很簡單的功能,不見得需要這樣做了!

舉個例:撈別人家的 API 資料,取出來參考。來個更精準的需求:查看某銀行的幣值變化或是某交易平台的虛擬幣價格。

這時就需要"存取網路"跟"JSON"處理方式,很佛心的,有人已提供了:

Import JSON into Google Sheets, this library adds various ImportJSON functions to your spreadsheet - https://github.com/bradjasper/ImportJSON

此目的是做成很通用的工具,但有時候,有些欄位資料想要自行客製化,那就寫一點 code 吧

1. 存取網路:

var jsondata = UrlFetchApp.fetch(url);

2. 處理 json format:

var object   = JSON.parse(jsondata.getContentText());

剩下的,對會寫程式的,就很簡單了,一切就是寫 javascript 啦,像是將 timestamp 轉 date:

var date_obj = new Date(input_timestamp_value * 1000);
var date_formated =
        date_obj.getFullYear() + '/' + (date_obj.getMonth() < 10 ? '0' : '' ) +(date_obj.getMonth()+1) +'/'+ (date_obj.getDate() < 10 ? '0' : '' ) + date_obj.getDate()
          ' ' + (date_obj.getHours() < 10 ? '0' : '') + date_obj.getHours() + ':' + date_obj.getMinutes() + ':' + (date_obj.getSeconds() < 10 ? '0': '') + date_obj.getSeconds();


後續在 Google app script 包裝成一個 function 後,並定義註解描述後,在 Google sheets 就可以用了!

/**
 * get_json_info
 *
 * @param {url}
 *
 * @customfunction
 **/
function get_json_info(url,fieldname) {
  var jsondata = UrlFetchApp.fetch(url);
  var object   = JSON.parse(jsondata.getContentText());
  return object[fieldname];
}

function main() { // 用來在 Google app script 裡 debug,可以指定跑此函數
  get_json_info("https://ipinfo.io/json","ip");
}


在 Google sheets 就簡單寫

=get_json_info("https://ipinfo.io/json","ip")

收工 XD

2016年7月4日 星期一

Bootstrap 筆記 - 讓 table 以 <tr> 為單位支援 click event

這功能其實不難,但順手筆記一下自己選的解法:

<table class="table table-striped table-hover">
<thead>
<tr>
<td cols="3">
<img class="img-responsive" src="something"/>
</td>
</tr>
</thead>
<tbody>
<tr data-href="link">
<td>Data1</td>
<td>Data2</td>
<td><a href="link">Data3</a></td>
</tr>
</tbody>
</table>


搭配 Javascript(jQuery):

<script>
$(document).ready(function() {
$(".table > tbody > tr").css('cursor', 'pointer').click(function() {
var link = $(this).data("href").trim();
if (link.length > 0)
window.document.location = link;
return false;
});
});
</script>


簡單的說,就是在某個 <td> 欄位裡埋入 <a> tag,但在 <tr> 裡的屬性多個 data-href 來記錄,最後再用 Javascript 埋入 <tr> click event。

看起來好像多埋了 <a> tag ,其主因是為了 SEO。

2015年8月21日 星期五

Javascript 開發筆記 - 透過 Google Maps Routing API 畫路徑 (Directions Service)

Google Maps Directions Service

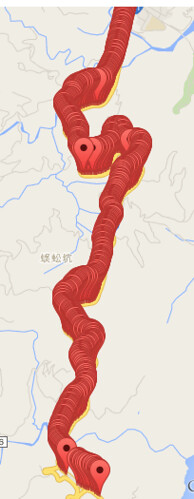
使用 GPS Location 畫圖時,點太多太精細,容易畫很慢,點太少太粗糙時,發現畫出的線會很糟,例如截彎取直的現象。雖然正解應該是先把精細路徑畫出圖來用,例如每個 zoom level 都畫好路線圖,而非動態畫線、畫點。但就是想偷懶透過 Google Maps API 來畫圖 XD 因此就研究了一下 Directions Service:https://developers.google.com/maps/documentation/javascript/directions

2000個點

假設原路線共有 2000 個精細點,接著取 200 個 sample 點出來,接著想想看怎樣用 Google Maps API 來畫圖。如果單純把這兩百個點畫連線,就會出現截彎取直的現象,因此,想到 Google 導航,透過導航機制自動幫你把路線畫得服服貼貼,畢竟 GPS 收集時也還有誤差問題,真正要做的好,還得把 GPS 位置修到路徑上,有許多眉眉角角。

在使用 Google Maps Directions Service 時,要留意限制,例如有 OVER_QUERY_LIMIT、MAX_WAYPOINTS_EXCEEDED 等限制,不是你想做就可以做:

  • OVER_QUERY_LIMIT indicates the webpage has sent too many requests within the allowed time period.
  • MAX_WAYPOINTS_EXCEEDED indicates that too many DirectionsWaypoints were provided in the DirectionsRequest. The maximum allowed waypoints is 8, plus the origin, and destination. Google Maps API for Work customers are allowed 23 waypoints, plus the origin, and destination. Waypoints are not supported for transit directions.

因此,需要將 200 個點,切成若干次 request ,每一個 request 含頭尾只能有 8 個座標點,其中給予頭尾就可以導航了,而其中的 6 個中繼點只是可以精細導航路線不會飄走。大概是這樣的概念處理資料,200個點,以 8 個點為單位 = 25 次 requests ,會踩到 OVER_QUERY_LIMIT 。儘管可以再透過 call api 的頻率來解決,但我又偷懶把 200 個點限縮成 5~6 次的 requests,然後再連續的 GPS 中,透過平均個數抽 6 個點出來,讓一個 request 還是有八個點,只是更不精細。

總之,程式碼大概長這樣:

<html>
<head>
<script src="https://code.jquery.com/jquery-2.1.4.min.js"></script>
<script src="https://maps.googleapis.com/maps/api/js?signed_in=true&callback=initMap" async defer></script>
<script>
var routes = [];
var points = [];
function initMap() {
var map = new google.maps.Map(document.getElementById('map'), {
zoom: 15,
center: {lat: 23.900422, lng: 121.603807}
});

var prev = null;
for (var i=0, cnt=data['results'].length; i<cnt ; ++i) {
var point = new google.maps.LatLng(data['results'][i]['location'].lat,data['results'][i]['location'].lng);
points.push({
location: point,
stopover: false, // 是否顯示
});

// add marker
if (0) {
var marker = new google.maps.Marker({
map: map,
position: point,
});
}
if (prev) {
// use multiple routes
routes.push({
origin: prev,
destination: point,
travelMode: google.maps.TravelMode.DRIVING
});
}
prev = point;
}

var directionsService = new google.maps.DirectionsService;
// multiple routes
// https://developers.google.com/maps/documentation/javascript/directions
if (0) {
for (var i=0, cnt=routes.length ; i<cnt ; ++i) {
console.log(i);
directionsService.route(routes[i], function(result, status) {
if (status == google.maps.DirectionsStatus.OK) {
var directionsDisplay = new google.maps.DirectionsRenderer({
suppressMarkers: true
});
directionsDisplay.setMap(map);
directionsDisplay.setDirections(result);
}
} );
}
}

// use multiple stops
// https://developers.google.com/maps/documentation/javascript/directions#Waypoints
var max_steps = 36;
for (var i=0, cnt=points.length; i < cnt ; i += max_steps) {
var stops = []; // max should be 8
var next_stop = Math.floor(max_steps / (8-2) );
for (var j=i+next_stop ; j<(max_steps - next_stop) && j < (cnt - 1) ; j += next_stop)  // 去頭去尾, 頭擺在 origin
stops.push(points[j]);
var request = {
origin: points[i].location,
destination: i+(max_steps - 1) < cnt ? points[i+max_steps-1].location : points[cnt-1].location,
waypoints: stops,
travelMode: google.maps.TravelMode.DRIVING,
};
directionsService.route(request, function(result, status) {
if (status == google.maps.DirectionsStatus.OK) {
var directionsDisplay = new google.maps.DirectionsRenderer({
suppressMarkers: true // 單純畫路線,不要顯示 marker
});
directionsDisplay.setMap(map);
directionsDisplay.setDirections(result);
} else {
console.log( status ); // OVER_QUERY_LIMIT, MAX_WAYPOINTS_EXCEEDED
}
} );
}
}

var data =
{
  "results": [
      {
         "elevation" : 17.00912857055664,
         "location" : {
            "lat" : 23.900397,
            "lng" : 121.603762
         },
         "resolution" : 610.8129272460938
      },
      {
         "elevation" : 20.88261413574219,
         "location" : {
            "lat" : 23.898869,
            "lng" : 121.603903
         },
         "resolution" : 610.8129272460938
      },
      {
         "elevation" : 22.29166030883789,
         "location" : {
            "lat" : 23.896661,
            "lng" : 121.60384
         },
         "resolution" : 610.8129272460938
      },
      {
         "elevation" : 20.24537467956543,
         "location" : {
            "lat" : 23.895185,
            "lng" : 121.60387
         },
         "resolution" : 610.8129272460938
      },
      {
         "elevation" : 30.49811744689941,
         "location" : {
            "lat" : 23.891678,
            "lng" : 121.603371
         },
         "resolution" : 610.8129272460938
      },
      // ...
   ]
};
</script>
</head>
<body>
<div id="map" style="width:100%; height:100%;"></div>
</body>
</html>

2015年5月7日 星期四

Javascript 開發筆記 - 使用 Yuotube Player API for iframe Embeds 將 videos 串成 playlist

透過 Youtube Player API 可以動態把一堆 Youtube video 串成一個 playlist 來播放。網路上不少範例,但很少看到處理多則 video 的方式,有也是一則 video 搭配一個 player 架構,摸了一下終於搞懂其設計架構,片段程式碼:

<div id="player"></div>
<script>
var player;
var videos = ['LzHFD1sEqpE', 'iV8JDbtXZm4', '-sjfQWGkGF4'];
(function() {
if (videos.length) {
var tag = document.createElement('script');
tag.onload = function() {
YT.ready(function() {
player = new YT.Player('player', {
playerVars: {
playlist: videos.join(","),
}
});
});
}
tag.src = "https://www.youtube.com/iframe_api";
var firstScriptTag = document.getElementsByTagName('script')[0];
firstScriptTag.parentNode.insertBefore(tag, firstScriptTag);
}
})();
</script>


更多資訊請參考:https://developers.google.com/youtube/iframe_api_reference

2015年4月2日 星期四

Android 開發筆記 - 嘗試取出 WebView Javascript console.log @ 小米2S Android 4.1.1

原先 Android 4.4 已經有漂亮的解法:Debugging Web Apps,但是,對於其他版本的就 糟糕了。

所幸小米2S的系統還算 ok,只需啟動開發者模式,並播打電話 *#*#717717#*#* 後,即可開啟完整的開發者模式,透過 adb 連線。

$ adb devices
...至少要看到小米2S機器

$ adb logcat com.android.chromium:* | grep 'WebViewerFragment'
...
D/WebViewerFragment(25584): onScroll:192.34418
D/WebViewerFragment(25584): onScroll:344.65582
D/WebViewerFragment(25584): onFling:-4593.181
D/WebViewerFragment(25584): onScroll:-71.85919
D/WebViewerFragment(25584): onScroll:-183.00793
D/WebViewerFragment(25584): onScroll:-61.014893
D/WebViewerFragment(25584): onScroll:-77.11798
D/WebViewerFragment(25584): onFling:5177.8477
D/WebViewerFragment(25584): onScroll:-42.316345
D/WebViewerFragment(25584): onScroll:-70.78821
D/WebViewerFragment(25584): onScroll:-89.440186
D/WebViewerFragment(25584): onScroll:-105.551575
D/WebViewerFragment(25584): onScroll:-117.46338
D/WebViewerFragment(25584): onFling:8612.66
...


如此,簡易版搞定 :P 上述訊息是 javascript console.log。另一外提的是,我把小米2s系統預設瀏覽器改成 chrom browser ,不知使用系統預設 browser 是否一樣,以及我安裝的 app 可能是 debug 版本,有一說 release 版本可能看不到。

2015年1月2日 星期五

MongoDB 開發筆記 - 替 Mongoose (Node.js MongoDB Driver) 送 patch 的經驗

大概 2014 年 11 月附近,下了班仍會抽空把玩 MongoDB ,當時就決定搭配 node.js 來把玩 :P 當時在挑選 Node.js MongoDB Driver 時,看到官方文件提到了 Mongoose ,就順勢把玩了幾下。

對於 nodejs - mongoose 跟 nodejs - mongodb 的差異點在於 mongoose 做了滿多整合方式,例如 QueryStreams 的效果,在處理大量資料時,非常便利!

除了適應 node.js 的 async 架構外,又發現 mongoose 跟原生 mongodb 設計上已經有些 out of date,在 Stack Overflow 和 mongoose issue 有不少抱怨,就試著 trace mongoose 架構,再送看看 patch,很幸運地被接受了 :P 而且只多寫了 2~3 行 code,果真好的 framework 都已經設計的很好,可能花了 15 分鐘了解架構,而 testing 花了 30 分鐘,結果 coding 才 3 分鐘 XDD

只是送 patch 的過程並沒有很順利,包含未先讀 mongoose / CONTRIBUTING.md 的描述就直接上 code,被挑了 coding style 問題,另外,還沒有跑 unit test XDDD 就碰到 CI 回報錯誤 Orz 接著才發現補上的那段 code 並不嚴謹。把 code 嚴謹化後,CI 也直接回報可以 merge :) 就這樣非常快地 2 天內就被 merge 進 master 了。

這次 patch 經驗:

  • 開發上碰到需求不被滿足,接著搜尋 Stack Overflow 及該專案的 issue tracking,發現問題一直沒被解決時,就可以著手看看要不要抽時間來貢獻
  • 接著發現解法後,一定要先看專案的 CONTRIBUTING 規定
  • 不錯的專案一定都有 unit test,記得跑一下
  • 提供簡單的 testing 程式碼跟預期結果,可以加速 commiter 閱讀及提升認同感

剩下的就只要花時間等待了 Orz 例如這次的 commiter 是 MongoDB New York RD,作息剛好日夜顛倒,因此每一次完整的互動大概都花了 2 天。

2014年7月11日 星期五

[Javascript] 使用 AJAX/jQuery 與 JSONP/Callback 處理跨 domain 問題

很久沒寫 ajax 了 :P 由於機器整合不易?所以 API 就是要跨網域多台機器要互動。至於原理可以看看 wiki JSONP 簡介,在此筆記一下 Server Site 跟 Client Site 的用法

Server Site API 支援 JSONP 使用模式:

假設 API 輸出結果為 {"status":true} 的 JSON 格式,改成多一個 function name 來包裝: callbackFunc({"status":true})

例如:

$ wget -qO- http://example.com/api
{"status":true}

$ wget -qO- 'http://example.com/api?mycallback=HelloCallback'
HelloCallback({"status":true})


Client Site:

<script>
$(document).ready(function(){
$.ajax({
type: 'GET',
dataType: 'jsonp' ,
jsonpCallback: 'HelloCallback',
url: 'http://example.com/api',
data: 'mycallback=HelloCallback',
success: function(data) {
console.log(data);
}
});
});
</script>


若 Server Site 用的參數剛好是 callback 的話:

$ wget -qO- http://example.com/api
{"status":true}

$ wget -qO- 'http://example.com/api?callback=HelloCallback'
HelloCallback({"status":true})


那 Client Site 可以化簡成:

<script>
$(document).ready(function(){
$.ajax({
type: 'GET',
dataType: 'jsonp' ,
url: 'http://example.com/api',
success: function(data) {
console.log(data);
}
});
});
</script>


可以用 Chrome Browser 觀看 jQuery 發出的 Requests 長什麼樣子,主因是 jQuery 預先幫忙包好了。

2014年6月1日 星期日

[NodeJS] 透過 Wget + HTTP Proxy Server 架構進行 Content 分析

前陣子研究抓取資料時,發現 web crawler 搭配 proxy 時,可以在 proxy 這層進行資料的處理、分析,就一直思考到底要用 python 還是 node.js 測試,最後,實在是 node.js 方便許多,就...衝啦。

在進行之前,小提一下 Proxy Server 本身就有 Internet Content Adaptation Protocol (ICAP) 機制,其實只需要架一個 Squid 在寫一些 ICAP 即可達到類似的效果,有興趣可參考:[Python] 使用 PyICAP 淺玩 ICAP 與 Squid (以 Response Modification / RESPMOD 為例) @ Ubuntu 12.04

對於沒開發過 node.js 的我,就先參考 node-http-proxy 的目錄結構建立起來一個 open source:node-content-filter-proxy

這兩天抽空把玩的心得:
  • 支援 HTTP Requests
  • 尚未處理 HTTPS Requests

抽取 <a href="...">...</a> 用法:


$ cd node-content-filter-proxy/examples && npm install
$ clear;node extract-hmtl-a-href.js
1 Jun 10:20:22 - Service Running at 3128 Port


透過 wget proxy usage:

$ http_proxy="http://localhost:3128" https_proxy="http://localhost:3128" wget -qO -  http://www.google.com/
<a href="http://www.google.com.sg/imghp?hl=en&tab=wi">Images<a/>
<a href="http://maps.google.com.sg/maps?hl=en&tab=wl">Maps<a/>
<a href="https://play.google.com/?hl=en&tab=w8">Play<a/>
...


簡單的說,想要透過既有的 crawler (wget) 去下載資料,但是,資料中我只對 hyperlink 感到興趣,所以透過 proxy server 更新成只回傳 hyperlink 就好,維持 hyperlink 結構可以讓 wget --recursive 抓資料。

如此一來,原先 crawer = wget 架構,轉形成 crawler = wget + proxy server + content analysis 模式,可以專心擺重在內容分析,不必從頭刻一隻類似 wget 的程式。

最後一提,在 extract-hmtl-a-href.js 範例中,採用的不是透過 regular expression 去分析 link ,而是接近一隻 Javascript Rendering Engine (cheerio) ,所以未來可以做的事更多了 :) 至於效率部分倒還好,畢竟 crawler 抓太快會被 ban 掉,此外,分析 content 時,也能設計複雜更高的 seed list (回吐  hyperlink 時),能避開 DOS 現象(例如限定某個 domain 、網站一天只抓2000筆等)。

2014年3月12日 星期三

[Javascript] Bootstrap - 使用大量 Collapse 與 錨點(anchor/hashchange) 處理

最近在使用 Bootstrap 來包裝 Web UI ,有一卡車多的東西就先用 Collapse 包起來,而官網的範例:

<div class="panel-group">
<div class="panel panel-default">
<div class="panel-heading">
<h4 class="panel-title">
<a data-toggle="collapse" data-parent="#accordion" href="#collapseOne">
Collapsible Group Item #1
</a>
</h4>
</div>
</div>
<div id="collapseOne" class="panel-collapse collapse in">
<div class="panel-body">
Anim pariatur cliche reprehenderit, enim eiusmod high life accusamus terry richardson ad squid. 3 wolf moon officia aute, non cupidatat skateboard dolor brunch. Food truck quinoa nesciunt laborum eiusmod. Brunch 3 wolf moon tempor, sunt aliqua put a bird on it squid single-origin coffee nulla assumenda shoreditch et. Nihil anim keffiyeh helvetica, craft beer labore wes anderson cred nesciunt sapiente ea proident. Ad vegan excepteur butcher vice lomo. Leggings occaecat craft beer farm-to-table, raw denim aesthetic synth nesciunt you probably haven't heard of them accusamus labore sustainable VHS.
</div>
</div>

...
</div>


其中可以留意 collapseOne 的 class 屬性中有 in,這效果是預設展開。

然而,如果又額外做了個 Menu 維護這群 Panels/Collapse 時,希望點選某項時可以讓瀏覽器 scrollbar 移到恰當地點時,則需要處理一下:

HTML:

<div id="menu">
<ul>
<li><a data-toggle="collapse" data-target="#collapseOne" href="#collapseOne">collapseOne</a></li>
<li><a data-toggle="collapse" data-target="#collapseTwo" href="#collapseTwo">collapseTwo</a></li>
<li><a data-toggle="collapse" data-target="#collapseThree" href="#collapseThree"> collapseThree </a></li>
</ul>
</div>


Javascript:

$(document).ready(function(){

$('a[href*=#]').click(function(e){
var target = $(this).attr('href');
//console.log($(this).attr('href'));
if( target[0] == '#' ) {
//target = target.substr(1);
if( $(target) && $(target).offset() && $(target).offset().top )
$('html,body').animate({
scrollTop: $(target).offset().top
}, 1000 );
}
});
});


然而,如果預設 Collopse 是關閉的,那上述可能無法正確顯示效果,則需要把錨點切換到預設不會關閉的地點,例如 panel-heading 的位置:

<div class="panel-group">
<div class="panel panel-default">
<div id="collapseOneHead" class="panel-heading">
<h4 class="panel-title">
<a data-toggle="collapse" data-parent="#accordion" href="#collapseOne">
Collapsible Group Item #1
</a>
</h4>
</div>
</div>
<div id="collapseOne" class="panel-collapse collapse in">
<div class="panel-body">
....
</div>
</div>

...
</div>


而 Menu 的 href 則改為 collapseOneHead 即可:

<div id="menu">
<ul>
<li><a data-toggle="collapse" data-target="#collapseOne" href="#collapseOneHead">collapseOne</a></li>
<li><a data-toggle="collapse" data-target="#collapseTwo" href="#collapseTwoHead">collapseTwo</a></li>
<li><a data-toggle="collapse" data-target="#collapseThree" href="#collapseThreeHead"> collapseThree </a></li>
</ul>
</div>


註:由於採用 CodeIgniter 的關係,在 錨點(anchor) 的變化有點不如預期,所以改在 <a> 點擊上處理,而非用偵測 hashchange 事件。

2014年3月11日 星期二

[Javascript] AngularJS 與 img src & img ng-src

用 AngularJS 在處理 img 時,沒看手冊的用法:

<img src="{{item.url}}" />

雖然網頁顯示一切正常,但仔細看 Google Chrome 開發人員工具時,發現有奇怪的 requests 發出去,是的,發出去的資料就是 http://hostname/%7B%7Bitem.url%7D%7D ,解法就是改用 ng-src 吧!

<img ng-src="{{item.url}}" />

AngularJS 官方文件 ngSrc :

Using Angular markup like {{hash}} in a src attribute doesn't work right: The browser will fetch from the URL with the literal text {{hash}} until Angular replaces the expression inside {{hash}}. The ngSrc directive solves this problem.

2014年3月4日 星期二

[Javascript] 偵測 AngularJS rendered a template - 以 Google Visualization API 應用為例

用 AngularJS MVC 架構時,想撈出資料後,再動態用 Google Visualization API 繪出資料。然而,在 AngularJS 架構下,不該怎樣偵測它已經完成呈現部分(rendered a template),依照原理,只好看看何時能取得到某物件(document.getElementById("tag_id"))。

Javascript:

(function(){

$scope.$watch(function(){
return document.getElementById(tag);
},function(value){
var val = value || null;
if(val) {
// doing...
}
});
})();


HTML:

<body ng-controller="appControl">
<div ng-repeat="item in data" id="{{item.id}}">{{item.id}}</div>
</body>


由於 <DIV> 是依照 AngularJS 架構產生的,而 Google Visualization API 需要綁定在某個 div 物件上,因此才需要去偵測 AngularJS 到底將 div 呈現出來了沒。

範例:

<script type='text/javascript' src='//www.google.com/jsapi'></script>
<script type='text/javascript' src='//ajax.googleapis.com/ajax/libs/angularjs/1.2.14/angular.min.js'></script>
<script type='text/javascript'>

google.load('visualization', '1', {'packages': ['corechart']});

function appControl($scope, $http, $location) {
$scope.data = null;
$scope.query = function() {
$http.get('/api', {}).success(function(data){
$scope.data = data;
for( var i=0 ; i<data.length ; ++i ) {
(function(){
var job_id = data[i]['id'];
var job_title = data[i]['title'];
var job_data = data[i]['data'];

$scope.$watch(function(){
return document.getElementById(job_id);
}, function(value) {
var check = value || null;
if(check) {
var data = new google.visualization.arrayToDataTable(job_data, true);
var options = { title: job_title, is3D: true };
//var chart = new google.visualization.PieChart(document.getElementById(job_id));
var chart = new google.visualization.PieChart(check);
chart.draw(data, options);
}
});
})();
}
}).error(function(data){
});
};
$scope.query();
}

</script>