顯示具有 image 標籤的文章。 顯示所有文章

2024年2月21日 星期三

Python 開發筆記 - 使用 Selenium / undetected_chromedriver / ChatGoogleGenerativeAI / gemini-pro-vision 完成自動登入網站的流程(含 retry 驗證碼架構)

有些工作任務需要去下載表單做一些自動化應用,因此有了要自動登入的需求,當然也會碰到認證碼辨識問題。此篇是延續 Python 開發筆記 - 使用 Google AI, Generative Language API, gemini-pro-vision 辨識圖片認證碼

整個處理原理:
  1. 使用 Selenium 去偵測網頁的狀態,取得登入要用的帳號, 密碼, 認證碼圖片, 認證碼數值, 登入按鈕
  2. 使用 ChatGoogleGenerativeAI/gemini-pro-vision 分析圖片內容,設法分析出認證碼數值
  3. 觸發 登入按鈕 送出表單
  4. 檢視登入流程,檢查是否有登入失敗的訊息,或是反過來思考怎樣判斷登入成功,若登入失敗重回 (1) 去取得新的認證碼圖片 
引入的函式庫:

import getpass
import os
import sys
import time
import json
import base64
import undetected_chromedriver as uc
from selenium.webdriver.common.by import By
from selenium.webdriver.support import expected_conditions as EC
from selenium.webdriver.support.ui import WebDriverWait
 
from langchain_core.messages import HumanMessage
from langchain_google_genai import ChatGoogleGenerativeAI

先採用 undetected_chromedriver 來包裝一下取得 browser driver:

def getBrowserDriver():
    option = uc.ChromeOptions()
    option.add_argument('--user-agent=Mozilla/5.0 (Windows NT 10.0; Win64; x64) AppleWebKit/537.36 (KHTML, like Gecko) Chrome/80.0.3987.163 Safari/537.36')
    #option.add_argument('--window-size=%d,%d' % self.res)
    #option.add_argument('--headless')
    driver = uc.Chrome(options=option)
    return driver

辨別圖片文字靠 ChatGoogleGenerativeAI model="gemini-pro-vision":

def codeDetection(imageBase64URL: str):
    llm = ChatGoogleGenerativeAI(model="gemini-pro-vision")
    message = HumanMessage(
        content=[
            {
                "type": "text",
                "text": "Please identify the English or numbers appearing in the image. The output format is 'The answer is: XXXX'"
,
            },
            {"type": "image_url", "image_url": imageBase64URL},
        ]
    )
    result = llm.invoke([message])
    return result

處理流程:

if __name__ == '__main__':
    if "GOOGLE_API_KEY" not in os.environ:
        os.environ["GOOGLE_API_KEY"] = getpass.getpass("Provide your Google API Key: ")
    if not os.environ["GOOGLE_API_KEY"]:
        print('ERROR, no GOOGLE_API_KEY info')
        sys.exit(1)

    output = {
        'status': False,
        'time': [],
    }

    browser = getBrowserDriver()
    start_time = time.time()

    browser.get(LOGIN_URL)

    # 15s timeout
    wait = WebDriverWait(browser, 15)

    # 等待關鍵的表單資料
    conditions = [
        EC.presence_of_element_located((By.ID, "input_user")),
        EC.presence_of_element_located((By.ID, "input_password")),
        EC.presence_of_element_located((By.ID, "input_velidation_code")),
        EC.presence_of_element_located((By.ID, "velidation_code_image")),
        EC.presence_of_element_located((By.ID, "login_button")),
    ]
    if wait.until(lambda driver: all(condition(driver) for condition in conditions)):
        output['status'] = True
    output['time'].append( time.time() - start_time )

    # 取得圖片元素
    imageElement = wait.until(EC.presence_of_element_located((By.ID, "velidation_code_image")))

    # 取得圖片的 HTML code
    imageHTMLCode = imageElement.get_attribute("outerHTML")
    print("Image HTML Code:", imageHTMLCode)

    # 取得圖片的 URL
    imageSrcURL = imageElement.get_attribute("src")
    print("Image URL:", imageSrcURL)

    # 透過 JavaScript 監聽 src 屬性變化
    script = f"""
        var target = document.getElementById('velidation_code_image');
        var observer = new MutationObserver(function(mutations) {{
            mutations.forEach(function(mutation) {{
                if (mutation.attributeName === 'src') {{
                    console.log('src attribute changed:', target.getAttribute('src'));
                }}
            }});
        }});
    
        var config = {{ attributes: true }};
        observer.observe(target, config);
    """
    
    # 執行 JavaScript 代碼
    browser.execute_script(script)

    # 等待一段時間,確保有足夠的時間監聽 src 屬性的變化
    time.sleep(5)

    # 取得更新後的圖片的 URL
    updatedImageSrc = imageElement.get_attribute("src")
    print("Updated Image URL:", updatedImageSrc)

    if not updatedImageSrc:
        print('ERROR, velidation_code_image not found')
        sys.exit(1)

    result = codeDetection(updatedImageSrc)
    print(result.content)
    loginCode = ''
    for c in result.content.split(':', 2)[1]:
        if c == '' or c == ' ':
            continue
        loginCode += c

    print(f"LoginCode: {loginCode}")
    element = wait.until(EC.presence_of_element_located((By.ID, "input_user")))
    element.send_keys('YourAccountName')
    element = wait.until(EC.presence_of_element_located((By.ID, "input_password")))
    element.send_keys('YourPassword')
    element = wait.until(EC.presence_of_element_located((By.ID, "input_velidation_code")))
    element.send_keys(loginCode)
    element = wait.until(EC.presence_of_element_located((By.ID, "login_button")))

    start_time = time.time()
    element.click()

    loginDone = False
    loginRetry = 0
    while loginDone == False and loginRetry <= 3:
        try:
            wait = WebDriverWait(browser, 5)
            element = wait.until(EC.presence_of_element_located((By.ID, "WebsiteErrorMessage")))
            div_element = element.find_element(By.TAG_NAME, "div")
            span_element = div_element.find_element(By.TAG_NAME, "span")
            inner_html = span_element.get_attribute('innerHTML')
            # 驗證碼輸入錯誤
            print(f"retry: {loginRetry}, inner HTML: {inner_html}")

            # 關閉錯誤訊息
            element = wait.until(EC.presence_of_element_located((By.ID, "WebsiteErrorMessageWindow")))
            div_element = element.find_element(By.TAG_NAME, "div")
            button_element = element.find_element(By.TAG_NAME, "button")
            button_element.click()

            loginRetry += 1

            updatedImageSrc = imageElement.get_attribute("src")
            print("Updated Image URL:", updatedImageSrc)
            result = codeDetection(updatedImageSrc)
            print(result.content)
            loginCode = ''
            for c in result.content.split(':', 2)[1]:
                if c == '' or c == ' ':
                    continue
                loginCode += c

            print(f"LoginCode: {loginCode}")
            element = wait.until(EC.presence_of_element_located((By.ID, "input_user")))
            element.clear()
            element.send_keys('YourAccountName')
            time.sleep(1)
            element = wait.until(EC.presence_of_element_located((By.ID, "input_password"))) 
            element.clear()
            element.send_keys('YourPassword')
            time.sleep(1)
            element = wait.until(EC.presence_of_element_located((By.ID, "input_velidation_code")))
            element.clear()
            element.send_keys(loginCode)
            time.sleep(1)
            element = wait.until(EC.presence_of_element_located((By.ID, "login_button")))
            element.click()
        except:
            loginDone = True

    output['time'].append( time.time() - start_time )

    if loginDone:
        print("Login Successful")
    else:
        print(f"Login Failed with retry times: {loginRetry}")
 
    print(json.dumps(output, indent=4))
    while True:
        time.sleep(1)

2023年8月31日 星期四

Node.js 筆記 - 使用 Puppeteer 抓取網頁上的圖片內容並靠 Tesseract 分析圖片上的文字 (OCR) @ macOS 13.5.1, node v20.5.1, tesseract v5.3.2

剛好有同好在詢問如何處理認證碼的事,就順手複習一下 node.js 與 Puppeteer 動態爬網頁,並且把認證碼圖片存起來,在靠 Tesseract 分析上述的文字。

以前略知 光學字元辨識(OCR) 的方式,但一直沒實戰,這次就順手摸一下:github.com/changyy/node-puppeteer-with-tesseract-tool

目前只單純練一下功,還不到實際使用的地步,因為 Tesseract 分析上仍有精準度問題,純做個小工具方便把玩。此程式碼只提供快速定位到 <img> (getElementById)  的方式,接著動態存成圖片,再呼叫工具分析它。

此外,已經存在本機了,後續也能靠 tesseract 指令反覆測試參數。

安裝:

% sudo port install tesseract tesseract-eng tesseract-chi-tra tesseract-chi-sim 
% sw_vers
ProductName: macOS
ProductVersion: 13.5.1
BuildVersion: 22G90
% tesseract --version
tesseract 5.3.2
leptonica-1.82.0
libgif 5.2.1 : libjpeg 8d (libjpeg-turbo 2.1.5.1) : libpng 1.6.40 : libtiff 4.5.1 : zlib 1.2.11 : libwebp 1.3.1 : libopenjp2 2.5.0
Found SSE4.1
Found libarchive 3.6.2 zlib/1.2.11 liblzma/5.4.1 bz2lib/1.0.8 liblz4/1.9.4 libzstd/1.5.4
Found libcurl/8.1.2 SecureTransport (LibreSSL/3.3.6) zlib/1.2.11 nghttp2/1.51.0

使用:

% nvm use v20
Now using node v20.5.1 (npm v9.8.0)
% npm install
% npm run main
> main
> node main.js
Usage> node /private/tmp/node-puppeteer-with-tesseract-tool/main.js "WebURL" "ImageObjectID"
% node main.js
Usage> node /private/tmp/node-puppeteer-with-tesseract-tool/main.js "WebURL" "ImageObjectID"

測試:

% node main.js 'https://xxx/login' 'verifyImgCode'
[INFO] WebURL: "https://xxx/login", The id of the DOM <img>: "verifyImgCode"

  Puppeteer old Headless deprecation warning:
    In the near future `headless: true` will default to the new Headless mode
    for Chrome instead of the old Headless implementation. For more
    information, please see https://developer.chrome.com/articles/new-headless/.
    Consider opting in early by passing `headless: "new"` to `puppeteer.launch()`
    If you encounter any bugs, please report them to https://github.com/puppeteer/puppeteer/issues/new/choose.

on.domcontentloaded
on.framenavigated: about:blank
on.load
...
page.screenshot
browser.close
tesseract.recognize result:  058B47

練精準度:

% tesseract /tmp/verify-code.png stdout -c tessedit_char_whitelist=0123456789

2018年12月3日 星期一

Android 開發筆記 - Image Picker 與權限管理

在 Android 6.0 (API:23) 後,就算 AndroidManifest.xml 寫好要權限的部分,但實務上在進行時,依舊要主動要一次,讓用戶感受到真的要權限了:https://developer.android.com/training/permissions/requesting

做 Image Picker 時,若最終要讀取資料,那需要 android.permission.READ_EXTERNAL_STORAGE 權限,以下則是在 MainActivity 運行的範例:

<?xml version="1.0" encoding="utf-8"?>
<manifest xmlns:android="http://schemas.android.com/apk/res/android">

    <application
        android:allowBackup="true"
        android:icon="@mipmap/ic_launcher"
        android:label="@string/app_name"
        android:roundIcon="@mipmap/ic_launcher_round"
        android:supportsRtl="true"
        android:theme="@style/AppTheme">
        <activity android:name=".MainActivity">
            <intent-filter>
                <action android:name="android.intent.action.MAIN" />

                <category android:name="android.intent.category.LAUNCHER" />
            </intent-filter>
        </activity>
    </application>
    <uses-permission android:name="android.permission.READ_EXTERNAL_STORAGE"/>
</manifest>


public class MainActivity extends AppCompatActivity {
private static final int REQUEST_SELECT_VIDEO = 1;
private static final int REQUEST_EXTERNAL_STORAGE = 2;
private static String[] PERMISSIONS_STORAGE = {
Manifest.permission.READ_EXTERNAL_STORAGE,
};

@Override
protected void onCreate(Bundle savedInstanceState) {
super.onCreate(savedInstanceState);
setContentView(R.layout.activity_main);

if (ActivityCompat.checkSelfPermission(this, Manifest.permission.READ_EXTERNAL_STORAGE) != PackageManager.PERMISSION_GRANTED) {
ActivityCompat.requestPermissions(this, PERMISSIONS_STORAGE, REQUEST_EXTERNAL_STORAGE);
} else {
request_pick();
}
}

void request_pick() {
final Uri mUri = android.provider.MediaStore.Images.Media.EXTERNAL_CONTENT_URI;
final Intent mIntent = new Intent(Intent.ACTION_PICK, mUri);
final PackageManager mPackageManager = getPackageManager();
List<ResolveInfo> list = mPackageManager.queryIntentActivities(mIntent, PackageManager.MATCH_DEFAULT_ONLY);
if (list.size() > 1) {
startActivityForResult(
Intent.createChooser(
new Intent(Intent.ACTION_PICK, mUri), "選取圖片"
),
REQUEST_SELECT_VIDEO
);
} else {
startActivityForResult(mIntent, REQUEST_SELECT_VIDEO);
}
}

@Override
protected void onActivityResult(int requestCode, int resultCode, @Nullable Intent data) {
super.onActivityResult(requestCode, resultCode, data);
if (resultCode == RESULT_OK) {
if (requestCode == REQUEST_SELECT_VIDEO) {
// ...
// 在處理檔案讀取時,缺少 android.permission.READ_EXTERNAL_STORAGE 會造成 IOException:
// open failed: EACCES (Permission denied)
// ...
}
}
}
}

2016年8月8日 星期一

Command line 批次顯示圖片寬高 @ Mac OS X 10.11.6

使用 sips 指令即可:

$ sips
sips 10.4.4 - scriptable image processing system.
This tool is used to query or modify raster image files and ColorSync ICC profiles.
Its functionality can also be used through the "Image Events" AppleScript suite.
Try 'sips --help' or 'sips --helpProperties' for help using this tool


用法:

$ find . -name "*.jpg" -exec sips -g pixelHeights -g pixelWidth {} \;

2016年8月2日 星期二

Microsoft Azure 管理筆記 - 使用 Azure CLI 自訂映像檔的維護方式

大部分的潮流都是走 PaaS 架構,然而,有些歷史的包袱只能走 IaaS 的架構 XD 而建立 Image 更是最基本的方式,甚至搭配 rsync 完成發布。而對於 Resource manage 機器來說,每次透過 capture 建立 Image 後,等於報廢回收,所以寫了個簡單的步驟記憶一下:
  1. 登入機器清除基本設定檔: $ sudo waagent -deprovision+user
  2. 透過 azure cli 執行 Shutdown:$ azure vm deallocate -g MyResource -n MyCurrentServer --subscription MySubscription
  3. 透過 azure cli 執行 Generalized:$ azure vm generalize MyResource MyCurrentServer --subscription MySubscription
  4. 透過 azure cli 執行 Capture:$ azure vm capture MyResource MyCurrentServer MyImageName -t MyImageName-Date.json --subscription MySubscription
做完後,原機器就可以下去領便當,可以把它 Delete 囉。

若預設產生的 MyImageName-Date.json 不夠用時,會自行添加資料,因此維護上就會出現麻煩,每次產生新的 template 中,其實只有 storageProfile 的設定,可以用 jq 跟 vimdiff 方便更新一下:

$ jq '' < MyImageName-old.json > old-formated.json
$ jq '' < MyImageName-Date.json > date-formated.json
$ vimdiff old-formated.json date-formated.json


把 old-formated.json 裡的 storageProfile 更新完成即可。

$ mv old-formated.json MyImageName-Date-formated.json

未來要建置原先那台機器時,就可以用以下指令在重建出來:

$ azure group deployment create MyResource -f MyImageName-Date-formated.json --subscription MySubscription

其他提醒:
  1. template.json 有描述 VHD 的資訊,若用上述 azure group deployment create 時,會彈跳出已存在的錯誤訊息,這時除了更新 template.json 資訊外,也可以到 Azure Portal -> Browse -> Storage account -> Blobs -> 沿路去找資料,把舊的、沒在用的砍掉再重跑
  2. 每次建立映像檔時,在 Azure Portal -> Browse -> Storage account -> Blobs -> system -> Microsoft.Compute -> Images -> vhds  會有 Image.vhd 跟 template.json 檔案,想清掉舊的可以去刪掉
  3. 製作完 Image 後的 server ,可以直接把它刪掉,但他的 NIC應當還會在,下次建立時,就可以沿用舊的網卡,通常 private ip 可以沿用,若有 public ip 的,若是 dynamic 配置則會變動
  4. 想使用同一個 template 開機器時,若多道指令一直跑時,指使用同一個 template file 時,會出現 Unable to edit or replace deployment 'filename-template.json' 
    : previous deployment from 'DATETIME' is still active. Please see https://aka.ms/arm-deploy for usage details. 偷懶的解法就是複製出來用 Orz 不知是不是 azure 採用 local file lock 等機制
  5. 若要採用 Availability Set 時,必須一開機就設定了,解法製作兩份 template.json ,一份用來維護 Image ,另一份就是開機就擺進 Availability Set,只需在 resources 中,多添加 : { "availabilitySet": { "id" : "/subscriptions/MySubscription/resourceGroups/MyResource/providers/Microsoft.Compute/availabilitySets/MyAvailabilitySet" } }, 來處理即可

Microsoft Azure 管理筆記 - 使用 Azure CLI 建立自訂的映像檔與開新機器的方式 (create a custom image/launch a server)

由於 Azure Portal 對 Resource manager 機器尚為提供 Web UI 可以方便點擊處理,就還是下海摸一下 command line 啦。

參考文件:

對 server 建立 image 過程中,server 狀態改變後會無法重啟,得用建立好的 Resource template 重新建立,需分外留意!機器就這樣下去領便當了 囧 (Azure/azure-powershell: UN-generalize a VM)

首先,遠端登入機器,執行此道指令

$ sudo waagent -deprovision+user

此命令會嘗試清除系統,使之適合重新佈建。這項作業會執行下列工作:

移除 SSH 主機金鑰 (如果組態檔中的 Provisioning.RegenerateSshHostKeyPair 是 'y')
清除 /etc/resolv.conf 中的名稱伺服器設定
移除 /etc/shadow 中的 root 使用者密碼 (如果組態檔中的 Provisioning.DeleteRootPassword 是 'y')
移除快取的 DHCP 用戶端租用
將主機名稱重設為 localhost.localdomain
刪除最後佈建的使用者帳戶 (取自於 /var/lib/waagent) 和相關聯的資料。


接著,再回到自己的常用的機器,改用 azure cli 對該機器設置以下流程:

$ azure config mode arm
info:    Executing command config mode
info:    New mode is arm
info:    config mode command OK


// Shutdown a virtual machine in a resource group and release the compute resources
$ azure vm deallocate -g MyResource -n MyCurrentVM --subscription MySubscription
info:    Executing command vm deallocate
+ Looking up the VM "MyCurrentVM"                            
+ Deallocating the virtual machine "MyCurrentVM"            
info:    vm deallocate command OK


// Set the state of a VM in a resource group to Generalized.
$ azure vm generalize MyResource MyCurrentVM --subscription MySubscription
info:    Executing command vm generalize
+ Looking up the VM "MyCurrentVM"                            
+ Generalizing the virtual machine "MyCurrentVM"            
info:    vm generalize command OK


$ azure vm capture MyResource MyCurrentVM MyImageID -t MyImageID-base.json --subscription MySubscription
info:    Executing command vm capture
+ Looking up the VM "MyCurrentVM"                            
+ Capturing the virtual machine "MyCurrentVM"                
info:    Saved template to file "MyImageID-base.json"
info:    vm capture command OK


接著,可以建立新開機器!只是開機器前又得好好管理"Resouce"建立,由於我已經有常用的 Resource 跟 Location 了,在此只需建立 IP 跟 NIC 即可!

$ azure network public-ip create MyResource MyImageID-ip-1 -l westus --subscription MySubscription
info:    Executing command network public-ip create
warn:    Using default --idle-timeout 4
warn:    Using default --allocation-method Dynamic
warn:    Using default --ip-version IPv4
+ Looking up the public ip "MyImageID-ip-1"                              
+ Creating public ip address "MyImageID-ip-1"                            
data:    Id                              : /subscriptions/MySubscription/resourceGroups/MyResource/providers/Microsoft.Network/publicIPAddresses/MyImageID-ip-1
data:    Name                            : MyImageID-ip-1
data:    Type                            : Microsoft.Network/publicIPAddresses
data:    Location                        : westus
data:    Provisioning state              : Succeeded
data:    Allocation method               : Dynamic
data:    IP version                      : IPv4
data:    Idle timeout in minutes         : 4
info:    network public-ip create command OK


$ azure network nic create MyResource MyImageID-nic-1 -k default -m MyResource -p MyImageID-ip-1 -l westus --subscription MySubscription
info:    Executing command network nic create
+ Looking up the network interface "MyImageID-nic-1"                    
+ Looking up the subnet "default"                                            
+ Looking up the public ip "MyImageID-ip-1"                              
+ Creating network interface "MyImageID-nic-1"                          
data:    Id                              : /subscriptions/MySubscription/resourceGroups/MyResource/providers/Microsoft.Network/networkInterfaces/MyImageID-nic-1
data:    Name                            : MyImageID-nic-1
data:    Type                            : Microsoft.Network/networkInterfaces
data:    Location                        : westus
data:    Provisioning state              : Succeeded
data:    Internal domain name suffix     : #############.dx.internal.cloudapp.net
data:    Enable IP forwarding            : false
data:    IP configurations:
data:      Name                          : default-ip-config
data:      Provisioning state            : Succeeded
data:      Private IP address            : 10.0.0.6
data:      Private IP version            : IPv4
data:      Private IP allocation method  : Dynamic
data:      Public IP address             : /subscriptions/MySubscription/resourceGroups/MyResource/providers/Microsoft.Network/publicIPAddresses/MyImageID-ip-1
data:      Subnet                        : /subscriptions/MySubscription/resourceGroups/MyResource/providers/Microsoft.Network/virtualNetworks/MyResource/subnets/default
data:  
info:    network nic create command OK


建立機器吧!

$ azure --version
0.10.2 (node: 4.2.4)


$ azure group deployment create MyResource -f MyImageID-base.json --subscription MySubscription
$ azure group deployment create MyResource -f MyImageID-base.json --subscription MySubscription -p '{"vmName":{"value":"MyVM"},"adminUserName":{"value":"ubuntu"},"adminPassword":{"value":"MyPassword"},"networkInterfaceId":{"value":"/subscriptions/MySubscription/resourceGroups/MyResource/providers/Microsoft.Network/networkInterfaces/MyImageID-nic-base"}}'


然而,因為預設產出的 template 定義了以下資訊,以至於開機器必須填寫以下資訊:

$ cat template.json | jq '.parameters'
{
  "vmName": {
    "type": "string"
  },
  "vmSize": {
    "type": "string",
    "defaultValue": "Standard_A1"
  },
  "adminUserName": {
    "type": "string"
  },
  "adminPassword": {
    "type": "securestring"
  },
  "networkInterfaceId": {
    "type": "string"
  }
}


用在這邊:

$ cat template.json | jq '.resources[0].properties.osProfile'
{
  "computerName": "[parameters('vmName')]",
  "adminUsername": "[parameters('adminUsername')]",
  "adminPassword": "[parameters('adminPassword')]"
}


接著,稍微修改來支援 ssh keypair 登入方式,將 template.json 中的 parameters 多增加個 adminPublicKey/adminPublicKeyPath:

$ cat template.json | jq '.parameters'
{
  "vmName": {
    "type": "string"
  },
  "vmSize": {
    "type": "string",
    "defaultValue": "Standard_A1"
  },
  "adminUserName": {
    "type": "string"
  },
  "adminPassword": {
    "type": "securestring",
    "defaultValue": null
  },
  "networkInterfaceId": {
    "type": "string"
  },
  "adminPublicKey": {
    "type": "array"
  },
  "adminPublicKeyPath": {
    "type": "string"
  }
}


並修改 properties.osProfile 區:

$ cat template.json | jq '.resources[0].properties.osProfile'
{
  "computerName": "[parameters('vmName')]",
  "adminUsername": "[parameters('adminUsername')]",
  "adminPassword": "[parameters('adminPassword')]",
  "linuxConfiguration": {
    "disablePasswordAuthentication": true,
    "ssh": {
      "publicKeys": [
         {
           "path": "[parameters('adminPublicKeyPath')]",
           "keyData": "[parameters('adminPublicKey')]"
         }
      ]
    }
  }
}


如此一來,就開機能用 keypair 登入機器:

$ azure group deployment create MyResource -f MyImageID-base.json --subscription MySubscription -p '{"adminPassword":{"value":""},"vmName":{"value":"MyVM"},"adminUserName":{"value":"ubuntu"},"adminPublicKey":{"value":"ssh-rsa ########"},"adminPublicKeyPath":{"value":"/home/ubuntu/.ssh/authorized_keys"},"networkInterfaceId":{"value":"/subscriptions/MySubscription/resourceGroups/MyResource/providers/Microsoft.Network/networkInterfaces/MyImageID-nic-base"}}'

2016年7月27日 星期三

Microsoft Azure 管理筆記 - 建立自訂的映像檔 (create a custom image)

最近一直沿用在 AWS 的維護經驗,對應到 Azure 的服務部署,不斷的產生概念上的衝突 XD
總之,太多用 AWS 了,還是從 AWS 的角度來寫個筆記吧。

首先,有些服務不能老是從一台乾淨的 linux server + script 部署出來,有時效的問題,因此就有了自建映像檔的需求,以 AWS 來說,就是 amazon machine image (AMI) 的部分。

然而,在 2016 年的夏天,Azure 的管理介面已經有分新舊版的差異 XD

新版:https://portal.azure.com
舊版:https://manage.windowsazure.com

其中在 Azure 開機器時,也會分 Virtual Machines 跟 Virtual machines (classic) 兩種,其中前者就是新一代的 resource 管理方式,資源管控設計是不錯的,可以做到很細微。但是,對於建立自訂的映像檔的部分,只有 Virtual machines (classic) 在新版選單上有。

Virtual machines (classic):
azure_vm_classic_create_image

Virtual machines:
azure_vm_without_create_image

根據與微軟技術傳教士的討論,據說新版有在開發了 Orz 希望能夠趕快提供這服務。

總之,若不想要用指令 create image 的話,可以先挑 Virtual machines (classic) 來使用。然而,建立完的 image 該怎樣叫出來開機器,新舊版操作介面都是可以處理的。

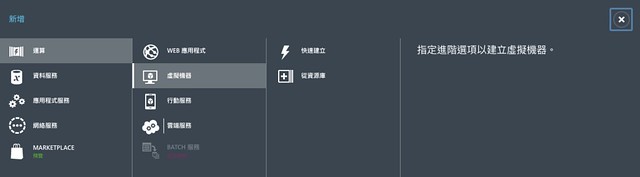
舊版 https://manage.windowsazure.com -> 新增 -> 運算 -> 虛擬機器 -> 從資源庫 -> 我的映像

auzre_vm_launch

新版 https://portal.azure.com -> 左下方 Browser -> VM image (classic) -> 挑選剛剛製作好的 Image -> 選 Create VM 即可。

以上就是初探 Azure 自訂映像檔、使用映像檔的流程。目前 Azure 頗像 2009 年的 AWS 服務,當年 AWS Web UI 也有很多功能還沒做出來,當時就是要 call api 做事,我想 Azure 新版 Portal 就是處於這個現狀。為了維護交接的成本,我會偏向盡可能用 Web UI 做事,因為不是每個人都願意去處理 command line 的。

此外,再提一下,新版 Virtual machines 則是以 create a custom template image 關鍵字去找,而大部分的自訂 image 包含常見的 VHD (Virtual Hard Disk) 字眼,只是這個領域比較偏 Windows 的用法。

2015年10月27日 星期二

透過 Google Analytics - Measurement Protocol 追蹤 IOT、Email 開信率等

雖然很多東西都建立在 Android 上,但總是有純 Unix 的環境,這時就用用 Google analytics (GA) 的 REST API 了 XD 這東西用途很廣,因為它可以偽裝成 image ,例如 <img src="//www.google-analytics.com/collect?...">,甚至可以用在 EDM 等等的(雖然 Email 常常預設把遠端資源關閉) ,此例,我們專注在 IOT 上,而測試方式只要用用 cURL 即可,十分便利。

由於是 IOT 角色,須留意 GA 的資源限制:https://developers.google.com/analytics/devguides/collection/protocol/v1/limits-quotas

  • 10 million hits per month per tracking ID
  • 200,000 hits per user per day
  • 500 hits per session not including ecommerce (item and transaction hit types).

總之,用法都很簡單,叫 IOT 定期打卡即可,最重要的工作項目反而是定義產品的使用情境,把那些狀態定義好後,當作 web page 來呼叫 Google Analytics API 吧!

簡易範例:

$ curl 'https://www.google-analytics.com/collect?v=1&t=screenview&tid=TRACKING_ID&an=YOUR_APP_NAME&cid=CLIENT_ID&cd=YOUR_PRODUCT_STATE'
GIF89a?????


其中範例回應的就是一張 GIF 圖檔,而更多應用請參考 https://developers.google.com/analytics/devguides/collection/protocol/v1/parameters ,若一直試不出來,可以用 https://ga-dev-tools.appspot.com/hit-builder/ 偵錯看看。

2015年10月4日 星期日

iOS 開發筆記 - 修正 Launch Image 失效問題

LaunchImage
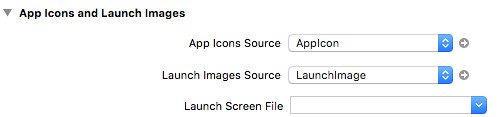
換了 Xcode 7.0.1 後,想說認真一下填滿 Images.xcassets 中的 LaunchImage,但始終沒有成功,總覺得一直讀取 Storyboard 的資料!

最後終於搞懂了,記得清空 Launch Screen File 欄位就沒問題啦。

若有碰到 ERROR ITMS-90475 iPad Multitasking support 的問題,再到 info.plist 塞入:

<key>UIRequiresFullScreen</key>
<string>YES</string>


即可解決。