最近幫看同事串 Sign In with Apple 好像有很多不順的地方,拿自己的 Apple developer 帳號試試 :P 相關文件:
首先就來闖關吧,先進行 Sign In with Apple 設定,需要指定某個 email domain 給 Apple 跟用戶溝通,此例用 appid.changyy.org 網域為例:
Certificates, Identifiers & Profiles -> More -> Sign In with Apple -> Configure

在添加網域進去之前,請記得先設定 SPF DNS Record,不然 Apple 一驗證不合 SPF 時,又得等 DNS Cache 更新等到天荒地老 Orz
在此先添加 Type=TXT 的 DNS Record 吧!
v=spf1 include:amazonses.com -all

接著用 dig 驗一下:
% dig -t txt appid.changyy.org


; <<>> DiG 9.10.6 <<>> -t txt appid.changyy.org

;; global options: +cmd

;; Got answer:

;; ->>HEADER<<- opcode: QUERY, status: NOERROR, id: 47410

;; flags: qr rd ra; QUERY: 1, ANSWER: 1, AUTHORITY: 0, ADDITIONAL: 1


;; OPT PSEUDOSECTION:

; EDNS: version: 0, flags:; udp: 512

;; QUESTION SECTION:

;appid.changyy.org.  IN TXT


;; ANSWER SECTION:

appid.changyy.org. 119 IN TXT "v=spf1 include:amazonses.com -all"


;; Query time: 56 msec

;; SERVER: 8.8.8.8#53(8.8.8.8)

;; WHEN: Wed Nov 20 00:48:09 CST 2019

;; MSG SIZE  rcvd: 92
添加 appid.changyy.org 網域,按下 Register 時,接著努力驗證通過即可。如果沒有先添加 SPF 就會出現類似訊息:The domain 'appid.changyy.org' is not SPF compliant.
接著再回到 Apple Developer 網站繼續按 Register (不是立刻通過,要等 DNS Cache 過期),就可以進行後續的認證了,如 https://appid.changyy.org/.well-known/apple-developer-domain-association.txt 配置等。接著又得搞 https 連線,又進入了 免費SSL/TLS憑證 - Let's Encrypt 與 NGINX 的設定 XD 在此不贅述。
終於可以進入 Apple Developer Account 其他設定了,首先要建立 Services IDs 時,會要求有一個 App ID 為 primary App ID ,這件事也代表 Sign In with Apple 的核心還是 App ,此例新建一個 App ID = org.changyy.apple.app-id 為例,並且在下方勾選 Sign In with Apple 且 Enable as a primary App ID。
接著,建立 Services IDs :
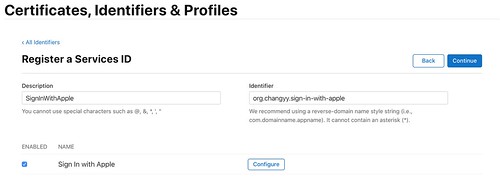
Certificates, Identifiers & Profiles -> Identifiers -> Add -> Services IDs -> 建立一個 org.changyy.sign-in-with-apple 並啟用 Sign In with Apple -> Configure -> Web Domain = appid.changyy.org 而 Return URLs = https://appid.changyy.org/callback.php 並按 Add 和 Save -> 再按 Continue 完成

最後,再來建立一組 Key 用來溝通:
Certificates, Identifiers & Profiles -> Keys -> 添加一組 Key Name = SignInWithAppleKey,記得勾選 Sign In With Apple -> 點擊 Configure 挑選完 App ID 按 Save -> 最後會下載一個 AuthKey_KeyID.p8 檔案,就是後續溝通的項目。


如此一來,在上述的過程中可以得到以下關鍵物:
- Service ID Identifier = org.changyy.sign-in-with-apple (後續是 OAuth 的 Client_ID)
- Key ID = 在 *.p8 的檔名上,或是在 Certificates, Identifiers & Profiles -> Keys -> SignInWithAppleKey 瀏覽可看到
- Team ID = 在 Apple Developer 登入後右上角可看見,或是在 Certificates, Identifiers & Profiles -> Identifiers -> 隨意一組 App ID -> App ID Prefix 就有標記 (Team ID) 資訊
- Return URLs = 在 Service ID 內編輯的,如 https://appid.changyy.org/callback.php
把這些資訊弄個 JSON 紀錄:
$ cat settings.json

{

        "CLIENT_ID": "org.changyy.sign-in-with-apple",

        "SCOPES": "name email",

        "REDIRECT_URI": "https://appid.changyy.org/callback.php",

        "STATE": "",

        "TEAM_ID": "YourTeamID",

        "KID" : "YourKeyID",

        "Key_P8_PATH" :"../keystore/AuthKey_YourKeyID.p8",

        "" : ""

}
最後把
https://github.com/changyy/sign-in-with-apple-js 拿來用,在根目錄建立 keystore 並擺放 AuthKey_YourKeyID.p8 以及上述 settings.json 擺在 /path/sign-in-with-apple-js/php/settings.json ,在把 https://appid.changyy.org/ Document_Root 設定在此專案的 /path/sign-in-with-apple-js/php 目錄上,如此用 https://appid.changyy.org/ 時,就會有以下畫面:

點擊後就會被引導完成 Apple 登入,登入後會導向到 https://appid.changyy.org/callback.php 並且看到簡單的 OAUTH code 的使用:
oepnssl = OpenSSL 1.1.1  11 Sep 2018
jwt_header = Array
(
    [typ] => JWT
    [alg] => ES256
    [kid] => YourKeyID
)

jwt_payload = Array
(
    [iss] => YourTeamID
    [iat] => 1574184061
    [exp] => 1574187661
    [aud] => https://appleid.apple.com
    [sub] => YourServiceID
)

apple_public_keys = Array
(
    [keys] => Array
        (
            [0] => Array
                (
                    [kty] => RSA
                    [kid] => AIDOPK1
                    [use] => sig
                    [alg] => RS256
                    [n] => lxrwmuYSAsTfn-lUu4goZSXBD9ackM9OJuwUVQHmbZo6GW4Fu_auUdN5zI7Y1dEDfgt7m7QXWbHuMD01HLnD4eRtY-RNwCWdjNfEaY_esUPY3OVMrNDI15Ns13xspWS3q-13kdGv9jHI28P87RvMpjz_JCpQ5IM44oSyRnYtVJO-320SB8E2Bw92pmrenbp67KRUzTEVfGU4-obP5RZ09OxvCr1io4KJvEOjDJuuoClF66AT72WymtoMdwzUmhINjR0XSqK6H0MdWsjw7ysyd_JhmqX5CAaT9Pgi0J8lU_pcl215oANqjy7Ob-VMhug9eGyxAWVfu_1u6QJKePlE-w
                    [e] => AQAB
                )

        )

)

apple_public_key_pem =

-----BEGIN PUBLIC KEY-----
MIIBIjANBgkqhkiG9w0BAQEFAAOCAQ8AMIIBCgKCAQEAlxrwmuYSAsTfn+lUu4go
ZSXBD9ackM9OJuwUVQHmbZo6GW4Fu/auUdN5zI7Y1dEDfgt7m7QXWbHuMD01HLnD
4eRtY+RNwCWdjNfEaY/esUPY3OVMrNDI15Ns13xspWS3q+13kdGv9jHI28P87RvM
pjz/JCpQ5IM44oSyRnYtVJO+320SB8E2Bw92pmrenbp67KRUzTEVfGU4+obP5RZ0
9OxvCr1io4KJvEOjDJuuoClF66AT72WymtoMdwzUmhINjR0XSqK6H0MdWsjw7ysy
d/JhmqX5CAaT9Pgi0J8lU/pcl215oANqjy7Ob+VMhug9eGyxAWVfu/1u6QJKePlE
+wIDAQAB
-----END PUBLIC KEY-----


apple_public_key_alg = RS256
[Lcobucci\JWT]
request data = Array
(
    [client_id] => YourServiceID
    [client_secret] => A.B.C1
    [code] => c
    [grant_type] => authorization_code
    [redirect_uri] => https://YourServiceIDReturnURL
)


response = Array
(
    [access_token] => a
    [token_type] => Bearer
    [expires_in] => 3600
    [refresh_token] => r
    [id_token] => id_token
)
[Firebase\JWT]
request data = Array
(
    [client_id] => YourServiceID
    [client_secret] => A.B.C2
    [code] => c
    [grant_type] => authorization_code
    [redirect_uri] => https://YourServiceIDReturnURL
)


response = Array
(
    [error] => invalid_client
)
[Firebase\JWT and \Lcobucci\JWT\Signer\Ecdsa\MultibyteStringConverter]
request data = Array
(
    [client_id] => YourServiceID
    [client_secret] => A.B.C3
    [code] => c
    [grant_type] => authorization_code
    [redirect_uri] => https://YourServiceIDReturnURL
)


response = Array
(
    [error] => invalid_grant
)
[Firebase\JWT without openssl_pkey_get_private and \Lcobucci\JWT\Signer\Ecdsa\MultibyteStringConverter]
request data = Array
(
    [client_id] => YourServiceID
    [client_secret] => A.B.C4
    [code] => c
    [grant_type] => authorization_code
    [redirect_uri] => https://YourServiceIDReturnURL
)


response = Array
(
    [error] => invalid_grant
)
網路上滿多人在討論
firebase/jwt 的用法,但其實在 2019/11/20 來看,firebase/jwt 仍就沒有完整 Sign In with Apple 所需的 JWT 編碼格式,我則是靠
Lcobucci/JWT 套件完成打通 Sign In with Apple 的,並且看懂為何 firebase/jwt 還不能打通 :P 拿著 Lcobucci/JWT 內的 MultibyteStringConverter 來小試身手果真就通了。再找個時間貢獻 firebase/jwt 來修正好了,這次為了檢驗 firebase/jwt 失敗問題,大概至少看了 5套 php-jwt 的寫法,結果大多都是從
luciferous/jwt fork 擴充的,這可是 2011 的程式呢。
而跟 Apple Auth API 溝通的結果,若本身 JWT 製作踩到演算法等問題只會收到 {"error":"invalid_client"},但這也包含 OAUTH REDIRECT_URI 不合法等等,如果演算法打通了,而 Code 過期或是被重複使用時,會收到 {"error":"invalid_grant"} 資訊。


