顯示具有 python 標籤的文章。 顯示所有文章

2024年8月7日 星期三

Python 開發筆記 - 使用 Nginx / WSGI / Gunicorn / Flask 進行 Python API 服務的上線整合 @ Ubuntu

近期工作上在 node.js 服務上,多開了一個 python api 服務做整合應用,目前先試著混合架構來擠擠機器資源而不是 micorservice 架構。

實作就是 Nginx 擋在前面,接著有些 requests 交給 node.js 運作,有些 requests 交給 python api 服務,整體上就是透過 Proxy Pass 架構:

$ cat /etc/nginx/conf.d/service.conf | grep location
    location / {

    location /node/ { rewrite ^/node/(.*)$ /$1 break; proxy_set_header X-Real-IP $remote_addr; proxy_set_header X-Forwarded-For $proxy_add_x_forwarded_for; proxy_redirect off; proxy_http_version 1.1; proxy_read_timeout 60; proxy_pass http://localhost:3000; }

    location /python/ { rewrite ^/python/(.*)$ /$1 break; proxy_set_header X-Real-IP $remote_addr; proxy_set_header X-Forwarded-For $proxy_add_x_forwarded_for; proxy_redirect off; proxy_http_version 1.1; proxy_read_timeout 60; proxy_pass http://unix:/var/run/service-py.sock; }

其中 node.js 是跑在 3000 port 服務,而 python api 跑在 unix:/var/run/service-py.sock ,上述 Nginx 設定檔剛好可以作為筆記,屬於兩種不同的設計方式,此外,這邊收到 requests 導向到 node.js 或 python api 時,都會刻意再去掉一些 prefix ,讓後面的服務開發比較多彈性。

回到 python api ,此次採用 Flask framework,他的運行很簡單:

```
% cat app.py
...
if __name__ == '__main__':
    app.run(host='localhost', port=3001)
```

直接執行法:

% python3 app.py 
 * Serving Flask app 'app' (lazy loading)
 * Environment: production
   WARNING: This is a development server. Do not use it in a production deployment.
   Use a production WSGI server instead.
 * Debug mode: off
WARNING: This is a development server. Do not use it in a production deployment. Use a production WSGI server instead.
 * Running on http://localhost:3001
Press CTRL+C to quit

使用 Flask 指令執行:

$ FLASK_APP=app.py flask run --host 0.0.0.0 --port 3001
 * Serving Flask app 'app.py' (lazy loading)
 * Environment: production
   WARNING: This is a development server. Do not use it in a production deployment.
   Use a production WSGI server instead.
 * Debug mode: off
WARNING: This is a development server. Do not use it in a production deployment. Use a production WSGI server instead.
 * Running on all addresses (0.0.0.0)
 * Running on http://127.0.0.1:3001
 * Running on http://x.x.x.x:3001
Press CTRL+C to quit

最後則是為了穩定性,採用 Nginx + WSGI 整合方式,透過 Gunicorn 來工作:

$ cat wsgi.py 
from app import app

if __name__ == "__main__":
    app.run()

$ sudo gunicorn --workers 4 --bind unix:/var/run/service-py.sock -m 777 wsgi:app
[2024-08-07] [1701223] [INFO] Starting gunicorn 20.0.4
[2024-08-07] [1701223] [INFO] Listening at: unix:/var/run/service-py.sock (1701223)
[2024-08-07] [1701223] [INFO] Using worker: sync
[2024-08-07] [1701225] [INFO] Booting worker with pid: 1701225
[2024-08-07] [1701226] [INFO] Booting worker with pid: 1701226
[2024-08-07] [1701227] [INFO] Booting worker with pid: 1701227
[2024-08-07] [1701228] [INFO] Booting worker with pid: 1701228

如果要把運行也包裝系統指令方便處理,就只需:

$ cat /etc/systemd/system/my-py.service 
[Unit]
Description=my-py-service
After=network.target

[Service]
Type=simple
User=root
WorkingDirectory=/path/project
#ExecStart=/usr/bin/python3 app.py
#Environment=FLASK_APP=app.py
#ExecStart=/usr/bin/python3 -m flask run --port 3001 --host 0.0.0.0
ExecStart=/usr/bin/gunicorn --workers 4 --bind unix:/var/run/service-py.sock -m 777 wsgi:app
Restart=on-failure

[Install]
WantedBy=multi-user.target

後續就可以透過以下方式管理:

$ sudo systemctl status my-py.service
$ sudo systemctl stop my-py.service
$ sudo systemctl start my-py.service
$ sudo systemctl restart my-py.service
2024年2月21日 星期三

Python 開發筆記 - 使用 Selenium / undetected_chromedriver / ChatGoogleGenerativeAI / gemini-pro-vision 完成自動登入網站的流程(含 retry 驗證碼架構)

有些工作任務需要去下載表單做一些自動化應用,因此有了要自動登入的需求,當然也會碰到認證碼辨識問題。此篇是延續 Python 開發筆記 - 使用 Google AI, Generative Language API, gemini-pro-vision 辨識圖片認證碼

整個處理原理:
  1. 使用 Selenium 去偵測網頁的狀態,取得登入要用的帳號, 密碼, 認證碼圖片, 認證碼數值, 登入按鈕
  2. 使用 ChatGoogleGenerativeAI/gemini-pro-vision 分析圖片內容,設法分析出認證碼數值
  3. 觸發 登入按鈕 送出表單
  4. 檢視登入流程,檢查是否有登入失敗的訊息,或是反過來思考怎樣判斷登入成功,若登入失敗重回 (1) 去取得新的認證碼圖片 
引入的函式庫:

import getpass
import os
import sys
import time
import json
import base64
import undetected_chromedriver as uc
from selenium.webdriver.common.by import By
from selenium.webdriver.support import expected_conditions as EC
from selenium.webdriver.support.ui import WebDriverWait
 
from langchain_core.messages import HumanMessage
from langchain_google_genai import ChatGoogleGenerativeAI

先採用 undetected_chromedriver 來包裝一下取得 browser driver:

def getBrowserDriver():
    option = uc.ChromeOptions()
    option.add_argument('--user-agent=Mozilla/5.0 (Windows NT 10.0; Win64; x64) AppleWebKit/537.36 (KHTML, like Gecko) Chrome/80.0.3987.163 Safari/537.36')
    #option.add_argument('--window-size=%d,%d' % self.res)
    #option.add_argument('--headless')
    driver = uc.Chrome(options=option)
    return driver

辨別圖片文字靠 ChatGoogleGenerativeAI model="gemini-pro-vision":

def codeDetection(imageBase64URL: str):
    llm = ChatGoogleGenerativeAI(model="gemini-pro-vision")
    message = HumanMessage(
        content=[
            {
                "type": "text",
                "text": "Please identify the English or numbers appearing in the image. The output format is 'The answer is: XXXX'"
,
            },
            {"type": "image_url", "image_url": imageBase64URL},
        ]
    )
    result = llm.invoke([message])
    return result

處理流程:

if __name__ == '__main__':
    if "GOOGLE_API_KEY" not in os.environ:
        os.environ["GOOGLE_API_KEY"] = getpass.getpass("Provide your Google API Key: ")
    if not os.environ["GOOGLE_API_KEY"]:
        print('ERROR, no GOOGLE_API_KEY info')
        sys.exit(1)

    output = {
        'status': False,
        'time': [],
    }

    browser = getBrowserDriver()
    start_time = time.time()

    browser.get(LOGIN_URL)

    # 15s timeout
    wait = WebDriverWait(browser, 15)

    # 等待關鍵的表單資料
    conditions = [
        EC.presence_of_element_located((By.ID, "input_user")),
        EC.presence_of_element_located((By.ID, "input_password")),
        EC.presence_of_element_located((By.ID, "input_velidation_code")),
        EC.presence_of_element_located((By.ID, "velidation_code_image")),
        EC.presence_of_element_located((By.ID, "login_button")),
    ]
    if wait.until(lambda driver: all(condition(driver) for condition in conditions)):
        output['status'] = True
    output['time'].append( time.time() - start_time )

    # 取得圖片元素
    imageElement = wait.until(EC.presence_of_element_located((By.ID, "velidation_code_image")))

    # 取得圖片的 HTML code
    imageHTMLCode = imageElement.get_attribute("outerHTML")
    print("Image HTML Code:", imageHTMLCode)

    # 取得圖片的 URL
    imageSrcURL = imageElement.get_attribute("src")
    print("Image URL:", imageSrcURL)

    # 透過 JavaScript 監聽 src 屬性變化
    script = f"""
        var target = document.getElementById('velidation_code_image');
        var observer = new MutationObserver(function(mutations) {{
            mutations.forEach(function(mutation) {{
                if (mutation.attributeName === 'src') {{
                    console.log('src attribute changed:', target.getAttribute('src'));
                }}
            }});
        }});
    
        var config = {{ attributes: true }};
        observer.observe(target, config);
    """
    
    # 執行 JavaScript 代碼
    browser.execute_script(script)

    # 等待一段時間,確保有足夠的時間監聽 src 屬性的變化
    time.sleep(5)

    # 取得更新後的圖片的 URL
    updatedImageSrc = imageElement.get_attribute("src")
    print("Updated Image URL:", updatedImageSrc)

    if not updatedImageSrc:
        print('ERROR, velidation_code_image not found')
        sys.exit(1)

    result = codeDetection(updatedImageSrc)
    print(result.content)
    loginCode = ''
    for c in result.content.split(':', 2)[1]:
        if c == '' or c == ' ':
            continue
        loginCode += c

    print(f"LoginCode: {loginCode}")
    element = wait.until(EC.presence_of_element_located((By.ID, "input_user")))
    element.send_keys('YourAccountName')
    element = wait.until(EC.presence_of_element_located((By.ID, "input_password")))
    element.send_keys('YourPassword')
    element = wait.until(EC.presence_of_element_located((By.ID, "input_velidation_code")))
    element.send_keys(loginCode)
    element = wait.until(EC.presence_of_element_located((By.ID, "login_button")))

    start_time = time.time()
    element.click()

    loginDone = False
    loginRetry = 0
    while loginDone == False and loginRetry <= 3:
        try:
            wait = WebDriverWait(browser, 5)
            element = wait.until(EC.presence_of_element_located((By.ID, "WebsiteErrorMessage")))
            div_element = element.find_element(By.TAG_NAME, "div")
            span_element = div_element.find_element(By.TAG_NAME, "span")
            inner_html = span_element.get_attribute('innerHTML')
            # 驗證碼輸入錯誤
            print(f"retry: {loginRetry}, inner HTML: {inner_html}")

            # 關閉錯誤訊息
            element = wait.until(EC.presence_of_element_located((By.ID, "WebsiteErrorMessageWindow")))
            div_element = element.find_element(By.TAG_NAME, "div")
            button_element = element.find_element(By.TAG_NAME, "button")
            button_element.click()

            loginRetry += 1

            updatedImageSrc = imageElement.get_attribute("src")
            print("Updated Image URL:", updatedImageSrc)
            result = codeDetection(updatedImageSrc)
            print(result.content)
            loginCode = ''
            for c in result.content.split(':', 2)[1]:
                if c == '' or c == ' ':
                    continue
                loginCode += c

            print(f"LoginCode: {loginCode}")
            element = wait.until(EC.presence_of_element_located((By.ID, "input_user")))
            element.clear()
            element.send_keys('YourAccountName')
            time.sleep(1)
            element = wait.until(EC.presence_of_element_located((By.ID, "input_password"))) 
            element.clear()
            element.send_keys('YourPassword')
            time.sleep(1)
            element = wait.until(EC.presence_of_element_located((By.ID, "input_velidation_code")))
            element.clear()
            element.send_keys(loginCode)
            time.sleep(1)
            element = wait.until(EC.presence_of_element_located((By.ID, "login_button")))
            element.click()
        except:
            loginDone = True

    output['time'].append( time.time() - start_time )

    if loginDone:
        print("Login Successful")
    else:
        print(f"Login Failed with retry times: {loginRetry}")
 
    print(json.dumps(output, indent=4))
    while True:
        time.sleep(1)

2023年11月5日 星期日

Python 開發筆記 - L2 Multicast / L3 Multicast 與 IGMP Snooping 測試

幫公司測試了一下 Professional Audiovisual (ProAV) 產品在不同 switch 上的情況,剛好有分別走 L2 Multicast 跟 L3 Multicast 溝通模式,而這些設備會使用 IGMP 通報 switch ,盡可能讓 Multicast 封包不要影響不必要的網路設備,避免俗稱的流量洪水事件。

由於過去經驗都是比較上層應用,這次就多多請教 chatGPT 惡補一下知識,其中 IGMP 的知識倒是被 Cloudflare 的教學文給救贖了一下:


IGMP 是用於 IPv4 的多點傳送通訊協定,是網際網路通訊協定的第四版。IPv6 依賴於多點傳送接聽程式探索 (MLD) 進行多點傳送。IPv6 網路使用 MLD 窺探而不是 IGMP 窺探。

就這句話,我反而在想 L2 Multicast 缺少 L3 (IP層) 的封包資訊,是不是讓 switch 做不到 IGMP snooping 功能?甚至舊款 switch 直接判定是未知 multicast 而進行永久性 broadcast 容錯設計?實測的結果是不同的 switch 行為是不一樣的。

整體上只需要簡單的 python 小程式,透過 scapy 套件,可非常輕鬆拼湊出想製作的 raw socket 來進行測試:

RX app: 

from scapy.all import *
from scapy.contrib.igmp import IGMP

multicastMac = "01:00:5e:00:02:01"
multicastGroupIP = '224.0.2.1'
nicName = '乙太網路'

# IGMPv2 Membership Report
igmpReportPacket = Ether(dst=multicastMac)/IP(dst=multicastGroupIP)/IGMP(type=0x16, mrcode=0, gaddr=multicastGroupIP)
sendp(igmpReportPacket, iface=nicName)

while True:
    multicastReceivePacket = sniff(iface=nicName, filter=f"ether dst {multicastMac}", count=1)
    if multicastReceivePacket:
        print("Received: ", multicastReceivePacket[0][Raw].load.decode("utf-8"))
        #print("Received: ", multicastReceivePacket[0][Raw].load)

TX app:

from scapy.all import *
from scapy.contrib.igmp import IGMP

multicastMac = "01:00:5e:00:02:01"
multicastGroupIP = '224.0.2.1'
nicName = '乙太網路2'

# IGMP Membership Report
igmpReportPacket = Ether(dst=multicastMac)/IP(dst=multicastGroupIP)/IGMP(type=0x16, mrcode=0, gaddr=multicastGroupIP)
sendp(igmpReportPacket, iface=nicName)

i = 0
while True:
    # Multicast
    if i % 3 == 0: 
        multicastTestMessagePacket = Ether(dst=multicastMac, type=0xffff)/"hello"
    elif i % 3 == 1:
        multicastTestMessagePacket = Ether(dst=multicastMac)/IP(dst=multicastGroupIP)/UDP(sport=12345, dport=12345)/"world"
    else:
        multicastTestMessagePacket = Ether(dst=multicastMac)/IP(src="192.168.1.2", dst=multicastGroupIP)/UDP(sport=12345, dport=12345)/"hello world"

    sendp(multicastTestMessagePacket, iface=nicName)

    # IGMPv2 Report
    if i % 600:
        sendp(igmpReportPacket, iface=nicName)
    i += 1

    time.sleep(1/10)

如此,弄一台筆電,讓他上頭有兩張 RJ45 網卡(可靠USB擴充),分別插上待側的 switch ,一邊當 RX 收訊息,另一邊當 TX 送訊息,接著調整 switch 設定後,觀察封包傳遞的狀況。可以的話,其實筆電可以設法弄個 3個網孔?接著另一網孔可以插在 switch 上,看看有沒有流量洪水(traffic floods)

收工

2023年10月10日 星期二

Python 開發筆記 - Ping 與 WakeOnLan (WOL) 的應用

這假期恰逢公司機房斷電,復電後在想該怎樣把重要的機器喚起。由於 VPN 等相關機器群健康運作(如套裝 NAS 機器),因此得以遠端回去做事。

下一刻就是回顧有哪些機器要遠端啟動,這時就多虧了強者同事有良好的筆記習慣,平時有撰寫 WIKI 管控機器群(包括 MacAddress),就這樣,可在指定機器上不斷發動 WOL 來喚醒。例如有些 router 本身就提供網頁介面幫忙,可以直接靠他們。若有 Ubuntu 機器,就來個 wakeonlan 工具:

$ dpkg -l | grep wakeonlan
ii  wakeonlan                              0.41-10                                 Sends 'magic packets' to wake-on-LAN enabled ethernet adapters

在這邊 ubuntu.pkgs.org/20.04/ubuntu-main-arm64/wakeonlan_0.41-12_all.deb.html 也能查看到,甚至瀏覽一下工具原始碼 github.com/jpoliv/wakeonlan ,而 WOL 的原理可以查看 WIKI 就習得實作技能 en.wikipedia.org/wiki/Wake-on-LAN 或詢問 chatGPT 也會很佛心。

假期期間,就弄個 python 工具 ping-before-wakeonlan ,目的是為了記錄此次喚起了幾台機器,可以限縮每次喚起的機器數量,避免一堆機器一起起來而造成電力需求過大而跳電,另外再加入把清單亂數排一下,避免前面清單的機器都無法喚起,又讓清單後面的機器沒機會被叫起來:


使用方式,主要為 `pip install ping-before-wakeonlan` 即可,以下是 venv 用法:

% python3 -m venv venv
% source venv/bin/activate
% pip install ping-before-wakeonlan
% ./venv/bin/ping-before-wakeonlan
% cat /tmp/device.json
[
   {
       "ip": "192.168.1.1",
       "mac_address": "00:00:00:00:00:01"
   },
   {
       "ip": "192.168.1.2",
       "mac_address": "00:00:00:00:00:02"
   },
   {
       "ip": "192.168.1.3",
       "mac_address": "00:00:00:00:00:03"
   }, ...
]

% ping-before-wakeonlan --device-info /tmp/device.json
Process: 1 / 7: Device: {'ip': '192.168.1.3', 'mac_address': '00:00:00:00:00:03'}
Process: 2 / 7: Device: {'ip': '192.168.1.2', 'mac_address': '00:00:00:00:00:02'}
Process: 3 / 7: Device: {'ip': '192.168.1.1', 'mac_address': '00:00:00:00:00:01'}
Process: 4 / 7: Device: {'ip': '192.168.1.4', 'mac_address': '00:00:00:00:00:04'}
Process: 5 / 7: Device: {'ip': '192.168.1.5', 'mac_address': '00:00:00:00:00:05'}
{
    "count": 5,
    "device": {
        "failed": [],
        "handled": [
            {
                "ip": "192.168.1.3",
                "mac_address": "00:00:00:00:00:03"
            },
            {
                "ip": "192.168.1.2",
                "mac_address": "00:00:00:00:00:02"
            },...
        ],
        "input": [
            {
                "ip": "192.168.1.3",
                "mac_address": "00:00:00:00:00:03"
            }, ...
        ],
        "online": [],
        "skip": [
            {
                "ip": "192.168.1.6",
                "mac_address": "00:00:00:00:00:06"
            }, ...
        ]
    },
    "info": [
        "..."
    ],
    "maxCount": 5,
    "ping": "ping -c 1 -W 3",
    "status": true,
    "version": "1.0.0"
}

2023年10月4日 星期三

Python 開發筆記 - 使用 Gitlab API 列出 Projects、Branches 和 Commits

剛好碰到需要製作 Gitlab 整合類服務,開發完後就把很基礎的項目整理成小工具來支援 JSON 輸出,未來可以跟 jq 做一堆連續技:

用法:

% virtualenv venv
created virtual environment CPython3.11.5.final.0-64 in 120ms
...

% source venv/bin/activate
(venv) % 
(venv) % pip3 install gitlab-api-helper
(venv) % ./venv/bin/gitlab-api-helper 
{
    "info": [
        "config file not found: .env",
        "--api empty"
    ],
    "result": null,
    "version": "1.0.0"
}
usage: gitlab-api-helper [-h] [--apiSetupConfig APISETUPCONFIG]
                         [--apiAccessToken APIACCESSTOKEN] [--api API]
                         [--sinceType {day,week,month}]
                         [--sinceNumber SINCENUMBER]
                         [--lookup {project,branch,commit}]
                         [--lookupProjectID LOOKUPPROJECTID]
                         [--lookupBranch LOOKUPBRANCH]

A Simple Tool for Gitlab API Usage

options:
  -h, --help            show this help message and exit
  --apiSetupConfig APISETUPCONFIG
                        Read Default Info from config file
  --apiAccessToken APIACCESSTOKEN
                        Using Gitlab API with private_token.
  --api API             Gitlab API URL
  --sinceType {day,week,month}
                        commit date range type
  --sinceNumber SINCENUMBER
                        commit date range value
  --lookup {project,branch,commit}
                        query result
  --lookupProjectID LOOKUPPROJECTID
                        Gitlab Project ID
  --lookupBranch LOOKUPBRANCH
                        Branch Name

剩下就看 github.com/changyy/gitlab-api-helper 或 pypi.org/project/gitlab-api-helper/ 的簡介囉

2021年10月26日 星期二

Python 筆記 - 使用 AdSense / AdMob API 製作 Dashboard

約莫經營流量變現三年多,大部分的工作都是靠 adsense/admob 網站就夠用了,但如果要整合到其他儀表板的話,就必須靠 AdMob/AdSense API 來撈點資料。

原先一直只靠 AdSense API 做事,但是舊版 AdSense API 在 2021-10-12 下線了,接著新版 AdSense API 就不在有 AdMob 數據,因此需要分開存取。

筆記瑣事:
  • 使用 Python3 開發,並安裝套件相關套件
    • google-api-python-client
    • google-auth-oauthlib
  • AdSense 跟 AdMob 授權的 Scope 是分開的
    • 'https://www.googleapis.com/auth/admob.readonly'
    • 'https://www.googleapis.com/auth/adsense.readonly'
  • Google 專案必須分別啟用 AdSense Management api 跟 AdMob api 使用權
  • Google 專案的憑證,只需使用 "OAuth 2.0 用戶端 ID" ,並採用 "電腦版應用程式" 即可
  • AdSense 跟 AdMob API 輸出的 DATE 欄位的格式不同
    • "2021-10-26"
    • "20211026"
因此,若要符合之前舊版 Adsense 的輸出,需要分別使用 AdSense api v2 跟 AdMob API v1 來整理數據,例如先將 AdMob 收益用日期作為關鍵字紀錄,接著輸出 AdSense 來源時,在計算當日營收時,再順便查表累計 AdMob 收益。

完整程式碼:

    result = service.accounts().reports().generate(
        account=account_id,
        dateRange='CUSTOM',
        startDate_year=startDate['year'],
        startDate_month=startDate['month'],
        startDate_day=startDate['day'],
        endDate_year=endDate['year'],
        endDate_month=endDate['month'],
        endDate_day=endDate['day'],
        metrics=output['data']['metrics'],
        dimensions=output['data']['dimensions'],
        currencyCode="USD",
        reportingTimeZone="ACCOUNT_TIME_ZONE",
    ).execute()

AdMob API 片段程式碼:

    result = service.accounts().networkReport().generate(
        parent=account_id,
        body= {
            'reportSpec': {
                'dateRange' : {
                    'startDate': output['data']['startDate'],
                    'endDate': output['data']['endDate'],
                },
                'dimensions': output['data']['dimensions'],
                'metrics': output['data']['metrics'],
                'localizationSettings': {
                    'currencyCode': 'USD',
                    'languageCode': 'en-US',
                },
            },
        },
    ).execute()

2021年10月19日 星期二

Python 筆記 - 研究 yt-dlp / youtube-dl 流程與開發方式

幫同事查了一下程式邏輯,下手的方向:
  • 入口點在哪
  • 到底怎樣跑
  • 我要怎樣擴充或貢獻一個影音網站 extractor
github.com/yt-dlp/yt-dlp 來看,入口點就直接看 yt-dlp.sh 即可:

% git clone https://github.com/yt-dlp/yt-dlp
% cd yt-dlp 
% python3 yt_dlp/__main__.py 
Usage: __main__.py [OPTIONS] URL [URL...]

__main__.py: error: You must provide at least one URL.
Type yt-dlp --help to see a list of all options.

接著掃一下 yt_dlp/__main__.py 和 yt_dlp/__init__.py 就略懂他在處理 command line 的參數,而程式的本體是在 yt_dlp/YoutubeDL.py 檔案,一樣在追個 yt_dlp/YoutubeDL.py 裡的 class YoutubeDL 中的 def __init__() 裡,可以看到 self.add_default_info_extractors() 這步,如此就把 yt_dlp/extractor/ 眾多網站影音分析爬蟲狀態初始化好。

接著,給予一則影音網站連結:

% python3 yt_dlp/__main__.py https://www.facebook.com/UserID/videos/VideoID/

程式就會在 yt_dlp/YoutubeDL.py extract_info() 分析做事,像是把所有 extractor 都瀏覽一次,透過呼叫 ie.suitable(url) 的機制判斷。這時可以對應在 yt_dlp/extractor/common.py 中,看到 class InfoExtractor(object) 裡的 suitable() 定義並用 _match_valid_url() 和 _VALID_URL 實作,這時回去猜 yt_dlp/extractor/facebook.py 時,找不到 suitable() 也找不到 _match_valid_url() 時,就可以猜應該是 _VALID_URL 的實作方式了。

回到 yt_dlp/YoutubeDL.py 時,在 extract_info() 分析做事時,找到合適的 extractor 後,就會立即靠 ie.extract(url) 解析,而實際實作是靠 _real_extract()。再找一下 yt_dlp/extractor/facebook.py 中是否有定義 extract() 或 _real_extract(),即可當作解析網站的程式邏輯入口點。

最後,想要擴充某個網站或是修補加強某個網站,就可以去改對應的 extractor 了。並且可以把在當前目錄下,不斷靠 yt-dlp.sh 去實測,也滿方便的。

2020年3月28日 星期六

[Python] 數據分析筆記 - 透過 pandas, scikit-learn 和 xgboost 分析 Kaggle airbnb-recruiting-new-user-bookings 案例

記得 2017 年也曾註冊 Kaggle 帳號,在上面挑個題目試試手氣,當時也有選中 Airbnb 來研究,可惜當年沒堅持下去,太多有趣的事了 XD 今年春天就來複習一下。

當初我是先從史丹佛 Andrew Ng 的課程看的,但大概只看個幾集就沒繼續,再過一陣子後就是台大教授林軒田的機器學習基石,我印象中有看完,因為我還在遲疑要不要接著看另一個進階課程,那時過境遷,沒再用都忘光了!
這些課程看著看著就不小心恍神了,接著自己僅用著一些原理去土砲...殊不知 Pandas 跟 scikit-learn 套件有多好用,當時只粗略用 Pandas 當 csv parser ,剩下的資料轉換、陣列計算還自己刻 numpy 架構去運算。所幸,終於有個更適合我這種懶人的微課程,那就是 Kaggle 的 Faster Data Science Education
我大概只需要從第三章 Intermediate Machine Learning 走完一遍就得到我想要的東西了。接著想找個戰場試試手氣,就又回想起 Kaggle 的 airbnb-recruiting-new-user-bookings 數據
接著用 airbnb-recruiting-new-user-bookings 關鍵字問個 google ,會發現到現在也有非常多人拿他當例子來分析,經典果真歷久不衰!大概不用破百行,就可以組出 airbnb 數據分析達八成的水準:

匯入函式庫:

from sklearn.model_selection import train_test_split
from sklearn.metrics import accuracy_score
from xgboost import XGBClassifier

import numpy as np
import pandas as pd

import datetime


匯入 csv 檔案:

train_users = pd.read_csv('input/train_users_2.csv')

將 age 內容調整,包含去除輸入錯誤(太大或大小者),例如明顯輸入的是西元年,就順便幫轉一下:

data_checker = train_users.select_dtypes(include=['number']).copy()
data_checker = data_checker[ (data_checker.age > 1000) & (data_checker.age < 2010) ]
data_checker['age'] = 2015 - data_checker['age'] # 推論當年的資料,用 2015 年來相減對方不小心輸錯的出生年來得到年紀

for idx,row in data_checker.iterrows():
        train_users.at[idx,'age'] = row['age']

data_checker = train_users.select_dtypes(include=['number']).copy()
data_checker = data_checker[ (data_checker.age >= 2010) | (data_checker.age >= 100) | (data_checker.age < 13) ]
data_checker['age'] = np.nan
for idx,row in data_checker.iterrows():
        train_users.at[idx,'age'] = row['age']


處理時間欄位,轉成 datetime 型態,並轉成 weekday:

data_checker = train_users.loc[:, 'timestamp_first_active'].copy()
data_checker = pd.to_datetime( (data_checker // 1000000), format='%Y%m%d')
train_users['timestamp_first_active'] = data_checker

str_to_datetime_fields = ['date_account_created', 'date_first_booking']

for field in str_to_datetime_fields:
        train_users[field] = pd.to_datetime(train_users[field])

# to weekday

train_users['first_active_weekday'] = train_users['timestamp_first_active'].dt.dayofweek
for field in str_to_datetime_fields:
        train_users[field+'_weekday'] = train_users[field].dt.dayofweek

# remove datetime fields

train_users.drop(str_to_datetime_fields, axis=1, inplace=True)
train_users.drop(['timestamp_first_active'], axis=1, inplace=True)


處理 label 資料,主要轉成 one-hot encoding,並且去除一些數值,統一轉成 NaN:

categorical_features = [
        'affiliate_channel',
        'affiliate_provider',
        #'country_destination',
        'first_affiliate_tracked',
        'first_browser',
        'first_device_type',
        'gender',
        'language',
        'signup_app',
        'signup_method'
]
for categorical_feature in categorical_features:
        train_users[categorical_feature].replace('-unknown-', np.nan, inplace=True)
        train_users[categorical_feature].replace('NaN', np.nan, inplace=True)
        train_users[categorical_feature] = train_users[categorical_feature].astype('category')

# https://pandas.pydata.org/pandas-docs/stable/reference/api/pandas.get_dummies.html
# Convert categorical variable into dummy/indicator variables.
train_users = pd.get_dummies(train_users, columns=categorical_features)


開始順練模型,建議先透過 sample 跑小量

# X = train_users.copy()
X = train_users.sample(n=3000,random_state=0).copy()
y = X['country_destination'].copy()
X = X.drop(['country_destination'], axis=1)

X_train, X_valid, y_train, y_valid = train_test_split(X, y)


print("Start to train...")

job_start = datetime.datetime.now()

my_model = XGBClassifier()
my_model.fit(X_train, y_train)

print("training done, time cost: ", (datetime.datetime.now() - job_start))

job_start = datetime.datetime.now()

predictions = my_model.predict(X_valid)
print("predict done, time cost: ", (datetime.datetime.now() - job_start))

print("score:", accuracy_score(predictions, y_valid))


運行結果:

Start to train...
training done, time cost:  0:00:14.270242
predict done, time cost:  0:00:00.056500
score: 0.8466666666666667


沒想到只需做一些處理,運算玩就有八成準確率了!以上還沒使用 sessions 資料。完整程式碼請參考:github.com/changyy/study-kaggle-airbnb-recruiting-new-user-bookings

2019年9月11日 星期三

[macOS] 修正 Python 錯誤訊息 (caused by URLError(SSLError(1, u'[SSL: TLSV1_ALERT_PROTOCOL_VERSION] tlsv1 alert protocol version (_ssl.c:590)'),))

查了一下,就是 openssl 版本不夠新。一開始還以為是自己用 MacPorts 維護,導致不是用系統 Python 的關係,但在追細一點就可以知道單純更新 openssl 就搞定了。

$ python -V
Python 2.7.16
$ /usr/bin/python -V
Python 2.7.10
$ /usr/bin/python -c "import json, urllib2; print json.load(urllib2.urlopen('https://www.howsmyssl.com/a/check'))['tls_version']"
TLS 1.2
$ python -c "import json, urllib2; print json.load(urllib2.urlopen('https://www.howsmyssl.com/a/check'))['tls_version']"
TLS 1.2

$ openssl version -a
OpenSSL 1.0.2s  28 May 2019
built on: reproducible build, date unspecified
platform: darwin64-x86_64-cc
options:  bn(64,64) rc4(ptr,int) des(idx,cisc,16,int) idea(int) blowfish(idx)
compiler: /usr/bin/clang -I. -I.. -I../include  -fPIC -fno-common -DOPENSSL_PIC -DZLIB -DOPENSSL_THREADS -D_REENTRANT -DDSO_DLFCN -DHAVE_DLFCN_H -isysroot /Applications/Xcode.app/Contents/Developer/Platforms/MacOSX.platform/Developer/SDKs/MacOSX10.14.sdk -arch x86_64 -O3 -DL_ENDIAN -Wall -DOPENSSL_IA32_SSE2 -DOPENSSL_BN_ASM_MONT -DOPENSSL_BN_ASM_MONT5 -DOPENSSL_BN_ASM_GF2m -DSHA1_ASM -DSHA256_ASM -DSHA512_ASM -DMD5_ASM -DAES_ASM -DVPAES_ASM -DBSAES_ASM -DWHIRLPOOL_ASM -DGHASH_ASM -DECP_NISTZ256_ASM
OPENSSLDIR: "/opt/local/etc/openssl"


就好好把 openssl 更新即可修正。感謝佛心 www.howsmyssl.com 測試服務:https://www.howsmyssl.com/

另外也可以直接拿 openssl 上場問問 Google server:

$ openssl s_client -connect google.com:443 -tls1_2

若自己的 openssl 不支援 TLS 1.2 時,會直接回應 unknown option -tls1_2

2018年6月2日 星期六

[Python] Line Chatbot 開發筆記 - Echo Service @ Ubuntu 18.04

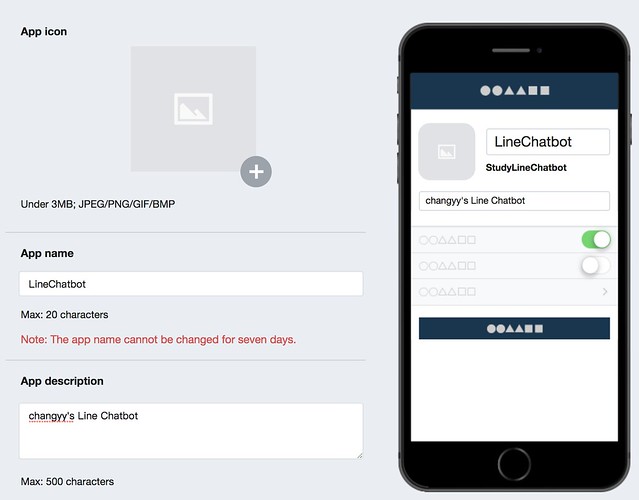
LineChatbot01

入口:https://developers.line.me/en/
文件:https://developers.line.me/en/docs/messaging-api/overview/

登入開發者後,先來個 Add new provider ,此例為 StudyLineChatbot ,接著選擇 Messaging API,填寫完基本資料後,再按幾下就創建了

其中,重要的資訊:
  • Channel secret
  • Channel access token (long-lived)
而 Channel access token (long-lived) 預設為空,要按個 Issue 來產生一組。

接著,Webhook URL 要填寫對接的 API 位置,該 API 必須提供 https 服務,另外再把 Auto-reply message 關閉。如此一來就完成 Line Chatbot 的設定。

接著談談 Webhook URL 的實作方式,此例用 Python 的 Flask 和 line-bot-sdk-python 完工,簡短程式 hello.py 如下(其實就是 https://github.com/line/line-bot-sdk-python README 範例程式,多增加一點輸出訊息):

from flask import Flask, request, abort

from linebot import (
    LineBotApi, WebhookHandler
)
from linebot.exceptions import (
    InvalidSignatureError
)
from linebot.models import (
    MessageEvent, TextMessage, TextSendMessage,
)

app = Flask(__name__)

line_bot_api = LineBotApi('YOUR_LINE_CHATBOT Channel access token (long-lived)')
handler = WebhookHandler('YOUR_LINE_CHATBOT Channel secret')

@app.route("/", methods=['POST'])
def callback():
    print("[INFO] Get request:")
    print(request.__dict__)
    print()

    # get X-Line-Signature header value
    signature = request.headers['X-Line-Signature']
    # get request body as text
    body = request.get_data(as_text=True)
    print("[INFO] Request Body: ---\n"+body+"\n---\n")

    # handle webhook body
    try:
        events = handler.handle(body, signature)
    except InvalidSignatureError:
        abort(400)

    print("[INFO] Handle Events \n")
    for event in events:
        if event is None:
            continue
        if not isinstance(event, MessageEvent):
            continue
        if not isinstance(event.message, TextMessage):
            continue
        line_bot_api.reply_message(
            event.reply_token,
            TextSendMessage(text=event.message.text)
        )
    return '{}'

@handler.add(MessageEvent, message=TextMessage)
def handle_message(event):
    line_bot_api.reply_message(
        event.reply_token,
        TextSendMessage(text=event.message.text)
    )

if __name__ == "__main__":
    app.run(host='0.0.0.0', port=8080)


然後,選擇在 Ubuntu server 上,透過 nginx 跟 uWSGI 設定。

Nginx:

location / {

try_files $uri @chatbot;
}

location @chatbot {
include uwsgi_params;
uwsgi_pass unix:/tmp/chatbot-uwsgi.sock;
}


uWSGI:

$ vim /etc/systemd/system/chatbot.uwsgi.service
[Unit]
Description=uWSGI Emperor
After=syslog.target

[Service]
ExecStart=/usr/local/bin/uwsgi --ini /path/project/chatbot-uwsgi.ini
RuntimeDirectory=uwsgi
Restart=always
KillSignal=SIGQUIT
Type=notify
StandardError=syslog
NotifyAccess=all

[Install]
WantedBy=multi-user.target

$ vim /path/project/chatbot-uwsgi.ini
[uwsgi]
base = /path/project/

app = hello
module = %(app)
home = %(base)/venv
pythonpath = %(base)
callable = app

socket = /tmp/%n.sock
chmod-socket = 666
logto = /var/log/uwsgi/%n.log


後續都統一靠以下招數更新:

$ sudo systemctl restart chatbot.uwsgi

以及 hello.py 輸出的資料和運行結果,都可以在 /var/log/uwsgi/chatbot-uwsgi.log 找到:

[INFO] Get request:
{'environ': {'QUERY_STRING': '', 'REQUEST_METHOD': 'POST', 'CONTENT_TYPE': 'application/json;charset=UTF-8', 'CONTENT_LENGTH': '237', 'REQUEST_URI': '/', 'PATH_INFO': '/', 'DOCUMENT_ROOT': '/etc/nginx/html', 'SERVER_PROTOCOL': 'HTTP/1.1', 'REQUEST_SCHEME': 'https', 'HTTPS': 'on', 'REMOTE_ADDR': '###.###.###.###', 'REMOTE_PORT': '34994', 'SERVER_PORT': '443', 'SERVER_NAME': 'chatbot.example.com', 'HTTP_X_LINE_SIGNATURE': '#####################', 'HTTP_CONTENT_TYPE': 'application/json;charset=UTF-8', 'HTTP_CONTENT_LENGTH': '237', 'HTTP_HOST': 'chatbot.example.com', 'HTTP_ACCEPT': '*/*', 'HTTP_USER_AGENT': 'LineBotWebhook/1.0', 'wsgi.input': <uwsgi._Input object at 0x7f0d8a4477c8>, 'wsgi.file_wrapper': <built-in function uwsgi_sendfile>, 'wsgi.version': (1, 0), 'wsgi.errors': <_io.TextIOWrapper name=2 mode='w' encoding='UTF-8'>, 'wsgi.run_once': False, 'wsgi.multithread': False, 'wsgi.multiprocess': False, 'wsgi.url_scheme': 'https', 'uwsgi.version': b'2.0.17', 'uwsgi.node': b'###########', 'werkzeug.request': <Request 'https://chatbot.example.com/' [POST]>}, 'shallow': False, 'view_args': {}, 'url_rule': <Rule '/' (POST, OPTIONS) -> callback>, 'url': 'https://chatbot.example.com/'}

[INFO] Request Body: ---
{"events":[{"type":"message","replyToken":"###############","source":{"userId":"##############","type":"user"},"timestamp":###########,"message":{"type":"text","id":"###########","text":"HelloWorld"}}]}
---

2017年9月30日 星期六

[Python] 機器學習筆記 - Feature Engineering 以鐵達尼號資料為例

之前都用一些工作經驗去分析一些資料,但不夠科學,有點僥倖的做事方式。如果碰到沒任何背景經驗的數據時,這時就慘了,就得回歸到靠數學統計了。

參考這篇:Titanic best working Classifier by Sina

整個過程十分享受如何用平均、標準差、去除雜訊、資料補齊、正規化、標籤數據化等等。讓我回想起之前寫的筆記,用了 LabelEncoder 等方式,結果...只要用 Pandas 搭配 map 架構就一口氣做光了 XD 並非 LabelEncoder 無用武之地,而是當你清楚資料屬性時,可以善用 Pandas 的架構去達成。而此例未用 OneHotEncoder 架構。

簡易筆記:

train = pd.read_csv('../input/train.csv', header = 0, dtype={'Age': np.float64})
test  = pd.read_csv('../input/test.csv' , header = 0, dtype={'Age': np.float64})
full_data = [train, test]

for dataset in full_data:
        dataset['Name_length'] = dataset['Name'].apply(len)
dataset['Has_Cabin'] = dataset["Cabin"].apply(lambda x: 0 if type(x) == float else 1)


用個 full_data = [train, test] 再搭配 "for dataset in full_data " 的好處是可以一口氣整理完 train/test dataset 的轉換,十方便利,之前完全沒想到這招。新增欄位就透過 pandas 架構直接添加,非常直觀,但沒想到可以一口氣搭配 apply 架構去處理,這樣程式超簡潔的:

dataset['Name_length'] = dataset['Name'].apply(len)
dataset['Has_Cabin'] = dataset["Cabin"].apply(lambda x: 0 if type(x) == float else 1)


另外,在字串處理時,可以搭配 replace 或 regular expression(apply) 做前置處理(正規化):

def get_title(name):
title_search = re.search(' ([A-Za-z]+)\.', name)
if title_search:
return title_search.group(1)
return ""

dataset['Title'] = dataset['Name'].apply(get_title)
#print(dataset['Title'].unique())
dataset['Title'] = dataset['Title'].replace(['Lady', 'Countess','Capt', 'Col','Don', 'Dr', 'Major', 'Rev', 'Sir', 'Jonkheer', 'Dona'], 'Rare')
dataset['Title'] = dataset['Title'].replace('Mlle', 'Miss')
dataset['Title'] = dataset['Title'].replace('Ms', 'Miss')
dataset['Title'] = dataset['Title'].replace('Mme', 'Mrs')
#print(dataset['Title'].unique())


整理完一輪後,把字串轉數據,就可以透過 map 來轉換,其中 fillna 則是把剩下沒對應到的都填 0 ,簡潔啊:

title_mapping = {"Mr": 1, "Miss": 2, "Mrs": 3, "Master": 4, "Rare": 5}
dataset['Title'] = dataset['Title'].map(title_mapping)
dataset['Title'] = dataset['Title'].fillna(0)


接著來處理年紀與票價的部分,由於偏隱私,容易無資料,這時看到作者就開始用亂數去填補年紀,並依照著標準差資訊來做,可以維持資料分布,高招!而票價則用中位數去填補:

age_avg = dataset['Age'].mean()
age_std = dataset['Age'].std()
age_null_count = dataset['Age'].isnull().sum()
age_null_random_list = np.random.randint(age_avg - age_std, age_avg + age_std, size=age_null_count)
#
# dataset['Age'][np.isnan(dataset['Age'])] = age_null_random_list
#
# SettingWithCopyWarning:
# A value is trying to be set on a copy of a slice from a DataFrame
# See the caveats in the documentation: http://pandas.pydata.org/pandas-docs/stable/indexing.html#indexing-view-versus-copy
#
dataset.loc[ dataset['Age'][np.isnan(dataset['Age'])].index , 'Age' ] = age_null_random_list

dataset.loc[ dataset['Age'] <= 16, 'Age'] = 0
dataset.loc[(dataset['Age'] > 16) & (dataset['Age'] <= 32), 'Age'] = 1
dataset.loc[(dataset['Age'] > 32) & (dataset['Age'] <= 48), 'Age'] = 2
dataset.loc[(dataset['Age'] > 48) & (dataset['Age'] <= 64), 'Age'] = 3
dataset.loc[ dataset['Age'] > 64, 'Age'] = 4 ;

dataset['Fare'] = dataset['Fare'].fillna(train['Fare'].median())
dataset.loc[ dataset['Fare'] <= 7.91, 'Fare'] = 0
dataset.loc[(dataset['Fare'] > 7.91) & (dataset['Fare'] <= 14.454), 'Fare'] = 1
dataset.loc[(dataset['Fare'] > 14.454) & (dataset['Fare'] <= 31), 'Fare']   = 2
dataset.loc[ dataset['Fare'] > 31, 'Fare'] = 3
dataset['Fare'] = dataset['Fare'].astype(int)


最後,再提一下新增屬性的部分,pandas 真的很方便,可以單純把某欄位的資訊計算一番,添加到新的欄位,也有透過 dataset.loc 來取得特定資料來重新設定:

dataset['Name_length'] = dataset['Name'].apply(len)
dataset['Has_Cabin'] = dataset["Cabin"].apply(lambda x: 0 if type(x) == float else 1)

dataset['IsAlone'] = 0
dataset.loc[dataset['FamilySize'] == 1, 'IsAlone'] = 1

dataset.loc[ dataset['Age'][np.isnan(dataset['Age'])].index , 'Age' ] = age_null_random_list

dataset.loc[ dataset['Age'] <= 16, 'Age'] = 0
dataset.loc[(dataset['Age'] > 16) & (dataset['Age'] <= 32), 'Age'] = 1


讀完這篇真是功力大增啊!以上是數據整理的流程,但是,還有個重點沒提到,那就是作者是整理完後,立馬看看某欄位跟目標欄位(Survived)的關係,才是真的靠數學來做事:

print (train[["Sex", "Survived"]].groupby(['Sex'], as_index=False).mean())
      Sex  Survived
0  female  0.742038
1    male  0.188908

print (train[['Title', 'Survived']].groupby(['Title'], as_index=False).mean())

    Title  Survived
0  Master  0.575000
1    Miss  0.702703
2      Mr  0.156673
3     Mrs  0.793651
4    Rare  0.347826


可以得知 Miss 跟 Mrs 的生存率超過七成!這才是該學的精神。對於常搭船的,大多很清楚一開始必然先讓婦幼先逃生,所以有背景就會先假定讓女性生存率高的分析方式,沒背景就得靠統計功力了

2017年9月19日 星期二

[Python] 機器學習筆記 - 使用 Pandas 處理 CSV 格式、過濾資料與自身 Index 更新問題

使用 Pandas 套件進行分析資料時,它提供的功能包括便利的資料過濾:

import seaborn as sns
import pandas as pd

dataset = sns.load_dataset("tips")
print(dataset)
print(dataset.shape)
print(dataset.columns)

print("list total_bill > 30:")
print(dataset[ dataset['total_bill'] > 30 ] )


然而,預設 Pandas 會記錄原先的 raw index ,這也有不錯的功用,但有時希望照新的架構顯示,需要再多用 reset_index():

print("list total_bill > 30 and tip < 4:")
print(dataset[ (dataset['total_bill'] > 30) & (dataset['tip'] < 4) ] )

print("rebuild index:")
dataset = dataset[ (dataset['total_bill'] > 30) & (dataset['tip'] < 4) ]
dataset = dataset.reset_index()
print(dataset)


連續動作:

$ python pandas_study.py
     total_bill   tip     sex smoker   day    time  size
0         16.99  1.01  Female     No   Sun  Dinner     2
1         10.34  1.66    Male     No   Sun  Dinner     3
2         21.01  3.50    Male     No   Sun  Dinner     3
3         23.68  3.31    Male     No   Sun  Dinner     2
4         24.59  3.61  Female     No   Sun  Dinner     4
5         25.29  4.71    Male     No   Sun  Dinner     4
6          8.77  2.00    Male     No   Sun  Dinner     2
7         26.88  3.12    Male     No   Sun  Dinner     4
8         15.04  1.96    Male     No   Sun  Dinner     2
9         14.78  3.23    Male     No   Sun  Dinner     2
10        10.27  1.71    Male     No   Sun  Dinner     2
11        35.26  5.00  Female     No   Sun  Dinner     4
12        15.42  1.57    Male     No   Sun  Dinner     2
13        18.43  3.00    Male     No   Sun  Dinner     4
14        14.83  3.02  Female     No   Sun  Dinner     2
15        21.58  3.92    Male     No   Sun  Dinner     2
16        10.33  1.67  Female     No   Sun  Dinner     3
17        16.29  3.71    Male     No   Sun  Dinner     3
18        16.97  3.50  Female     No   Sun  Dinner     3
19        20.65  3.35    Male     No   Sat  Dinner     3
20        17.92  4.08    Male     No   Sat  Dinner     2
21        20.29  2.75  Female     No   Sat  Dinner     2
22        15.77  2.23  Female     No   Sat  Dinner     2
23        39.42  7.58    Male     No   Sat  Dinner     4
24        19.82  3.18    Male     No   Sat  Dinner     2
25        17.81  2.34    Male     No   Sat  Dinner     4
26        13.37  2.00    Male     No   Sat  Dinner     2
27        12.69  2.00    Male     No   Sat  Dinner     2
28        21.70  4.30    Male     No   Sat  Dinner     2
29        19.65  3.00  Female     No   Sat  Dinner     2
..          ...   ...     ...    ...   ...     ...   ...
214       28.17  6.50  Female    Yes   Sat  Dinner     3
215       12.90  1.10  Female    Yes   Sat  Dinner     2
216       28.15  3.00    Male    Yes   Sat  Dinner     5
217       11.59  1.50    Male    Yes   Sat  Dinner     2
218        7.74  1.44    Male    Yes   Sat  Dinner     2
219       30.14  3.09  Female    Yes   Sat  Dinner     4
220       12.16  2.20    Male    Yes   Fri   Lunch     2
221       13.42  3.48  Female    Yes   Fri   Lunch     2
222        8.58  1.92    Male    Yes   Fri   Lunch     1
223       15.98  3.00  Female     No   Fri   Lunch     3
224       13.42  1.58    Male    Yes   Fri   Lunch     2
225       16.27  2.50  Female    Yes   Fri   Lunch     2
226       10.09  2.00  Female    Yes   Fri   Lunch     2
227       20.45  3.00    Male     No   Sat  Dinner     4
228       13.28  2.72    Male     No   Sat  Dinner     2
229       22.12  2.88  Female    Yes   Sat  Dinner     2
230       24.01  2.00    Male    Yes   Sat  Dinner     4
231       15.69  3.00    Male    Yes   Sat  Dinner     3
232       11.61  3.39    Male     No   Sat  Dinner     2
233       10.77  1.47    Male     No   Sat  Dinner     2
234       15.53  3.00    Male    Yes   Sat  Dinner     2
235       10.07  1.25    Male     No   Sat  Dinner     2
236       12.60  1.00    Male    Yes   Sat  Dinner     2
237       32.83  1.17    Male    Yes   Sat  Dinner     2
238       35.83  4.67  Female     No   Sat  Dinner     3
239       29.03  5.92    Male     No   Sat  Dinner     3
240       27.18  2.00  Female    Yes   Sat  Dinner     2
241       22.67  2.00    Male    Yes   Sat  Dinner     2
242       17.82  1.75    Male     No   Sat  Dinner     2
243       18.78  3.00  Female     No  Thur  Dinner     2

[244 rows x 7 columns]
(244, 7)
Index(['total_bill', 'tip', 'sex', 'smoker', 'day', 'time', 'size'], dtype='object')
list total_bill > 30:
     total_bill    tip     sex smoker   day    time  size
11        35.26   5.00  Female     No   Sun  Dinner     4
23        39.42   7.58    Male     No   Sat  Dinner     4
39        31.27   5.00    Male     No   Sat  Dinner     3
44        30.40   5.60    Male     No   Sun  Dinner     4
47        32.40   6.00    Male     No   Sun  Dinner     4
52        34.81   5.20  Female     No   Sun  Dinner     4
56        38.01   3.00    Male    Yes   Sat  Dinner     4
59        48.27   6.73    Male     No   Sat  Dinner     4
83        32.68   5.00    Male    Yes  Thur   Lunch     2
85        34.83   5.17  Female     No  Thur   Lunch     4
95        40.17   4.73    Male    Yes   Fri  Dinner     4
102       44.30   2.50  Female    Yes   Sat  Dinner     3
112       38.07   4.00    Male     No   Sun  Dinner     3
141       34.30   6.70    Male     No  Thur   Lunch     6
142       41.19   5.00    Male     No  Thur   Lunch     5
156       48.17   5.00    Male     No   Sun  Dinner     6
167       31.71   4.50    Male     No   Sun  Dinner     4
170       50.81  10.00    Male    Yes   Sat  Dinner     3
173       31.85   3.18    Male    Yes   Sun  Dinner     2
175       32.90   3.11    Male    Yes   Sun  Dinner     2
179       34.63   3.55    Male    Yes   Sun  Dinner     2
180       34.65   3.68    Male    Yes   Sun  Dinner     4
182       45.35   3.50    Male    Yes   Sun  Dinner     3
184       40.55   3.00    Male    Yes   Sun  Dinner     2
187       30.46   2.00    Male    Yes   Sun  Dinner     5
197       43.11   5.00  Female    Yes  Thur   Lunch     4
207       38.73   3.00    Male    Yes   Sat  Dinner     4
210       30.06   2.00    Male    Yes   Sat  Dinner     3
212       48.33   9.00    Male     No   Sat  Dinner     4
219       30.14   3.09  Female    Yes   Sat  Dinner     4
237       32.83   1.17    Male    Yes   Sat  Dinner     2
238       35.83   4.67  Female     No   Sat  Dinner     3
list total_bill > 30 and tip < 4:
print index:
index: 56
index: 102
index: 173
index: 175
index: 179
index: 180
index: 182
index: 184
index: 187
index: 207
index: 210
index: 219
index: 237
rebuild index:
    index  total_bill   tip     sex smoker  day    time  size
0      56       38.01  3.00    Male    Yes  Sat  Dinner     4
1     102       44.30  2.50  Female    Yes  Sat  Dinner     3
2     173       31.85  3.18    Male    Yes  Sun  Dinner     2
3     175       32.90  3.11    Male    Yes  Sun  Dinner     2
4     179       34.63  3.55    Male    Yes  Sun  Dinner     2
5     180       34.65  3.68    Male    Yes  Sun  Dinner     4
6     182       45.35  3.50    Male    Yes  Sun  Dinner     3
7     184       40.55  3.00    Male    Yes  Sun  Dinner     2
8     187       30.46  2.00    Male    Yes  Sun  Dinner     5
9     207       38.73  3.00    Male    Yes  Sat  Dinner     4
10    210       30.06  2.00    Male    Yes  Sat  Dinner     3
11    219       30.14  3.09  Female    Yes  Sat  Dinner     4
12    237       32.83  1.17    Male    Yes  Sat  Dinner     2
print index:
index: 0
index: 1
index: 2
index: 3
index: 4
index: 5
index: 6
index: 7
index: 8
index: 9
index: 10
index: 11
index: 12

2017年9月15日 星期五

[Python] 機器學習筆記 - 使用 準確率/召回率 (Precision-Recall) 評估分析成果

研究所時,算是第一次接觸這名詞,老闆的研究領域是 Search Engines ,用來評估索引成果好不好。最近則打算用在機器學習的成果分析,卻想不起當時老闆用來解釋索引成果的案例,還是容易忘記 XD 網路上打滾一下,發現這篇寫的廣告投放實際案例很好懂,也不容易忘,建議可以逛一下:準確率(Precision)與召回率(Recall)

回到本文,單純紀錄如何用既有函式庫計算:

import numpy as np
from sklearn.metrics import average_precision_score, precision_score, recall_score

# Classification metrics can't handle a mix of binary and continuous targets
#y = np.array([0, 0, 1, 1])
#scores = np.array([0.1, 0.3, 0.2, 0.8])

y = [0, 0, 1, 1]
scores = [0, 1, 1, 1]

#print(precision_score(y, scores, average='macro'))
#print(recall_score(y, scores, average='macro'))
#print(average_precision_score(y, scores))
#import sys
#sys.exit(0)

print('precision: %0.2f, recall: %0.2f, score: %0.2f' % (
        precision_score(y, scores, average='macro'),
        recall_score(y, scores, average='macro'),
        average_precision_score(y, scores)
))


成果:

precision: 0.83, recall: 0.75, score: 0.67

需要更詳細的範例,請參考:http://scikit-learn.org/stable/auto_examples/model_selection/plot_precision_recall.html

[Python] 機器學習筆記 - 使用 ROC 曲線 (receiver operating characteristic curve) 評估分析成果

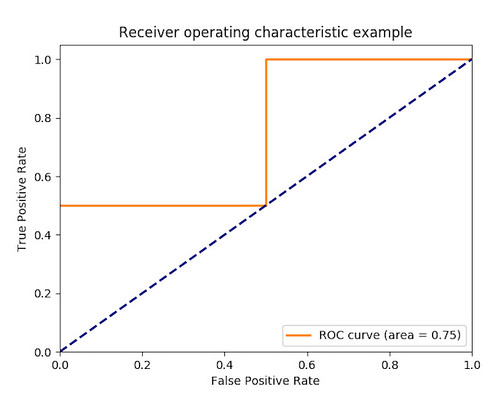
roc curve

最近回想起兩年前走跳過的一場黑客松,當年的題目恰好是一個屬性的分類,就是一篇文章屬性給你,請告訴我它是不是 spam!所幸網路上還可以看到其他人的作品,逛了一下也順便研究別人的報告怎麼寫,其中有一組使用了 ROC 曲線來回報自己的分析成果,就來多多認識一下。

而 ROC 曲線是什麼?其實在 WIKI 或是 scikit-learn 文件(也引用WIKI資料)有很明確地解釋:
簡單的說,當畫出此圖後,若一開始就達左上角是最完美的,若一開始分析結果是斜線上方是好的,反之下方是差的。接下來,則是會去計算曲線下方的面積,產生一個介於 0~1 的數值,只要等於 0.5 就是跟隨機猜測一樣,代表此分析模型沒有預測價值;若大於 0.5 代表猜測是正向的,而小於 0.5 代表猜測的方向恰好相反;而 1 或 0 代表全部辨識正確或全部辨識錯誤。

因此,只需設法把模型預測結果畫一下 ROC 曲線,在算出個面積,就收工啦!

範例請參考 http://scikit-learn.org/stable/auto_examples/model_selection/plot_roc.html ,在此只筆記畫圖的部分:

import numpy as np
from sklearn.metrics import roc_curve, auc
y = np.array([0, 0, 1, 1])
scores = np.array([0.1, 0.4, 0.35, 0.8])
fpr, tpr, _ = roc_curve(y, scores)
roc_auc = auc(fpr, tpr)

import matplotlib as mpl
#mpl.use('Agg')
import matplotlib.pyplot as plt

fig = plt.figure()
lw = 2
plt.plot(fpr, tpr, color='darkorange', lw=lw, label='ROC curve (area = %0.2f)' % roc_auc)
plt.plot([0, 1], [0, 1], color='navy', lw=lw, linestyle='--')
plt.xlim([0.0, 1.0])
plt.ylim([0.0, 1.05])
plt.xlabel('False Positive Rate')
plt.ylabel('True Positive Rate')
plt.title('Receiver operating characteristic example')
plt.legend(loc="lower right")
#fig.savefig('/tmp/roc.png')
plt.show()

2017年8月31日 星期四

[Python] 機器學習筆記 - sklearn.preprocessing 之 LabelEncoder, OneHotEncoder

最近挑一些資料來練習分析,想要用矩陣乘法,第一個念頭就是用 Hash table 把 keyword 轉成數值,接著要符合ㄧ些數學式子,又把數值擴展成 nx1 維,直到強者大大推坑看一些文件,我才發現這種招數很常使用,都有 library/framework 可以直接套用,順便把之前隨手寫的程式架構整理一下

先說一下 Hash table 的用法,就單純掃過所有數值,對所有數值建立查表方式,可以掃過一輪資料時,順便把標記都處理完畢:

import matplotlib.pyplot as plt
import seaborn as sns
import numpy as np

dataset = sns.load_dataset("tips")
print(dataset)
print(dataset.shape)
print(dataset.columns)
# Index(['total_bill', 'tip', 'sex', 'smoker', 'day', 'time', 'size'], dtype='object')

dataset_formated = None

# 土炮模式
fields_lookup = {}

print(dataset.columns)
for index, row in dataset.iterrows():
row_formated = np.empty([])

#for fieldname in dataset.columns:
for fieldname in [ 'day', 'smoker', 'time', 'sex', 'size' ]:
#print(field)

field_value = None
if fieldname not in fields_lookup:
fields_lookup[fieldname] = {}
if row[fieldname] not in fields_lookup[fieldname]:
fields_lookup[fieldname][ row[fieldname] ] = len(fields_lookup[fieldname])

# field value from hash table
field_data = np.zeros(1, dtype=np.int)
field_data[0] = fields_lookup[fieldname][ row[fieldname] ]

# handle row
row_formated = np.append( row_formated, field_data.reshape(1, -1) )

# handle data
if dataset_formated is None:
dataset_formated = np.zeros([ dataset.shape[0], row_formated.reshape(1, -1).size ], dtype=np.int)
dataset_formated[index] = row_formated.reshape(1, -1)
#print(row_formated)
#print(row_formated.reshape(1, -1))

print(fields_lookup)
print(dataset_formated)


如此一來就完成編碼,也完成資料格式轉換:

{'day': {'Sun': 0, 'Sat': 1, 'Thur': 2, 'Fri': 3}, 'smoker': {'No': 0, 'Yes': 1}, 'time': {'Dinner': 0, 'Lunch': 1}, 'sex': {'Female': 0, 'Male': 1}, 'size': {2: 0, 3: 1, 4: 2, 1: 3, 6: 4, 5: 5}}

然而,對於部分演算法可能拿編碼的整數進行運算,或是想要更精準把整數擴展成選擇結果,那解法就是擴展欄位,例如有 5 種結果,就擴展成 5 個欄位,選到的標 1 ,沒選到標 0,土炮處理方式就麻煩了點,需要先掃一次建立 hash table,接著第二次在重建數據:

# build hash table only
for index, row in dataset.iterrows():
#for fieldname in dataset.columns:
for fieldname in [ 'day', 'smoker', 'time', 'sex', 'size' ]:
#print(field)
if fieldname not in fields_lookup:
fields_lookup[fieldname] = {}
if row[fieldname] not in fields_lookup[fieldname]:
fields_lookup[fieldname][ row[fieldname] ] = len(fields_lookup[fieldname])

print(fields_lookup)

# build new matrix
for index, row in dataset.iterrows():
row_formated = np.empty([])

for fieldname in [ 'day', 'smoker', 'time', 'sex', 'size' ]:
# field value from hash table
field_data = np.zeros([len(fields_lookup[fieldname]), 1], dtype=np.int)
field_data[ fields_lookup[fieldname][row[fieldname]] ][0] = 1

# handle row
row_formated = np.append( row_formated, field_data.reshape(1, -1) )

#print(row_formated)

# handle data
if dataset_formated is None:
dataset_formated = np.zeros([ dataset.shape[0], row_formated.reshape(1, -1).size ], dtype=np.int)
dataset_formated[index] = row_formated.reshape(1, -1)
#print(row_formated)
#print(row_formated.reshape(1, -1))

print(dataset_formated)


回到常用的方式 - LabelEncoder:

from sklearn.preprocessing import LabelEncoder
from sklearn.preprocessing import OneHotEncoder

dataset_encode = dataset.copy()
labels = {}

for i, field in enumerate(dataset.columns):
if field == 'tip' or field == 'total_bill':
continue
labels[field] = list(set(dataset[field].unique()))
label_encoder = LabelEncoder()
label_encoder.fit(labels[field])

# original
#print(dataset_encode.iloc[:,i])
#print(dataset_encode[field])

# encode
#feature = label_encoder.transform(dataset_encode.iloc[:,i])
#feature = feature.reshape(dataset.shape[0], 1)
# https://stackoverflow.com/questions/24458645/label-encoding-across-multiple-columns-in-scikit-learn
dataset_encode[field] = label_encoder.fit_transform(dataset_encode[field])

#print(dataset_encode[field])

print(dataset_encode)


輸出:

     total_bill   tip  sex  smoker  day  time  size
0         16.99  1.01    0       0    2     0     1
1         10.34  1.66    1       0    2     0     2
2         21.01  3.50    1       0    2     0     2
3         23.68  3.31    1       0    2     0     1
4         24.59  3.61    0       0    2     0     3
5         25.29  4.71    1       0    2     0     3
6          8.77  2.00    1       0    2     0     1
7         26.88  3.12    1       0    2     0     3
8         15.04  1.96    1       0    2     0     1
9         14.78  3.23    1       0    2     0     1
10        10.27  1.71    1       0    2     0     1
11        35.26  5.00    0       0    2     0     3
12        15.42  1.57    1       0    2     0     1
13        18.43  3.00    1       0    2     0     3
14        14.83  3.02    0       0    2     0     1
15        21.58  3.92    1       0    2     0     1
16        10.33  1.67    0       0    2     0     2
17        16.29  3.71    1       0    2     0     2
18        16.97  3.50    0       0    2     0     2
19        20.65  3.35    1       0    1     0     2
20        17.92  4.08    1       0    1     0     1
21        20.29  2.75    0       0    1     0     1
22        15.77  2.23    0       0    1     0     1
23        39.42  7.58    1       0    1     0     3
24        19.82  3.18    1       0    1     0     1
25        17.81  2.34    1       0    1     0     3
26        13.37  2.00    1       0    1     0     1
27        12.69  2.00    1       0    1     0     1
28        21.70  4.30    1       0    1     0     1
29        19.65  3.00    0       0    1     0     1
..          ...   ...  ...     ...  ...   ...   ...
214       28.17  6.50    0       1    1     0     2
215       12.90  1.10    0       1    1     0     1
216       28.15  3.00    1       1    1     0     4
217       11.59  1.50    1       1    1     0     1
218        7.74  1.44    1       1    1     0     1
219       30.14  3.09    0       1    1     0     3
220       12.16  2.20    1       1    0     1     1
221       13.42  3.48    0       1    0     1     1
222        8.58  1.92    1       1    0     1     0
223       15.98  3.00    0       0    0     1     2
224       13.42  1.58    1       1    0     1     1
225       16.27  2.50    0       1    0     1     1
226       10.09  2.00    0       1    0     1     1
227       20.45  3.00    1       0    1     0     3
228       13.28  2.72    1       0    1     0     1
229       22.12  2.88    0       1    1     0     1
230       24.01  2.00    1       1    1     0     3
231       15.69  3.00    1       1    1     0     2
232       11.61  3.39    1       0    1     0     1
233       10.77  1.47    1       0    1     0     1
234       15.53  3.00    1       1    1     0     1
235       10.07  1.25    1       0    1     0     1
236       12.60  1.00    1       1    1     0     1
237       32.83  1.17    1       1    1     0     1
238       35.83  4.67    0       0    1     0     2
239       29.03  5.92    1       0    1     0     2
240       27.18  2.00    0       1    1     0     1
241       22.67  2.00    1       1    1     0     1
242       17.82  1.75    1       0    1     0     1
243       18.78  3.00    0       0    3     0     1

[244 rows x 7 columns]


若想保留之前的欄位,也可用添加新欄位的方式:

dataset_encode[field+"-encode"] = label_encoder.fit_transform(dataset_encode[field])

而 OneHotEncoder 則是因為產出的維度會變大,要再設法把新產出來的數值再添加回去:

from sklearn.preprocessing import LabelEncoder
from sklearn.preprocessing import OneHotEncoder

dataset_encode = dataset.copy()
labels = {}

for i, field in enumerate(dataset.columns):
if field == 'tip' or field == 'total_bill':
continue

# original
#print(dataset_encode.iloc[:,i])
#print(dataset_encode[field])

# LabelEncode
labels[field] = list(set(dataset[field].unique()))
label_encoder = LabelEncoder()
label_encoder.fit(labels[field])

# https://stackoverflow.com/questions/24458645/label-encoding-across-multiple-columns-in-scikit-learn
dataset_encode[field+"-LabelEncode"] = label_encoder.fit_transform(dataset_encode[field])
#dataset_encode[field] = label_encoder.fit_transform(dataset_encode[field])

# OneHotEncode
feature = label_encoder.transform(dataset_encode[field])
feature = feature.reshape(dataset.shape[0], 1)
# http://scikit-learn.org/stable/modules/generated/sklearn.preprocessing.OneHotEncoder.html
onehot_encoder = OneHotEncoder(sparse=False,n_values=len(labels[field]))
onehot_result = onehot_encoder.fit_transform(feature)
#dataset_encode[field+"-OneHotEncode"] = onehot_encoder.fit_transform(feature)
#onehot_encoder[ ["A","B"] ] = onehot_result

for index in range(len(labels[field])):
dataset_encode[field+"-OneHotEncode-"+str(index)] = onehot_result[:,index]

#print(dataset_encode[field])

print(dataset_encode.head(5))


如此一來,結果會是這樣:

   total_bill   tip     sex smoker  day    time  size  sex-LabelEncode  \
0       16.99  1.01  Female     No  Sun  Dinner     2                0
1       10.34  1.66    Male     No  Sun  Dinner     3                1
2       21.01  3.50    Male     No  Sun  Dinner     3                1
3       23.68  3.31    Male     No  Sun  Dinner     2                1
4       24.59  3.61  Female     No  Sun  Dinner     4                0

   sex-OneHotEncode-0  sex-OneHotEncode-1         ...           \
0                 1.0                 0.0         ...          
1                 0.0                 1.0         ...          
2                 0.0                 1.0         ...          
3                 0.0                 1.0         ...          
4                 1.0                 0.0         ...          

   time-LabelEncode  time-OneHotEncode-0  time-OneHotEncode-1  \
0                 0                  1.0                  0.0
1                 0                  1.0                  0.0
2                 0                  1.0                  0.0
3                 0                  1.0                  0.0
4                 0                  1.0                  0.0

   size-LabelEncode  size-OneHotEncode-0  size-OneHotEncode-1  \
0                 1                  0.0                  1.0
1                 2                  0.0                  0.0
2                 2                  0.0                  0.0
3                 1                  0.0                  1.0
4                 3                  0.0                  0.0

   size-OneHotEncode-2  size-OneHotEncode-3  size-OneHotEncode-4  \
0                  0.0                  0.0                  0.0
1                  1.0                  0.0                  0.0
2                  1.0                  0.0                  0.0
3                  0.0                  0.0                  0.0
4                  0.0                  1.0                  0.0

   size-OneHotEncode-5
0                  0.0
1                  0.0
2                  0.0
3                  0.0
4                  0.0