2014年3月31日 星期一

[Linux] 架設 Proftp 與 FTP over TLS 供網頁工讀生上傳資料 @ Ubuntu 12.04

突然收到個命令,要架一檯機器給工讀生用 Orz 雖然幾乎都用 sftp 了,為了讓不熟 Unix 的網頁開發者可以輕鬆上傳資料,最後就是架一台機器,開個 ftp 讓他連進去使用。

流程:

$ sudo apt-get install nginx proftpd
$ sudo vim /etc/proftpd/proftpd.conf
Include /etc/proftpd/tls.conf

$ sudo vim /etc/proftpd/tls.conf
TLSEngine                               on
TLSLog                                  /var/log/proftpd/tls.log
TLSProtocol                             SSLv23
TLSRSACertificateFile                   /etc/ssl/certs/proftpd.crt
TLSRSACertificateKeyFile                /etc/ssl/private/proftpd.key

$ sudo openssl req -x509 -newkey rsa:1024 -keyout /etc/ssl/private/proftpd.key -out /etc/ssl/certs/proftpd.crt -nodes -days 3650

$ sudo vim /etc/proftpd/conf.d/AuthUserFile.conf
DefaultRoot ~
AuthUserFile /etc/proftpd/ftpd.passwd
RequireValidShell off

$ id www-data
uid=33(www-data) gid=33(www-data) groups=33(www-data)
$ sudo ftpasswd --file /etc/proftpd/ftpd.passwd --passwd --name webadmin --home /usr/share/nginx/www --shell=/bin/false --uid 33

$ sudo chown -R www-data:www-data /usr/share/nginx/www

$ sudo service proftpd restart

2014年3月28日 星期五

[PHP] foreach $key => $value Passing by Reference Problem

最近開發時,碰到了一個 passing by reference 的問題,追了一陣子才發現 Orz

程式碼:

<?php

$a = array( 'A', 'B', 'C' , 'D' );
print_r($a);
foreach( $a as &$v )
        $v = strtolower($v);
$v = 123123123;
print_r($a);


結果:

Array
(
    [0] => A
    [1] => B
    [2] => C
    [3] => D
)
Array
(
    [0] => a
    [1] => b
    [2] => c
    [3] => 123123123
)


可以看到上述的最後一個 element 變成 123123123,而解法就是透過 unset 來處理:

<?php
$a = array( 'A', 'B', 'C' , 'D' );
print_r($a);
foreach( $a as &$v )
        $v = strtolower($v);
unset($v);
$v = 123123123;
print_r($a);


結果:

Array
(
    [0] => A
    [1] => B
    [2] => C
    [3] => D
)
Array
(
    [0] => a
    [1] => b
    [2] => c
    [3] => d
)

2014年3月27日 星期四

[Linux] MySQL 資料庫 charset 從 latin1 轉 utf8 筆記 @ Ubuntu 12.04

昨天剛順利移機([Linux] 透過 MySQL Replication 之 Master Slave 切換進行 DB server 移機 @ Ubuntu 12.04),移機後自以為沒事就收工了,結果發現 MySQL DB Server 預設的 charset 是 latin1 而非 utf8 ,接著就開始改設定檔([Linux] MySQL Server & Client characterset 設定 @ Ubuntu 12.04),以為改完沒事...才發現大條的才剛開始。

那就是昨天移機後的資料,都是以 latin1 編碼儲存進去的:

mysql> \s
...
Server characterset:    utf8
Db     characterset:    utf8
Client characterset:    utf8
Conn.  characterset:    utf8
...
mysql> SELECT message FROM TABLE;


會有一堆看不懂,改用 latin1 編碼就看懂了

mysql> SET NAMES latin1;
mysql> \s
...
Server characterset:    utf8
Db     characterset:    utf8
Client characterset:    latin1
Conn.  characterset:    latin1
...
mysql> SELECT message FROM TABLE;


接著就在想到底該怎樣轉 XD 因為 TABLE 的 charset 是 UTF8 編碼,不管怎樣做 convert, cast 似乎都沒成效,最後找到一些招術,幸運地真的解掉,流程:
  1. 先備份資料庫
  2. 先確認到底是哪幾筆資料有問題,用 mysqldump db_name table_name --where "id>=100 AND id <=200" > data.sql 的方式匯出
  3. 修改 data.sql 的 table 名稱、編碼定義(例如 TABLE_LATIN1、DEFAULT CHARSET=latin1),記得要把 table 改名稱,以免匯入時會 DROP 之前的資料
  4. 匯入 data.sql
  5. 建立一個新 table ,其資料表跟 TABLE_LATIN1 一樣,但 DEFAULT CHARSET=utf8,名為 TABLE_UTF8
  6. 設定 mysql 編碼為 latin1 ,並從 TABLE_LATIN1 取出資料,以 CONVERT(message USING BINARY) 存入 TABLE_UTF8 中
  7. 設定 mysql 編碼為 utf8 ,接著查證 TABLE_UTF8 是否正確,若正確的話,可以把資料從 TABLE_UTF8 更新到為本的 table 中
連續動作:

$ mysqldumo -u account -p db_name table_src_name --where 'id>=100 AND id<=200' > table_src_name.latin1.sql
$ vim table_src_name.latin1.sql
-- ...
DROP TABLE IF EXISTS `table_src_name_latin1`;
CREATE TABLE `table_src_name_latin1` (
`id` int(11) NOT NULL AUTO_INCREMENT,
`message` text NOT NULL,
PRIMARY KEY (`id`)
) ENGINE=InnoDB AUTO_INCREMENT=0 DEFAULT CHARSET=latin1;
-- ...

$ mysql -u account -p -D dbname < table_src_name.latin1.sql
$ mysql -u account -p
mysql> use db_name;
mysql> CREATE TABLE `table_src_name_utf8` (
`id` int(11) NOT NULL AUTO_INCREMENT,
`message` text NOT NULL,
PRIMARY KEY (`id`)
) ENGINE=InnoDB AUTO_INCREMENT=0 DEFAULT CHARSET=utf8;
mysql> \s
Server characterset:    utf8
Db     characterset:    utf8
Client characterset:    utf8
Conn.  characterset:    utf8
mysql> SET NAMES latin1;
mysql> \s
Server characterset:    utf8
Db     characterset:    utf8
Client characterset:    latin1
Conn.  characterset:    latin1
mysql> INSERT INTO table_src_name_utf8 SELECT id, CONVERT(message USING BINARY) FROM table_src_name_latin1;
mysql> SET NAMES utf8;
mysql> SELECT * FROM table_src_name_utf8;
mysql> UPDATE table_src_name as d, table_src_name_utf8 as s SET d.message = s.message WHERE d.id = s.id;

[Linux] MySQL Server & Client characterset 設定 @ Ubuntu 12.04

這...太久沒設定了,記得 n 年前也都會碰到 Orz

首先先查詢現況:

mysql> status;
...
Server characterset:    latin1
Db     characterset:    latin1
Client characterset:    utf8
Conn.  characterset:    utf8


接著設定:

$ ls -la /etc/mysql/
total 24
drwxr-xr-x  3 root root 4096 Mar 27 08:58 .
drwxr-xr-x 91 root root 4096 Mar 26 22:41 ..
drwxr-xr-x  2 root root 4096 Mar 27 09:03 conf.d
-rw-------  1 root root  333 Mar 25 16:00 debian.cnf
-rwxr-xr-x  1 root root 1220 Jan 22 05:48 debian-start
-rw-r--r--  1 root root 3638 Mar 27 08:56 my.cnf
$ sudo touch /etc/mysql/conf.d/charset.cnf
[client]
default-character-set=utf8

[mysqld]
character-set-server=utf8
collation-server=utf8_unicode_ci

$ sudo service mysql restart


再查詢一次:

mysql> status;
...
Server characterset:    utf8
Db     characterset:    utf8
Client characterset:    utf8
Conn.  characterset:    utf8


參考資料:

2014年3月26日 星期三

[Linux] 透過 MySQL Replication 之 Master Slave 切換進行 DB server 移機 @ Ubuntu 12.04

事情的緣由是想要進行 DB server 的升級,做法有不少種,而最重要的是要將 down time 降低。由於未來有考慮把 DB server 移到 AWS RDB 上頭,參考 AWS RDB 的 import/export 方式,故選擇從 replication slave 來摸摸。

建立 Replication Slave 的流程:
  1. 將原先的 db1 server 調整成可以成為 master db 的功能
    • $ vim /etc/mysql/my.cnf
      • 拿掉 bind-address 127.0.0.1
      • 指定 server-id = 1
      • 指定 log_bin = /var/log/mysql/mysql-bin.log
      • innodb_flush_log_at_trx_commit=1
      • sync_binlog=1
    • $ sudo service mysql restart
  2. 在 master db 上建立 replication slave 存取權限
    • master:mysql> GRANT REPLICATION SLAVE ON *.* TO 'repl'@'%' IDENTIFIED BY 'repl_password';
  3. 在 master db 上匯出資料
    • master:mysql> FLUSH TABLES WITH READ LOCK;
    • master:mysql> SHOW MASTER STATUS;
    • $ mysqldump -u root -p --all-databases --lock-all-tables > all.sql
    • master:mysql> UNLOCK TABLES;
    • 想辦法把 all.sql 弄到 slave db server
  4. 在 db2 server 設定可以成為 slave db 功能
    • $ vim /etc/mysql/my.cnf
      • 拿掉 bind-address 127.0.0.1
      • 指定 server-id = 2
      • 指定 log_bin = /var/log/mysql/mysql-bin.log
    • $ sudo service mysql restart
  5. 在 db server 匯入 master db 的資料
    • 從 master db server 取得 all.sql
    • $ mysql -u root -p < all.sql
  6. 在 slave db 設定 master db 資訊
    • slave:mysql> CHANGE MASTER TO
      MASTER_HOST='MasterDBIP',
      MASTER_USER='repl',
      MASTER_PASSWORD='repl_password',
      MASTER_LOG_FILE='File',
      MASTER_LOG_POS=Position;
    • slave:mysql> START SLAVE;
    • slave:mysql> SHOW MASTER STATUS;
    • slave:mysql> SHOW SLAVE STATUS;
如此一來,就可以看到 Slave 跟 Master 一直保持同步了,可以用一些指令,如 SELECT count(*) FROM TABLE; 來比較看看。

以上就是架設 MySQL Replication Slave 的流程,接下來是進行 DB Server 移機的過程,目的就是將上述的 db1 server 下線,並改用 db2 server 當 master,有點像是把 switch slave server to master 的味道,過程:
  1. 鎖住 db1 server
    • db1:mysql> FLUSH TABLES WITH READ LOCK;
  2. 確認 db2 server 資料有 sync
  3. 在 db2 server 取消 slave 行為
    • db2:mysql> STOP SLAVE;
    • db2:mysql> RESET SLAVE;
  4. 將所有相關的 application 的 db 連線導到 db2 server
透過上述 MySQL Replication 移機的方式,所造成的 down time 會小很多。另外,更好的解法是先處理好 primary key (例如 2N 與 2N+1)的問題,然後先把 application db 切到 db2,過一陣子後再把 db1 shutdown ,就可以避免資料遺失問題。

最後補充一下,在 Master DB Server 新增帳號時,在 Slave DB server 並沒有 sync ,解法除了一開始在設定 Slave 前就把帳號建立好外,另一種解法就是讓 Slave DB 先暫停 Slave 角色,接著新增完帳號再重回 Slave 角色,而新資料又可以從 Master sync 回來。
  1. slave:mysql> STOP SLAVE;
  2. slave:mysql> 新增使用者;
  3. slave:mysql> START SLAVE;
關於新增帳號的問題是在於要把 db2(Slave) 轉成 Master 時,需要更新帳號能夠存取 db2 的權限,然而透過上述 mysqldump -u root -p --all-databases --lock-all-tables 更新方式,db2 裡的資料都是以 db1 的環境去設定的。
[Linux] 限制使用者只能用 public key 登入 @ Ubuntu 12.04

原先是要用在 mysql 之 rsync 的備份方式,雖然最後不用了,也順便記一下:

$ sudo vim /etc/ssh/sshd_config
#PasswordAuthentication yes # default
RSAAuthentication yes
PubkeyAuthentication yes

Match User user1,user2
PasswordAuthentication no


$ sudo service ssh reload

2014年3月21日 星期五

[PHP] 使用 Memory Cache (php://memory) 加速 File Handle 操作

最近使用 maxmind / MaxMind-DB-Reader-php 時,發現大量處理很慢,研究一下 src / MaxMind / Db / Reader.php 後,發現 DB 沒有一口氣讀進記憶體使用,就找一下如何將檔案搬進 Memory 後,一樣用 File Handle 對 memory 操作,如此可以降低 source code 的更動。

用法(以 src / MaxMind / Db / Reader.php 為例):

$this->fileHandle = @fopen($database, 'rb');
if ($this->fileHandle === false) {
throw new \InvalidArgumentException(
"Error opening \"$database\"."
);
}

$this->fileSize = @filesize($database);
if ($this->fileSize === false) {
throw new \UnexpectedValueException(
"Error determining the size of \"$database\"."
);
}

// Add by changyy
$fp = fopen("php://memory", 'rb+');
if(is_resource($fp)) {
fputs($fp, fread($this->fileHandle, $this->fileSize) );
rewind($fp);
fclose($this->fileHandle);
$this->fileHandle = $fp;
}


使用的結果,在 Linode 2048 的機器上,測試 20k 筆資料,未加時約 65 秒,加了可以進步到 40 秒附近,稍微失落 Orz 此外,可以用 memory_get_peak_usage() 來的知記憶體的增減。

2014年3月20日 星期四

iOS 開發筆記 - 在 Compiler Time 使用 __has_include 偵測 Framework 是否存在

__has_include Framework

以 FacebookSDK 來說,之前一直都用 github.com/facebook/facebook-ios-sdk 來使用,最近發現 source tree 預設有一些 bug 無法在 Xcode 5.1 編譯成功,自行修又容易碰到維護問題,於是就跑去下載 Facebook 官方打包好的 facebook-ios-sdk-current.pkg 來用了。

之前用 Facebook source code 來編譯時,在 header file 的使用:

#import "Facebook.h"

然而,現在改用 FacebookSDK 時,則該使用

#import <FacebookSDK/FacebookSDK.h>

因此想要在 Compiler Time 來確認,因此來增加彈性。

所幸有找到類似堪用的方式(Include File Checking Macros):

#if defined(__has_include)
#if __has_include("FacebookSDK/FacebookSDK.h")
#import <FacebookSDK/FacebookSDK.h>
#else
#import "Facebook.h"
#endif
#endif


此外,在 Project 的 Build Settings,就可以這樣通用設定:
  • Framework Search Path: /path/sdk/FacebookSDK
  • Library Search Paths: ${SRCROOT}
  • User Header Search Path: /path/sdk/facebook-ios-sdk
其中 /path/sdk/FacebookSDK 指的是 facebook-ios-sdk-current.pkg 安裝位置(只要把pkg裡的 FacebookSDK.framework 拖進去會自動設定好),而 Library Search Paths 和 User Header Search Path 的設定則是為了採用 source tree 方式。

2014年3月18日 星期二

[PHP] CodeIgniter 處理多層子目錄 Routing 問題

[PHP] CodeIgniter 處理多層子目錄 Routing 問題

過去使用 CodeIgniter 一直以為在 application/controller 裡的目錄結構可以無限延伸使用,如:

application/conotrollers/service/dashboard/product.php
application/conotrollers/service/api/product.php
application/conotrollers/service/welcome.php
application/conotrollers/welcome.php


當瀏覽 hostname/ 可以由 conotrollers/welcome.php 處理,瀏覽 hostname/service/welcome 則由 conotrollers/service/welcome.php 處理,一切正常。

但瀏覽 hostname/service/api/product 和 hostname/service/dashboard/product 時,卻噴 404 Page Not Found 訊息。

一開始以為 nginx rules 設定錯誤,追一下 CodeIgniter 的 source code 後,發現 CodeIgniter 的程式碼沒有用遞迴或等價方式去搜尋子目錄,再透過相關關鍵字才發現,關於多層子目錄的需求,則只能透過指定 routing 的設定方式進行,但對應到還是一層目錄結構:

例如 hostname/service/dashboard/product 用法:

$ vim application/config/routes.php

$route['service/(:any)/(:any)'] = 'service_$1/$2';


而目錄結構更新為:

application/conotrollers/service_dashboard/product.php
application/conotrollers/service_api/product.php
application/conotrollers/welcome.php


簡言之,就是以 application/controllers 為基準,頂多再加一層 subdir 而已,而想要 uri 有多層的含義,只能自定 route 來達到。

2014年3月16日 星期日

[OSX] Xcode 5.1 - Unused Entity Issue: Unused Variable @ Mac OS X 10.9.2

Unused Entity Issue - Unused Variable

上次手滑更新 Xcode 後,發現新版 Facebook SDK 3.13 (2014/03/06 15:39:14) 編譯時會出現 Unused Entity Issue: Unused Variable 的錯誤,且看到有人提出了,暫時就先自己處理一下吧 :P

2014年3月15日 星期六

存在感、表現慾望與建設性

cocoaheads-taipei

因高手的介紹,第一次在台北參加小型聚會 CocoaHeads.tw 2014 3月聚會,場地是由知名 PicCollage app 的公司 Cardinal Blue 所提供的,也是他們家上班場所,十分舒適啊!

cocoaheads-taipei 2014-03

經過這次小型聚會,讓我想起不少點滴,像是以前在研究單位時,每兩周的技術分享一樣,真的,一個人所能接收的訊息、機會都跟工作有關,有道是男怕入錯行,不是沒有原因的 XD 這次聽到 KKBOX iOS developer 分享 CarPlay 挺有趣的。

心得:
  1. Cardinal Blue 辦公室真漂亮
  2. 不少人正積極尋找舞台,力求發揮(iOS app 派的商業特質?)
  3. 工作著實地影響一個人精進,若在工作上無法吸收到新技術,下班再去做就真的太累了 XD 此時就比較適合挑其他人生目標、舞台?
  4. 早期 iOS app 適合單打獨鬥,小功能就容易吸引人,現況適合打群架,要豐富的應用(如軟硬結合)才比較能有話題。此外,一旦開發週期拉長,產品無法及時曝光商業價值就降低
  5. 雖然 idea 的新穎性是個創業的因素,我自己第一份工作也常會因為看的多&遠,常常對別人開槍,後來某天後來有了新體悟:同樣的路,走 100 遍各有各的滋味 :) 此外,市場規模、地域性仍是個關鍵點,如同台灣現況很夯的 web service (團購、群眾募資等)不少也是從國外引進來... :P 所以,開槍時若多一點建設性方向的分享,應該會提升交流品質
最後,則是著實地提醒自己,該排好時程精實執行!

2014年3月14日 星期五

Android 開發筆記 - 使用 Google Cloud Messaging for Android (GCM)

原來 Android Cloud to Device Messaging Framework (C2DM) has been officially deprecated as of June 26, 2012 ... 現在改用 Google Cloud Messaging for Android
Google Cloud Messaging for Android (GCM) is a free service that helps developers send data from servers to their Android applications on Android devices, and upstream messages from the user's device back to the cloud. This could be a lightweight message telling the Android application that there is new data to be fetched from the server (for instance, a "new email" notification informing the application that it is out of sync with the back end), or it could be a message containing up to 4kb of payload data (so apps like instant messaging can consume the message directly). The GCM service handles all aspects of queueing of messages and delivery to the target Android application running on the target device.
一遍後,其實 GCM 的架構跟 Apple Push Notification service (APNs) 很像,主要都是先由 Mobile device 跟 Android server (Apple server) 註冊一個 token,接著再請 Mobile device 將此 token 交給 Service Provide。而 Service Provider 就利用這個 token 跟 Mobile device 傳訊息。比較不一樣的是 GCM 提供的架構多了一些設計,詳細請參考官網資料,在此僅簡易筆記一下。

Google Developer console:
  1. 首先,先到 Google Developer Console 建立一個 project,可得到 Service Provider ID
  2. 啟用 GCM service
  3. 建立 keys,APIs & auth > Credentials > Create a new key > Server key  (測試上 IP 設定為 0.0.0.0/0)
  4. 得到一組 API key,之後就是透過這個 key 跟 Mobile device's token 丟訊息
Android app:
  1. 下載 Google Play service library 並安置好
  2. 在 AndroidManifest.xml 宣告相關權限、並新增 <receiver> 來接收 Service Provider 的訊息
  3. 接著就是程式啟動時,透過 Google library 跟 GCM 註冊一個 token,此時需要指定 Service Provider ID 資訊
  4. 將 token 交給 Service Provider,如此一來 service provider 就可以傳訊息
  5. 實作好 <receiver>,當訊息進來時,啟動一個 service 發 notification 出去
接著是一些片段範例:
  • Service Provider ID: Your-Sender-ID
  • API KEY: API_Key
  • Android App Package Name: com.example.gcm
  • Mobile device token: MobileDeviceToken
  • Message:hello world
  • Payload: {"to":"MobileDeviceToken","data":{"message":"hello world","action":"com.example.gcm"}}
Service Provider 發訊息給指定的 Mobile device:

$ curl --header "Authorization: key=API_Key" --header Content-Type:"application/json" https://android.googleapis.com/gcm/send  -d '{"to":"MobileDeviceToken","data":{"message":"hello world","action":"com.example.gcm"}}'

Android app - AndroidManifest.xml:

<?xml version="1.0" encoding="utf-8"?>
<manifest xmlns:android="http://schemas.android.com/apk/res/android"
    package="com.example.gcm"
    android:versionCode="1"
    android:versionName="1.0" >

    <uses-sdk
        android:minSdkVersion="8"
        android:targetSdkVersion="15" />

    <!--  ADD FOR Google Cloud Messaging ### Begin -->
    <uses-permission android:name="android.permission.INTERNET" />
    <uses-permission android:name="android.permission.GET_ACCOUNTS" />
    <uses-permission android:name="android.permission.WAKE_LOCK" />
    <uses-permission android:name="com.google.android.c2dm.permission.RECEIVE" />
<permission android:name="com.example.gcm.permission.C2D_MESSAGE"
        android:protectionLevel="signature" />
<uses-permission android:name="com.example.gcm.permission.C2D_MESSAGE" />
    <!--  ADD FOR Google Cloud Messaging ### End -->


    <application
        android:allowBackup="true"
        android:icon="@drawable/ic_launcher"
        android:label="@string/app_name"
        android:theme="@style/AppTheme" >
        <activity
            android:name="com.example.gcm.MainActivity"
            android:label="@string/app_name" >
            <intent-filter>
                <action android:name="android.intent.action.MAIN" />

                <category android:name="android.intent.category.LAUNCHER" />
            </intent-filter>
        </activity>
   
        <!--  ADD FOR Google Cloud Messaging ### Begin -->
        <meta-data android:name="com.google.android.gms.version"
        android:value="@integer/google_play_services_version" />
        <receiver
            android:name=".GcmBroadcastReceiver"
            android:permission="com.google.android.c2dm.permission.SEND" >
            <intent-filter>
                <action android:name="com.google.android.c2dm.intent.RECEIVE" />
                <category android:name="com.example.gcm" />
            </intent-filter>
        </receiver>
        <service android:name=".GcmIntentService" />
        <!--  ADD FOR Google Cloud Messaging ### End -->

   
    </application>
</manifest>


Android app - Receiver:

package com.example.gcm;

import com.google.android.gms.gcm.GoogleCloudMessaging;

import android.content.Context;
import android.content.Intent;
import android.os.Bundle;
import android.support.v4.content.WakefulBroadcastReceiver;
import android.util.Log;

public class GcmBroadcastReceiver extends WakefulBroadcastReceiver {
private static final String TAG = "GCM";

@Override
public void onReceive(Context context, Intent intent) {
// TODO Auto-generated method stub
Log.i(TAG, "GcmBroadcastReceiver");

GoogleCloudMessaging gcm = GoogleCloudMessaging.getInstance(context);
String messageType = gcm.getMessageType(intent);
Log.i(TAG, "GcmBroadcastReceiver messageType:"+messageType);

Bundle extras = intent.getExtras();
if (!extras.isEmpty()) {
if (GoogleCloudMessaging.MESSAGE_TYPE_SEND_ERROR.equals(messageType)) {

} else if (GoogleCloudMessaging.MESSAGE_TYPE_DELETED.equals(messageType)) {

} else if (GoogleCloudMessaging.MESSAGE_TYPE_MESSAGE.equals(messageType)) {

}
Log.i(TAG, "GcmBroadcastReceiver Received: " + extras.toString());
}
}
}


Android app - MainActivity:

public class MainActivity extends ActionBarActivity {
private static final String TAG = "GCM";
public static final String EXTRA_MESSAGE = "message";
public static final String PROPERTY_REG_ID = "registration_id";
private static final String PROPERTY_APP_VERSION = "appVersion";
private final static int PLAY_SERVICES_RESOLUTION_REQUEST = 9000;
String SENDER_ID = "Your-Sender-ID";

GoogleCloudMessaging gcm;
AtomicInteger msgId = new AtomicInteger();
String regid;
Context context;

private boolean checkPlayServices() {
   int resultCode = GooglePlayServicesUtil.isGooglePlayServicesAvailable(this);
   if (resultCode != ConnectionResult.SUCCESS) {
       if (GooglePlayServicesUtil.isUserRecoverableError(resultCode)) {
           GooglePlayServicesUtil.getErrorDialog(resultCode, this,
                   PLAY_SERVICES_RESOLUTION_REQUEST).show();
       } else {
           Log.i(TAG, "This device is not supported.");
           finish();
       }
       return false;
   }
   return true;
}

private String getRegistrationId(Context context) {
   final SharedPreferences prefs = getGCMPreferences(context);
   String registrationId = prefs.getString(PROPERTY_REG_ID, "");
   if (registrationId.isEmpty()) {
       Log.i(TAG, "Registration not found.");
       return "";
   }
   // Check if app was updated; if so, it must clear the registration ID
   // since the existing regID is not guaranteed to work with the new
   // app version.
   int registeredVersion = prefs.getInt(PROPERTY_APP_VERSION, Integer.MIN_VALUE);
   int currentVersion = getAppVersion(context);
   if (registeredVersion != currentVersion) {
       Log.i(TAG, "App version changed.");
       return "";
   }
   return registrationId;
}

private SharedPreferences getGCMPreferences(Context context) {
   // This sample app persists the registration ID in shared preferences, but
   // how you store the regID in your app is up to you.
   return getSharedPreferences(MainActivity.class.getSimpleName(),
           Context.MODE_PRIVATE);
}

private static int getAppVersion(Context context) {
   try {
       PackageInfo packageInfo = context.getPackageManager()
               .getPackageInfo(context.getPackageName(), 0);
       return packageInfo.versionCode;
   } catch (NameNotFoundException e) {
       // should never happen
       throw new RuntimeException("Could not get package name: " + e);
   }
}
private void registerInBackground() {
new AsyncTask<Object, Object, Object>() {

@Override
protected Object doInBackground(final Object... arg0) {
// TODO Auto-generated method stub
String msg = "";
           try {
               if (gcm == null) {
                   gcm = GoogleCloudMessaging.getInstance(context);
               }
               regid = gcm.register(SENDER_ID);
               msg = "Device registered, registration ID=" + regid;

               // You should send the registration ID to your server over HTTP,
               // so it can use GCM/HTTP or CCS to send messages to your app.
               // The request to your server should be authenticated if your app
               // is using accounts.
               sendRegistrationIdToBackend();

               // For this demo: we don't need to send it because the device
               // will send upstream messages to a server that echo back the
               // message using the 'from' address in the message.

               // Persist the regID - no need to register again.
               storeRegistrationId(context, regid);
           } catch (IOException ex) {
               msg = "Error :" + ex.getMessage();
               // If there is an error, don't just keep trying to register.
               // Require the user to click a button again, or perform
               // exponential back-off.
           }
           return msg;
}

}.execute(null, null, null);
}

private void sendRegistrationIdToBackend() {
   // Your implementation here.
}

private void storeRegistrationId(Context context, String regId) {
   final SharedPreferences prefs = getGCMPreferences(context);
   int appVersion = getAppVersion(context);
   Log.i(TAG, "Saving regId on app version " + appVersion);
   Log.i(TAG, "Saving regId: " + regId);
   SharedPreferences.Editor editor = prefs.edit();
   editor.putString(PROPERTY_REG_ID, regId);
   editor.putInt(PROPERTY_APP_VERSION, appVersion);
   editor.commit();
}

@Override
protected void onCreate(Bundle savedInstanceState) {
super.onCreate(savedInstanceState);
setContentView(R.layout.activity_main);

        context = getApplicationContext();

        // Check device for Play Services APK. If check succeeds, proceed with
        //  GCM registration.
        if (checkPlayServices()) {
            gcm = GoogleCloudMessaging.getInstance(this);
            regid = getRegistrationId(context);

            if (regid.isEmpty()) {
                registerInBackground();
            }
        } else {
            Log.i(TAG, "No valid Google Play Services APK found.");
        }

if (savedInstanceState == null) {
getSupportFragmentManager().beginTransaction()
.add(R.id.container, new PlaceholderFragment()).commit();
}
}
// ...
}


更完整的範例請參考官網:GCM Client

Android 開發筆記 - 透過 Eclipse 新增 Android Project 時,勾選 Create Activity 卻沒自動建立

no activity

這個問題以前沒碰過,但類似的現象則有碰過,記得以前碰到時也是想到去看看 Eclipse 有沒更新,我是下載套裝軟體 (ADT Bundle for Mac),但一直新都沒東西 Orz

後來直接再加入 https://dl-ssl.google.com/android/eclipse/ 來使用,就終於有更新了,更新後的確也解決了。

只是追了一下,在 ADT Bundle for Mac -> Eclipse -> Help -> Install New Software -> Available Software Sites 中,其實有 Android Developer Tools Update Site (http://dl-ssl.google.com/android/eclipse/)。

但...我已經更新好了,就沒法手動更新看看,或是只要把 http 改成 https 也能解決?!

Android 開發筆記 - @integer/google_play_services_version no resource found

最近在把玩 Google Cloud Messaging 時,發現 AndroidManifest.xml 顯示這則錯誤訊息。

解法:

  1. 在 Android SDK Manager 中,確認 Extras -> Google Play service 已安裝
  2. 透過 Eclipse 進行 project import:File -> Import -> Android -> Existing Android Code Into Workspace -> 挑選 google-play-services_lib 的位置 (例如 /path/adt-bundle-mac-x86_64-20131030/sdk/extras/google/google_play_services/libproject/google-play-services_lib),記得要挑 libproject 裡的
  3. 在原本的 project 進行設定:Eclipse -> Project ->Properties -> Android -> Library -> Add -> 挑選 google-play-services_lib
如此一來,即可解決(Eclipse 有時不會馬上更新狀態,要把 project close 後再 open)。

2014年3月12日 星期三

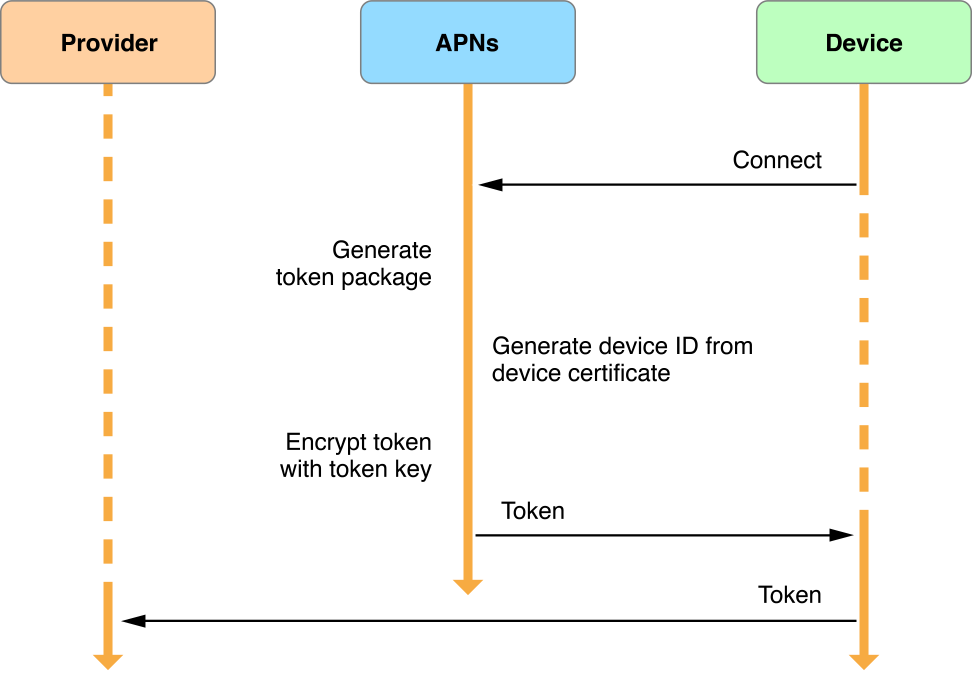
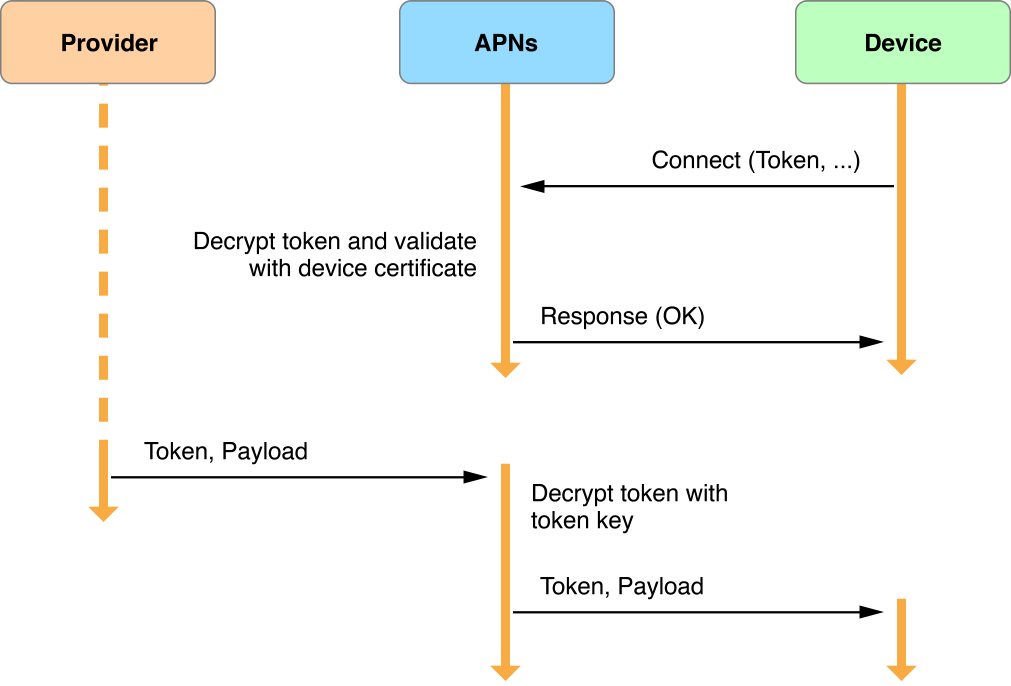
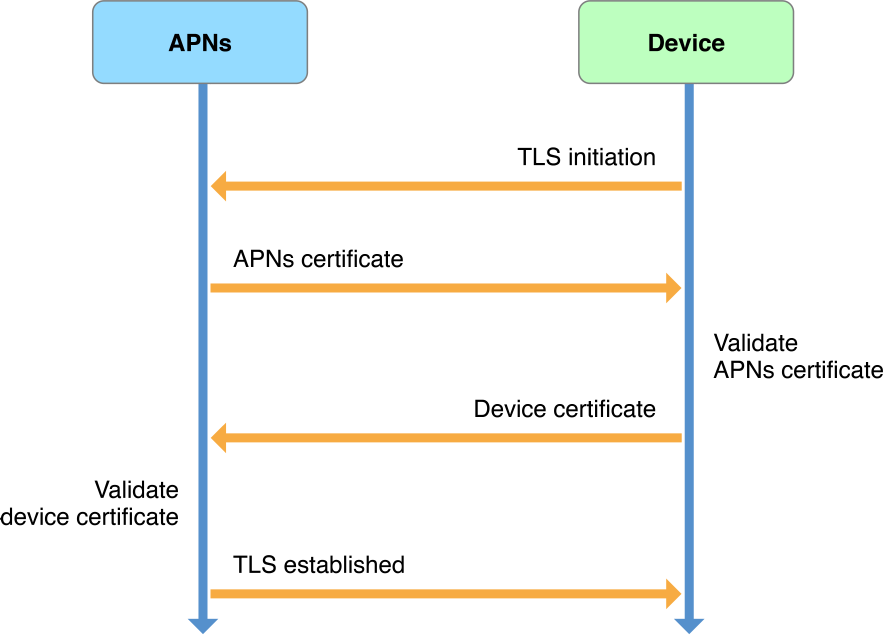
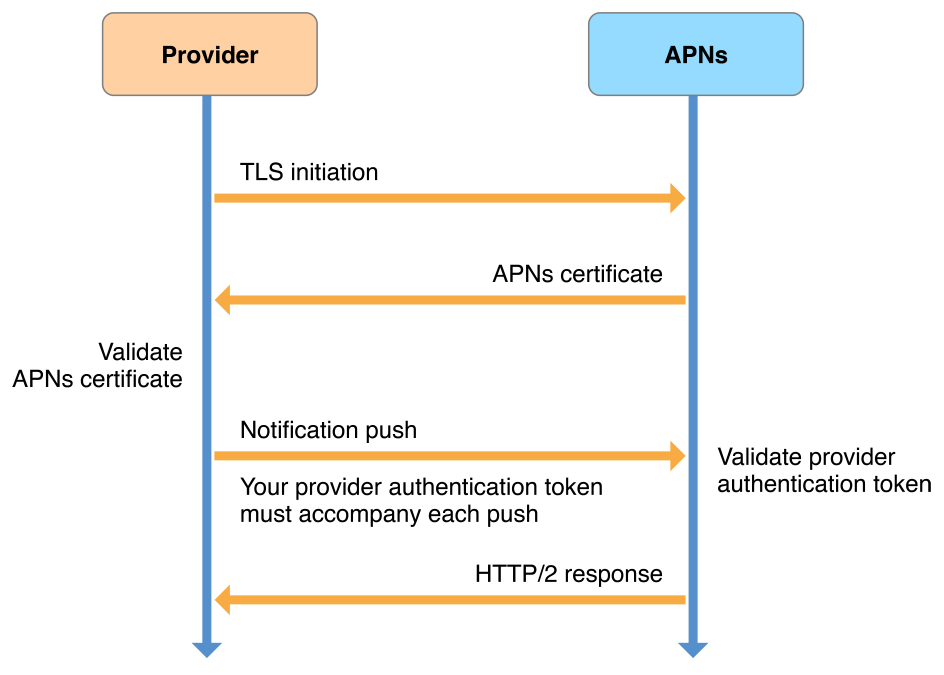
iOS 開發筆記 - 使用 Apple Push Notification service (APNs)

Apple 官方詳細的文件:Local Notifications and Push Notifications,漂亮的流程圖:

Service-to-Device Connection Trust:


Provider-to-Service Connection Trust:


Token Generation and Dispersal:

Token Trust (Notification):


心得:
  • 透過 Apple Push Notification service (APNs) 時,可以有提醒使用者來使用 app 的效果,無論使用者是否正在使用、背景使用、關閉使用都可以,就只要不要刪掉 app 都可以
  • APNs 只是讓 Service Provider 透過 Gateway 主動丟訊息給使用者,也不保證丟的到,除了訊息也可以設定 expiry date 外,也可以從 Feedback service 來取得傳送失敗的資訊
  • APNs 是單向傳訊息,所以,其實就像打聲招呼而已,等使用者使用 app 時,需額外處理連回自家 server 的部分,才能完成互動
Service Provider 進行 Push Notification 流程:
  1. 在 iOS Developer Center 對指定的 APP ID 設定好 Push Notifications 的憑證等
  2. 在 OSX 上,將憑證輸出成 P12 檔
  3. 透過 openssl 將 *.P12 檔轉成 PEM 格式
    $ openssl pkcs12 -in 憑證.p12 -out CertificateName.pem -nodes
    Enter Import Password:
    MAC verified OK
  4. Server 使用 PEM 檔案與 Apple server 進行 SSL/TLS 溝通
  5. 資料格式需依照 The Binary Interface and Notification Format 編碼,簡易程式:github.com/changyy/ios-apple-push-notification-service/php/send.php
iOS app 設定:
  1. 在程式啟動處,進行 APNs 註冊流程
  2. 判斷是否註冊成功,成功後要將 deviceToken 傳給 Service Provider
    - (NSString *)getHEX:(NSData *)data
    {
        const unsigned char *dataBytes = [data bytes];
        NSMutableString *ret = [NSMutableString stringWithCapacity:[data length] * 2];
        for (int i=0; i<[data length]; ++i)
            [ret appendFormat:@"%02X", (NSUInteger)dataBytes[i]];
        return ret;
    }
    - (void)application:(UIApplication *)app didRegisterForRemoteNotificationsWithDeviceToken:(NSData *)devToken {
        NSLog(@"didRegisterForRemoteNotificationsWithDeviceToken: %@", [self getHEX:devToken]);
    }

    - (void)application:(UIApplication *)app didFailToRegisterForRemoteNotificationsWithError:(NSError *)err {
        NSLog(@"didFailToRegisterForRemoteNotificationsWithError: %@", err);
    }
  3. 若程式在使用中,可以監控是否有通知
    - (void)application:(UIApplication *)application didReceiveRemoteNotification:(NSDictionary *)userInfo {
        NSLog(@"didReceiveRemoteNotification: %@",userInfo);
        if (application.applicationState == UIApplicationStateActive)
        {
            // use UIAlertView
        }
        else
        {
            //application.applicationIconBadgeNumber =[[[userInfo objectForKey:@"aps"] objectForKey: @"badge"] integerValue];
            //NSInteger badgeNumber = [application applicationIconBadgeNumber];
            //[application setApplicationIconBadgeNumber:++badgeNumber];
        }
    }

iOS 開發筆記 - NSData to HEX NSString

最近把玩 Apple Push Notification service 時,需要將 App 取得的 Device Token 轉成 HEX String 來使用。

- (NSString *)getHEX:(NSData *)data
{
    const unsigned char *dataBytes = [data bytes];
    NSMutableString *ret = [NSMutableString stringWithCapacity:[data length] * 2];
    for (int i=0; i<[data length]; ++i)
        [ret appendFormat:@"%02X", (NSUInteger)dataBytes[i]];
    return ret;

}

[Javascript] Bootstrap - 使用大量 Collapse 與 錨點(anchor/hashchange) 處理

最近在使用 Bootstrap 來包裝 Web UI ,有一卡車多的東西就先用 Collapse 包起來,而官網的範例:

<div class="panel-group">
<div class="panel panel-default">
<div class="panel-heading">
<h4 class="panel-title">
<a data-toggle="collapse" data-parent="#accordion" href="#collapseOne">
Collapsible Group Item #1
</a>
</h4>
</div>
</div>
<div id="collapseOne" class="panel-collapse collapse in">
<div class="panel-body">
Anim pariatur cliche reprehenderit, enim eiusmod high life accusamus terry richardson ad squid. 3 wolf moon officia aute, non cupidatat skateboard dolor brunch. Food truck quinoa nesciunt laborum eiusmod. Brunch 3 wolf moon tempor, sunt aliqua put a bird on it squid single-origin coffee nulla assumenda shoreditch et. Nihil anim keffiyeh helvetica, craft beer labore wes anderson cred nesciunt sapiente ea proident. Ad vegan excepteur butcher vice lomo. Leggings occaecat craft beer farm-to-table, raw denim aesthetic synth nesciunt you probably haven't heard of them accusamus labore sustainable VHS.
</div>
</div>

...
</div>


其中可以留意 collapseOne 的 class 屬性中有 in,這效果是預設展開。

然而,如果又額外做了個 Menu 維護這群 Panels/Collapse 時,希望點選某項時可以讓瀏覽器 scrollbar 移到恰當地點時,則需要處理一下:

HTML:

<div id="menu">
<ul>
<li><a data-toggle="collapse" data-target="#collapseOne" href="#collapseOne">collapseOne</a></li>
<li><a data-toggle="collapse" data-target="#collapseTwo" href="#collapseTwo">collapseTwo</a></li>
<li><a data-toggle="collapse" data-target="#collapseThree" href="#collapseThree"> collapseThree </a></li>
</ul>
</div>


Javascript:

$(document).ready(function(){

$('a[href*=#]').click(function(e){
var target = $(this).attr('href');
//console.log($(this).attr('href'));
if( target[0] == '#' ) {
//target = target.substr(1);
if( $(target) && $(target).offset() && $(target).offset().top )
$('html,body').animate({
scrollTop: $(target).offset().top
}, 1000 );
}
});
});


然而,如果預設 Collopse 是關閉的,那上述可能無法正確顯示效果,則需要把錨點切換到預設不會關閉的地點,例如 panel-heading 的位置:

<div class="panel-group">
<div class="panel panel-default">
<div id="collapseOneHead" class="panel-heading">
<h4 class="panel-title">
<a data-toggle="collapse" data-parent="#accordion" href="#collapseOne">
Collapsible Group Item #1
</a>
</h4>
</div>
</div>
<div id="collapseOne" class="panel-collapse collapse in">
<div class="panel-body">
....
</div>
</div>

...
</div>


而 Menu 的 href 則改為 collapseOneHead 即可:

<div id="menu">
<ul>
<li><a data-toggle="collapse" data-target="#collapseOne" href="#collapseOneHead">collapseOne</a></li>
<li><a data-toggle="collapse" data-target="#collapseTwo" href="#collapseTwoHead">collapseTwo</a></li>
<li><a data-toggle="collapse" data-target="#collapseThree" href="#collapseThreeHead"> collapseThree </a></li>
</ul>
</div>


註:由於採用 CodeIgniter 的關係,在 錨點(anchor) 的變化有點不如預期,所以改在 <a> 點擊上處理,而非用偵測 hashchange 事件。

2014年3月11日 星期二

iOS 開發筆記 - 使用 AssetsLibrary (assets-library://) 取得相簿內照片的原圖、縮圖

一直以來都是自己檔案管理,最近開始想要用內建相簿來管理儲存。

用法:

#import <AssetsLibrary/ALAssetsLibrary.h>
#import <AssetsLibrary/AssetsLibrary.h>

typedef void (^DoneHandler)(NSDictionary *ret);
- (void)get:(NSString *)key callback:(DoneHandler)handler {
 
ALAssetsLibrary* assetslibrary = [[ALAssetsLibrary alloc] init];
 
[assetslibrary assetForURL:[NSURL URLWithString:key] resultBlock:^(ALAsset *asset) {
//NSLog(@"asset:%@",asset);
UIImage *image = nil;
image = [UIImage imageWithCGImage:[asset aspectRatioThumbnail]];
image = [UIImage imageWithCGImage:[[asset defaultRepresentation] fullResolutionImage]];
image = [UIImage imageWithCGImage:[[asset defaultRepresentation] fullScreenImage]];
        handler(@{@"image":image});
} failureBlock:^(NSError *error) {
        handler(@{});
}];
}


其中 key 是類似這樣:assets-library://asset/asset.JPG?id=xxx&ext=JPG。

iOS 開發筆記 - 使用 MD5

忽然發現,自己在 iOS 上沒有用過 MD5 耶,一定是太少寫程式了 Orz

#import <CommonCrypto/CommonDigest.h>

- (NSString *)md5:(NSString *)str
{
    const char *cStr = [str UTF8String];
    unsigned char result[CC_MD5_DIGEST_LENGTH];
    CC_MD5( cStr, strlen(cStr), result );
    return [NSString
            stringWithFormat: @"%02X%02X%02X%02X%02X%02X%02X%02X%02X%02X%02X%02X%02X%02X%02X%02X",
            result[0], result[1],
            result[2], result[3],
            result[4], result[5],
            result[6], result[7],
            result[8], result[9],
            result[10], result[11],
            result[12], result[13],
            result[14], result[15]
            ];

}


驗證方式:

$ echo -n "string" | md5

參考資料:Calculate MD5 on iPhone

[OSX] 使用 ntpdate 和 systemsetup 更新系統時間 @ Mac OS X 10.9.2

公司的 Air 被幫我當成不關機的裝置,只是隨著不關機的時間拉長時,系統的時間就會開始延遲,解法就是用 ntpdate 設定一下。

$ sudo su
# ntpdate -u $(systemsetup -getnetworktimeserver|awk '{print $4}')

[Javascript] AngularJS 與 img src & img ng-src

用 AngularJS 在處理 img 時,沒看手冊的用法:

<img src="{{item.url}}" />

雖然網頁顯示一切正常,但仔細看 Google Chrome 開發人員工具時,發現有奇怪的 requests 發出去,是的,發出去的資料就是 http://hostname/%7B%7Bitem.url%7D%7D ,解法就是改用 ng-src 吧!

<img ng-src="{{item.url}}" />

AngularJS 官方文件 ngSrc :

Using Angular markup like {{hash}} in a src attribute doesn't work right: The browser will fetch from the URL with the literal text {{hash}} until Angular replaces the expression inside {{hash}}. The ngSrc directive solves this problem.

2014年3月6日 星期四

AWSome Day 2014 Taipei

AWSome Day 2014 Taipei

記得上一回使用 Amazon EC2 已經是 2009 年年底了,當時有 firefox plugin 可以管 EC2 就很威了!經過幾年少用 EC2 後,今年想說該複習一下,就報名參加了 :P

聽完一輪的想法:
  • AWS 提供很完整的方案,甚至企業型用法的 Amazon Virtual Private Cloud (VPC)
  • 比起 2009 年的概念,現在有很完整的 Access control 稱作 AWS Identity and Access Management (IAM)
  • 現在有 Amazon Relational Database Service (RDS),我猜應該本就有 HA 功能,而 RDS 所謂的 HA 方案是指跨 region 程度的。此外自家也有推 Amazon DynamoDB 的 NOSQL 方案
  • 檔案儲存的 Amazon S3 也有便利的 access control !以 bucket (類似folder) 為單位
  • Amazon ElastiCache 還可以建 Cluster ,有常見 Redis 跟 Memcached 方案 
  • AWS Elastic Load Balancing (ELB) ,如其名 load balancing
  • Amazon CloudWatch,可以監控機器狀況,若太操時可以選擇自動加開機器等
  • 有點內建 CDN 功能:世界各地有 Region 跟 Edge,其中 Region 是可以開機器,而 Edge 則是 cache 
聽到這裡,我認為 AWS 真的很猛,大概把一般公司對 MIS 的需求都做完了 XD 難怪一直主打 startup 廣告,如 airbnb 如何在 2012 年靠 AWS 服務,處理六個月內倍增的訂單數等,其他家則是說用了 AWS 省了多少錢。

對於錢的角度,我認為 AWS 就像買保險一樣,初期看起來花費比其他家 VPS 貴,但它提供的方案很全面性,如彈性計算的 EC2、資料庫 RDS、檔案儲存備份 S3、服務分流 ELB 跟服務監控與自動彈性調整 CloudWatch 等,一整個讓 startup 不必分心於管機器這件事,更可以專心做服務。流量大就砸錢,錢花完就增資 XD

管機器啊,只有真的管過才知道機器難管之處 XDDD 所以,要怎樣說服老闆花錢又是另一門學問囉!例如顧一個 MIS 年花 60 萬好了,但這個價碼初期用 AWS (WebOps) 好像很噴錢(大多都是 RD 兼職),但一旦服務流量變大時,馬上加人不見得可以處理好,用 AWS 卻像買個保險可以快速解決,甚至某些服務性質來說,有可能省到錢(節省人力)。

最後一提...不是用了 AWS 就可以自動 scale up!當然是自家服務本身就要設計,所以在 AWS 的傳道上,會鼓吹一開始就設計可以 scale up 的架構,而非像其他 startup 先不作重在 scale up ,等做大再煩惱 :P

相關連結:

2014年3月5日 星期三

iOS 開發筆記 - App Submission Feedback (Resolution Center) - 2.23: Apps must follow the iOS Data Storage Guidelines or they will be rejected

這理由收過兩次才過,累積成就筆記一下 XD 與其跟 Reviewer 解釋資料產生本來就會耗那麼多空間,不如還是自己乖乖丟到 NSTemporaryDirectory 吧 Orz

We found that your app does not follow the iOS Data Storage Guidelines, which is required per the App Store Review Guidelines.

In particular, we found that on launch and/or content download, your app stores 1x.xx MB. To check how much data your app is storing:

- Install and launch your app
- Go to Settings > iCloud > Storage & Backup > Manage Storage
- If necessary, tap "Show all apps"
- Check your app's storage

The iOS Data Storage Guidelines indicate that only content that the user creates using your app, e.g., documents, new files, edits, etc., should be backed up by iCloud.

Temporary files used by your app should only be stored in the /tmp directory; please remember to delete the files stored in this location when the user exits the app.

Data that can be recreated but must persist for proper functioning of your app - or because customers expect it to be available for offline use - should be marked with the "do not back up" attribute. For NSURL objects, add the NSURLIsExcludedFromBackupKey attribute to prevent the corresponding file from being backed up. For CFURLRef objects, use the corresponding kCFURLIsExcludedFromBackupKey attribute.

For more information, please see Technical Q&A 1719: How do I prevent files from being backed up to iCloud and iTunes?.

It is necessary to revise your app to meet the requirements of the iOS Data Storage Guidelines.
For discrete code-level questions, you may wish to consult with Apple Developer Technical Support. Please be sure to:

- include the complete details of your rejection issues
- prepare any symbolicated crash logs, screenshots, and steps to reproduce the issues for when the DTS engineer follows up.

For information on how to symbolicate and read a crash log, please see Tech Note TN2151 Understanding and Analyzing iPhone OS Application Crash Reports.

If you have difficulty reproducing this issue, please try testing the workflow as described in <https://developer.apple.com/library/ios/qa/qa1764/>Technical Q&A QA1764: How to reproduce a crash or bug that only App Review or users are seeing.


解法:
  • 挑 NSTemporaryDirectory() 來儲存資料
  • 當 app 被強制或使用者手動關閉時,清一下資料吧(連續兩下 Home 等切到背景不算)

    - (void)applicationWillTerminate:(UIApplication *)application {
    // remove data ...
    }

2014年3月4日 星期二

[Javascript] 偵測 AngularJS rendered a template - 以 Google Visualization API 應用為例

用 AngularJS MVC 架構時,想撈出資料後,再動態用 Google Visualization API 繪出資料。然而,在 AngularJS 架構下,不該怎樣偵測它已經完成呈現部分(rendered a template),依照原理,只好看看何時能取得到某物件(document.getElementById("tag_id"))。

Javascript:

(function(){

$scope.$watch(function(){
return document.getElementById(tag);
},function(value){
var val = value || null;
if(val) {
// doing...
}
});
})();


HTML:

<body ng-controller="appControl">
<div ng-repeat="item in data" id="{{item.id}}">{{item.id}}</div>
</body>


由於 <DIV> 是依照 AngularJS 架構產生的,而 Google Visualization API 需要綁定在某個 div 物件上,因此才需要去偵測 AngularJS 到底將 div 呈現出來了沒。

範例:

<script type='text/javascript' src='//www.google.com/jsapi'></script>
<script type='text/javascript' src='//ajax.googleapis.com/ajax/libs/angularjs/1.2.14/angular.min.js'></script>
<script type='text/javascript'>

google.load('visualization', '1', {'packages': ['corechart']});

function appControl($scope, $http, $location) {
$scope.data = null;
$scope.query = function() {
$http.get('/api', {}).success(function(data){
$scope.data = data;
for( var i=0 ; i<data.length ; ++i ) {
(function(){
var job_id = data[i]['id'];
var job_title = data[i]['title'];
var job_data = data[i]['data'];

$scope.$watch(function(){
return document.getElementById(job_id);
}, function(value) {
var check = value || null;
if(check) {
var data = new google.visualization.arrayToDataTable(job_data, true);
var options = { title: job_title, is3D: true };
//var chart = new google.visualization.PieChart(document.getElementById(job_id));
var chart = new google.visualization.PieChart(check);
chart.draw(data, options);
}
});
})();
}
}).error(function(data){
});
};
$scope.query();
}

</script>

2014年3月2日 星期日

[Javascript] JQuery UI - Uncaught TypeError: Object function (a,b){return new n.fn.init(a,b)} has no method 'curCSS' @ JQuery 1.11.0

最近在用某個 open source 時,他的開發是用 jQuery 1.5.x 系列 ,但一用最新版 jQuery 1.11.0 時,就會蹦出這個錯誤訊息,找了一下應該是用了 non-stable  API 吧?

解法:

<script type="text/javascript" src="/js/jquery-1.11.0.min.js"></script>
<script>
    jQuery.curCSS = jQuery.css;
</script>


雖然解法不是很好 XD 但對於使用 open source 而言,可以降低維護問題,也算是無可厚非的吧。