顯示具有 iOS 標籤的文章。 顯示所有文章

2021年8月25日 星期三

[macOS] 使用 hashcat 驗證/回憶 iOS iPhone/iPad iTunes 備份檔 密碼

故事起源於幫長輩換手機,這時手機有用過 itunes 備份過一份並且加密,但...怎麼都想不起密碼。在網路上找尋解法時,大概可以看到幾款破解軟體(推論是免費試用,真正要破解時需加價)。此刻的不方便,反而要感謝起 Apple 資安服務,高規格保護資料!大家的破解原理都是一樣的:暴力解-猜密碼。

研究後,發現有個 hashcat 的 open source 統包了眾多加密系統的猜密碼任務,而網路上 2017年也以人講解使用過程,還滿仔細的:

Crack Encrypted iOS backups with Hashcat

筆記一下過程:
  1. 先找到 iOS 備份檔擺放的位置: https://support.apple.com/en-us/HT204215
    • macOS: ~/Library/Application Support/MobileSync/Backup/
  2. 備份都是目錄結構,找到目錄中的 Manifest.plist 檔案
  3. 依照裡頭的資訊,準備餵給 hashcat 的資料,可分成 iOS 10 以上跟 iOS 9 以前,組成 inputFromManifest.txt 資料
    • Less then iOS 10:
      • $itunes_backup$*<ver>*<WPKY>*<ITER>*<SALT>**
    • iOS 10 or later:
      • $itunes_backup$*<ver>*<WPKY>*<ITER>*<SALT>*<DPIC>*<DPSL>
如此,就可以靠 hashcat 來運算,其原理包括支援平行處理(GPU)去算出密碼,包括從字典檔、暴力猜等等的。此外,關於上述 2~3 步驟,其實也有人佛心提供工具:github.com/philsmd/itunes_backup2hashcat,透過 perl 小程式自動幫人從 Manifest.plist 組出資訊:

% perl itunes_backup2hashcat.pl yourBackupDir/Manifest.plist 
$itunes_backup$*10*#######*####*######*######*##################
% perl itunes_backup2hashcat.pl yourBackupDir/Manifest.plist > inputFromManifest.txt

後續就著重 hashcat 的指令筆記,若要更多指令資訊,逛個官方網站是最方便的:hashcat.net/wiki/doku.php?id=hashcat

以在 https://www.youtube.com/watch?v=MMySnPzsPYU 內提供的範例資訊:

% cat inputFromManifest.txt 
$itunes_backup$*10*c8c96e8d6175f1356da6dcf5791ad76be166232b4a01bd6974abb27c39034993591c15ba03a14e3b*10000*0ca3ccfc453b32f9ca9aceb754b87f4e0ab9cb95*10000000*bdee6869caa7999e9576f390a248a29f38d10d6f

這時都是 iOS 10 的密碼,因此在使用 hashcat 會採用 -m 148000 參數。若是 iOS 9 以前,要用 -m 14700 參數這些都有定義在官方網站的 wiki 中。

第一招:暴力解,此例猜4個數字:

% hashcat -d 1 -m 14800 ./inputFromManifest.txt -a 3 '?d?d?d?d'
hashcat (v6.2.3) starting

OpenCL API (OpenCL 1.2 (Jun 17 2021 15:24:17)) - Platform #1 [Apple]
====================================================================
* Device #1: Intel(R) Core(TM) i5-7360U CPU @ 2.30GHz, 16320/16384 MB (4096 MB allocatable), 4MCU
* Device #2: Intel(R) Iris(TM) Plus Graphics 640, skipped

Minimum password length supported by kernel: 0
Maximum password length supported by kernel: 256

Hashes: 1 digests; 1 unique digests, 1 unique salts
Bitmaps: 16 bits, 65536 entries, 0x0000ffff mask, 262144 bytes, 5/13 rotates

Optimizers applied:
* Zero-Byte
* Single-Hash
* Single-Salt
* Brute-Force
* Slow-Hash-SIMD-LOOP
* (null)

Watchdog: Temperature abort trigger set to 100c

Host memory required for this attack: 1 MB

[s]tatus [p]ause [b]ypass [c]heckpoint [f]inish [q]uit => 

這時隨時都可以按 s 去看暴力解的進度:

Session..........: hashcat
Status...........: Running
Hash.Name........: iTunes backup >= 10.0
Hash.Target......: $itunes_backup$*10*c8c96e8d6175f1356da6dcf5791ad76b...d10d6f
Time.Started.....: Wed Aug 25 20:37:03 2021 (6 mins, 50 secs)
Time.Estimated...: Wed Aug 25 23:30:00 2021 (2 hours, 46 mins)
Kernel.Feature...: Pure Kernel
Guess.Mask.......: ?d?d?d?d [4]
Guess.Queue......: 1/1 (100.00%)
Speed.#1.........:        1 H/s (13.34ms) @ Accel:128 Loops:256 Thr:1 Vec:4
Recovered........: 0/1 (0.00%) Digests
Progress.........: 0/10000 (0.00%)
Rejected.........: 0/0 (0.00%)
Restore.Point....: 0/1000 (0.00%)
Restore.Sub.#1...: Salt:0 Amplifier:0-1 Iteration:8056320-8056576
Candidate.Engine.: Device Generator
Candidates.#1....: 1234 -> 1124
Hardware.Mon.SMC.: Fan0: 100%
Hardware.Mon.#1..: Temp: 66c

[s]tatus [p]ause [b]ypass [c]heckpoint [f]inish [q]uit => 

而幸運解出密碼時,會顯示以下資訊,主要是 Status 會顯示 Cracked 而密碼則是紀錄在冒號後面 (:1234)

$itunes_backup$*10*c8c96e8d6175f1356da6dcf5791ad76be166232b4a01bd6974abb27c39034993591c15ba03a14e3b*10000*0ca3ccfc453b32f9ca9aceb754b87f4e0ab9cb95*10000000*bdee6869caa7999e9576f390a248a29f38d10d6f:1234
                                                          
Session..........: hashcat
Status...........: Cracked
Hash.Name........: iTunes backup >= 10.0
Hash.Target......: $itunes_backup$*10*c8c96e8d6175f1356da6dcf5791ad76b...d10d6f
Time.Started.....: Wed Aug 25 20:37:03 2021 (8 mins, 26 secs)
Time.Estimated...: Wed Aug 25 20:45:29 2021 (0 secs)
Kernel.Feature...: Pure Kernel
Guess.Mask.......: ?d?d?d?d [4]
Guess.Queue......: 1/1 (100.00%)
Speed.#1.........:        1 H/s (11.09ms) @ Accel:128 Loops:256 Thr:1 Vec:4
Recovered........: 1/1 (100.00%) Digests
Progress.........: 512/10000 (5.12%)
Rejected.........: 0/512 (0.00%)
Restore.Point....: 0/1000 (0.00%)
Restore.Sub.#1...: Salt:0 Amplifier:0-1 Iteration:9984-9999
Candidate.Engine.: Device Generator
Candidates.#1....: 1234 -> 1124
Hardware.Mon.SMC.: Fan0: 100%
Hardware.Mon.#1..: Temp: 65c

Started: Wed Aug 25 20:36:57 2021
Stopped: Wed Aug 25 20:45:30 2021

第二招:將可能的密碼寫在 myPasswordlist.txt 中去驗證,指令:

% cat myPasswords.txt 
5678
09876
1234

% hashcat -d 1 -m 14800 ./inputFromManifest.txt ./myPasswords.txt 
hashcat (v6.2.3) starting

OpenCL API (OpenCL 1.2 (Jun 17 2021 15:24:17)) - Platform #1 [Apple]
====================================================================
* Device #1: Intel(R) Core(TM) i5-7360U CPU @ 2.30GHz, 16320/16384 MB (4096 MB allocatable), 4MCU
* Device #2: Intel(R) Iris(TM) Plus Graphics 640, skipped

Minimum password length supported by kernel: 0
Maximum password length supported by kernel: 256

Hashes: 1 digests; 1 unique digests, 1 unique salts
Bitmaps: 16 bits, 65536 entries, 0x0000ffff mask, 262144 bytes, 5/13 rotates
Rules: 1

Optimizers applied:
* Zero-Byte
* Single-Hash
* Single-Salt
* Slow-Hash-SIMD-LOOP
* (null)

Watchdog: Temperature abort trigger set to 100c

Host memory required for this attack: 1 MB

Dictionary cache built:
* Filename..: ./myPasswords.txt
* Passwords.: 3
* Bytes.....: 16
* Keyspace..: 3
* Runtime...: 0 secs

The wordlist or mask that you are using is too small.     
This means that hashcat cannot use the full parallel power of your device(s).
Unless you supply more work, your cracking speed will drop.
For tips on supplying more work, see: https://hashcat.net/faq/morework

Approaching final keyspace - workload adjusted.           

$itunes_backup$*10*c8c96e8d6175f1356da6dcf5791ad76be166232b4a01bd6974abb27c39034993591c15ba03a14e3b*10000*0ca3ccfc453b32f9ca9aceb754b87f4e0ab9cb95*10000000*bdee6869caa7999e9576f390a248a29f38d10d6f:1234
                                                          
Session..........: hashcat
Status...........: Cracked
Hash.Name........: iTunes backup >= 10.0
Hash.Target......: $itunes_backup$*10*c8c96e8d6175f1356da6dcf5791ad76b...d10d6f
Time.Started.....: Wed Aug 25 20:52:58 2021 (10 secs)
Time.Estimated...: Wed Aug 25 20:53:08 2021 (0 secs)
Kernel.Feature...: Pure Kernel
Guess.Base.......: File (./myPasswords.txt)
Guess.Queue......: 1/1 (100.00%)
Speed.#1.........:        0 H/s (0.18ms) @ Accel:128 Loops:256 Thr:1 Vec:4
Recovered........: 1/1 (100.00%) Digests
Progress.........: 3/3 (100.00%)
Rejected.........: 0/3 (0.00%)
Restore.Point....: 0/3 (0.00%)
Restore.Sub.#1...: Salt:0 Amplifier:0-1 Iteration:9984-9999
Candidate.Engine.: Device Generator
Candidates.#1....: 5678 -> 1234
Hardware.Mon.SMC.: Fan0: 20%
Hardware.Mon.#1..: Temp: 58c

...

大概就這兩招筆記一下,未來忘記密碼時,就可以靠 hashcat 幫忙批次測試記憶中的密碼了

2021年2月3日 星期三

Flutter 開發文件之 iOS 與 Android 實作筆記 - 使用 Admob 以 Interstitial ads 為例


關於 flutter 使用 Admob 的架構,可參考網路上數篇文章:
此例筆記 iOS & Android 的設定方式,並且記錄碰到的錯誤訊息。

Android app 設定方式:

1. 更新 flutter_app/pubspec.yaml 添加 dependencies (記得要運行 flutter pub get)

firebase: ^8.0.0
firebase_admob: ^0.11.0+1

2. 安置從 Firebase 建立專案時得到的 google-services.json 檔案,擺在 flutter_app/android/app/ 中

3. 更新 flutter_app/android/build.gradle 的 buildscript -> dependencies 設定

//classpath 'com.android.tools.build:gradle:3.5.0'
// 為了修正錯誤訊息:error: unexpected element <queries> found in <manifest>.
classpath 'com.android.tools.build:gradle:4.0.0'
classpath 'com.google.gms:google-services:4.3.3'

4. 更新 flutter_app/android/gradle/wrapper/gradle-wrapper.properties 的 gradle 版本至 6.1.1

#為了修正錯誤訊息:Minimum supported Gradle version is 6.1.1. Current version is 5.6.2. If using the gradle wrapper
distributionUrl=https\://services.gradle.org/distributions/gradle-6.1.1-all.zip

5. 增加 flutter_app/app/build.gradle 的 apply 項目

apply plugin: 'com.google.gms.google-services'

6. 更新 flutter_app/android/app/src/main/AndroidManifest.xml 添加 meta data (僅範例程式數值)

<meta-data android:name="com.google.android.gms.ads.APPLICATION_ID" android:value="ca-app-pub-3940256099942544~3347511713"/>

7. 更新 flutter_app/lib/main.dart (此改自於範例程式,讓 add Button 可以產生一個插頁廣告)

iOS app 設定方式:

1. 更新 flutter_app/pubspec.yaml 添加 dependencies(記得要運行 flutter pub get)

firebase: ^8.0.0
firebase_admob: ^0.11.0+1

2. 安置從 Firebase 建立專案時得到的 GoogleService-Info.plist ,用 Xcode 打開專案,把 GoogleService-Info.plist 拖拉擺入跟 Info.plist 的同階目錄位置。

% open flutter_app/ios/Runner.xcworkspace
% ls flutter_app/ios/Runner/GoogleService-Info.plist

3. 更新 Info.plist 內容,添加資訊 GADApplicationIdentifier 等資訊(僅範例程式數值)

<key>GADApplicationIdentifier</key>
<string>ca-app-pub-3940256099942544~1458002511</string>
<key>SKAdNetworkItems</key>
  <array>
    <dict>
      <key>SKAdNetworkIdentifier</key>
      <string>cstr6suwn9.skadnetwork</string>
    </dict>
  </array>

4. 更新 Podfile ,上方添加 platform :ios, '10.0'

為了修正錯誤訊息: 
Automatically assigning platform `iOS` with version `9.0` on target `Runner` because no platform was specified. Please specify a platform for this target in your Podfile.

5. 更新 flutter_app/lib/main.dart (此改自於範例程式,讓 add Button 可以產生一個插頁廣告)

如此就收工啦!而 flutter_app/lib/main.dart 內容如下:

import 'package:flutter/material.dart';

import 'package:firebase_core/firebase_core.dart';
import 'package:firebase_admob/firebase_admob.dart';

Future<void> main() async {
  WidgetsFlutterBinding.ensureInitialized();
  await Firebase.initializeApp();
  runApp(MyApp());
}

class MyApp extends StatelessWidget {
  @override
  Widget build(BuildContext context) {
    return MaterialApp(
      title: 'Flutter Demo',
      theme: ThemeData(
        primarySwatch: Colors.blue,
        visualDensity: VisualDensity.adaptivePlatformDensity,
      ),
      home: MyHomePage(title: 'Flutter Demo Home Page'),
    );
  }
}

class MyHomePage extends StatefulWidget {
  MyHomePage({Key key, this.title}) : super(key: key);

  final String title;

  @override
  _MyHomePageState createState() => _MyHomePageState();
}

class _MyHomePageState extends State<MyHomePage> {
  int _counter = 0;

  MobileAdTargetingInfo targetingInfo = MobileAdTargetingInfo(
    keywords: <String>['flutterio', 'beautiful apps'],
    contentUrl: 'https://flutter.io',
    childDirected: true,
    nonPersonalizedAds: true,
  );

  InterstitialAd _interstitialAd;

  InterstitialAd createInterstitialAd() {
    return InterstitialAd(
      adUnitId: InterstitialAd.testAdUnitId,
      targetingInfo: targetingInfo,
      listener: (MobileAdEvent event) {
        print("InterstitialAd event $event");
      },
    );
  }

  @override
  void initState() {
    super.initState();
    FirebaseAdMob.instance.initialize(appId: FirebaseAdMob.testAppId);
    //_interstitialAd = createInterstitialAd()..load();
  }

  @override
  void dispose() {
    _interstitialAd?.dispose();
    super.dispose();
  }

  void _incrementCounter() {
    _interstitialAd?.dispose();
    _interstitialAd = createInterstitialAd()..load()..show();
    setState(() {
      _counter++;
    });
  }

  @override
  Widget build(BuildContext context) {
    return Scaffold(
      appBar: AppBar(
        title: Text(widget.title),
      ),
      body: Center(
        child: Column(
          mainAxisAlignment: MainAxisAlignment.center,
          children: <Widget>[
            Text(
              'You have pushed the button this many times:',
            ),
            Text(
              '$_counter',
              style: Theme.of(context).textTheme.headline4,
            ),
          ],
        ),
      ),
      floatingActionButton: FloatingActionButton(
        onPressed: _incrementCounter,
        tooltip: 'Increment',
        child: Icon(Icons.add),
      ), // This trailing comma makes auto-formatting nicer for build methods.
    );
  }
}


2021年1月22日 星期五

Flutter 開發文件之 iOS 與 Android 實作筆記 - 使用 Firebase 回報 App 使用人數


先說一下,有出類似文件教人怎樣使用 Firebase - Admob 部分,在此僅流水帳紀錄引用 firebase 的用法,體驗一下透過 Flutter 同時開發 ios 和 android app 時,並且使用額外函式庫的過程。

原理:

1. 使用 Android Studio + Flutter plugin 來建立 Flutter 專案
- 在此 package name 使用 org.changyy.study.flutter
- 自動產生 android Package Name = org.changyy.study.flutter_app
- 自動產生 iOS Bundle ID = org.changyy.study.flutterApp
- 假定專案位於 ~/AndroidStudioProjects/flutter_app

2. 建立 Firebase 專案
- 在此使用 org-changyy-study-flutter 作為 firebase project name

3. iOS app
- 使用 Xcode 置入 firebase 的設定檔案 GoogleService-Info.list
- 用指令打開專案 % open ~/AndroidStudioProjects/flutter_app/ios/Runner.xcworkspace/
- 使用 CocoaPods 添加 Firebase 函式庫
- 在 AppDelegate.swift 置入 Firebase 啟動程式碼

4. Android app
- 依照 Firebase 專案建置過程安置 google-service.json 檔案
- 在 <專案>/build.gradle 設置相依套件 com.google.gms:google-service:4.3.4
- 在 <專案>/app/build.gradle 添加 plugin 和引入 com.google.firebase:firebase-analytics

5. 回到 Flutter 專案,分別叫出 iOS simulator 跟 Android emulator 運行


若沒意外,就可以同時在這兩個模擬器上跑出來,並且在 Firebase 專案後臺,看到兩個使用者:


2019年9月18日 星期三

iOS 開發筆記 - 使用 Swift 完成 GA Measurement Protocol 實作

大概去年夏天,偶爾會寫一點 Swift 程式,雖然對 Objective c 比較熟,但時勢變遷就該順應潮流。那時採用 GoogleAnalytics 套件,但 Google Analytics for App 要在今年秋天下線了,Google一直要大家改用 Firebase ,且 Google 牌 cocoapods GoogleAnalytics 也的確幾年沒更新了。只是 Firebase 就明顯要人多花錢,例如要先把 Firebase 的數據匯入到 GA 上免錢,但有些查詢又要搞到 BigQuery 才行,雖然 BigQuery 有免費額度 啦 XD 因此趁 GA Measurement Protocol 還沒下線前,多用用他吧!把以前是 App Screen 就設法轉成 Web Pageview 吧,唯一的缺點是 Session 這類,若要硬做也是一招啦,在此就都不管了。

在此只包裝成 3 個函式供人使用即可,分別是取得 clientID、回報 pageview、回報 event 既可:

override func viewDidLoad() {
super.viewDidLoad()
// Do any additional setup after loading the view.

GAEvent(trackingID: "UA-########-#", clientID: getClientID(), eventCategory: "TestEC", eventAction: "TestEA", eventLabel: "TestEL", eventValue: 0)

GAPageView(trackingID: "UA-########-#", clientID: getClientID(), path:"/")
}

func getClientID() -> String {
// example
return UUID().uuidString
}

func GAPageView(trackingID:String, clientID:String, path:String ) {
var url = URLComponents(string: "https://www.google-analytics.com/collect")!
if trackingID.isEmpty || clientID.isEmpty || path.isEmpty {
return
}
url.queryItems = [
URLQueryItem(name: "v", value: "1"),
URLQueryItem(name: "tid", value: trackingID),
URLQueryItem(name: "cid", value: clientID),
URLQueryItem(name: "t", value: "pageview"),
URLQueryItem(name: "dh", value: "example.com"),
URLQueryItem(name: "dp", value: path),
]
//#if DEBUG
//url.queryItems?.append(URLQueryItem(name: "cd1", value: "DEBUG"))
//#endif
//if let appVersion = Bundle.main.infoDictionary?["CFBundleShortVersionString"] as? String, appVersion.isEmpty {
//    url.queryItems?.append(URLQueryItem(name: "cd2", value: appVersion))
//}

let request = URLRequest(url: url.url!)
let task = URLSession.shared.dataTask(with: request) {(data, response, error) in
//guard let data = data else { return }
//print(String(data: data, encoding: .utf8)!)
if let httpResponse = response as? HTTPURLResponse {
print("GAPageView: \(httpResponse.statusCode)" )
}
}
task.resume()
}

func GAEvent(trackingID:String, clientID:String, eventCategory:String, eventAction:String, eventLabel:String, eventValue:Int) {
var url = URLComponents(string: "https://www.google-analytics.com/collect")!
if trackingID.isEmpty || clientID.isEmpty || path.isEmpty {
return
}

url.queryItems = [
URLQueryItem(name: "v", value: "1"),
URLQueryItem(name: "tid", value: trackingID),
URLQueryItem(name: "cid", value: clientID),
URLQueryItem(name: "t", value: "event"),
URLQueryItem(name: "ec", value: eventCategory),
]
//#if DEBUG
//url.queryItems?.append(URLQueryItem(name: "cd1", value: "DEBUG"))
//#endif
//if let appVersion = Bundle.main.infoDictionary?["CFBundleShortVersionString"] as? String, appVersion.isEmpty {
//    url.queryItems?.append(URLQueryItem(name: "cd2", value: appVersion))
//}

if !eventAction.isEmpty {
url.queryItems?.append(URLQueryItem(name: "ea", value: eventAction))
if !eventLabel.isEmpty {
url.queryItems?.append(URLQueryItem(name: "el", value: eventAction))
if eventValue >= 0 {
url.queryItems?.append(URLQueryItem(name: "ev", value: "\(eventValue)"))
}
}
}

let request = URLRequest(url: url.url!)
let task = URLSession.shared.dataTask(with: request) {(data, response, error) in
//guard let data = data else { return }
//print(String(data: data, encoding: .utf8)!)
if let httpResponse = response as? HTTPURLResponse {
print("GAEvent: \(httpResponse.statusCode)" )
}
}
task.resume()
}


其中 getClientID() 只是個示意,因為每次呼叫 UUID().uuidString 都會產生一組新的,可以把它存起來使用,或是針對某些情境設計規劃,像是服務有提供登入機制時,就改用從 user id 計算得出等那類即可。

2019年2月10日 星期日

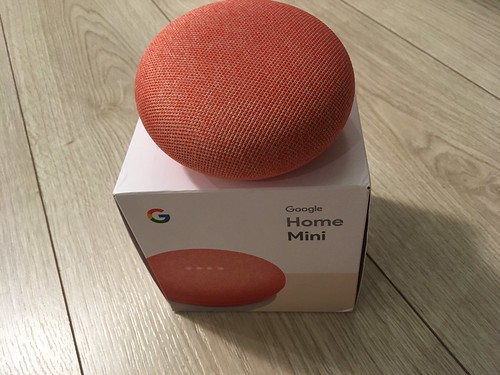
Google Home mini 中文音控設定 與 幼兒教育、長輩戲劇 應用?

GoogleHomeMini

2018年夏天因加速公司研究音控服務,自己買了一台 Google Home mini ,研究的差不多後就擺晾在一旁,今天整理了一下,想說該拍賣掉了 XD 意外發現已經支援中文音控! 可搜尋 "Google Home mini 中文設定教學" 囉!據說這招是需要兩隻 Android 手機也能達成,由於我本身是用 iPhone,就必須搭配另一隻 Android 手機

在此簡介環境,需要:
  1. Google Home mini
  2. Android 手機
  3. iPhone 手機 
  4. Android 手機安裝 Google Home app ; iPhone 安裝 Google Home app 
  5. Android phone 跟 iPhone 上的 Google Home app 都綁定同一個 Google 帳號
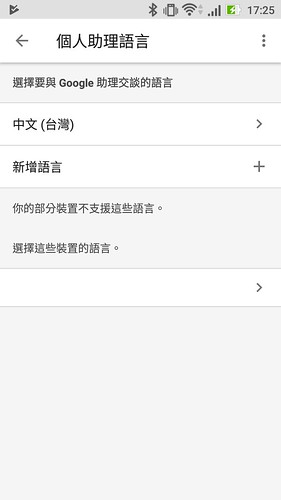
首先開啟 Android phone 上的 Google Home app => 右下角"帳戶" => 設定 => Google 助理 => 語言 => 第一語言設定成 "中文(台灣)",並將第二語言設定成 "無",且要讓最下方 "選擇這些裝置的語言" 留白,不做任何選擇 (此時若仍顯示英文,就來靠 iPhone 或另一隻手機處理)

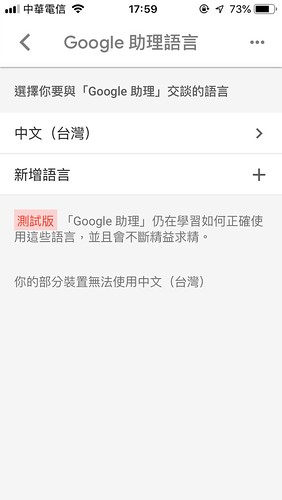
接著換 iPhone 開啟 Google Home app => 右下角"帳戶" => 往下滑到 "Google 助理" 區域,選擇 "更多設定" => 點擊 "Google 助理" 分頁 => "Google助理的聲音" => 把下方的英文也清掉,留下只有第一語言的中文(另外,iPhone 的 Google 助理語言不能選中文,要靠 Android phone 來處理)

後續你的 Google Home mini 就會講中文了!並且無論 Android 或 iPhone 的 Google Home mini ,進入 Google 助理 => 語言,都會看到最下方留白了:

Android Google助理-語言 iPhone Google助理-語言

接下來才是重頭戲 XD 若家裡也有 Chromecast 的話,小孩在吵的時候,就只要說:

OK Google, 請播放 Youtube 上的瑪莎與熊第一集

這樣就可以打發小孩了(誤),更別說還有一卡車正版戲劇可以隨叫隨播,長輩也能開開心心


當然,沒有 Chromecast 還有 Spotify !在台灣已經接近全平台可免費使用,可以直接說:

OK Google, 播放 K-POP 音樂

如此就可以聽聽韓流最新音樂,更別說南韓音樂的快速迭代,立刻有聽不完的韓流音樂

最後,無聊時可以多講講 OK Google ,想必小孩也會學的,接下來請谷歌小姐陪小孩講話唸故事了 XD

2019年1月31日 星期四

iOS 開發筆記 - [BoringSSL] nw_protocol_boringssl_input_finished, boringssl_context_alert_callback_handler, boringssl_session_errorlog, boringssl_session_handshake_error_print 處理方式

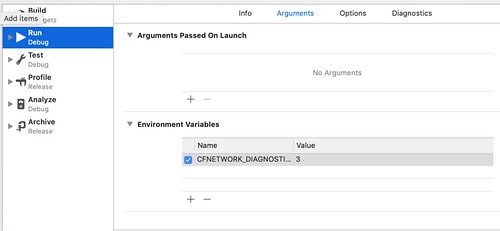
CFNETWORK_DIAGNOSTICS=3

看到以下訊息,完全摸不著頭緒:

[BoringSSL] nw_protocol_boringssl_input_finished(1543) [C294.1:2][0x11f2823d0] Peer disconnected during the middle of a handshake. Sending errSSLClosedNoNotify(-9816) alert
TIC TCP Conn Failed [294:0x2812a5a40]: 3:-9816 Err(-9816)
[BoringSSL] nw_protocol_boringssl_input_finished(1543) [C295.1:2][0x108589540] Peer disconnected during the middle of a handshake. Sending errSSLClosedNoNotify(-9816) alert
TIC TCP Conn Failed [295:0x2812d0540]: 3:-9816 Err(-9816)
[BoringSSL] boringssl_context_alert_callback_handler(3724) [C296.1:2][0x108450060] Alert level: fatal, description: inappropriate fallback
[BoringSSL] boringssl_session_errorlog(224) [C296.1:2][0x108450060] [boringssl_session_handshake_incomplete] SSL_ERROR_SSL(1): operation failed within the library
[BoringSSL] boringssl_session_handshake_error_print(205) [C296.1:2][0x108450060] 4838922792:error:1000043e:SSL routines:OPENSSL_internal:TLSV1_ALERT_INAPPROPRIATE_FALLBACK:/BuildRoot/Library/Caches/com.apple.xbs/Sources/boringssl/boringssl-109.230.1/ssl/tls_record.cc:586:SSL alert number 86
[BoringSSL] boringssl_context_get_error_code(3617) [C296.1:2][0x108450060] SSL_AD_INAPPROPRIATE_FALLBACK
TIC TCP Conn Failed [296:0x2812d0a80]: 3:-9860 Err(-9860)
NSURLSession/NSURLConnection HTTP load failed (kCFStreamErrorDomainSSL, -9860)
Task <FAB06FFC-73C2-48D8-AAEA-750F2FCF1969>.<0> HTTP load failed (error code: -1200 [3:-9860])
NSURLConnection finished with error - code -1200


最後拜讀 StackOverflow - XCode 9 iOS 11 BoringSSL SSL_ERROR_ZERO_RETURN 可以定義 CFNETWORK_DIAGNOSTICS = 3 數值來 debug,並透過 Xcode's scheme 管理環境變數即可,收工!

2018年5月14日 星期一

iOS App 開發筆記 - 關於 case sensitive 檔案系統與 CocoaPods 和 Ruby/Gems 的處理

某天重灌 macOS 時,把主硬碟弄成 case sensitive ,想說自己都很熟悉 linux server 的行為,殊不知替自己埋了很多坑。首先,如果用 CocoaPods 維護套件時,別人的程式碼不見得會依照此規範,同理在 Ruby/Gems 更是如此。

解法?先切一個 partition 不區分大小寫吧!在把 Xcode build code 的暫存區也移至該 partition 來解!

未來還是推薦用 case insensitive 的 partition 吧 Orz 想搞龜毛還是用另一區,千萬別要跟青春過意不去啊。

將 Xcode build 臨時區移走:

$ mv ~/Library/Developer/Xcode/DerivedData/ ~/Library/Developer/Xcode/DerivedData-bak/
$ mkdir /Volumes/Data/XcodeDerivedData
$ ln -s /Volumes/Data/XcodeDerivedData ~/Library/Developer/Xcode/DerivedData


如此一來,關於 Xcode 與 CocoaPods 的大小寫問題應當可以解了,但...如果 build code 過程還有搭配 ruby script 做事,很抱歉,請自己改 ruby 了 Orz 例如:

require 'CFPropertyList'

很抱歉,在 Ruby 的 CFPropertyList 套件中,他實際是小寫的 Orz 請看:

https://github.com/ckruse/CFPropertyList/tree/master/lib

最重要的,這類還可能搞壞 gem 的管理狀態,這時解法就有點痛苦了,絕對不是三兩句就解掉的。

2016年4月25日 星期一

[PHP] Use iTunesConnect API to Add iOS App External Test User

其實,已經有 TestFlight 很方便了,但基於一些練習,就稍微仿別人做過的流程練習一下,原理不難:

  1. 使用 cURL + cookie 完成登入 iTunesConnect
  2. 切換至 App 頁面資訊,查看有多少 Test User
  3. 添加 Test User
  4. 刪除 Test User
如此而已 :P 於是乎,用 https://github.com/changyy/codeigniter-library-ios-test-user 紀錄一下。

2015年11月25日 星期三

iOS 開發筆記 - 把玩 Chromecast SDK 播放網路連結(圖片、影片)

買了一隻 Chromecast ,除了試用產品外,也想試試看 Chromecast SDK 。快速翻了一下 iOS App Development - ios sender 文件,還是不得其門而入 XD 最後還是乖乖看範例程式:https://github.com/googlecast/CastVideos-ios

簡言之,我是使用 Cocoapods 管理 Chromecast SDK 的:

$ vim Podfile
pod 'google-cast-sdk'
pod 'google-cast-remote-display-sdk'


接著寫一點程式,參考 CastVideos-ios 內的 CastDeviceController 範例了解整個流程。

總之,若要簡單播放一個 URL ,需要依序完成以下動作:

  1. 搜尋 chromecast device 並實作 GCKDeviceScannerListener 偵測裝置
    • GCKFilterCriteria *filterCriteria = [GCKFilterCriteria criteriaForAvailableApplicationWithID:kGCKMediaDefaultReceiverApplicationID];
    • self.chromecastScanner = [[GCKDeviceScanner alloc] initWithFilterCriteria:filterCriteria];
    • [self.chromecastScanner addListener:self];
    • [self.chromecastScanner startScan];
  2. 透過 - (void)deviceDidComeOnline:(GCKDevice *)device 偵測到後,進行連線
    • self.chromecastManager = [[GCKDeviceManager alloc] initWithDevice:self.chooseDevice clientPackageName:[NSBundle mainBundle].bundleIdentifier];
    • self.chromecastManager.delegate = self;
    • [self.chromecastManager connect];
  3. 連線裝置後,透過 Launch application 跟 Chromecast Device 進行溝通
    • [self.chromecastManager launchApplication:kGCKMediaDefaultReceiverApplicationID];
  4. 透過 - (void)deviceManager:(GCKDeviceManager *)deviceManager didConnectToCastApplication:(GCKApplicationMetadata *)applicationMetadata sessionID:(NSString *)sessionID launchedApplication:(BOOL)launchedApplication; 偵測完成 chromecast app 程式啟動並建立 GCKMediaControlChannel
    • self.mediaControlChannel = [[GCKMediaControlChannel alloc] init];
    • self.mediaControlChannel.delegate = self;
    • [deviceManager addChannel:self.mediaControlChannel];
    • [self.mediaControlChannel requestStatus];
  5. 播放 Resource,以 http://www.w3schools.com/html/mov_bbb.mp4 為例
    • NSMutableArray *tracks = [[NSMutableArray alloc] init];
    • GCKMediaMetadata *metadata = [[GCKMediaMetadata alloc] initWithMetadataType:GCKMediaMetadataTypeGeneric];
    • GCKMediaInformation *mi = [[GCKMediaInformation alloc] initWithContentID:@"http://www.w3schools.com/html/mov_bbb.mp4" streamType:GCKMediaStreamTypeNone contentType:nil metadata:metadata streamDuration:0 mediaTracks:tracks textTrackStyle:[GCKMediaTextTrackStyle createDefault] customData:nil];
    • [self.mediaControlChannel loadMedia:mi autoplay:YES];

如此一來 Chromecast device 就會播放指定的連結啦。

2015年10月13日 星期二

iOS 開發筆記 - 處理 Simulator 上 Keyboard 沒顯示的問題

原來 iOS 8 Simulator 操作習慣改了,預設對應到實體鍵盤,若需要顯示虛擬鍵盤有兩種方式:
  1. iOS Simulator -> Hardware -> Keyboard -> 取消 Connect Hardware Keyboard
  2. 在 iOS Simulator 操作環境上,使用快速鍵呼叫:shift + command + K

2015年10月4日 星期日

iOS 開發筆記 - 修正 Launch Image 失效問題

LaunchImage
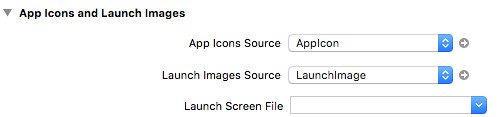
換了 Xcode 7.0.1 後,想說認真一下填滿 Images.xcassets 中的 LaunchImage,但始終沒有成功,總覺得一直讀取 Storyboard 的資料!

最後終於搞懂了,記得清空 Launch Screen File 欄位就沒問題啦。

若有碰到 ERROR ITMS-90475 iPad Multitasking support 的問題,再到 info.plist 塞入:

<key>UIRequiresFullScreen</key>
<string>YES</string>


即可解決。

2015年10月3日 星期六

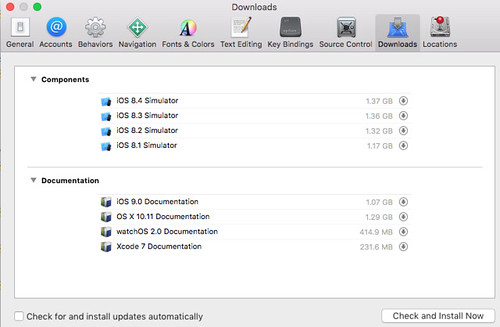
iOS 開發筆記 - 下載舊版 Simulator,如 iOS 8 Simulator

Download iOS Simulator

記得很久以前,我還有把 Xcode 3,4 系列燒成光碟,為的就是舊版 simulator,後來不知不覺就都不需要,甚至把玩 app 都直接用最新版 iOS siumulator 跟 sdk 了。不過這次 iOS 9 跟 iOS 8 有一些 layout 問題,所以還是找一下舊版 simulator 吧!

Xcode -> Preferences -> Downloads 或是 iOS Simulator -> Hardware -> Device -> Manage Devices -> 左下角 + -> iOS Version -> Download more simulators 。

此外,有人說在 OS X EI Capitan 已不支援 iOS 7 Simulator 了 :P 所以在此版本的作業系統下載不到。

另外一提,安裝 Simulator 需要用高級權限 Orz 不然會有以下訊息:

Cloud not download and install iOS 8.x Simulator.

高級權限的方式:

sudo /Applications/Xcode.app/Contents/MacOS/Xcode

iOS 開發筆記 - iOS9 存取外部資源失敗與解決方式 (App Transport Security & Info.plist & URL Scheme)

iOS 9 引入了外部資源存取的限制(App Transport Security),例如 App 操作過程中,對網路上的資料發送 requests 要求資料時,會被擋下來。這個影響的範圍滿廣的,例如做 QRCode app 時,掃描到 URL 時,開啟 UIWebView 卻無法瀏覽,或是在 UIWebView 呈現網頁時,塞一個 <img> tag 進去卻顯示不出來。

類似錯誤訊息:
  • App Transport Security has blocked a cleartext HTTP (http://) resource load since it is insecure. Temporary exceptions can be configured via your app's Info.plist file.
  • NSURLSession/NSURLConnection HTTP load failed (kCFStreamErrorDomainSSL, -9802)
若有用 FB SDK ,也會出現:
  • FBSDKLog: WARNING: FBSDK secure network request failed. Please verify you have configured your app for Application Transport Security compatibility described at https://developers.facebook.com/docs/ios/ios9
解法就是設定 Info.plist,在 iOS9 多了個 NSAppTransportSecurity 項目可以設定,可以參考 FB SDK 文件( https://developers.facebook.com/docs/ios/ios9 ),若 App 無法限制存取的來源(像QRCode App),那只好設定 NSAllowsArbitraryLoads = YES 啦

此外,對於判斷 URL Scheme 也是個問題,例如常見判斷 JB 的方式:

[[UIApplication sharedApplication] canOpenURL:[NSURL URLWithString:@"cydia://package/com.example.package"]]

也有類似的資源限制問題:

-canOpenURL: failed for URL: "cydia://package/com.example.package" - error: "This app is not allowed to query for scheme cydia"

這時也得設定 LSApplicationQueriesSchemes 參數來處理,設定完會變成:

-canOpenURL: failed for URL: "cydia://package/com.example.package" - error: "(null)"

2015年9月3日 星期四

iOS 開發筆記 - Push Notification 收到 SSL operation failed with code 1. OpenSSL Error messages: error:1409F07F:SSL routines:SSL3_WRITE_PENDING:bad write retry 和 SSL Broken

網路上的一些討論:

  • get SSL Broken pipe error when try to make push notification - http://stackoverflow.com/questions/2626054/get-ssl-broken-pipe-error-when-try-to-make-push-notification
  • APNS SSL operation failed with code 1 - http://stackoverflow.com/questions/18378534/apns-ssl-operation-failed-with-code-1
簡言之,批次處理發訊動作時,其中有一個 notification token 失效時,會導致與 Apple Notification Server 的連線中斷 Orz 例如發 500 個,其中第二個壞了,會導致後面 498 個無法使用前一次的連線,要記得處理一下。解法就是要去偵測連線是否中斷,一旦中斷後要重連。

2015年8月8日 星期六

iOS 開發筆記 - 呼叫外部程式來處理一些資源(URL Scheme)

把一些 resource 轉交給外部程式,常見的就是 URL Scheme 技巧。

已知 URL scheme ,判斷是否支援:

if ([[UIApplication sharedApplication] canOpenURL:url])
    [[UIApplication sharedApplication] openURL:url];


若是 file:// 開頭的,可以用這試試:

UIDocumentInteractionController *dic = [UIDocumentInteractionController interactionControllerWithURL:url];
[dic presentOptionsMenuFromRect:self.view.bounds inView:self.view animated:YES];


其他,可以用這試試:

UIActivityViewController *avc = [[UIActivityViewController alloc] initWithActivityItems:@[url] applicationActivities:nil];
[self presentViewController:avc animated:YES completion:nil];

2015年4月21日 星期二

iOS 開發筆記 - 製作 iOS Simulator app 版本送交給 Facebook 進行 review (creating-ios-simulator-build-for-review)

似乎...Facebook SDK 文件沒找到?只好隨意 Google 一些資料

$ cd /path/project
$ xcodebuild -showsdks
OS X SDKs:
OS X 10.9                     -sdk macosx10.9
OS X 10.10                     -sdk macosx10.10

iOS SDKs:
iOS 8.3                       -sdk iphoneos8.3

iOS Simulator SDKs:
Simulator - iOS 8.3           -sdk iphonesimulator8.3

$ xcodebuild -arch i386 -sdk iphonesimulator8.3


若用 CocoaPods (碰到 ld: library not found for -lPods-XXX ) 或 xcworkspace 維護的,需要多一點指令:

$ xcodebuild -arch i386 -sdk iphonesimulator8.3 -workspace YourName.xcworkspace -scheme YourName

接著,想執行看看:

$ ios-sim launch /Users/user/Library/Developer/Xcode/DerivedData/YourName-xxxxxx/Build/Products/Debug-iphonesimulator/YourName.app

其中 ios-sim 可以逛一下這邊:https://github.com/phonegap/ios-sim

2015年4月13日 星期一

iOS 開發筆記 - 使用 Facebook SDK 4.0 分享至塗鴉牆與簡易的 publish_actions 權限判斷流程

大概都遵循 Facebook 文件,這邊指紀錄在一個 ViewController 中,啟動分享至使用者塗鴉牆的流程,包括判斷使用者是否安裝過 Facebook app、是否授權 publish_actions 等,以及選擇用 Facebook app 分享或是用 Facebook SDK 分享等。

#import <FBSDKCoreKit/FBSDKCoreKit.h>
#import <FBSDKShareKit/FBSDKShareLinkContent.h>
#import <FBSDKShareKit/FBSDKShareDialog.h>
#import <FBSDKShareKit/FBSDKShareAPI.h>
#import <FBSDKShareKit/FBSDKShareOpenGraphAction.h>

#import <FBSDKLoginKit/FBSDKLoginManager.h>
#import <FBSDKLoginKit/FBSDKLoginManagerLoginResult.h>

@interface ViewController () <FBSDKSharingDelegate>
@property (nonatomic, strong) NSString *url;
@end

@implementation ViewController

#pragma mark - FBSDKSharingDelegate

- (void)sharer:(id<FBSDKSharing>)sharer didCompleteWithResults:(NSDictionary *)results {
    UIAlertView *alertView = [[UIAlertView alloc] initWithTitle:@"INFO" message:@"done" delegate:nil cancelButtonTitle:@"ok" otherButtonTitles: nil];
    [alertView show];
}

- (void)sharer:(id<FBSDKSharing>)sharer didFailWithError:(NSError *)error {
    UIAlertView *alertView = [[UIAlertView alloc] initWithTitle:@"INFO" message:@"error" delegate:nil cancelButtonTitle:@"ok" otherButtonTitles: nil];
    [alertView show];
}

- (void)sharerDidCancel:(id<FBSDKSharing>)sharer {
    UIAlertView *alertView = [[UIAlertView alloc] initWithTitle:@"INFO" message:@"cancel" delegate:nil cancelButtonTitle:@"ok" otherButtonTitles: nil];
    [alertView show];
}

#pragma mark - share methods

- (void)useFacebookApp {
    FBSDKShareLinkContent *content = [[FBSDKShareLinkContent alloc] init];
    content.contentURL = [NSURL URLWithString:self.url];
    [FBSDKShareDialog showFromViewController:self
                                 withContent:content
                                    delegate:nil];
}

- (void)useFacebookSDK {
    FBSDKShareLinkContent *content = [[FBSDKShareLinkContent alloc] init];
    content.contentURL = [NSURL URLWithString:self.url];
    [FBSDKShareAPI shareWithContent:content delegate:self];
}

#pragma mark - init action

- (void)doShare
{
    if (![FBSDKAccessToken currentAccessToken]) {
        FBSDKLoginManager *login = [[FBSDKLoginManager alloc] init];
        [login logInWithPublishPermissions:@[@"publish_actions"] handler:^(FBSDKLoginManagerLoginResult *result, NSError *error) {
            if (error) {
                // Process error
                NSLog(@"Process error");
            } else if (result.isCancelled) {
                // Handle cancellations
            } else {
                if ([result.grantedPermissions containsObject:@"publish_actions"]) {
                    [self useFacebookSDK];
                } else {
                    [self useFacebookApp];
                }
            }
        }];
        return;
    } else if ([[FBSDKAccessToken currentAccessToken] hasGranted:@"publish_actions"]) {
        [self useFacebookSDK];
    } else {
        [self useFacebookApp];
    }
    return;
}

@end

2015年4月9日 星期四

iOS 開發筆記 - Terminating app due to uncaught exception 'NSInvalidArgumentException', reason: '*** -[__NSPlaceholderArray initWithObjects:count:]: attempt to insert nil object from objects[0]'

閒暇時,追了這個 bug 很久...

主因是 source code 又沒看到 NSPlaceholderArray 關鍵字,最後才發現這是只是單純的 NSArray 相關更動事件。

要找的關鍵處有幾個:
  • [arrayObject addObject:object];
  • [arrayObject addObjectsFromArray:arrayObject];
  • [NSArray arrayWithObject:object];
  • ...
結果漏了一個生成 NSArray 很好用的語法:
  • @[]
出包之處就是 @[] 相關動作啦,例如 @[obj1, obj2, obj3]; 其中有個 object 是 nil 啦

2015年4月3日 星期五

iOS 開發筆記 - 使用 Facebook iOS SDK 4 之處理 FBSDKLoginManager result.isCancelled = true 問題

很久沒用 FB iOS SDK 了,一不小心發現已經進入到 4.0 版本,接著一堆 code 失效 Orz 接著,又來適應一下新板 SDK 的情況。

看著文件刻了一下:

#import <FBSDKCoreKit/FBSDKCoreKit.h>
#import <FBSDKLoginKit/FBSDKLoginManager.h>
#import <FBSDKLoginKit/FBSDKLoginManagerLoginResult.h>
- (void)testFB {
    if (![FBSDKAccessToken currentAccessToken]) {
        NSLog(@"do login");
     
        FBSDKLoginManager *login = [[FBSDKLoginManager alloc] init];
        [login logInWithPublishPermissions:@[@"publish_actions"] handler:^(FBSDKLoginManagerLoginResult *result, NSError *error) {
            if (error) {
                // Process error
                NSLog(@"Process error");
            } else if (result.isCancelled) {
                // Handle cancellations
                NSLog(@"Handle cancellations: %@, %@, %@", result, result.grantedPermissions, [FBSDKAccessToken currentAccessToken]);
            } else {
                if ([result.grantedPermissions containsObject:@"publish_actions"]) {
                    NSLog(@"with publish_actions");
                } else {
                    NSLog(@"without publish_actions");
                }
            }
        }];
        return;
    } else if ([[FBSDKAccessToken currentAccessToken] hasGranted:@"publish_actions"]) {
        NSLog(@"use publish_actions");
    }
 
    NSLog(@"token: %@", [FBSDKAccessToken currentAccessToken]);
}


很奇妙地,無論使用者如何授權此 Facebook app ,永遠都會落入 result.isCancelled == true 的事件中,然後 token 永遠都 null。

追了一下,原來還要設定 AppDelegate 太久沒用都忘記了,啊 FB iOS SDK 文件上也沒提醒 Orz

- (BOOL)application:(UIApplication *)application openURL:(NSURL *)url sourceApplication:(NSString *)sourceApplication annotation:(id)annotation {
    return [[FBSDKApplicationDelegate sharedInstance] application:application
                                                          openURL:url
                                                sourceApplication:sourceApplication
                                                       annotation:annotation];
}


如此一來,有幾種情境就都能抓到了:
  • 使用者不想授權此 app => Handle cancellations
  • 使用者授權此 app ,但不想給 publish_actions 權限 => without publish_actions
  • 使用者授權此 app ,並給予 publish_actions 權限 => with publish_actions

2015年3月10日 星期二

Facebook 開發筆記 - 使用單一 Facebook app 仿 OAuth 架構提供單多平台多 app 登入使用

由於 Facebook app 在任何平台上,只能允許一個 app,例如 iOS platform 就只能綁定一個 iOS app,如果想要多個 iOS app 都用同一款 Facebook app 時,就出現了這奇妙的需求 :P

因此,再次包裝的方式,那就是用 UIWebview/WebView 來解吧!對於任何一款 Mobile app 都是採用 Browser 來完成登入的。而 Backend service 是維持採用同一款 Facebook app。

原理:主體是以 Facebook Javascript SDK 來使用,當完成 Facebook app 登入認證後,將 Javascript 端取得的 Facebook app token 丟給 backend service ,驗證後交換成自家 service token,未來用自己的 service token 來進行服務互動。

以上狀態僅需依照 Facebook SDK Javascript 文件已經可以完成大半了:

FB.getLoginStatus(function(response) {
  if (response.status === 'connected') {
    console.log('get facebook app token');
  }
  else {
    FB.login();
  }
});


在 response.status === 'connected' 就能取得 facebook token,再轉呼叫自家 service 來交換 token 即可收工。

然而?事情不是那麼簡單的 XD 在 mobile platform 環境上,用 chrome browser 或是 safari 都可以正常工作,唯獨 PhoneGap 等類似架構會出錯,主因是 Facebook SDK Javascript 登入時,會彈跳視窗,結束後可以再導回來,但在 PhoneGap 架構上,可能受限於沒有分頁機制而出錯?總之,解法:自行用 direct_url 跟 Facebook 互動吧!這招印象中是在寫 server side 的用法:

當使用者點擊 login 時,不要用 Facebook Javascript SDK,而是將網址導向到:

https://www.facebook.com/dialog/oauth?client_id=YourFacebookAppID&redirect_uri=http://localhostOrServiceWebURL/&response_type=token&scope=publish_stream,email

當使用者完成登入後,將導回你指定的位置,而這時在 FB.getLoginStatus 時,又可以正常取得 response.status === 'connected' 等資訊了。