2015年10月30日 星期五

[Linux] Python Fabric - 在 SSH 架構上,進行服務部署 @ Ubuntu 14.04

強者同事又獻技 fab 指令,從官網簡介:

Fabric is a Python (2.5-2.7) library and command-line tool for streamlining the use of SSH for application deployment or systems administration tasks.

原來如此!我還活在播接時代再把玩 bash script XDD 其實之前也有試過一些同時發 ssh remote command 的工具,但悲劇收場後,就沒再用了,現在就在來吸收這套吧!

$ sudo apt-get install fabric
$ fab
Fatal error: Couldn't find any fabfiles!

Remember that -f can be used to specify fabfile path, and use -h for help.

Aborting.


是的, fab 指令會尋找當前目錄下的 fabfile.py:

$ vim fabfile.py
def hello(what):
print 'hello ' + str(what)


$ fab hello:world
hello world

Done.


非常簡潔明瞭,反正 fab 後面接的字串就是個 fabfile.py 裡定義的函數,冒號後面就是給進去的參數。接著要寫一些遠端部署指令就是寫個 function 定義一些想傳的參數,接著就愉快地寫 python 就好!可以省去用一堆 ssh target_host "remote_command" 的方式了!

$ vim fabfile.py
from fabric.api import run, task, execute, runs_once
from fabric.colors import green, magenta
import fabric.api as api

@task(default=True)
def heartbeat():
        _info("hearbeat")
run("date")

def _info(message):
        print green(message + " on %s" % api.env.host_string)

def _warn(message):
        print magenta(message + " on %s" % api.env.host_string)
$ fab
hearbeat on None
No hosts found. Please specify (single) host string for connection: localhost
[localhost] run: date
[localhost] Login password for 'user':
[localhost] out: Fri Oct 30 12:51:51 UTC 2015
[localhost] out:


Done.
Disconnecting from localhost... done.

$ fab -H localhost
[localhost] Executing task 'heartbeat'
hearbeat on localhost
[localhost] run: date
[localhost] Login password for 'user':
[localhost] out: Fri Oct 30 12:53:09 UTC 2015
[localhost] out:


Done.
Disconnecting from localhost... done.


接下來,就可以想想一連串的行為了!

[Linux] 架設私有 Yum Server 服務 @ CentOS 6.6

經強者同事的經驗傳授,對於線上服務機器應追蹤限定軟體的使用版本,可降低環境複雜度,以便偵錯。因此,學一下架設 YUM Server 來提供服務吧!

原理就是挑一台機器留個 30GB 空間,把官方的 Packages 都下載回來,接著更新其他台機器的 repo 位置即可。此例以 CentOS 6.6 x86_64 為例。

$ yum install yum-arch createrepo nginx

其中 nginx 只是為了 web server 而已,這是 CentOS yum server 架構,透過 filesytem + sqlite + http server。

$ yum install nginx
$ service nginx start
$ mkdir -p /var/www
$ ln -s /usr/share/nginx/html/ /var/www/html


接著要將資料 Yum package 都下載下來,先確認來源是不是官方版,也可以將 /etc/yum.repos.d/ 清到只剩 CentOS-Base.repo 檔案即可:

$ vim /etc/yum.repos.d/CentOS-Base.repo
[base]
name=CentOS-$releasever - Base
baseurl=http://mirror.centos.org/centos/$releasever/os/$basearch/
gpgcheck=1
gpgkey=file:///etc/pki/rpm-gpg/RPM-GPG-KEY-CentOS-6

#released updates
[updates]
name=CentOS-$releasever - Updates
baseurl=http://mirror.centos.org/centos/$releasever/updates/$basearch/
gpgcheck=1
gpgkey=file:///etc/pki/rpm-gpg/RPM-GPG-KEY-CentOS-6

#additional packages that may be useful
[extras]
name=CentOS-$releasever - Extras
baseurl=http://mirror.centos.org/centos/$releasever/extras/$basearch/
gpgcheck=1
gpgkey=file:///etc/pki/rpm-gpg/RPM-GPG-KEY-CentOS-6

#additional packages that extend functionality of existing packages
[centosplus]
name=CentOS-$releasever - Plus
baseurl=http://mirror.centos.org/centos/$releasever/centosplus/$basearch/
gpgcheck=1
enabled=0
gpgkey=file:///etc/pki/rpm-gpg/RPM-GPG-KEY-CentOS-6

$ mkdir -p /var/www/html/centos/6/sync
$ cd /var/www/html/centos/6/sync
$ time reposync --repoid=updates --repoid=extras --repoid=base --repoid=centosplus
...
$ createrepo /var/www/html/centos/6/sync/base/
$ createrepo /var/www/html/centos/6/sync/updates/
$ createrepo /var/www/html/centos/6/sync/extras/
$ createrepo /var/www/html/centos/6/sync/centosplus/
Spawning worker 0 with ### pkgs
Workers Finished
Gathering worker results

Saving Primary metadata
Saving file lists metadata
Saving other metadata
Generating sqlite DBs
Sqlite DBs complete

$ mkdir -p /var/www/html/centos/6/updates /var/www/html/centos/6/extras/ /var/www/html/centos/6/os/ /var/www/html/centos/6/centosplus /var/www/html/centos/6/contrib
$ cd /var/www/html/centos/6/updates && ln -s ../sync/updates/ x86_64 && cd -
$ cd /var/www/html/centos/6/extras && ln -s ../sync/extras/ x86_64 && cd -
$ cd /var/www/html/centos/6/os && ln -s ../sync/base/ x86_64 && cd -
$ cd /var/www/html/centos/6/centosplus && ln -s ../sync/centosplus/ x86_64 && cd -


如此一來,搭配 web server 就可以存取這些位置:

http://public_ip/centos/6/updates
http://public_ip/centos/6/extras
http://public_ip/centos/6/os
http://public_ip/centos/6/centosplus


接著,其他 yum client 的 /etc/yum.repos.d/CentOS-Base.repo 位置更新為:

[base]
name=CentOS-$releasever - Base
baseurl=http://public_ip/centos/$releasever/os/$basearch/
gpgcheck=1
gpgkey=file:///etc/pki/rpm-gpg/RPM-GPG-KEY-CentOS-6

#released updates
[updates]
name=CentOS-$releasever - Updates
baseurl=http://public_ip/centos/$releasever/updates/$basearch/
gpgcheck=1
gpgkey=file:///etc/pki/rpm-gpg/RPM-GPG-KEY-CentOS-6

#additional packages that may be useful
[extras]
name=CentOS-$releasever - Extras
baseurl=http://public_ip/centos/$releasever/extras/$basearch/
gpgcheck=1
gpgkey=file:///etc/pki/rpm-gpg/RPM-GPG-KEY-CentOS-6

#additional packages that extend functionality of existing packages
[centosplus]
name=CentOS-$releasever - Plus
baseurl=http://public_ip/centos/$releasever/centosplus/$basearch/
gpgcheck=1
enabled=0
gpgkey=file:///etc/pki/rpm-gpg/RPM-GPG-KEY-CentOS-6


接著在做個 yum update 後,其 packages 即可被控管使用,而製作私有的 package 時,大概就多添加個區段,並把 gpgcheck 設定成 0:

$ cat /etc/yum.repos.d/self.repo
[self]
name=SelfYumServer-$releasever
baseurl=http://public_ip/centos/$releasever/self/$basearch/
gpgcheck=0
gpgkey=file:///etc/pki/rpm-gpg/RPM-GPG-KEY-CentOS-6


此外,對於私有 Yum server 來說,每次變動 /var/www/html/centos/6/self/x64_86/Packages 後,都必須執行 createrepo /var/www/html/centos/6/self/x64_86/ 來更新狀態,如此一來別人就能找到。

最後,若 client 出現無法找到最新版的情況,請試試在 client server 清掉 cache,屆時重應該就會找到:

$ yum clean metadata dbcache 或 $ yum clean all

2015年10月29日 星期四

[Linux] PostgreSQL 9.4 簡易筆記 - 建立資料庫、使用者、索引 @ Ubuntu 14.04

安裝:

$ sudo apt-get install postgresql-9.4

列出已存在的資料庫:

$ sudo -u postgres psql -l
                                  List of databases
   Name    |  Owner   | Encoding |   Collate   |    Ctype    |   Access privileges
-----------+----------+----------+-------------+-------------+-----------------------
 postgres  | postgres | UTF8     | en_US.UTF-8 | en_US.UTF-8 |
 template0 | postgres | UTF8     | en_US.UTF-8 | en_US.UTF-8 | =c/postgres          +
           |          |          |             |             | postgres=CTc/postgres
 template1 | postgres | UTF8     | en_US.UTF-8 | en_US.UTF-8 | =c/postgres          +
           |          |          |             |             | postgres=CTc/postgres
(3 rows)


建立資料庫:

$ sudo -u postgres createdb MyDB

刪除資料庫:

$ sudo -u postgres dropdb MyDB

建立使用者(-P: 建立密碼, -l: 有登入權限[預設], -L: 禁止登入, -s: 超級使用者, -d: 建立資料庫權限):

$ sudo -u postgres createuser -P -s -d -l root
$ sudo -u postgres createuser -s -d -l user1
$ sudo -u postgres createuser -s -l user2
$ sudo -u postgres createuser -l user3
$ sudo -u postgres createuser -d user4
$ sudo -u postgres createuser -s user5


列出使用者列表:

$ sudo -u postgres psql -c "SELECT * FROM pg_user";
 usename  | usesysid | usecreatedb | usesuper | usecatupd | userepl |  passwd  | valuntil | useconfig
----------+----------+-------------+----------+-----------+---------+----------+----------+-----------
 postgres |       10 | t           | t        | t         | t       | ******** |          |
 user1    |    ####1 | t           | t        | t         | f       | ******** |          |
 user2    |    ####2 | t           | t        | t         | f       | ******** |          |
 user3    |    ####3 | f           | f        | f         | f       | ******** |          |
 user4    |    ####4 | t           | f        | f         | f       | ******** |          |
 user5    |    ####5 | t           | t        | t         | f       | ******** |          |
 root     |    ####6 | t           | t        | t         | f       | ******** |          |
(7 rows)


刪除帳號:

$ sudo -u postgres dropuser user1
$ sudo -u postgres dropuser user2
$ sudo -u postgres dropuser user3
$ sudo -u postgres dropuser user4
$ sudo -u postgres dropuser user5


遠端登入資料庫(資料庫跟使用者必須先建立):

$ sudo -u postgres createdb helloworld
$ sudo -u postgres createuser -P -l user1
$ sudo -u postgres createuser -P -L user2

$ psql -h localhost -U user1
Password for user user1:
psql: FATAL:  database "user1" does not exist

$ psql -h localhost -U user1 -d helloworld
Password for user user1:
psql (9.4.4)
SSL connection (protocol: TLSv1.2, cipher: ECDHE-RSA-AES256-GCM-SHA384, bits: 256, compression: off)
Type "help" for help.

helloworld=>\q

$ psql -h localhost -U user2 -d helloworld
Password for user user2:
psql: FATAL:  role "user2" is not permitted to log in


以下皆在 helloworld 資料庫行動:

$ psql -h localhost -U user1 -d helloworld
Password for user user1:
psql (9.4.4)
SSL connection (protocol: TLSv1.2, cipher: ECDHE-RSA-AES256-GCM-SHA384, bits: 256, compression: off)
Type "help" for help.

helloworld=>


建立資料表:

helloworld=> CREATE TABLE haha ( field1 INT, field2 VARCHAR(64) );
CREATE TABLE
helloworld=> CREATE TABLE hehe ( field1 TEXT );


列出資料表:

helloworld=> \d
       List of relations
 Schema | Name | Type  | Owner
--------+------+-------+-------
 public | haha | table | user1
 public | hehe | table | user1
(2 rows)


查詢資料表定義:

helloworld=> \d haha
            Table "public.haha"
 Column |         Type          | Modifiers
--------+-----------------------+-----------
 field1 | integer               |
 field2 | character varying(64) |


刪除資料表:

helloworld=> DDROP TABLE haha;
DROP TABLE


建立索引:

helloworld=> CREATE INDEX index_test ON hehe ( field1 );
helloworld=> \d hehe
    Table "public.hehe"
 Column | Type | Modifiers
--------+------+-----------
 field1 | text |
Indexes:
    "index_test" btree (field1)


刪除索引:

helloworld=> DROP INDEX index_test;
DROP INDEX
helloworld=> \d hehe
    Table "public.hehe"
 Column | Type | Modifiers
--------+------+-----------
 field1 | text |


建立 Partial Indexes:

helloworld=> CREATE INDEX index_substring ON hehe ( substring(field1, 0, 32) );
CREATE INDEX
helloworld=> CREATE INDEX index_condition ON hehe ( field1 )
helloworld->  WHERE substring(field1, 0, 1) = 'a' ;
CREATE INDEX
helloworld=> \d hehe
    Table "public.hehe"
 Column | Type | Modifiers
--------+------+-----------
 field1 | text |
Indexes:
    "index_condition" btree (field1) WHERE "substring"(field1, 0, 1) = 'a'::text
    "index_substring" btree ("substring"(field1, 0, 32))


從 STDIN 輸入資料至 helloworld.hehe 中:

$ bash --version
GNU bash, version 4.3.30(1)-release (x86_64-pc-linux-gnu)
Copyright (C) 2013 Free Software Foundation, Inc.
License GPLv3+: GNU GPL version 3 or later <http://gnu.org/licenses/gpl.html>

This is free software; you are free to change and redistribute it.
There is NO WARRANTY, to the extent permitted by law.

$ cat <<EOF | psql -h localhost -U user1 -W -d helloworld
> COPY hehe (field1) FROM stdin;
> 1
> 2
> 3
> 4
> 5
> 6
> EOF
Password for user user1:
COPY 6

$ psql -h localhost -U user1 -W -d helloworld -c 'SELECT * FROM hehe;'
Password for user user1:
 field1
--------
 1
 2
 3
 4
 5
 6
(6 rows)

2015年10月27日 星期二

透過 Google Analytics - Measurement Protocol 追蹤 IOT、Email 開信率等

雖然很多東西都建立在 Android 上,但總是有純 Unix 的環境,這時就用用 Google analytics (GA) 的 REST API 了 XD 這東西用途很廣,因為它可以偽裝成 image ,例如 <img src="//www.google-analytics.com/collect?...">,甚至可以用在 EDM 等等的(雖然 Email 常常預設把遠端資源關閉) ,此例,我們專注在 IOT 上,而測試方式只要用用 cURL 即可,十分便利。

由於是 IOT 角色,須留意 GA 的資源限制:https://developers.google.com/analytics/devguides/collection/protocol/v1/limits-quotas

  • 10 million hits per month per tracking ID
  • 200,000 hits per user per day
  • 500 hits per session not including ecommerce (item and transaction hit types).

總之,用法都很簡單,叫 IOT 定期打卡即可,最重要的工作項目反而是定義產品的使用情境,把那些狀態定義好後,當作 web page 來呼叫 Google Analytics API 吧!

簡易範例:

$ curl 'https://www.google-analytics.com/collect?v=1&t=screenview&tid=TRACKING_ID&an=YOUR_APP_NAME&cid=CLIENT_ID&cd=YOUR_PRODUCT_STATE'
GIF89a?????


其中範例回應的就是一張 GIF 圖檔,而更多應用請參考 https://developers.google.com/analytics/devguides/collection/protocol/v1/parameters ,若一直試不出來,可以用 https://ga-dev-tools.appspot.com/hit-builder/ 偵錯看看。

2015年10月24日 星期六

[Linux] 調校 Apache Web server 筆記 ab、systcl.conf、limits.conf、mpm_prefork.conf @ Ubuntu 14.04

最近又播空出來處理一下,之前機器在規劃時,幾乎都用系統預設的資源,接著就直接上 AWS Auto scaling,整體上進入 m3.medium 都還堪用,直到要上到 m3.large 規模時,開始發現當初設置的 Auto scaling rules 不是很適當。於是乎把 CPU 靈敏度下調,例如 CPU 只要衝到 15% 使用率就開新機器,反正大部分的時間都夠用 :P

而現在就老老實實先用 apache benchmark 試試! 首先操作環境都是 AWS EC2,先替機器上 Elastic IP 吧!因為 想測不同規格的機器,這時用個 Elastic IP 會方便一點,避免機器 IP 被換掉,此外,建議發動 ab 的機器規格要好於壓力測試的機器。

當發動 ab 測試的機器得到 apr_socket_recv: Connection reset by peer (104) 而被壓力測試的機器 dmesg 出現 TCP: TCP: Possible SYN flooding on port 80. Dropping request.  Check SNMP counters. 時,請調整壓力測試機器。

$ sudo vim /etc/sysctl.conf
net.ipv6.conf.all.disable_ipv6 = 1
net.ipv4.tcp_tw_reuse = 1
net.ipv4.tcp_tw_recycle = 1
net.ipv4.tcp_syncookies = 0
net.ipv4.tcp_synack_retries = 1
net.ipv4.tcp_max_syn_backlog = 102400
net.ipv4.tcp_max_tw_buckets = 102400
$ sudo sysctl -p


其中 tcp_tw 代表 TCP Socket Time-Wait,而 syncookies 為 SYN Cookies 機制,而 syn_backlog 跟 tw_buckets 的數量,調大就是允許讓系統花多一點資源讓 client 等待而非直接 reject client。

而發動機器 file open 數量太小時,會出現 socket: Too many open files (24) 資訊,這時就先用 root 角色,並用 ulimit -n 8000 調高限制,若要保持其資源限制,就修改 /etc/security/limits.conf

$ sudo vim /etc/security/limits.conf
* soft nofile 12345
* hard nofile 23456

此例就是允許任何人開 12345 個檔案。

接著 ab 常用指令:

$ ab -c 300 -n 50000 http://ip/

記得若測試的 IP 位置在首頁,要有 "/" 結尾 :P 接著關注報表,例如 Requests per second 跟 Time per request 數字,若 requests per second 比 concurrent 數字還要大,那就調大 -c 的參數試試,去尋找一個合適的點即可。

另外,由於 Apache web server 預設採用 prefork MPM 模式,那邊也有些資源上限要調整:

$ sudo vim /etc/apache2/mods-enabled/mpm_prefork.conf
# prefork MPM
# StartServers: number of server processes to start
# MinSpareServers: minimum number of server processes which are kept spare
# MaxSpareServers: maximum number of server processes which are kept spare
# MaxRequestWorkers: maximum number of server processes allowed to start
# MaxConnectionsPerChild: maximum number of requests a server process serves

<IfModule mpm_prefork_module>
ServerLimit 7500
StartServers 20
MinSpareServers 15
MaxSpareServers 50
MaxRequestWorkers 7500
MaxConnectionsPerChild 0
</IfModule>

$ sudo service apache2 reload


最後心得...在 AWS EC2 m3.large 的機器上,大多每秒就是處理一千五附近的連線,也就同時可處理 1500 連線。可以用 ab -k -c 1500 -n 5000000 測試看看。

2015年10月20日 星期二

透過 Bitbucket、Jenkins、Slack 打造持續發佈打屁等自動化架構

透過 Bitbucket 作為 git 版本控制的服務托管處,而 slack 則是工程師打屁好去處,而 Jenkins 則是打造一鍵發佈的便利介面。雖說連續動作也可以化簡成一隻 script,但能夠端出 Web UI 介面,還是大勝!

首先提一下 git 版本控制,透過 Bitbucket 服務,人多的話還是花一點小錢了!在 Bitbucket 可以建立群組概念,大概可粗略分成 Administrators、Developer、Deploy 三個個群組(若要細分則可以變成 iOS Developer、Android Developer、Web developer 或是甚至以專案為單位等),這邊設計讓所以有成員都進 Developer 並且 Developer group 預設對所有專案擁有 read only 權限。而埋了一個機器人在 deploy group 中,預設沒有任何權限(機器人不需進入 developer group)。當有專案要搭建自動發佈流程時,請專案擁有者或管理者,讓專案可供 Deploy Group 有 write 權限,這是為了 Jenkins 發佈新版時,能夠打個 tag 記錄狀態。而 Deploy group 裡的機器人,就只需添加個 ssh key 即可。

在 Jenkins Web UI:
  1. 建立作業 => 填寫作業名稱 => 建置 Free-Style 軟體專案 
  2. 設定 Slack Notifications => 進階設定 Team Domain、Integration Token 和 Project Channel => Test Connection
  3. 原始碼管理 => git => git@bitbucket.org:group/project.git => Credentials 搭配 Bitbucket SSH key => Branches to build 要指定 => Additional Behaviours => Advanced sub-modules behaviours => Recursively update submodules
  4. 建置環境 => Create a formatted version number => 設定 Environment Variable Name (VERSION) => Version Number Format String (1.0.0) 
  5. 建置 => 例如拉完程式碼後想要做的事,如 /path/project-build.sh project-name  $VERSION $BUILD_NUMBER $JOB_NAME 
  6. 建置後動作 => Git Publisher => Push Only If Build Succeeds => Tag to push (develop-$VERSION-$BUILD_NUMBER) => Target remote name (origin)
如此一來,開發者可以用 bitbucket 持續開發,並且用不同 branch 管理,如 develop branch、alpha branch、release branch 等,而 Jenkins 就建立三個任務,分別從上述 branch 取資料出來使用,而在 "建置" 跟 "建置後動作" 都可以對各個 branch 操作做細部的調整。

例如"建置"中的 /path/project-build.sh 的程式,就可以包含建立 RPM 、更新 repos 等行為,同時有環境變數 $VERSION $BUILD_NUMBER $JOB_NAME 拿來輔助。

以上就是將程式碼編譯打包的流程,若要再添加上 deploy 流程時,可以再額外建置一個 Jenkins 工作,裡頭只需填寫 slack 通知和建置項目,而建置項目就可以一隻 script 處理發佈的動作即可,而在相對應工作中,把剛剛的 deploy task 建立相依性即可。

如此一來,當 Jenkins 每一次建置時,各個階段的都丟訊息至 slack 指定的頻道,等同通知相關人員。若需要做類似 git hook 來達成自動建置時,可以使用 Jenkins "建置觸發程式" 裡的輪詢  SCM 項目,例如每 10 分鐘確認一次 bitbucket 專案狀況等,達成類似 git hook 行為。

2015年10月19日 星期一

有限資源

西本願寺

最近剛加入的強者夥伴即將離開,得知時心情五味雜陳,但說真的,打從強者加入時,便一直等待著這事件到來。站在朋友的立場仍十分建議他去新環境闖闖,但站在團隊剛建立的初期,內心又有種落寞感,不禁回憶起當年離開前老闆時,我堅定的想法配著老闆孤寂的背影,不也是一樣嗎?

隨著年紀的增長,同輩之間仍不斷進步著,越來越明瞭同輩之間扣除一起當 co-founder 外,是不太可能共事的,因為職場上的機會跟資源是有限的,有時不是為了競爭,而是順應潮流,總要有個人當頭,就像創業過程中,五五分帳的股份永遠是最爛的策略一樣。然而,大家都很強,又該怎樣相處?這真的是個大哉問,最佳解可能是任職不同團隊吧?再怎樣扁平化管理,總是有人被老闆愛戴有人被老闆操 XD

或許,這是老天安排的訓練,好好面對團隊夥伴離開的事件吧!這件事永遠都會發生的。如同每個 leader 總會抱怨人力不夠,而這件事打從一開始就永遠存在的。人生就是一直在有限的資源中做最佳的策略。

2015年10月18日 星期日

Bash 筆記 - 使用 s3fs、mysqldump、find 透過 s3 定期備份 MySQL 資料庫資料

由於資料庫恰好有 timestamp 這個數值,除設計完 incremental backup 方式後(Bash 筆記 - 使用時間區間備份 MySQL 資料表),而備份好的資料又感到麻煩,所以就往 s3 丟吧!而 s3 的丟法就用 s3fs 來執行。

流程:
  1. 執行 db incremental backup
  2. 使用 s3fs 掛載 s3 空間
  3. 確認 s3 是否已有資料,若沒有則複製過去
其中我把 db backup 的(tar.bz2)產物都有做一次 checksum (tar.bz2.md5),因此判斷是否已在 s3 上時,可以判斷 checksum file 即可:

mkdir -p /data/fuse-tmp/my-s3-bucket
mkdir -p /data/s3/my-s3-bucket
touch /data/s3/my-s3-bucket.password
s3fs my-s3-bucket /data/s3/my-s3-bucket -d -o use_cache=/data/fuse-tmp -o passwd_file=/data/s3/my-s3-bucket.password

find /data/db/ -name "*.bz2" -exec bash -c "test -e {}.md5 && test ! -e /data/s3/my-s3-bucket/\`basename {}\`.md5 && echo 'upload {} , {}.md5 ... ' && time cp {} {}.md5 /data/s3/smy-s3-bucket/ && echo 'done' " \;

sync;sync;sync

fusermount -u /data/s3/my-s3-bucket


其中,/data/db 是擺放一堆 db.sql.tar.bz2 跟 db.sql.tar.bz2.md5 的位置,而我讓備份過程中最後產出 db.sql.tar.bz2.md5 檔,因此先判斷 /data/db/db.sql.tar.bz2.md5 是否產生也代表備份流程是否跑完,接著才檢查 /data/s3/my-s3-bucket/db.sql.tar.bz2.md5 資料來決定是否要上傳到 s3 。

最後,s3 還可以開啟版本控制,這樣可以避免不小心蓋掉檔案的問題 :) 達成完整可自動化的備份方案

2015年10月16日 星期五

[OSX] 使用 ImageMagick convert 處理 SVG 轉 PNG @ Mac OS X 10.11

$ sudo port install ImageMagick
$ convert test.svg test.png


若需要指定尺寸:

$ convert -density 300 test.svg test.png

若需要指定背景:

$ convert -background transparent -density 300 test.svg test.png

2015年10月15日 星期四

使用 Firefox 瀏覽器測試 DNS Round Robin 的方式

關於 DNS round robin 得設置可以把 ttl=0 來方便測試,單純測試 DNS record 有沒有正常顯示,可以單純不斷用 ping 查看 ip address 即可:

$ ping test.domain.name

接著想驗證 server site 有沒有 session 相關的問題,單純用 wget/curl 也可以啦,但如果有一些圖片資料是跟 session 有關的(例如驗證碼,產生的來源資料一樣,但輸出每次都不一樣),這時又頭痛了一下 XD 原先一直想用 Chrome browser,但最後反而跑去用 Firefox! 測試 DNS round robin 是否正常!

首先要驗證 web service 跟 dns round robin 的方式,必須先把 http client 關掉 keep-alive 機制,以 firefox 來說,就是在網址列輸入 about:config 後,搜尋 keep 關鍵字就能找到 network.http.keep-alive.timeout ,把它設成 0 即可,但千萬不要把 network.tcp.keepalive.enabled 設成 false ,那會導致上述的所有設定都無效 XD

接著問題就降低成 DNS round robin 的事了,嗯,沒有最佳解,因為 DNS round robin 本來就沒有每一次 requests 都配置不同的 IP,所以為了提升測試效率,只好自行去寫死 /etc/hosts 等類似的位置了 XD 雖然小蠢,但還是堪用啦。總之,最重要的是要先把 http client 的 keep-alive 關掉才能測試。

2015年10月13日 星期二

iOS 開發筆記 - 處理 Simulator 上 Keyboard 沒顯示的問題

原來 iOS 8 Simulator 操作習慣改了,預設對應到實體鍵盤,若需要顯示虛擬鍵盤有兩種方式:
  1. iOS Simulator -> Hardware -> Keyboard -> 取消 Connect Hardware Keyboard
  2. 在 iOS Simulator 操作環境上,使用快速鍵呼叫:shift + command + K

2015年10月12日 星期一

APC Back-UPS ES 500 / BE500TW 電池規格

APC Back-UPS ES 500

在 2009 年秋天買了一台 UPS 把玩,如今 6 年了,前陣子買了台立燈給他插上去,正逢颱風停電倒變成另類的用途 XD 由於習慣出門還是把它當延長線關掉,最近開啟時會出現長叫聲,雖然一開始經過幾次反覆開關可以避開,如今卻也無解了 XD 只要翻翻使用手冊啦

Troubleshooting and Battery Replacement:http://www.apcmedia.com/salestools/ASTE-6Z7V8R/ASTE-6Z7V8R_R0_EN.pdf?sdirect=true

原先想說電池很重要,上個官網買好了,但...沒有台灣 XD 翻出電池想找 spec 倒是一直沒找到,最後才發現被陰了,原因是被貼子蓋掉啦!

這幾年跟越南真有緣 :P 總之,上個露天逛一下,應該加運費 400 可搞定。

規格紀錄一下:

  • 12V 7.2AH
  • 長 151 mm、寬 651 mm、高 94 mm,總高 97mm

2015年10月6日 星期二

[PHP] 處理 PHP CodeIgniter 與 apache web server、nginx 的 Rewrite Rules

之前比較常用 Apache Web server ,在使用 PHP CodeIngiter 時,常常設定 Rewrite Rules 時,需要做一些手腳,例如:http://hostname/ci 想要瀏覽到 PHP CodeIgniter Project,而 ci 這個並非實體目錄,且 PHP CI Project 並非擺在 DocumentRoot 裡,這時就有很多環境變數需處理。

由於要符合 PHP CodeIgniter 的 routing rules,必須把 /ci 這個 path 給去掉,在 Apache Web server 透過 RewriteBase 處理,而 Nginx 又更麻煩一點,需處理 fastcgi_param REQUEST_URI 跟 fastcgi_param SCRIPT_FILENAME 資訊。

Apache 的設定:

Alias /ci /data/ci-project
<Directory /data/ci-project>
       Options FollowSymLinks
       DirectoryIndex index.php
       AllowOverride None

       Require all granted
       <IfModule mod_rewrite.c>
               RewriteEngine On
               RewriteBase /ci

               RewriteCond %{REQUEST_URI} ^system.*
               RewriteRule ^(.*)$ /index.php?/$1 [L]
 
               RewriteCond %{REQUEST_URI} ^application.*
               RewriteRule ^(.*)$ /index.php?/$1 [L]

               RewriteCond %{REQUEST_FILENAME} !-f
               RewriteCond %{REQUEST_FILENAME} !-d
               RewriteRule ^(.*)$ index.php?/$1 [L]
       </IfModule>
</Directory>


Nginx 設定:

        set $request_prefix '/ci/';
        set $ci_sys_dir '/opt/actions-channel-api/';

        location /ci/ {
                alias $ci_sys_dir;
                index  index.php index.html index.htm;

                try_files $uri $uri/ /ci/index.php?$query_string;
        }
        location ~* \.php$ {
                fastcgi_pass 127.0.0.1:9000;
                fastcgi_index index.php;
                fastcgi_split_path_info ^(.+\.php)(.*)$;
                include fastcgi_params;

                set $target_request_uri $request_uri;
                if ($target_request_uri ~ ^/ci/(.*)$ ) {
                        set $target_request_uri /$1;
                }
                fastcgi_param REQUEST_URI $target_request_uri;

                set $target_fastcgi_script_name $fastcgi_script_name;
                if ($target_fastcgi_script_name ~ ^/ci/(.*)$ ) {
                        set $target_fastcgi_script_name $1;
                }
                fastcgi_param SCRIPT_FILENAME $ci_sys_dir$target_fastcgi_script_name;
        }


其他 Nginx 筆記:

  • alias 的數值記得要補上最後的 "/" ;alias 跟 root 的最大差別是 alias 的位置不需要在 document root  裡頭
  • 在 try_files 流程中,一旦符合條件後,就不會再執行該 nginx location 底部項目,因此還是把 php handler 拉到最外層,而不要全部都寫在 location /ci/ 此區塊裡頭
  • nginx 可定義很多環境變數,若想要看它就寫到 log 即可:
    • http {
          log_format proxy ' "$request"  "$status"  "$http_referer"  "$http_user_agent"  $request_time  $upstream_response_time "$ci_sys_dir" "$target_fastcgi_script_name"  "$target_request_uri"  '
      }

2015年10月4日 星期日

iOS 開發筆記 - 修正 Launch Image 失效問題

LaunchImage
換了 Xcode 7.0.1 後,想說認真一下填滿 Images.xcassets 中的 LaunchImage,但始終沒有成功,總覺得一直讀取 Storyboard 的資料!

最後終於搞懂了,記得清空 Launch Screen File 欄位就沒問題啦。

若有碰到 ERROR ITMS-90475 iPad Multitasking support 的問題,再到 info.plist 塞入:

<key>UIRequiresFullScreen</key>
<string>YES</string>


即可解決。

2015年10月3日 星期六

iOS 開發筆記 - 下載舊版 Simulator,如 iOS 8 Simulator

Download iOS Simulator

記得很久以前,我還有把 Xcode 3,4 系列燒成光碟,為的就是舊版 simulator,後來不知不覺就都不需要,甚至把玩 app 都直接用最新版 iOS siumulator 跟 sdk 了。不過這次 iOS 9 跟 iOS 8 有一些 layout 問題,所以還是找一下舊版 simulator 吧!

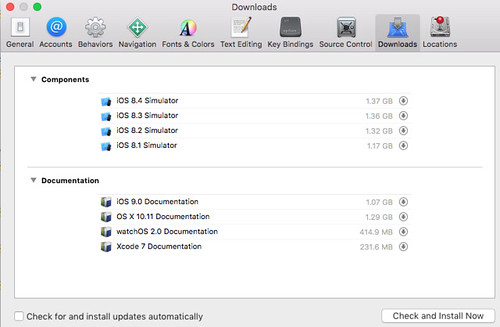
Xcode -> Preferences -> Downloads 或是 iOS Simulator -> Hardware -> Device -> Manage Devices -> 左下角 + -> iOS Version -> Download more simulators 。

此外,有人說在 OS X EI Capitan 已不支援 iOS 7 Simulator 了 :P 所以在此版本的作業系統下載不到。

另外一提,安裝 Simulator 需要用高級權限 Orz 不然會有以下訊息:

Cloud not download and install iOS 8.x Simulator.

高級權限的方式:

sudo /Applications/Xcode.app/Contents/MacOS/Xcode

iOS 開發筆記 - iOS9 存取外部資源失敗與解決方式 (App Transport Security & Info.plist & URL Scheme)

iOS 9 引入了外部資源存取的限制(App Transport Security),例如 App 操作過程中,對網路上的資料發送 requests 要求資料時,會被擋下來。這個影響的範圍滿廣的,例如做 QRCode app 時,掃描到 URL 時,開啟 UIWebView 卻無法瀏覽,或是在 UIWebView 呈現網頁時,塞一個 <img> tag 進去卻顯示不出來。

類似錯誤訊息:
  • App Transport Security has blocked a cleartext HTTP (http://) resource load since it is insecure. Temporary exceptions can be configured via your app's Info.plist file.
  • NSURLSession/NSURLConnection HTTP load failed (kCFStreamErrorDomainSSL, -9802)
若有用 FB SDK ,也會出現:
  • FBSDKLog: WARNING: FBSDK secure network request failed. Please verify you have configured your app for Application Transport Security compatibility described at https://developers.facebook.com/docs/ios/ios9
解法就是設定 Info.plist,在 iOS9 多了個 NSAppTransportSecurity 項目可以設定,可以參考 FB SDK 文件( https://developers.facebook.com/docs/ios/ios9 ),若 App 無法限制存取的來源(像QRCode App),那只好設定 NSAllowsArbitraryLoads = YES 啦

此外,對於判斷 URL Scheme 也是個問題,例如常見判斷 JB 的方式:

[[UIApplication sharedApplication] canOpenURL:[NSURL URLWithString:@"cydia://package/com.example.package"]]

也有類似的資源限制問題:

-canOpenURL: failed for URL: "cydia://package/com.example.package" - error: "This app is not allowed to query for scheme cydia"

這時也得設定 LSApplicationQueriesSchemes 參數來處理,設定完會變成:

-canOpenURL: failed for URL: "cydia://package/com.example.package" - error: "(null)"

iOS 開發筆記 - UITableViewCell 在 iOS9 的環境中,預設沒有佔滿 UITableView Width

假設 UITableView 的寬度有 768,但 UITableViewCell 拿不到 768 ,導致用程式計算的排版會出錯,且連 titleForHeaderInSection 顯示也一樣,追了一下應該是 Margin 效果

https://developer.apple.com/library/prerelease/ios/documentation/UIKit/Reference/UITableView_Class/#//apple_ref/occ/instp/UITableView/cellLayoutMarginsFollowReadableWidth

偷懶解法:

if([self.tableView respondsToSelector:@selector(setCellLayoutMarginsFollowReadableWidth:)])
self.tableView.cellLayoutMarginsFollowReadableWidth = NO;