顯示具有 push 標籤的文章。 顯示所有文章

2018年5月7日 星期一

處理 Google Cloud Messaging for Android (GCM) token 重複問題 (canonical_ids)

事情是這樣的,拖了很久才開始處理這段 XD 拖到連 GCM 都要下線了:

As of April 10, 2018, Google has deprecated GCM. The GCM server and client APIs are deprecated and will be removed as soon as April 11, 2019. Migrate GCM apps to Firebase Cloud Messaging (FCM), which inherits the reliable and scalable GCM infrastructure, plus many new features. See the migration guide to learn more.

為何要處理?主因是一隻 android mobile device 很有可能因為隱私狀態改變、重新安裝軟體後,導致 GCM token 變更,如果當年沒有設計 global uuid 來辨識移動裝置的話(像是綁個人帳號、用 wifi mac_address 等),那 token 肯定會收到一卡車多,這時要發送訊息時,就可能出現多個 token 對應到同一位使用者,造成用戶被 Push  轟炸 (這些在 Firebase 設計理念上都有改善了,例如可以單純對全部 android user 發訊息等等),特別是 QA 常常安裝反安裝程式...

原先我們依賴著 wifi mac_address ,但在某版 Android 發現他是可變的 Orz (忘了是隱私提升還是某OEM廠的bug) 對於維護 GCM token ,就只剩下一條路:試著對他發送訊息,檢查回應是不是有變化。

連續動作:

$check_failed_db_ids = array();
$tokens = array(
array( 'id' => 'db record id', 'token' => 'GCM token'),
// ...
);

$payload = array(
'registration_ids' => array(),
'dry_run' => true,
'data' => array(
'body' => 'test'
),
);

while(count($tokens) > 0) {
//
// Step 1: init
//
$payload['registration_ids'] = array();
$current_task = array_splice($tokens, 0, 900);
foreach($current_task as $items) {
array_push($payload['registration_ids'], $items['token']);
}

//
// Step 2: call gcm api
//
$ch = curl_init();
curl_setopt($ch, CURLOPT_URL, "https://android.googleapis.com/gcm/send");
curl_setopt($ch, CURLOPT_HTTPHEADER, array(
"Authorization: key=".$api_key,
'Content-Type: application/json'
));
curl_setopt($ch, CURLOPT_POST , true);
curl_setopt($ch, CURLOPT_POSTFIELDS, json_encode($payload));
curl_setopt($ch, CURLOPT_RETURNTRANSFER, true);
//curl_setopt($ch, CURLOPT_VERBOSE, true);
$ret = curl_exec($ch);
curl_close($ch);

$ret_json = @json_decode($ret, true);
if (isset($ret_json['results'])) {
$echo_cnt = count($ret_json['results']);
for ($i=0;$i<$echo_cnt; ++$i) {
// 通常有 error 都可以考慮去掉了;當有 registration_id 則是代表已轉換 token
// 完整範例跟解釋:https://developers.google.com/cloud-messaging/http#example-responses
if (isset($ret_json['results'][$i]['error']) || isset($ret_json['results'][$i]['registration_id'])) {
array_push($check_failed_db_ids, $i);

}
}
}

//
// Step 3: update db record & reset $check_failed_db_ids
//
// ...

}

2017年10月18日 星期三

Firebase 開發筆記 - FCM 與 Web app debug

之前已經小試身手了,在此把 Web app notification debug 訊息紀錄一下。

1. 關於發 push 要用的 Serverkey 擺在 Firebase -> Project -> Settings -> Project settings -> CLOUD MESSAGING -> Project credentials 的 Server key

2. 初始化 index.html ,請至 Firebase -> Project -> Overview -> Add Firebase to your web app,把他埋在 <head></head> 即可

<script src="https://www.gstatic.com/firebasejs/4.5.2/firebase.js"></script>
<script>
  // Initialize Firebase
  var config = {
    apiKey: "YourAPIKey",
    authDomain: "your-app.firebaseapp.com",
    databaseURL: "https://your-app.firebaseio.com",
    projectId: "your-app",
    storageBucket: "your-app.appspot.com",
    messagingSenderId: "your-app-id"
  };
  firebase.initializeApp(config);
</script>


3. 使用 const messaging = firebase.messaging(); 來操作,如要求收訊權限,取得後則進行要 FCM token:
<script>
const messaging = firebase.messaging();
messaging.requestPermission()
.then(function() {
console.log('Notification permission granted.');
try_to_get_token();
})
.catch(function(err) {
console.log('Unable to get permission to notify.', err);
});
function try_to_get_token() {
messaging.getToken()
.then(function(currentToken) {
if (currentToken) {
console.log("currentToken:", currentToken);
} else {
console.log('No Instance ID token available. Request permission to generate one.');
}
})
.catch(function(err) {
console.log('An error occurred while retrieving token. ', err);
});
}
</script>


4. 開發上請使用 Chrome browser ,想要重置 FCM token 可以在 chrome://settings/content/notifications 將指定網域清除

5. 碰到要不到 FCM token 錯誤訊息

browserErrorMessage: "Failed to register a ServiceWorker: A bad HTTP response code (404) was received when fetching the script."
code: "messaging/failed-serviceworker-registration"
message: "Messaging: We are unable to register the default service worker. Failed to register a ServiceWorker: A bad HTTP response code (404) was received when fetching the script. (messaging/failed-serviceworker-registration)."


解法一:在根目錄建置一個空的檔案,檔名為 firebase-messaging-sw.js (最方便的解法)

$ touch /path/www/document_root/firebase-messaging-sw.js

解法二:刻一個 ServiceWorker 處理 (彈性的解法)

$ touch sw.js (與 index.html 同層即可)
$ vim index.html
<script>
const messaging = firebase.messaging();

if ('serviceWorker' in navigator) {
navigator.serviceWorker.register('sw.js').then(function(registration) {
console.log('ServiceWorker registration successful with scope: ', registration.scope);
messaging.useServiceWorker(registration);
//try_to_get_token();
messaging.requestPermission()
.then(function() {
console.log('Notification permission granted.');
try_to_get_token();
})
.catch(function(err) {
console.log('Unable to get permission to notify.', err);
});

}).catch(function(err) {
//registration failed :(
console.log('ServiceWorker registration failed: ', err);
});
}
</script>


6. 建置收訊息的部分:

前景:
<script>
const messaging = firebase.messaging();
messaging.onTokenRefresh(function() {
console.log("onTokenRefresh");
try_to_get_token();
});

messaging.onMessage(function(payload) {
console.log("Message received. ", payload);
});

if ('serviceWorker' in navigator) {
console.log("test 'serviceWorker' in navigator");
navigator.serviceWorker.register('sw.js').then(function(registration) {
console.log('ServiceWorker registration successful with scope: ', registration.scope);
messaging.useServiceWorker(registration);
//try_to_get_token();
messaging.requestPermission()
.then(function() {
console.log('Notification permission granted.');
try_to_get_token();
})
.catch(function(err) {
console.log('Unable to get permission to notify.', err);
});

}).catch(function(err) {
//registration failed :(
console.log('ServiceWorker registration failed: ', err);
});
}

function try_to_get_token() {
messaging.getToken()
.then(function(currentToken) {
if (currentToken) {
console.log("currentToken:", currentToken);
} else {
console.log('No Instance ID token available. Request permission to generate one.');
}
})
.catch(function(err) {
console.log('An error occurred while retrieving token. ', err);
});
}
</script>


背景(/firebase-messaging-sw.js 或是自訂的 ServiceWorker):

$ vim sw.js
// Import and configure the Firebase SDK
// These scripts are made available when the app is served or deployed on Firebase Hosting
// If you do not serve/host your project using Firebase Hosting see https://firebase.google.com/docs/web/setup
importScripts('https://www.gstatic.com/firebasejs/4.5.2/firebase-app.js');
importScripts('https://www.gstatic.com/firebasejs/4.5.2/firebase-messaging.js');
importScripts('https://www.gstatic.com/firebasejs/4.5.2/firebase.js');

  // Initialize Firebase
  var config = {
    apiKey: "YourAppApiKey",
    authDomain: "your-app.firebaseapp.com",
    databaseURL: "https://your-app.firebaseio.com",
    projectId: "your-app",
    storageBucket: "your-app.appspot.com",
    messagingSenderId: "your-app-id"
  };
  firebase.initializeApp(config);

const messaging = firebase.messaging();

// If you would like to customize notifications that are received in the
// background (Web app is closed or not in browser focus) then you should
// implement this optional method.
// [START background_handler]
messaging.setBackgroundMessageHandler(function(payload) {
  console.log('[firebase-messaging-sw.js] Received background message ', payload);
  // Customize notification here
  const notificationTitle = 'Background Message Title';
  const notificationOptions = {
    body: 'Background Message body.',
    icon: '/firebase-logo.png'
  };

  return self.registration.showNotification(notificationTitle,
      notificationOptions);
});
// [END background_handler]


7. 背景工作補充 /firebase-messaging-sw.js (或是自訂的 ServiceWorker)

當 /firebase-messaging-sw.js (或是自訂的 ServiceWorker) 是空白時,這時 web app (chrome browser) 都到訊息時,只會提醒有訊息在背景更新,且前景都不會觸發 messaging.onMessage 的事件。

8. 若發現異常,例如 Web 前景有 token 又收不到訊息時,請留意背景工作是否有實作,建議把 chrome browser 重開,仍不行時,甚至在 chrome://settings/content/notifications 清除重新來過

9.善用 curl command 測試:

curl -X POST -H "Authorization: key=YourAppServerKey" -H "Content-Type: application/json" -d '{
  "notification": {
    "title": "Hello",
    "body": "World",
    "icon": "firebase-logo.png",
    "click_action": "http://localhost:8081"
  },
  "to": "FCM token"
}' "https://fcm.googleapis.com/fcm/send"


10. 若 user 移除接收,送訊息時會收到回饋:

{"multicast_id":####,"success":0,"failure":1,"canonical_ids":0,"results":[{"error":"NotRegistered"}]}

11. FCM 跟用戶有沒有登入(Google帳號)無關

2017年10月17日 星期二

Firebase 開發筆記 - Firebase Cloud Messaging (FCM) 初體驗、 Topic 管理與 Web notification

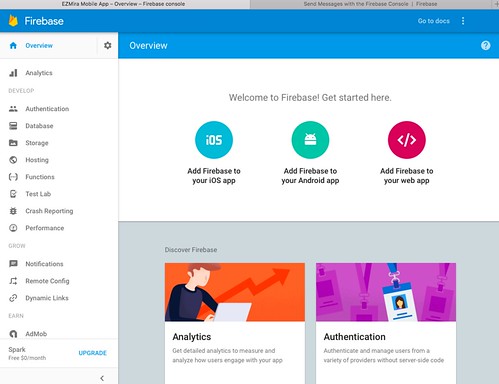
firebase-web-console

最近強者同事推薦使用 FCM ,看了一下,對於計費方式有點抖,若一切免費的話,真的超佛心 :P 由於支援潮流的訊息訂閱架構,基本上幾乎可以不用自行紀錄 notification token 了,用起來很直觀又方便。例如,想要個別通知時,可以每一個 user 給予一個 topic id (如 user id) ,就能夠不用紀錄 raw notification token 單獨發訊給對方!有一點點像用運算取代空間感。

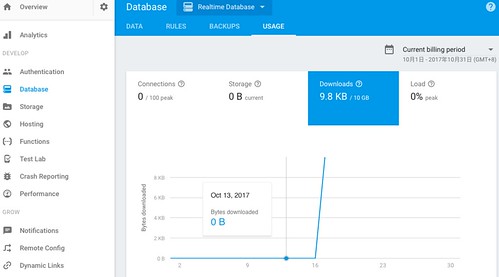
當發送 push 給使用者後,且使用者取得訊息時,關注 Realtime db 的 Download 流量有變動,不知是不是真的要計算流量?若是的話,大約發送一則訊息算 2KB ,而免費版流量 10GB/month,約一個月可以發送 500萬則訊息。

firebase-rt-db-download

若真的要計算流量費的話,那 FCM 就不是免錢,接著要花錢則是 25 美金方案有 20GB/month ,接著更高級則是 $1/GB 計費。

Updated @ 2017/10/18: 與 Firebase 客服聯繫,確認 FCM 不佔用 Realtime Database 流量!並且一口氣發送 100 則後,流量也沒有大量增加,符合預期!超佛心。強者同事提醒,對於 Database Download 流量,可能是 Firebase dashboard/console 的資訊讀寫 ( https://firebase.google.com/docs/database/usage/billing - Firebase console data )

聊聊趣味的地方,關於 Topic 管理機制,當你有 FCM token 後,可以在 server site 幫 device 訂閱 topic 喔!這功能很便利,就像...你紀錄了一堆 GCM token / APNs token 後,自己過濾對象,再進行發送。然而,topic 概念在於"使用情境"知道後,直接刻在 app 端,只是突然新增使用情境時,就得變成新版 app user 可以接受,舊版則無法接受到訊息,這時 server site 若有記錄 FCM token 時,就可以代勞幫忙訂閱:

https://developers.google.com/instance-id/reference/server#manage_relationship_maps_for_multiple_app_instances

https://iid.googleapis.com/iid/v1:batchAdd
Content-Type:application/json
Authorization:key=API_KEY
{
   "to": "/topics/movies",
   "registration_tokens": ["nKctODamlM4:CKrh_PC8kIb7O...", "1uoasi24:9jsjwuw...", "798aywu:cba420..."],
}


同理,也可以取消訂閱:https://iid.googleapis.com/iid/v1:batchRemove

若 server site 是 node.js 的,可以直接用 SDK :https://firebase.google.com/docs/cloud-messaging/admin/manage-topic-subscriptions

最後,筆記一下 Web app 的部分:假設網站服務位置為 https://example.com/fcm/ ,預設都要在根目錄埋上 firebase-messaging-sw.js 檔案,可以空白。

$ touch /var/www/firebase-messaging-sw.js
$ vim /var/www/fcm/index.html
<html>
<head>
<script src="https://www.gstatic.com/firebasejs/4.5.2/firebase.js"></script>
<script>
// Initialize Firebase
var config = {
apiKey: "your-app-apikey",
authDomain: "your-app.firebaseapp.com",
databaseURL: "https://your-app.firebaseio.com",
projectId: "your-app",
storageBucket: "your-app.appspot.com",
messagingSenderId: "your-app-id"
};
firebase.initializeApp(config);
</script>
</head>
<body>
<script>
const messaging = firebase.messaging();

messaging.onTokenRefresh(function() {
messaging.getToken()
.then(function(refreshedToken) {
console.log('Token refreshed.', refreshedToken);
})
.catch(function(err) {
console.log('Unable to retrieve refreshed token ', err);
});
});

messaging.onMessage(function(payload) {
console.log("Message received. ", payload);
});

messaging.requestPermission()
.then(function() {
console.log('Notification permission granted.');
resetUI();
})
.catch(function(err) {
console.log('Unable to get permission to notify.', err);
});

function resetUI() {
console.log('resetUI');
messaging.getToken()
.then(function(currentToken) {
if (currentToken) {
console.log("currentToken:", currentToken);
} else {
console.log('No Instance ID token available. Request permission to generate one.');
}
})
.catch(function(err) {
console.log('An error occurred while retrieving token. ', err);
});
}
</script>
</body>
</html>


如此一來,用 chrome browser 瀏覽 https://example.com/fcm/ 會彈跳視窗詢問是否接收訊息,點擊接受後,在 dev tools 的 console 可以看到:

Notification permission granted.
resetUI
currentToken: thisClientFCMToken

如此一來,就可以對他發訊、設定此 client 去訂閱 topic 了:

$ curl -X POST -H "Authorization: key=YourFCMAppServerKey" -H "Content-Type: application/json" -d '{
  "notification": {
    "title": "Hello",
    "body": "World",
    "icon": "firebase-logo.png",
    "click_action": "http://localhost:8081"
  },
  "to": "thisClientFCMToken"
}' "https://fcm.googleapis.com/fcm/send"

$ curl -X POST -H "Authorization: key= YourFCMAppServerKey" -H "Content-Type: application/json" -d '{
  "registration_tokens":["thisClientFCMToken"],
  "to": "/topics/foo-bar"
}' "https://iid.googleapis.com/iid/v1:batchAdd"

$ curl -X POST -H "Authorization: key= YourFCMAppServerKey" -H "Content-Type: application/json" -d '{
  "notification": {
    "title": "Hello",
    "body": "World",
    "icon": "firebase-logo.png",
    "click_action": "http://localhost:8081"
  },
  "to": "/topics/foo-bar"
}' "https://fcm.googleapis.com/fcm/send"

2016年10月9日 星期日

iOS 開發筆記 - 建立/更新 Apple Push Notification Service (APNs) 憑證、P12轉PEM、驗證 PEM、PHP 範例程式

APNs_export_key

以前寫過幾篇 APNs 筆記,但好像都沒很完整,結果每年要更新憑證時,都要再找資料複習一次 Orz 所以就把它筆記下來吧!
首先,在 iOS Developer 網站上可以維護 APNs 憑證,然而,一旦過期,其實會自動消失 Orz 而 APNs 這服務滿像開發一次後就一直擺在那,沒用行事曆紀錄肯定忘掉。

如果,當初的 Certificate Signing Request (CSR) 以及 private key(.p12) 還留著的話,可以繼續拿來用,若沒有的話,就重新建立。整個就像第一次建立一樣 :P

Step 1:

iOS Developer Website -> Certificate -> All -> [+] -> Production -> Apple Push Notification service SSL (Sandbox & Production) -> App ID: -> Your App ID -> About Creating a Certificate Signing Request (CSR) -> Upload CRS file

若之前的 CSR 跟 p12 都還在,就可以省去製作 CSR,直接拿舊的上傳;若要新建立就從 Keychain -> 憑證輔助程式 -> 從憑證授權要求憑證 -> 輸入 email -> 預設將產生 CertificateSigningRequest.certSigningRequest 檔案,把他拿去上傳吧。另外,記得要把下載到的 aps.cer 點擊匯入至 keychain 中。

Step 2:

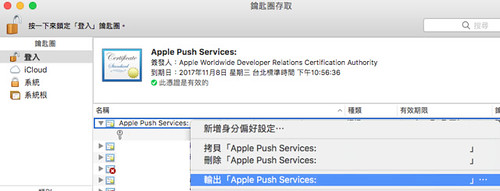
在 keychain -> 類別 -> 我的憑證 -> 可以看到 Apple Push Service 資訊,展開後,點擊專用密鑰,在點擊上方的憑證後,可以以憑證為單位輸出 p12 資料,這是跟 APN server 溝通的通行證。

Step 3:

使用 openssl 將通行證轉檔,從 p12 成 pem 檔

$ openssl pkcs12 -in App.p12 -out App.pem -nodes

轉換後,可以用文字編輯器打開 App.pem 檔案,會看到兩段:

-----BEGIN CERTIFICATE-----
...
-----END CERTIFICATE-----
-----BEGIN PRIVATE KEY-----
...
-----END PRIVATE KEY-----


而 CERTIFICATE 上頭也會標記是哪個 App ID 的,未來忘記都可以翻來看

Step 4:

做簡單的 pem 驗證即可。

Production:

$ openssl s_client -connect gateway.push.apple.com:2195 -cert App.pem

Sandbox:

$ openssl s_client -connect gateway.sandbox.push.apple.com:2195 -cert App.pem

若 pem 是正常的,應該連線完就停在那邊:

...
---
SSL handshake has read 3385 bytes and written 2515 bytes
---
New, TLSv1/SSLv3, Cipher is AES256-SHA
Server public key is 2048 bit
Secure Renegotiation IS supported
Compression: NONE
Expansion: NONE
No ALPN negotiated
SSL-Session:
    Protocol  : TLSv1.2
    Cipher    : AES256-SHA
    Session-ID:
    Session-ID-ctx:
    Master-Key: #######
    Key-Arg   : None
    PSK identity: None
    PSK identity hint: None
    SRP username: None
    Start Time: 1476026971
    Timeout   : 300 (sec)
    Verify return code: 0 (ok)
---
^C


Step 5:

可以拿 pem 跟 APNs 互動了!以下是片段 PHP 程式碼,有興趣可再試試 changyy/codeigniter-library-notification 包好的 library。

<?php

$ssl_ctx = stream_context_create();
stream_context_set_option($ssl_ctx, 'ssl', 'local_cert', $pem_file_path);

if( is_resource( $fp = stream_socket_client(
$use_sansbox ? 'ssl://gateway.sandbox.push.apple.com:2195' : 'ssl://gateway.push.apple.com:2195',
$err,
$errstr,
60,
STREAM_CLIENT_CONNECT|STREAM_CLIENT_PERSISTENT,
$ssl_ctx
) ) ) {

//$payload = array(
// 'aps' => array(
// 'alert' => array(
// 'title' => $title,
// 'body' => $message,
// )
// )
//);

$packed_data =
// Command (Simple Notification Format)
chr(0)
// device token
. pack('n', 32) . pack('H*', $notification_token)
// payload
//. pack('n', strlen($raw_cmd)) . $raw_cmd;
. $raw_data;

if( @fwrite($fp, $packed_data, strlen($packed_data)) !== false ) {
echo "SUCCESS";
} else {
echo "FAILURE";
}

fclose($fp);
}

2015年9月3日 星期四

iOS 開發筆記 - Push Notification 收到 SSL operation failed with code 1. OpenSSL Error messages: error:1409F07F:SSL routines:SSL3_WRITE_PENDING:bad write retry 和 SSL Broken

網路上的一些討論:

  • get SSL Broken pipe error when try to make push notification - http://stackoverflow.com/questions/2626054/get-ssl-broken-pipe-error-when-try-to-make-push-notification
  • APNS SSL operation failed with code 1 - http://stackoverflow.com/questions/18378534/apns-ssl-operation-failed-with-code-1
簡言之,批次處理發訊動作時,其中有一個 notification token 失效時,會導致與 Apple Notification Server 的連線中斷 Orz 例如發 500 個,其中第二個壞了,會導致後面 498 個無法使用前一次的連線,要記得處理一下。解法就是要去偵測連線是否中斷,一旦中斷後要重連。

2014年9月18日 星期四

iOS 開發筆記 - 驗證 Apple Push Notification PEM File 以及 Remove PEM Password

半年前曾開發過: 使用 Apple Push Notification service (APNs),最近更新 PEM  後,要驗證一下 PEM 是否正確。

驗證還滿簡單的,單純用 openssl 進行,假設是 dev 模式,對象就是 snadbox:

$ openssl s_client -connect gateway.sandbox.push.apple.com:2195 -cert cert.pem -key key.pem

其中 cert.pem 跟 key.pem 也可以合在一起:

$ cat cert.pem key.pem > out.pem
$ openssl s_client -connect gateway.sandbox.push.apple.com:2195 -cert out.pem


假設產出的 key.pem 有密碼保護,為了圖方便想要去密碼的話,可以用:

$ openssl rsa -in key.pem -out nopass.pem

如此一來就搞定了,若測試的是 Production PEM ,記得改用 gateway.push.apple.com:2195 即可。

$ openssl s_client -connect gateway.push.apple.com:2195 -cert cert.pem -key key.pem