顯示具有 apns 標籤的文章。 顯示所有文章

2016年10月9日 星期日

iOS 開發筆記 - 建立/更新 Apple Push Notification Service (APNs) 憑證、P12轉PEM、驗證 PEM、PHP 範例程式

APNs_export_key

以前寫過幾篇 APNs 筆記,但好像都沒很完整,結果每年要更新憑證時,都要再找資料複習一次 Orz 所以就把它筆記下來吧!
首先,在 iOS Developer 網站上可以維護 APNs 憑證,然而,一旦過期,其實會自動消失 Orz 而 APNs 這服務滿像開發一次後就一直擺在那,沒用行事曆紀錄肯定忘掉。

如果,當初的 Certificate Signing Request (CSR) 以及 private key(.p12) 還留著的話,可以繼續拿來用,若沒有的話,就重新建立。整個就像第一次建立一樣 :P

Step 1:

iOS Developer Website -> Certificate -> All -> [+] -> Production -> Apple Push Notification service SSL (Sandbox & Production) -> App ID: -> Your App ID -> About Creating a Certificate Signing Request (CSR) -> Upload CRS file

若之前的 CSR 跟 p12 都還在,就可以省去製作 CSR,直接拿舊的上傳;若要新建立就從 Keychain -> 憑證輔助程式 -> 從憑證授權要求憑證 -> 輸入 email -> 預設將產生 CertificateSigningRequest.certSigningRequest 檔案,把他拿去上傳吧。另外,記得要把下載到的 aps.cer 點擊匯入至 keychain 中。

Step 2:

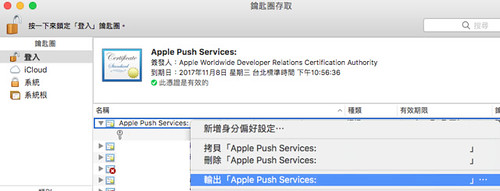
在 keychain -> 類別 -> 我的憑證 -> 可以看到 Apple Push Service 資訊,展開後,點擊專用密鑰,在點擊上方的憑證後,可以以憑證為單位輸出 p12 資料,這是跟 APN server 溝通的通行證。

Step 3:

使用 openssl 將通行證轉檔,從 p12 成 pem 檔

$ openssl pkcs12 -in App.p12 -out App.pem -nodes

轉換後,可以用文字編輯器打開 App.pem 檔案,會看到兩段:

-----BEGIN CERTIFICATE-----
...
-----END CERTIFICATE-----
-----BEGIN PRIVATE KEY-----
...
-----END PRIVATE KEY-----


而 CERTIFICATE 上頭也會標記是哪個 App ID 的,未來忘記都可以翻來看

Step 4:

做簡單的 pem 驗證即可。

Production:

$ openssl s_client -connect gateway.push.apple.com:2195 -cert App.pem

Sandbox:

$ openssl s_client -connect gateway.sandbox.push.apple.com:2195 -cert App.pem

若 pem 是正常的,應該連線完就停在那邊:

...
---
SSL handshake has read 3385 bytes and written 2515 bytes
---
New, TLSv1/SSLv3, Cipher is AES256-SHA
Server public key is 2048 bit
Secure Renegotiation IS supported
Compression: NONE
Expansion: NONE
No ALPN negotiated
SSL-Session:
    Protocol  : TLSv1.2
    Cipher    : AES256-SHA
    Session-ID:
    Session-ID-ctx:
    Master-Key: #######
    Key-Arg   : None
    PSK identity: None
    PSK identity hint: None
    SRP username: None
    Start Time: 1476026971
    Timeout   : 300 (sec)
    Verify return code: 0 (ok)
---
^C


Step 5:

可以拿 pem 跟 APNs 互動了!以下是片段 PHP 程式碼,有興趣可再試試 changyy/codeigniter-library-notification 包好的 library。

<?php

$ssl_ctx = stream_context_create();
stream_context_set_option($ssl_ctx, 'ssl', 'local_cert', $pem_file_path);

if( is_resource( $fp = stream_socket_client(
$use_sansbox ? 'ssl://gateway.sandbox.push.apple.com:2195' : 'ssl://gateway.push.apple.com:2195',
$err,
$errstr,
60,
STREAM_CLIENT_CONNECT|STREAM_CLIENT_PERSISTENT,
$ssl_ctx
) ) ) {

//$payload = array(
// 'aps' => array(
// 'alert' => array(
// 'title' => $title,
// 'body' => $message,
// )
// )
//);

$packed_data =
// Command (Simple Notification Format)
chr(0)
// device token
. pack('n', 32) . pack('H*', $notification_token)
// payload
//. pack('n', strlen($raw_cmd)) . $raw_cmd;
. $raw_data;

if( @fwrite($fp, $packed_data, strlen($packed_data)) !== false ) {
echo "SUCCESS";
} else {
echo "FAILURE";
}

fclose($fp);
}

2014年9月18日 星期四

iOS 開發筆記 - 驗證 Apple Push Notification PEM File 以及 Remove PEM Password

半年前曾開發過: 使用 Apple Push Notification service (APNs),最近更新 PEM  後,要驗證一下 PEM 是否正確。

驗證還滿簡單的,單純用 openssl 進行,假設是 dev 模式,對象就是 snadbox:

$ openssl s_client -connect gateway.sandbox.push.apple.com:2195 -cert cert.pem -key key.pem

其中 cert.pem 跟 key.pem 也可以合在一起:

$ cat cert.pem key.pem > out.pem
$ openssl s_client -connect gateway.sandbox.push.apple.com:2195 -cert out.pem


假設產出的 key.pem 有密碼保護,為了圖方便想要去密碼的話,可以用:

$ openssl rsa -in key.pem -out nopass.pem

如此一來就搞定了,若測試的是 Production PEM ,記得改用 gateway.push.apple.com:2195 即可。

$ openssl s_client -connect gateway.push.apple.com:2195 -cert cert.pem -key key.pem

2014年3月12日 星期三

iOS 開發筆記 - 使用 Apple Push Notification service (APNs)

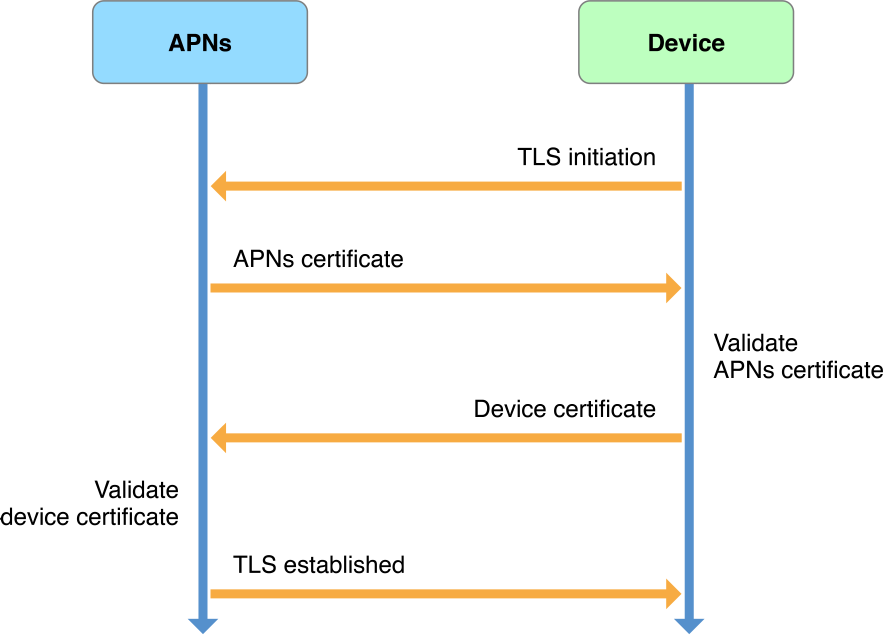
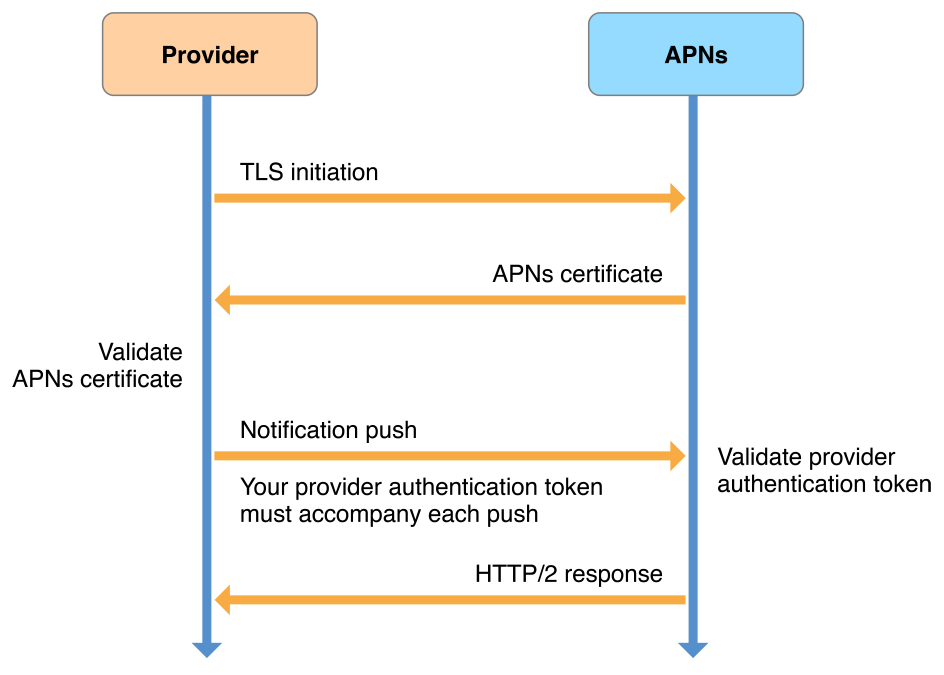
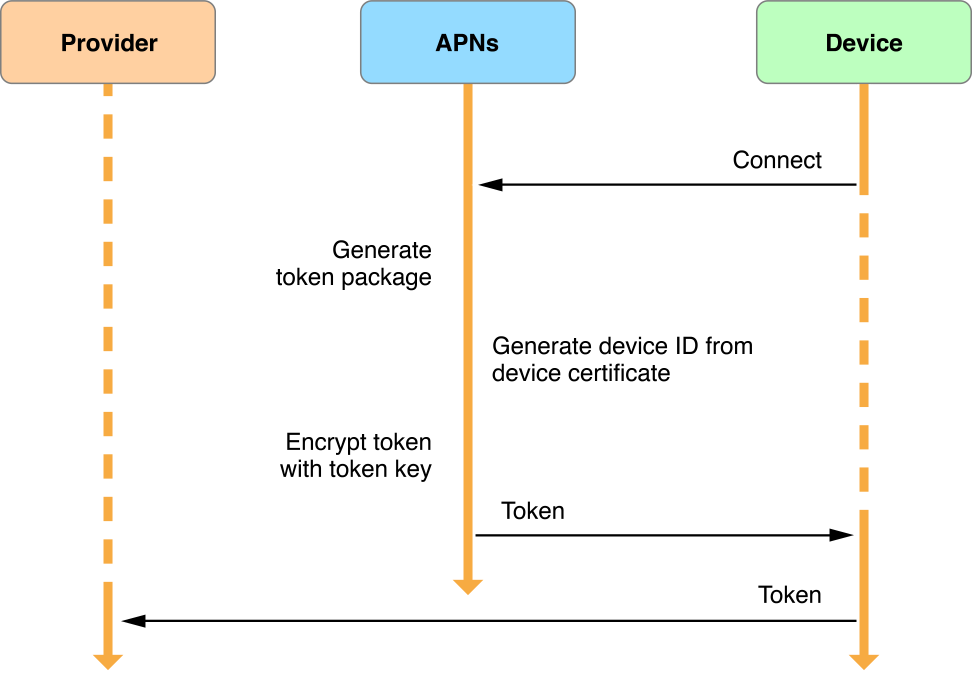
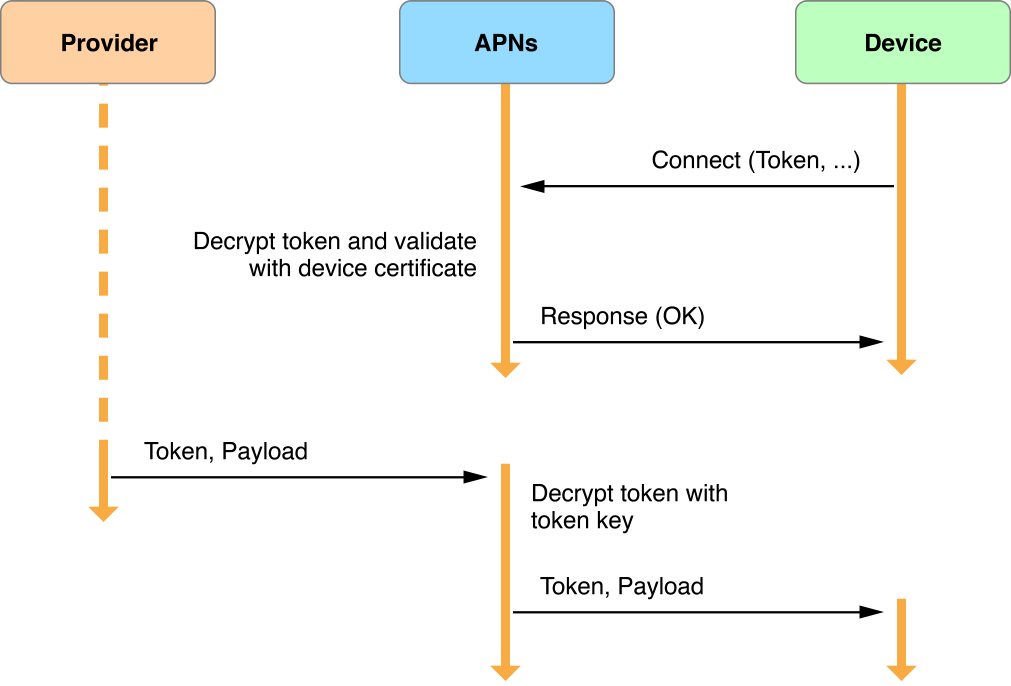
Apple 官方詳細的文件:Local Notifications and Push Notifications,漂亮的流程圖:

Service-to-Device Connection Trust:


Provider-to-Service Connection Trust:


Token Generation and Dispersal:

Token Trust (Notification):


心得:
  • 透過 Apple Push Notification service (APNs) 時,可以有提醒使用者來使用 app 的效果,無論使用者是否正在使用、背景使用、關閉使用都可以,就只要不要刪掉 app 都可以
  • APNs 只是讓 Service Provider 透過 Gateway 主動丟訊息給使用者,也不保證丟的到,除了訊息也可以設定 expiry date 外,也可以從 Feedback service 來取得傳送失敗的資訊
  • APNs 是單向傳訊息,所以,其實就像打聲招呼而已,等使用者使用 app 時,需額外處理連回自家 server 的部分,才能完成互動
Service Provider 進行 Push Notification 流程:
  1. 在 iOS Developer Center 對指定的 APP ID 設定好 Push Notifications 的憑證等
  2. 在 OSX 上,將憑證輸出成 P12 檔
  3. 透過 openssl 將 *.P12 檔轉成 PEM 格式
    $ openssl pkcs12 -in 憑證.p12 -out CertificateName.pem -nodes
    Enter Import Password:
    MAC verified OK
  4. Server 使用 PEM 檔案與 Apple server 進行 SSL/TLS 溝通
  5. 資料格式需依照 The Binary Interface and Notification Format 編碼,簡易程式:github.com/changyy/ios-apple-push-notification-service/php/send.php
iOS app 設定:
  1. 在程式啟動處,進行 APNs 註冊流程
  2. 判斷是否註冊成功,成功後要將 deviceToken 傳給 Service Provider
    - (NSString *)getHEX:(NSData *)data
    {
        const unsigned char *dataBytes = [data bytes];
        NSMutableString *ret = [NSMutableString stringWithCapacity:[data length] * 2];
        for (int i=0; i<[data length]; ++i)
            [ret appendFormat:@"%02X", (NSUInteger)dataBytes[i]];
        return ret;
    }
    - (void)application:(UIApplication *)app didRegisterForRemoteNotificationsWithDeviceToken:(NSData *)devToken {
        NSLog(@"didRegisterForRemoteNotificationsWithDeviceToken: %@", [self getHEX:devToken]);
    }

    - (void)application:(UIApplication *)app didFailToRegisterForRemoteNotificationsWithError:(NSError *)err {
        NSLog(@"didFailToRegisterForRemoteNotificationsWithError: %@", err);
    }
  3. 若程式在使用中,可以監控是否有通知
    - (void)application:(UIApplication *)application didReceiveRemoteNotification:(NSDictionary *)userInfo {
        NSLog(@"didReceiveRemoteNotification: %@",userInfo);
        if (application.applicationState == UIApplicationStateActive)
        {
            // use UIAlertView
        }
        else
        {
            //application.applicationIconBadgeNumber =[[[userInfo objectForKey:@"aps"] objectForKey: @"badge"] integerValue];
            //NSInteger badgeNumber = [application applicationIconBadgeNumber];
            //[application setApplicationIconBadgeNumber:++badgeNumber];
        }
    }