2014年3月12日 星期三

iOS 開發筆記 - 使用 Apple Push Notification service (APNs)

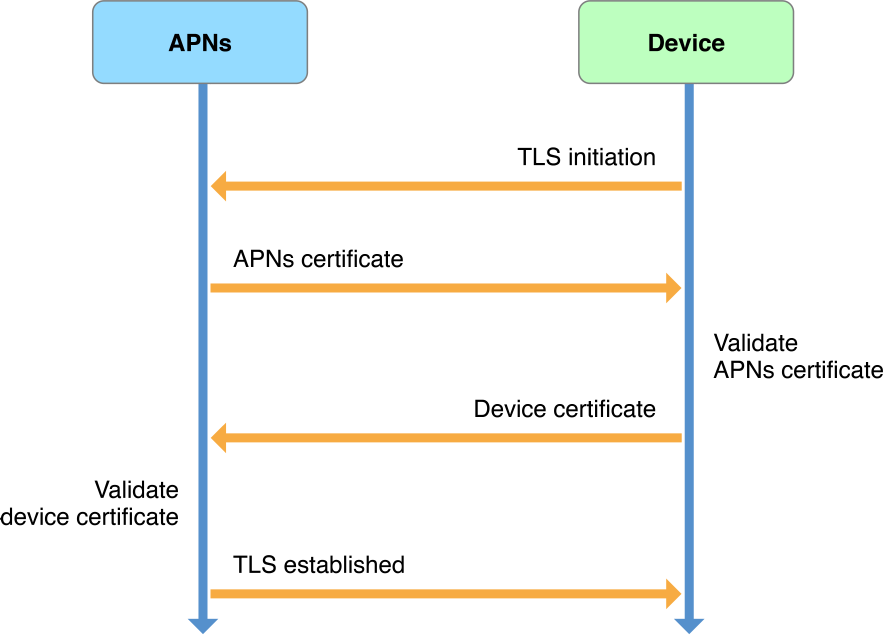
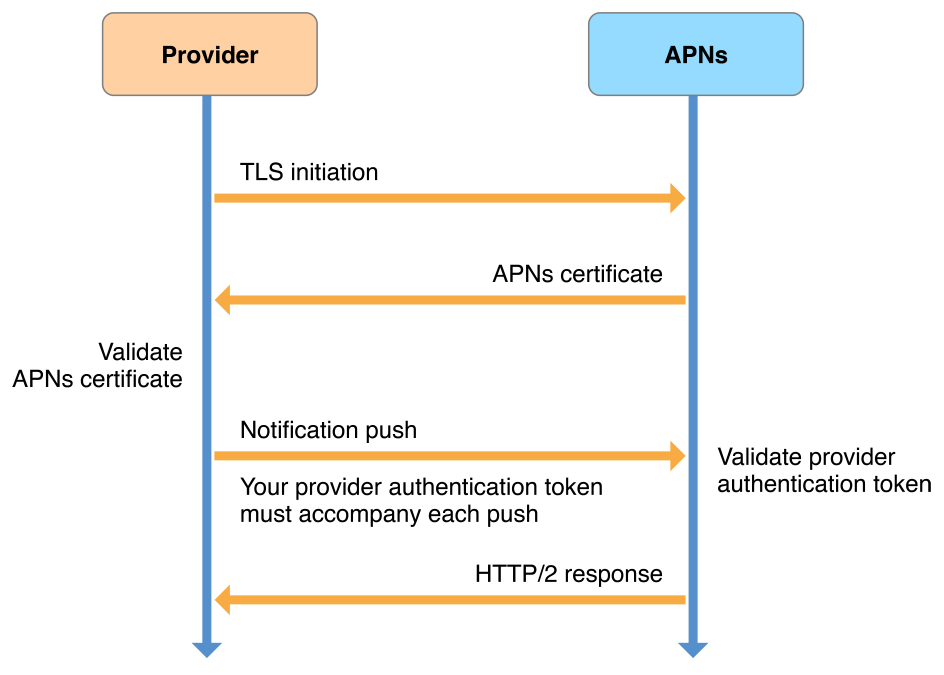
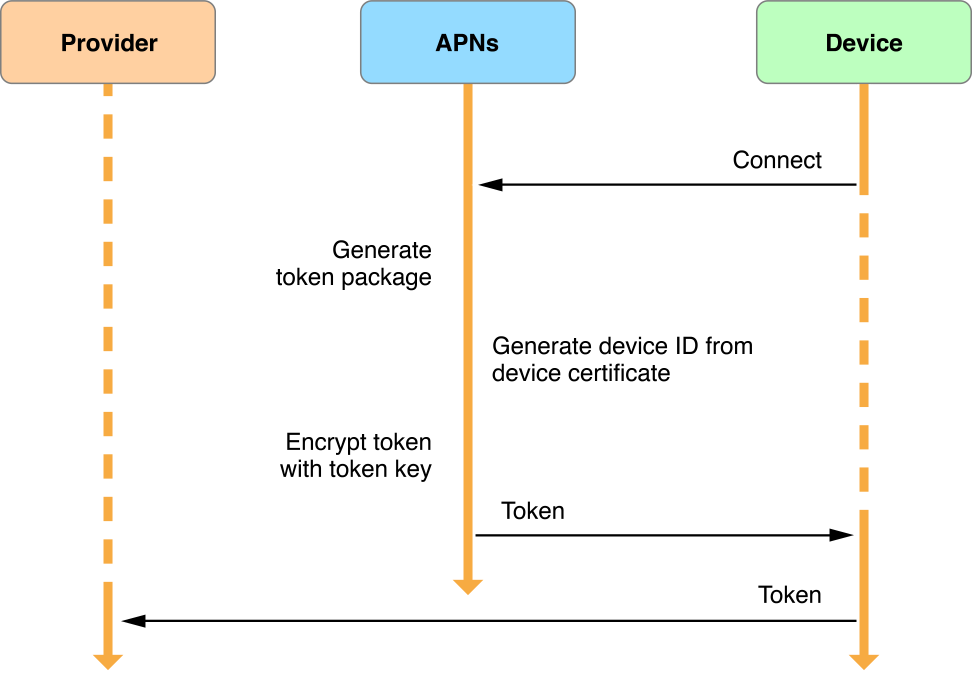
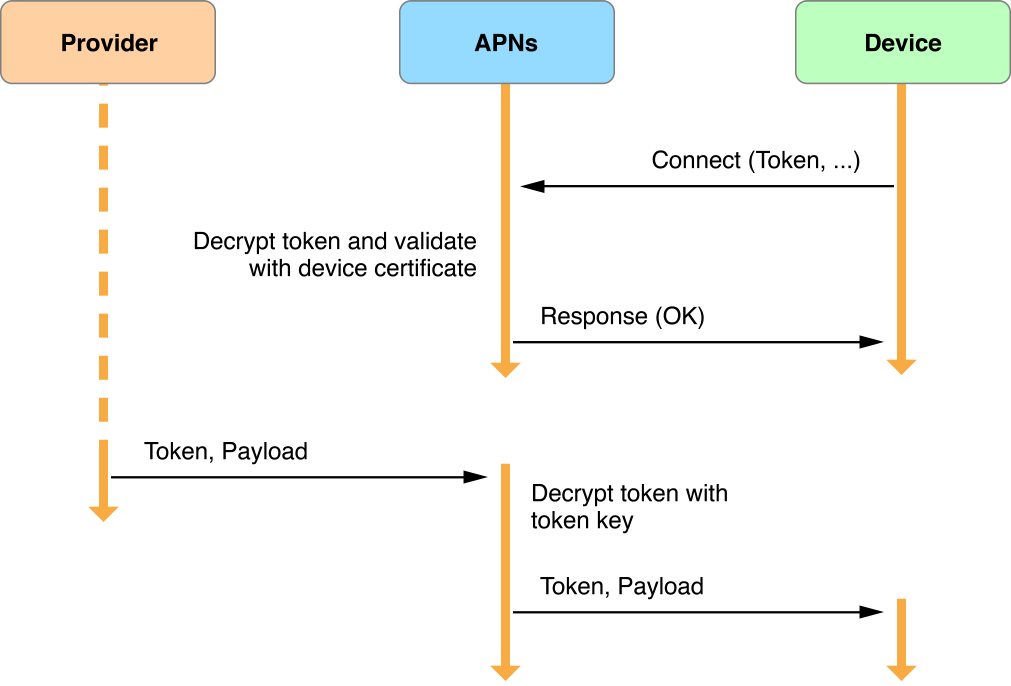
Apple 官方詳細的文件:Local Notifications and Push Notifications,漂亮的流程圖:

Service-to-Device Connection Trust:


Provider-to-Service Connection Trust:

Token Generation and Dispersal:
Token Trust (Notification):

心得:
  • 透過 Apple Push Notification service (APNs) 時,可以有提醒使用者來使用 app 的效果,無論使用者是否正在使用、背景使用、關閉使用都可以,就只要不要刪掉 app 都可以
  • APNs 只是讓 Service Provider 透過 Gateway 主動丟訊息給使用者,也不保證丟的到,除了訊息也可以設定 expiry date 外,也可以從 Feedback service 來取得傳送失敗的資訊
  • APNs 是單向傳訊息,所以,其實就像打聲招呼而已,等使用者使用 app 時,需額外處理連回自家 server 的部分,才能完成互動
Service Provider 進行 Push Notification 流程:
  1. 在 iOS Developer Center 對指定的 APP ID 設定好 Push Notifications 的憑證等
  2. 在 OSX 上,將憑證輸出成 P12 檔
  3. 透過 openssl 將 *.P12 檔轉成 PEM 格式
    $ openssl pkcs12 -in 憑證.p12 -out CertificateName.pem -nodes
    Enter Import Password:
    MAC verified OK
  4. Server 使用 PEM 檔案與 Apple server 進行 SSL/TLS 溝通
  5. 資料格式需依照 The Binary Interface and Notification Format 編碼,簡易程式:github.com/changyy/ios-apple-push-notification-service/php/send.php
iOS app 設定:
  1. 在程式啟動處,進行 APNs 註冊流程
  2. 判斷是否註冊成功,成功後要將 deviceToken 傳給 Service Provider
    - (NSString *)getHEX:(NSData *)data
    {
        const unsigned char *dataBytes = [data bytes];
        NSMutableString *ret = [NSMutableString stringWithCapacity:[data length] * 2];
        for (int i=0; i<[data length]; ++i)
            [ret appendFormat:@"%02X", (NSUInteger)dataBytes[i]];
        return ret;
    }
    - (void)application:(UIApplication *)app didRegisterForRemoteNotificationsWithDeviceToken:(NSData *)devToken {
        NSLog(@"didRegisterForRemoteNotificationsWithDeviceToken: %@", [self getHEX:devToken]);
    }

    - (void)application:(UIApplication *)app didFailToRegisterForRemoteNotificationsWithError:(NSError *)err {
        NSLog(@"didFailToRegisterForRemoteNotificationsWithError: %@", err);
    }
  3. 若程式在使用中,可以監控是否有通知
    - (void)application:(UIApplication *)application didReceiveRemoteNotification:(NSDictionary *)userInfo {
        NSLog(@"didReceiveRemoteNotification: %@",userInfo);
        if (application.applicationState == UIApplicationStateActive)
        {
            // use UIAlertView
        }
        else
        {
            //application.applicationIconBadgeNumber =[[[userInfo objectForKey:@"aps"] objectForKey: @"badge"] integerValue];
            //NSInteger badgeNumber = [application applicationIconBadgeNumber];
            //[application setApplicationIconBadgeNumber:++badgeNumber];
        }
    }

iOS 開發筆記 - NSData to HEX NSString

最近把玩 Apple Push Notification service 時,需要將 App 取得的 Device Token 轉成 HEX String 來使用。

- (NSString *)getHEX:(NSData *)data
{
    const unsigned char *dataBytes = [data bytes];
    NSMutableString *ret = [NSMutableString stringWithCapacity:[data length] * 2];
    for (int i=0; i<[data length]; ++i)
        [ret appendFormat:@"%02X", (NSUInteger)dataBytes[i]];
    return ret;

}

[Javascript] Bootstrap - 使用大量 Collapse 與 錨點(anchor/hashchange) 處理

最近在使用 Bootstrap 來包裝 Web UI ,有一卡車多的東西就先用 Collapse 包起來,而官網的範例:

<div class="panel-group">
<div class="panel panel-default">
<div class="panel-heading">
<h4 class="panel-title">
<a data-toggle="collapse" data-parent="#accordion" href="#collapseOne">
Collapsible Group Item #1
</a>
</h4>
</div>
</div>
<div id="collapseOne" class="panel-collapse collapse in">
<div class="panel-body">
Anim pariatur cliche reprehenderit, enim eiusmod high life accusamus terry richardson ad squid. 3 wolf moon officia aute, non cupidatat skateboard dolor brunch. Food truck quinoa nesciunt laborum eiusmod. Brunch 3 wolf moon tempor, sunt aliqua put a bird on it squid single-origin coffee nulla assumenda shoreditch et. Nihil anim keffiyeh helvetica, craft beer labore wes anderson cred nesciunt sapiente ea proident. Ad vegan excepteur butcher vice lomo. Leggings occaecat craft beer farm-to-table, raw denim aesthetic synth nesciunt you probably haven't heard of them accusamus labore sustainable VHS.
</div>
</div>

...
</div>


其中可以留意 collapseOne 的 class 屬性中有 in,這效果是預設展開。

然而,如果又額外做了個 Menu 維護這群 Panels/Collapse 時,希望點選某項時可以讓瀏覽器 scrollbar 移到恰當地點時,則需要處理一下:

HTML:

<div id="menu">
<ul>
<li><a data-toggle="collapse" data-target="#collapseOne" href="#collapseOne">collapseOne</a></li>
<li><a data-toggle="collapse" data-target="#collapseTwo" href="#collapseTwo">collapseTwo</a></li>
<li><a data-toggle="collapse" data-target="#collapseThree" href="#collapseThree"> collapseThree </a></li>
</ul>
</div>


Javascript:

$(document).ready(function(){

$('a[href*=#]').click(function(e){
var target = $(this).attr('href');
//console.log($(this).attr('href'));
if( target[0] == '#' ) {
//target = target.substr(1);
if( $(target) && $(target).offset() && $(target).offset().top )
$('html,body').animate({
scrollTop: $(target).offset().top
}, 1000 );
}
});
});


然而,如果預設 Collopse 是關閉的,那上述可能無法正確顯示效果,則需要把錨點切換到預設不會關閉的地點,例如 panel-heading 的位置:

<div class="panel-group">
<div class="panel panel-default">
<div id="collapseOneHead" class="panel-heading">
<h4 class="panel-title">
<a data-toggle="collapse" data-parent="#accordion" href="#collapseOne">
Collapsible Group Item #1
</a>
</h4>
</div>
</div>
<div id="collapseOne" class="panel-collapse collapse in">
<div class="panel-body">
....
</div>
</div>

...
</div>


而 Menu 的 href 則改為 collapseOneHead 即可:

<div id="menu">
<ul>
<li><a data-toggle="collapse" data-target="#collapseOne" href="#collapseOneHead">collapseOne</a></li>
<li><a data-toggle="collapse" data-target="#collapseTwo" href="#collapseTwoHead">collapseTwo</a></li>
<li><a data-toggle="collapse" data-target="#collapseThree" href="#collapseThreeHead"> collapseThree </a></li>
</ul>
</div>


註:由於採用 CodeIgniter 的關係,在 錨點(anchor) 的變化有點不如預期,所以改在 <a> 點擊上處理,而非用偵測 hashchange 事件。

2014年3月11日 星期二

iOS 開發筆記 - 使用 AssetsLibrary (assets-library://) 取得相簿內照片的原圖、縮圖

一直以來都是自己檔案管理,最近開始想要用內建相簿來管理儲存。

用法:

#import <AssetsLibrary/ALAssetsLibrary.h>
#import <AssetsLibrary/AssetsLibrary.h>

typedef void (^DoneHandler)(NSDictionary *ret);
- (void)get:(NSString *)key callback:(DoneHandler)handler {
 
ALAssetsLibrary* assetslibrary = [[ALAssetsLibrary alloc] init];
 
[assetslibrary assetForURL:[NSURL URLWithString:key] resultBlock:^(ALAsset *asset) {
//NSLog(@"asset:%@",asset);
UIImage *image = nil;
image = [UIImage imageWithCGImage:[asset aspectRatioThumbnail]];
image = [UIImage imageWithCGImage:[[asset defaultRepresentation] fullResolutionImage]];
image = [UIImage imageWithCGImage:[[asset defaultRepresentation] fullScreenImage]];
        handler(@{@"image":image});
} failureBlock:^(NSError *error) {
        handler(@{});
}];
}


其中 key 是類似這樣:assets-library://asset/asset.JPG?id=xxx&ext=JPG。

iOS 開發筆記 - 使用 MD5

忽然發現,自己在 iOS 上沒有用過 MD5 耶,一定是太少寫程式了 Orz

#import <CommonCrypto/CommonDigest.h>

- (NSString *)md5:(NSString *)str
{
    const char *cStr = [str UTF8String];
    unsigned char result[CC_MD5_DIGEST_LENGTH];
    CC_MD5( cStr, strlen(cStr), result );
    return [NSString
            stringWithFormat: @"%02X%02X%02X%02X%02X%02X%02X%02X%02X%02X%02X%02X%02X%02X%02X%02X",
            result[0], result[1],
            result[2], result[3],
            result[4], result[5],
            result[6], result[7],
            result[8], result[9],
            result[10], result[11],
            result[12], result[13],
            result[14], result[15]
            ];

}


驗證方式:

$ echo -n "string" | md5

參考資料:Calculate MD5 on iPhone