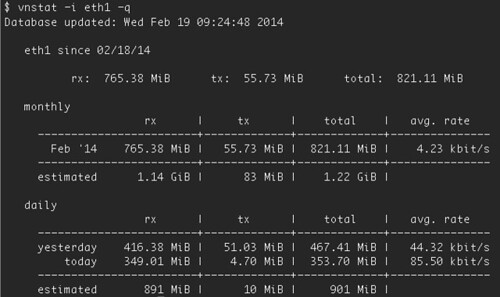
最近在用雲端服務,採用用多少資源付多少錢,其中的變動收費的就是網路流量,所以就裝一下 vnstat 來計算一下,實在很夠用!
$ sudo apt-get install vnstat
接著就可以很方便地用 command line 執行顯示了。
Init DB(0), Port: 30000, Path: /home/id/data/mongodb-study/cluster/db/db-0

 $ mongod --dbpath /home/id/data/mongodb-study/cluster/db/db-0 --port 30000 --oplogSize 700 --logpath /home/id/data/mongodb-study/cluster/log/db-0.log --rest --replSet firstset


Init DB(1), Port: 30001, Path: /home/id/data/mongodb-study/cluster/db/db-1

 $ mongod --dbpath /home/id/data/mongodb-study/cluster/db/db-1 --port 30001 --oplogSize 700 --logpath /home/id/data/mongodb-study/cluster/log/db-1.log --rest --replSet firstset


Init DB(2), Port: 30002, Path: /home/id/data/mongodb-study/cluster/db/db-2

 $ mongod --dbpath /home/id/data/mongodb-study/cluster/db/db-2 --port 30002 --oplogSize 700 --logpath /home/id/data/mongodb-study/cluster/log/db-2.log --rest --replSet firstset


nohup: ignoring input and appending output to `nohup.out'

nohup: ignoring input and appending output to `nohup.out'

nohup: ignoring input and appending output to `nohup.out'


Waiting...

        localhost:30000: .....OK

        localhost:30001: OK

        localhost:30002: OK


Connect to localhost:30000


Initialize the First Replica Set:


$ monogo localhost:30000/admin

mongo> db.runCommand( {'replSetInitiate': {'_id': 'firstset', 'members': [{'host': 'localhost:30000', '_id': 1}, {'host': 'localhost:30001', '_id': 2}, {'host': 'localhost:30002', '_id': 3}]}} )


Result:

{u'info': u'Config now saved locally.  Should come online in about a minute.', u'ok': 1.0}


All is done.


server info:

 $ mongo localhost:30000/admin --eval 'printjson(rs.status())'


shutdown servers:

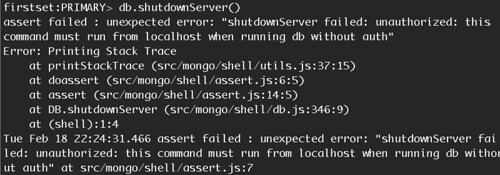
 $ mongo localhost:30000/admin --eval 'db.shutdownServer()'

 $ mongo localhost:30001/admin --eval 'db.shutdownServer()'

 $ mongo localhost:30002/admin --eval 'db.shutdownServer()'
Init DB(0), Port: 30000, Path: /home/id/data/mongodb-study/cluster/db/db-0

 $ mongod --dbpath /home/id/data/mongodb-study/cluster/db/db-0 --port 30000 --oplogSize 700 --logpath /home/id/data/mongodb-study/cluster/log/db-0.log --rest

nohup: ignoring input and appending output to `nohup.out'


Waiting...

        localhost:30000: ..OK


Connect to localhost:30000


Initialize the First Replica Set:


$ monogo localhost:30000/admin

mongo> db.addUser( {user: "account", pwd:"password", roles:["userAdminAnyDatabase"] })


Add account done.


Restart the mongod:


Init DB(0), Port: 30000, Path: /home/id/data/mongodb-study/cluster/db/db-0

 $ mongod --dbpath /home/id/data/mongodb-study/cluster/db/db-0 --port 30000 --oplogSize 700 --logpath /home/id/data/mongodb-study/cluster/log/db-0.log --rest --replSet firstset --keyFile keyfile


Init DB(1), Port: 30001, Path: /home/id/data/mongodb-study/cluster/db/db-1

 $ mongod --dbpath /home/id/data/mongodb-study/cluster/db/db-1 --port 30001 --oplogSize 700 --logpath /home/id/data/mongodb-

study/cluster/log/db-1.log --rest --replSet firstset --keyFile keyfile


nohup: ignoring input and appending output to `nohup.out'

Init DB(2), Port: 30002, Path: /home/id/data/mongodb-study/cluster/db/db-2

 $ mongod --dbpath /home/id/data/mongodb-study/cluster/db/db-2 --port 30002 --oplogSize 700 --logpath /home/id/data/mongodb-

study/cluster/log/db-2.log --rest --replSet firstset --keyFile keyfile


nohup: ignoring input and appending output to `nohup.out'

nohup: ignoring input and appending output to `nohup.out'

nohup: ignoring input and appending output to `nohup.out'


Waiting...

        localhost:30000: .......OK

        localhost:30001: ...................................OK

        localhost:30002: .OK


Connect to localhost:30000


Initialize the First Replica Set:


$ monogo localhost:30000/admin

mongo> db.runCommand( {'replSetInitiate': {'_id': 'firstset', 'members': [{'host': 'localhost:30000', '_id': 1}, {'host': 'localhost:30001', '_id': 2}, {'host': 'localhost:30002', '_id': 3}]}} )


Result:

{u'info': u'Config now saved locally.  Should come online in about a minute.', u'ok': 1.0}


All is done.


server info:

 $ mongo localhost:30000/admin -u account -p password --eval 'printjson(rs.status())'


shutdown servers:

 $ mongo localhost:30000/admin -u account -p password --eval 'db.shutdownServer()'

 $ mongo localhost:30001/admin -u account -p password --eval 'db.shutdownServer()'

 $ mongo localhost:30002/admin -u account -p password --eval 'db.shutdownServer()'
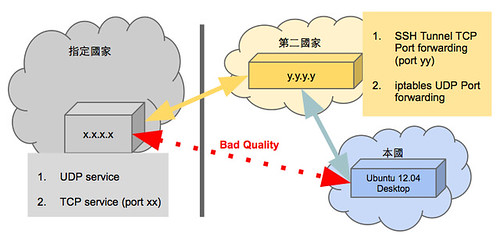
$ ssh -N -L local_port:x.x.x.x:xx x.x.x.x
$ sudo vim /etc/rc.local

su -s /bin/sh account -c 'autossh -N -f -L x.x.x.x:xx x.x.x.x'
$ iptables -A PREROUTING -t nat -i eth0 -p tcp --dport yy -j DNAT --to x.x.x.x:xx

$ iptables -A FORWARD -p tcp -d x.x.x.x --dport xx -j ACCEPT
$ redir --lport yy --laddr=y.y.y.y --cport=xx --caddr=x.x.x.x

$ sudo apt-get install openvpn
$ cp -r /usr/share/doc/openvpn/examples/easy-rsa/2.0 /tmp/easy-rsa

$ cp /tmp/easy-rsa/openssl-1.0.0.cnf /tmp/easy-rsa/openssl.cnf

$ cd /tmp/easy-rsa/

$ source ./vars

$ ./clean-all

$ ./build-dh

$ ./pkitool --initca

$ ./pkitool --server server

$ ./build-key client

$ sudo su

# chown -R root:root /tmp/easy-rsa/keys/
# cd keys

# cp ca.crt server.crt server.key dh*.pem /etc/openvpn/
$ sudo cp /usr/share/doc/openvpn/examples/sample-config-files/server.conf.gz /etc/openvpn

$ sudo gunzip /etc/openvpn/server.conf.gz
$ sudo vim /etc/openvpn/server.conf
$ sudo vim /etc/openvpn/server.conf

push "redirect-gateway def1 bypass-dhcp"

push "dhcp-option DNS 8.8.8.8"


$ iptables -t nat -A POSTROUTING -s 10.8.0.0/24 -o eth0 -j MASQUERADE
$ sudo apt-get install openvpn

$ sudo cp -r /usr/share/doc/openvpn/examples/sample-config-files/ /etc/openvpn/example

$ sudo cp ca.crt client.crt client.key /etc/openvpn/example
$ sudo vim /etc/openvpn/example/client.conf
$ sudo openvpn --config /etc/openvpn/example/client.conf
$ sudo vim /etc/rc.local

openvpn --config /etc/openvpn/example/client.conf > /var/log/openvpn_client.log 2>&1 &
VIF="tun0"

iptables -t nat -A POSTROUTING -o $VIF -j MASQUERADE
