2017年10月26日 星期四

網域交易 - 使用 Sedo.com 交易與 Namecheap 網域轉移

domain_transfer_00_namecheap

由於追求更佳的 SEO 效果,強者同事跟原網域擁有者進行議價,並且採用數家網路服務推論網域的價格、Google 關鍵字比較:
最後,老闆也接受提案跟給予此次任務的資源範圍,就開始這一連串的網域轉移過程,整個過程為:
  1. 查 whois 得知網域擁有者,與賣家通信議價
  2. 談定價錢後,賣家挑定 Sedo.com 進行交易
  3. 賣家把 Domain 的特定 Email 聯繫設定為 Sedo.com,如TRANSFERSERVICE@SEDO.COM
  4. Sedo.com 驗證賣家的確擁有網域,如 Email 聯繫、domain name server 設定等
  5. 買家電匯至 Sedo.com 指定帳戶
  6. 賣家解除 Domain 鎖定、Sedo.com 提供 Domain 轉移 Auth Code
  7. 買家進行網域移轉,過程會發信給 whois record 填寫的 Admin Email進行最後認證
  8. 由於 Sedo.com 為此 Domain Admin Email 收信者,可自動完成驗證
  9. 買家完成網域轉移,可以掌握該網域
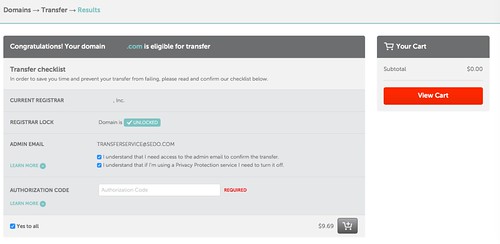
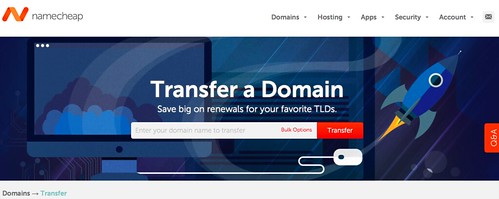
其中 (7) 步驟部分,我們採用 Namecheap 管理,一開始就直接用 Namecheap 的 Domain transfer,直接在界面上輸入要移轉的 domain,就會顯示該 domain 是否 unlock 、請輸入 Auth Code 等等,此部會有一個金流要支付,為 ICANN fee ($0.18) + domain 續約一年的費用,約 10 美金上下

domain_transfer_01_init_at_namecheap

付款完,可以在 Namecheap Dashboard 上看到 domain 的狀態,依序為:
  1. Domain is with another registrar. / Transfer will begin shortly.
  2. Domain is with another registrar. / Verifying domain contacts.
  3. Domain is with another registrar. / Awaiting release from previous registrar.
移轉完畢時,Namecheap 會發信告知,信件標題:Transfer Domain: Complete: YourDomainName,整個時程不超過 5 個小時。

關鍵原理:

  • 網域移轉時,轉出方須設定 domain unlock 、提供 Auth Code 給對方,接收方需要正確輸入 Auth Code 才能進行,而接收的網域服務管理者,也會發信給原網域的 Admin Email 告知此事,對方可以有七天的時間思考,七天沒回應就默認接受,若有異議當下就可以取消
  • 流程是 Sedo.com 先幫忙確認該網域可以被轉移,透過檢查 domain lock/unlock 狀態、指定對方要更新 Amdin Email 聯絡人等等的機制
  • 整筆交易 Sedo.com 收取 3% 服務費(此次並未在 Sedo.com 平台議價),金額超過一萬鎂時,無法使用 Paypal ,只能用電匯;若單純在 Sedo.com 進行採購標案,Sedo.com 本身會先檢驗買家的財務能力,包含要給予戶頭資訊,像辦理信用卡一樣
  • 使用 Namecheap 接收時,會收一筆 ICANN fee $0.18 費用 + Domain transfer 費用(滿像原網域續約一年的費用),最後接收後,網域有效時間應當會多增加一年

2017年10月18日 星期三

Firebase 開發筆記 - FCM 與 Web app debug

之前已經小試身手了,在此把 Web app notification debug 訊息紀錄一下。

1. 關於發 push 要用的 Serverkey 擺在 Firebase -> Project -> Settings -> Project settings -> CLOUD MESSAGING -> Project credentials 的 Server key

2. 初始化 index.html ,請至 Firebase -> Project -> Overview -> Add Firebase to your web app,把他埋在 <head></head> 即可

<script src="https://www.gstatic.com/firebasejs/4.5.2/firebase.js"></script>
<script>
  // Initialize Firebase
  var config = {
    apiKey: "YourAPIKey",
    authDomain: "your-app.firebaseapp.com",
    databaseURL: "https://your-app.firebaseio.com",
    projectId: "your-app",
    storageBucket: "your-app.appspot.com",
    messagingSenderId: "your-app-id"
  };
  firebase.initializeApp(config);
</script>


3. 使用 const messaging = firebase.messaging(); 來操作,如要求收訊權限,取得後則進行要 FCM token:
<script>
const messaging = firebase.messaging();
messaging.requestPermission()
.then(function() {
console.log('Notification permission granted.');
try_to_get_token();
})
.catch(function(err) {
console.log('Unable to get permission to notify.', err);
});
function try_to_get_token() {
messaging.getToken()
.then(function(currentToken) {
if (currentToken) {
console.log("currentToken:", currentToken);
} else {
console.log('No Instance ID token available. Request permission to generate one.');
}
})
.catch(function(err) {
console.log('An error occurred while retrieving token. ', err);
});
}
</script>


4. 開發上請使用 Chrome browser ,想要重置 FCM token 可以在 chrome://settings/content/notifications 將指定網域清除

5. 碰到要不到 FCM token 錯誤訊息

browserErrorMessage: "Failed to register a ServiceWorker: A bad HTTP response code (404) was received when fetching the script."
code: "messaging/failed-serviceworker-registration"
message: "Messaging: We are unable to register the default service worker. Failed to register a ServiceWorker: A bad HTTP response code (404) was received when fetching the script. (messaging/failed-serviceworker-registration)."


解法一:在根目錄建置一個空的檔案,檔名為 firebase-messaging-sw.js (最方便的解法)

$ touch /path/www/document_root/firebase-messaging-sw.js

解法二:刻一個 ServiceWorker 處理 (彈性的解法)

$ touch sw.js (與 index.html 同層即可)
$ vim index.html
<script>
const messaging = firebase.messaging();

if ('serviceWorker' in navigator) {
navigator.serviceWorker.register('sw.js').then(function(registration) {
console.log('ServiceWorker registration successful with scope: ', registration.scope);
messaging.useServiceWorker(registration);
//try_to_get_token();
messaging.requestPermission()
.then(function() {
console.log('Notification permission granted.');
try_to_get_token();
})
.catch(function(err) {
console.log('Unable to get permission to notify.', err);
});

}).catch(function(err) {
//registration failed :(
console.log('ServiceWorker registration failed: ', err);
});
}
</script>


6. 建置收訊息的部分:

前景:
<script>
const messaging = firebase.messaging();
messaging.onTokenRefresh(function() {
console.log("onTokenRefresh");
try_to_get_token();
});

messaging.onMessage(function(payload) {
console.log("Message received. ", payload);
});

if ('serviceWorker' in navigator) {
console.log("test 'serviceWorker' in navigator");
navigator.serviceWorker.register('sw.js').then(function(registration) {
console.log('ServiceWorker registration successful with scope: ', registration.scope);
messaging.useServiceWorker(registration);
//try_to_get_token();
messaging.requestPermission()
.then(function() {
console.log('Notification permission granted.');
try_to_get_token();
})
.catch(function(err) {
console.log('Unable to get permission to notify.', err);
});

}).catch(function(err) {
//registration failed :(
console.log('ServiceWorker registration failed: ', err);
});
}

function try_to_get_token() {
messaging.getToken()
.then(function(currentToken) {
if (currentToken) {
console.log("currentToken:", currentToken);
} else {
console.log('No Instance ID token available. Request permission to generate one.');
}
})
.catch(function(err) {
console.log('An error occurred while retrieving token. ', err);
});
}
</script>


背景(/firebase-messaging-sw.js 或是自訂的 ServiceWorker):

$ vim sw.js
// Import and configure the Firebase SDK
// These scripts are made available when the app is served or deployed on Firebase Hosting
// If you do not serve/host your project using Firebase Hosting see https://firebase.google.com/docs/web/setup
importScripts('https://www.gstatic.com/firebasejs/4.5.2/firebase-app.js');
importScripts('https://www.gstatic.com/firebasejs/4.5.2/firebase-messaging.js');
importScripts('https://www.gstatic.com/firebasejs/4.5.2/firebase.js');

  // Initialize Firebase
  var config = {
    apiKey: "YourAppApiKey",
    authDomain: "your-app.firebaseapp.com",
    databaseURL: "https://your-app.firebaseio.com",
    projectId: "your-app",
    storageBucket: "your-app.appspot.com",
    messagingSenderId: "your-app-id"
  };
  firebase.initializeApp(config);

const messaging = firebase.messaging();

// If you would like to customize notifications that are received in the
// background (Web app is closed or not in browser focus) then you should
// implement this optional method.
// [START background_handler]
messaging.setBackgroundMessageHandler(function(payload) {
  console.log('[firebase-messaging-sw.js] Received background message ', payload);
  // Customize notification here
  const notificationTitle = 'Background Message Title';
  const notificationOptions = {
    body: 'Background Message body.',
    icon: '/firebase-logo.png'
  };

  return self.registration.showNotification(notificationTitle,
      notificationOptions);
});
// [END background_handler]


7. 背景工作補充 /firebase-messaging-sw.js (或是自訂的 ServiceWorker)

當 /firebase-messaging-sw.js (或是自訂的 ServiceWorker) 是空白時,這時 web app (chrome browser) 都到訊息時,只會提醒有訊息在背景更新,且前景都不會觸發 messaging.onMessage 的事件。

8. 若發現異常,例如 Web 前景有 token 又收不到訊息時,請留意背景工作是否有實作,建議把 chrome browser 重開,仍不行時,甚至在 chrome://settings/content/notifications 清除重新來過

9.善用 curl command 測試:

curl -X POST -H "Authorization: key=YourAppServerKey" -H "Content-Type: application/json" -d '{
  "notification": {
    "title": "Hello",
    "body": "World",
    "icon": "firebase-logo.png",
    "click_action": "http://localhost:8081"
  },
  "to": "FCM token"
}' "https://fcm.googleapis.com/fcm/send"


10. 若 user 移除接收,送訊息時會收到回饋:

{"multicast_id":####,"success":0,"failure":1,"canonical_ids":0,"results":[{"error":"NotRegistered"}]}

11. FCM 跟用戶有沒有登入(Google帳號)無關
2017年10月17日 星期二

Firebase 開發筆記 - Firebase Cloud Messaging (FCM) 初體驗、 Topic 管理與 Web notification

firebase-web-console

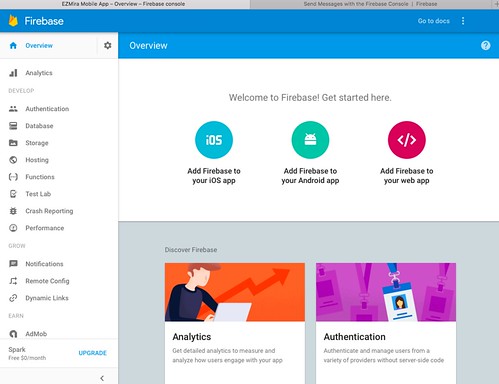
最近強者同事推薦使用 FCM ,看了一下,對於計費方式有點抖,若一切免費的話,真的超佛心 :P 由於支援潮流的訊息訂閱架構,基本上幾乎可以不用自行紀錄 notification token 了,用起來很直觀又方便。例如,想要個別通知時,可以每一個 user 給予一個 topic id (如 user id) ,就能夠不用紀錄 raw notification token 單獨發訊給對方!有一點點像用運算取代空間感。

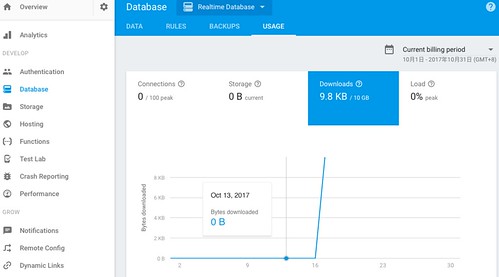
當發送 push 給使用者後,且使用者取得訊息時,關注 Realtime db 的 Download 流量有變動,不知是不是真的要計算流量?若是的話,大約發送一則訊息算 2KB ,而免費版流量 10GB/month,約一個月可以發送 500萬則訊息。

firebase-rt-db-download

若真的要計算流量費的話,那 FCM 就不是免錢,接著要花錢則是 25 美金方案有 20GB/month ,接著更高級則是 $1/GB 計費。

Updated @ 2017/10/18: 與 Firebase 客服聯繫,確認 FCM 不佔用 Realtime Database 流量!並且一口氣發送 100 則後,流量也沒有大量增加,符合預期!超佛心。強者同事提醒,對於 Database Download 流量,可能是 Firebase dashboard/console 的資訊讀寫 ( https://firebase.google.com/docs/database/usage/billing - Firebase console data )

聊聊趣味的地方,關於 Topic 管理機制,當你有 FCM token 後,可以在 server site 幫 device 訂閱 topic 喔!這功能很便利,就像...你紀錄了一堆 GCM token / APNs token 後,自己過濾對象,再進行發送。然而,topic 概念在於"使用情境"知道後,直接刻在 app 端,只是突然新增使用情境時,就得變成新版 app user 可以接受,舊版則無法接受到訊息,這時 server site 若有記錄 FCM token 時,就可以代勞幫忙訂閱:

https://developers.google.com/instance-id/reference/server#manage_relationship_maps_for_multiple_app_instances

https://iid.googleapis.com/iid/v1:batchAdd
Content-Type:application/json
Authorization:key=API_KEY
{
   "to": "/topics/movies",
   "registration_tokens": ["nKctODamlM4:CKrh_PC8kIb7O...", "1uoasi24:9jsjwuw...", "798aywu:cba420..."],
}


同理,也可以取消訂閱:https://iid.googleapis.com/iid/v1:batchRemove

若 server site 是 node.js 的,可以直接用 SDK :https://firebase.google.com/docs/cloud-messaging/admin/manage-topic-subscriptions

最後,筆記一下 Web app 的部分:假設網站服務位置為 https://example.com/fcm/ ,預設都要在根目錄埋上 firebase-messaging-sw.js 檔案,可以空白。

$ touch /var/www/firebase-messaging-sw.js
$ vim /var/www/fcm/index.html
<html>
<head>
<script src="https://www.gstatic.com/firebasejs/4.5.2/firebase.js"></script>
<script>
// Initialize Firebase
var config = {
apiKey: "your-app-apikey",
authDomain: "your-app.firebaseapp.com",
databaseURL: "https://your-app.firebaseio.com",
projectId: "your-app",
storageBucket: "your-app.appspot.com",
messagingSenderId: "your-app-id"
};
firebase.initializeApp(config);
</script>
</head>
<body>
<script>
const messaging = firebase.messaging();

messaging.onTokenRefresh(function() {
messaging.getToken()
.then(function(refreshedToken) {
console.log('Token refreshed.', refreshedToken);
})
.catch(function(err) {
console.log('Unable to retrieve refreshed token ', err);
});
});

messaging.onMessage(function(payload) {
console.log("Message received. ", payload);
});

messaging.requestPermission()
.then(function() {
console.log('Notification permission granted.');
resetUI();
})
.catch(function(err) {
console.log('Unable to get permission to notify.', err);
});

function resetUI() {
console.log('resetUI');
messaging.getToken()
.then(function(currentToken) {
if (currentToken) {
console.log("currentToken:", currentToken);
} else {
console.log('No Instance ID token available. Request permission to generate one.');
}
})
.catch(function(err) {
console.log('An error occurred while retrieving token. ', err);
});
}
</script>
</body>
</html>


如此一來,用 chrome browser 瀏覽 https://example.com/fcm/ 會彈跳視窗詢問是否接收訊息,點擊接受後,在 dev tools 的 console 可以看到:

Notification permission granted.
resetUI
currentToken: thisClientFCMToken

如此一來,就可以對他發訊、設定此 client 去訂閱 topic 了:

$ curl -X POST -H "Authorization: key=YourFCMAppServerKey" -H "Content-Type: application/json" -d '{
  "notification": {
    "title": "Hello",
    "body": "World",
    "icon": "firebase-logo.png",
    "click_action": "http://localhost:8081"
  },
  "to": "thisClientFCMToken"
}' "https://fcm.googleapis.com/fcm/send"

$ curl -X POST -H "Authorization: key= YourFCMAppServerKey" -H "Content-Type: application/json" -d '{
  "registration_tokens":["thisClientFCMToken"],
  "to": "/topics/foo-bar"
}' "https://iid.googleapis.com/iid/v1:batchAdd"

$ curl -X POST -H "Authorization: key= YourFCMAppServerKey" -H "Content-Type: application/json" -d '{
  "notification": {
    "title": "Hello",
    "body": "World",
    "icon": "firebase-logo.png",
    "click_action": "http://localhost:8081"
  },
  "to": "/topics/foo-bar"
}' "https://fcm.googleapis.com/fcm/send"

2017年10月5日 星期四

台灣人力市場價

ptt-tech_job-M.1507055381.A.6A7

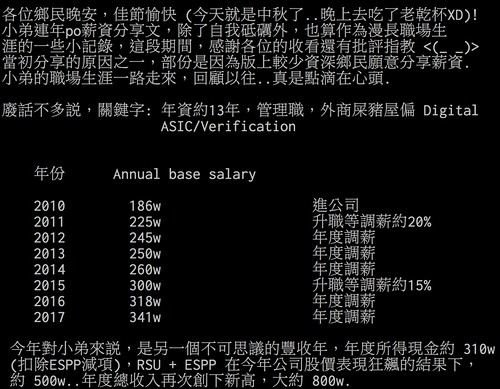
昨天看到大神按讚,剛好掃了這篇:[心得] 我的薪資歷程史 (續4) - 看板 Tech_Job - 批踢踢實業坊,感到健康又溫馨,所以來記錄一下。

我自己的心得...其實美國、中國和台灣的價目的確有很明顯的起薪差距,當你了解這個生態時,通常已深陷在某一個區域難以自拔,像是人已在矽谷、人在上海,或是人在台灣抱怨著數字 XD 台灣這邊大多都是看著鄉民的分享,且 PTT 有太多負面的情緒,且真正高薪者都忙得喘不過氣,要嘛工作,要嘛忙著訂機票排假期,誰跟你在那邊浪費時間處理負面心情,時間就是金錢啊!

在同業交流上,得到的資訊跟這位強者分享的極吻合。像是矽谷起薪好則 8~12萬鎂,六年資歷的資深等級拿到 30萬鎂的也有。而台灣的外商價也如上述對應,如大大的年資拿到一百八的數字,要超過也是有的,通常得搭配天時地利人和,拿了個二百五也不是不行。而這些是建立在生態圈,已穩健成長的公司,會願意花錢找強者,而完成A輪的新創,更是會花多錢來加速的公司成長的,因此,拿到高於行情時,要承擔的是面對收掉的風險,而拿到低於市場行情時,要想想自己的吃虧是為了什麼,想透了才會走得遠,最怕就是人云亦云,永遠不知幾兩重 Orz

回過頭來,我覺得台灣的人力價為了避免惡性競爭,大多都會說好一個範圍,太高就會碰到 HR 的思維:那其他成員該怎辦。而這樣是不是好事?也說不上來。只知道若一間公司起薪範圍屬於可接受的價碼,那剩下就好好珍惜,雖然跳槽是數字變化最快的方式(例如10%~50%)且不用等上一整年後才調薪,但公司若還有機會時,可跟這位大大一樣深耕,求一個不會虧待你的公司、有願景的公司,並且等待他起飛。

舉些對應例子:某強者當初離開 hTC 加入新創(當時股價還沒破千),他的新創老闆偶爾都會碎碎唸幾句“不好意思讓你少賺了”,但強者還是甘之如飴(在新創也過得很讚) ;前同事當初待在 hTC 趁勢賺了間中和房;負面的,則是分紅費用化,當時拿到 hTC 的股票繳的稅 > 死抱著股票的餘值。

總之,一切看緣分,強求不來啊,但時時努力是必要的,不要帶著負面心情、懷才不遇、惡習文化來圈地搞政治,重要的,求的是公司強盛後的分紅,而不是那份起薪啊

2017年9月30日 星期六

[Python] 機器學習筆記 - Feature Engineering 以鐵達尼號資料為例

之前都用一些工作經驗去分析一些資料,但不夠科學,有點僥倖的做事方式。如果碰到沒任何背景經驗的數據時,這時就慘了,就得回歸到靠數學統計了。

參考這篇:Titanic best working Classifier by Sina

整個過程十分享受如何用平均、標準差、去除雜訊、資料補齊、正規化、標籤數據化等等。讓我回想起之前寫的筆記,用了 LabelEncoder 等方式,結果...只要用 Pandas 搭配 map 架構就一口氣做光了 XD 並非 LabelEncoder 無用武之地,而是當你清楚資料屬性時,可以善用 Pandas 的架構去達成。而此例未用 OneHotEncoder 架構。

簡易筆記:

train = pd.read_csv('../input/train.csv', header = 0, dtype={'Age': np.float64})
test  = pd.read_csv('../input/test.csv' , header = 0, dtype={'Age': np.float64})
full_data = [train, test]

for dataset in full_data:
        dataset['Name_length'] = dataset['Name'].apply(len)
dataset['Has_Cabin'] = dataset["Cabin"].apply(lambda x: 0 if type(x) == float else 1)


用個 full_data = [train, test] 再搭配 "for dataset in full_data " 的好處是可以一口氣整理完 train/test dataset 的轉換,十方便利,之前完全沒想到這招。新增欄位就透過 pandas 架構直接添加,非常直觀,但沒想到可以一口氣搭配 apply 架構去處理,這樣程式超簡潔的:

dataset['Name_length'] = dataset['Name'].apply(len)
dataset['Has_Cabin'] = dataset["Cabin"].apply(lambda x: 0 if type(x) == float else 1)


另外,在字串處理時,可以搭配 replace 或 regular expression(apply) 做前置處理(正規化):

def get_title(name):
title_search = re.search(' ([A-Za-z]+)\.', name)
if title_search:
return title_search.group(1)
return ""

dataset['Title'] = dataset['Name'].apply(get_title)
#print(dataset['Title'].unique())
dataset['Title'] = dataset['Title'].replace(['Lady', 'Countess','Capt', 'Col','Don', 'Dr', 'Major', 'Rev', 'Sir', 'Jonkheer', 'Dona'], 'Rare')
dataset['Title'] = dataset['Title'].replace('Mlle', 'Miss')
dataset['Title'] = dataset['Title'].replace('Ms', 'Miss')
dataset['Title'] = dataset['Title'].replace('Mme', 'Mrs')
#print(dataset['Title'].unique())


整理完一輪後,把字串轉數據,就可以透過 map 來轉換,其中 fillna 則是把剩下沒對應到的都填 0 ,簡潔啊:

title_mapping = {"Mr": 1, "Miss": 2, "Mrs": 3, "Master": 4, "Rare": 5}
dataset['Title'] = dataset['Title'].map(title_mapping)
dataset['Title'] = dataset['Title'].fillna(0)


接著來處理年紀與票價的部分,由於偏隱私,容易無資料,這時看到作者就開始用亂數去填補年紀,並依照著標準差資訊來做,可以維持資料分布,高招!而票價則用中位數去填補:

age_avg = dataset['Age'].mean()
age_std = dataset['Age'].std()
age_null_count = dataset['Age'].isnull().sum()
age_null_random_list = np.random.randint(age_avg - age_std, age_avg + age_std, size=age_null_count)
#
# dataset['Age'][np.isnan(dataset['Age'])] = age_null_random_list
#
# SettingWithCopyWarning:
# A value is trying to be set on a copy of a slice from a DataFrame
# See the caveats in the documentation: http://pandas.pydata.org/pandas-docs/stable/indexing.html#indexing-view-versus-copy
#
dataset.loc[ dataset['Age'][np.isnan(dataset['Age'])].index , 'Age' ] = age_null_random_list

dataset.loc[ dataset['Age'] <= 16, 'Age'] = 0
dataset.loc[(dataset['Age'] > 16) & (dataset['Age'] <= 32), 'Age'] = 1
dataset.loc[(dataset['Age'] > 32) & (dataset['Age'] <= 48), 'Age'] = 2
dataset.loc[(dataset['Age'] > 48) & (dataset['Age'] <= 64), 'Age'] = 3
dataset.loc[ dataset['Age'] > 64, 'Age'] = 4 ;

dataset['Fare'] = dataset['Fare'].fillna(train['Fare'].median())
dataset.loc[ dataset['Fare'] <= 7.91, 'Fare'] = 0
dataset.loc[(dataset['Fare'] > 7.91) & (dataset['Fare'] <= 14.454), 'Fare'] = 1
dataset.loc[(dataset['Fare'] > 14.454) & (dataset['Fare'] <= 31), 'Fare']   = 2
dataset.loc[ dataset['Fare'] > 31, 'Fare'] = 3
dataset['Fare'] = dataset['Fare'].astype(int)


最後,再提一下新增屬性的部分,pandas 真的很方便,可以單純把某欄位的資訊計算一番,添加到新的欄位,也有透過 dataset.loc 來取得特定資料來重新設定:

dataset['Name_length'] = dataset['Name'].apply(len)
dataset['Has_Cabin'] = dataset["Cabin"].apply(lambda x: 0 if type(x) == float else 1)

dataset['IsAlone'] = 0
dataset.loc[dataset['FamilySize'] == 1, 'IsAlone'] = 1

dataset.loc[ dataset['Age'][np.isnan(dataset['Age'])].index , 'Age' ] = age_null_random_list

dataset.loc[ dataset['Age'] <= 16, 'Age'] = 0
dataset.loc[(dataset['Age'] > 16) & (dataset['Age'] <= 32), 'Age'] = 1


讀完這篇真是功力大增啊!以上是數據整理的流程,但是,還有個重點沒提到,那就是作者是整理完後,立馬看看某欄位跟目標欄位(Survived)的關係,才是真的靠數學來做事:

print (train[["Sex", "Survived"]].groupby(['Sex'], as_index=False).mean())
      Sex  Survived
0  female  0.742038
1    male  0.188908

print (train[['Title', 'Survived']].groupby(['Title'], as_index=False).mean())

    Title  Survived
0  Master  0.575000
1    Miss  0.702703
2      Mr  0.156673
3     Mrs  0.793651
4    Rare  0.347826


可以得知 Miss 跟 Mrs 的生存率超過七成!這才是該學的精神。對於常搭船的,大多很清楚一開始必然先讓婦幼先逃生,所以有背景就會先假定讓女性生存率高的分析方式,沒背景就得靠統計功力了