$ cd /path/project

$ git submodule add https://github.com/google/googletest/tree/master/googletest 3rdParty/googletest


$ vim CMakeLists.txt

...


add_subdirectory(3rdParty/googletest)

add_executable(your_unit_test

 your_unit_test.cpp

)

add_dependencies(your_unit_test gtest)

include_directories(${gtest_SOURCE_DIR}/include)

target_link_libraries(your_unit_test

 gtest

)
2016年4月4日 星期一
透過 Git Submodule 和 CMake 使用 GoogleTest
大概兩年前有練習一下 [CPP] Unit Test for C++ Usage via Google Test,連假來複習一下,著重在 CMakefile 的使用:

2016年3月22日 星期二
Nginx 筆記 - 對於 requests 重導與 request_uri 變數 encode/decode 問題
事情是這樣的,有個服務應用配置 web server (www.localhost) 跟 app server (api.localhost) 時,有這這樣的特性:
網站首頁:http://www.localhost/
前端API:http://www.localhost/api/
真正API:http://api.localhost/
例如有一則 API 服務 http://www.localhost/api/helloworld 必須重導至 http://api.localhost/helloworld 才行。由於 web server 主要服務 static files 而 app server 則是服務 api ,但所有入口點都是在 web server,因此就需要將 requests 導向給後方的 app server:
這樣,看似無限美好,但是有個關鍵要留意,上頭有做一次字串處理:set $request_url $1; 這一步把 /api/helloworld 轉成 /helloworld 沒錯,但 $request_url 變數連帶處理了解碼的問題,當整個 requests 只是常見的英數符號時,都是一切正常的,但如果是帶有中文字等需要做 URLEncode/Decode 時,就會出包啦。
接著,使用 curl 來驗證:
看見 X-WWW-Request-URL 和 X-WWW-Request-URI 代表為 3000 port 服務。
可以看到 X-API-Request-URI: /helloworld?abc=123 時,代表有將 requests 導向到 8000 port 的服務。
接著,試試看URLEncode吧!
在 3000 port 服務中,X-WWW-Request-URL 和 X-WWW-Request-URI 一致是非常正常,但是,換成 /api/%E4%BD%A0%E5%A5%BD%E5%97%8E%0D%0A 就會出包啦:
仔細看會發現 X-API-Request-URI 缺少 %0A 的資料,並且看到 request_uri 有點像是被重新組合過,從原本的大寫變小寫了,但最重要的是有缺資料!
而解法?就是改用 rewrite 來避開了,但是對於這種 URLEncode 的,還必須有前置處理,例如定義新的服務網址: /api/urlencode/%E4%BD%A0%E5%A5%BD%E5%97%8E%0D%0A 用法,接著更新 nginx 設定檔:
如此一來,就會看到 URLENCODE 資訊是沒有被解析過,完整的 pass 到 8000 port 服務囉
網站首頁:http://www.localhost/
前端API:http://www.localhost/api/
真正API:http://api.localhost/
例如有一則 API 服務 http://www.localhost/api/helloworld 必須重導至 http://api.localhost/helloworld 才行。由於 web server 主要服務 static files 而 app server 則是服務 api ,但所有入口點都是在 web server,因此就需要將 requests 導向給後方的 app server:
upstream backend_hosts { server api.localhost:80; }


set $request_url $request_uri;

if ($uri ~ ^/api(.*)$ ) {

 set $request_url $1;

}

location ^~ /api/ {

 proxy_read_timeout 300;

 proxy_set_header Host $http_host; proxy_redirect off;

 proxy_set_header X-Forwarded-For $proxy_add_x_forwarded_for;

 proxy_pass http://backend_hosts$request_url$is_args$args;

 proxy_buffering off;

}
這樣,看似無限美好,但是有個關鍵要留意,上頭有做一次字串處理:set $request_url $1; 這一步把 /api/helloworld 轉成 /helloworld 沒錯,但 $request_url 變數連帶處理了解碼的問題,當整個 requests 只是常見的英數符號時,都是一切正常的,但如果是帶有中文字等需要做 URLEncode/Decode 時,就會出包啦。
$ sudo apt-get install nginx

$ sudo vim /etc/nginx/conf.d/www.conf

upstream backend_hosts { server 127.0.0.1:8000; }


# Web Server

server {

        listen 3000;


        set $request_url $request_uri;

        if ($uri ~ ^/api(.*)$ ) {

                set $request_url $1;

        }

        location ^~ /api/ {

                proxy_read_timeout 300;

                proxy_set_header Host $http_host; proxy_redirect off;

                proxy_set_header X-Forwarded-For $proxy_add_x_forwarded_for;

                proxy_pass http://backend_hosts$request_url$is_args$args;

                proxy_buffering off;

        }


        location ^~ / {

                add_header X-WWW-Request-URL $request_url;

                add_header X-WWW-Request-URI $request_uri;

                return 200;

        }

}

# APP Server

server {

        listen 8000;


        location ^~ / {

                add_header X-API-Request-URI $request_uri;

                return 200;

        }

}

$ sudo service nginx configtest && sudo service nginx restart
接著,使用 curl 來驗證:
$ curl -s -D - 'http://127.0.0.1:3000/'

HTTP/1.1 200 OK

Server: nginx/1.4.6 (Ubuntu)
Content-Type: application/octet-stream

Content-Length: 0

Connection: keep-alive

X-WWW-Request-URL: /

X-WWW-Request-URI: /
看見 X-WWW-Request-URL 和 X-WWW-Request-URI 代表為 3000 port 服務。
$ curl -s -D - 'http://127.0.0.1:3000/api/helloworld?abc=123'

HTTP/1.1 200 OK

Server: nginx/1.4.6 (Ubuntu)

Content-Type: application/octet-stream

Content-Length: 0

Connection: keep-alive

X-API-Request-URI: /helloworld?abc=123
可以看到 X-API-Request-URI: /helloworld?abc=123 時,代表有將 requests 導向到 8000 port 的服務。
接著,試試看URLEncode吧!
$ curl -s -D - 'http://127.0.0.1:3000/%E4%BD%A0%E5%A5%BD%E5%97%8E%0D%0A'

HTTP/1.1 200 OK

Server: nginx/1.4.6 (Ubuntu)

Content-Type: application/octet-stream

Content-Length: 0

Connection: keep-alive

X-WWW-Request-URL: /%E4%BD%A0%E5%A5%BD%E5%97%8E%0D%0A

X-WWW-Request-URI: /%E4%BD%A0%E5%A5%BD%E5%97%8E%0D%0A
在 3000 port 服務中,X-WWW-Request-URL 和 X-WWW-Request-URI 一致是非常正常,但是,換成 /api/%E4%BD%A0%E5%A5%BD%E5%97%8E%0D%0A 就會出包啦:
$ curl -s -D - 'http://127.0.0.1:3000/api/%E4%BD%A0%E5%A5%BD%E5%97%8E%0D%0A'

HTTP/1.1 200 OK

Server: nginx/1.4.6 (Ubuntu)

Content-Type: application/octet-stream

Content-Length: 0

Connection: keep-alive

X-API-Request-URI: /%e4%bd%a0%e5%a5%bd%e5%97%8e%0d
仔細看會發現 X-API-Request-URI 缺少 %0A 的資料,並且看到 request_uri 有點像是被重新組合過,從原本的大寫變小寫了,但最重要的是有缺資料!
而解法?就是改用 rewrite 來避開了,但是對於這種 URLEncode 的,還必須有前置處理,例如定義新的服務網址: /api/urlencode/%E4%BD%A0%E5%A5%BD%E5%97%8E%0D%0A 用法,接著更新 nginx 設定檔:
upstream backend_hosts { server 127.0.0.1:8000; }


server {

        listen 3000;


        set $request_url $request_uri;


        if ($request_uri ~ ^/api(.*)$ ) {

                rewrite ^ $request_uri;

                rewrite ^/api(.*)$ $1;

                set  $request_url $1;

        }


        location ^~ / {


                add_header X-WWW-Request-URL $request_url;

                add_header X-WWW-Request-URI $request_uri;

                return 200;

        }


        location ^~ /urlencode {

                proxy_read_timeout 300;

                proxy_set_header Host $http_host; proxy_redirect off;

                proxy_set_header X-Forwarded-For $proxy_add_x_forwarded_for;

                proxy_pass http://backend_hosts$request_url;

                proxy_buffering off;

        }

}


server {

        listen 8000;


        location ^~ / {

                add_header X-API-Request-URI $request_uri;

                return 200;

        }

}
如此一來,就會看到 URLENCODE 資訊是沒有被解析過,完整的 pass 到 8000 port 服務囉
$ curl -s -D - 'http://127.0.0.1:3000/api/urlencode/%E4%BD%A0%E5%A5%BD%E5%97%8E%0D%0A'

HTTP/1.1 200 OK

Server: nginx/1.4.6 (Ubuntu)

Content-Type: application/octet-stream

Content-Length: 0

Connection: keep-alive

X-API-Request-URI: /urlencode/%E4%BD%A0%E5%A5%BD%E5%97%8E%0D%0A
2016年3月17日 星期四
[Linux] 透過 du + sort 指令,查詢資料儲存最大量的目錄 @ Ubuntu 14.04
還滿常用 du -hd1 的指令,可以列出當下目錄的使用情況,且只列出一層子目錄。然而,列完後又想要排序,以此更快抓到問題 :P 發現 sort -h 指令頗好用:-h, --human-numeric-sort, compare human readable numbers (e.g., 2K 1G)
所以連續技:
所以連續技:
$ du -hd1

...

13M     ./Cache

552M    ./Uploads

340K    ./css

1GB     .
$ du -hd1 | sort -h

...

340K    ./css

13M     ./Cache

552M    ./Uploads

1GB     .
2016年3月15日 星期二
AWS 筆記 - 使用 CodeCommit
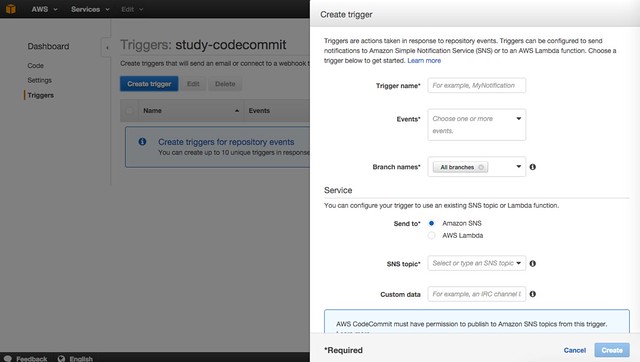
雖然很習慣自己架 git server ,但基於摸熟 AWS 服務,就小試一下。整個流程很簡單,建立一個 git repo 就輸入完名稱即可建立,接著提供 SSH / HTTPS 的存取方式。而特別的地方應該是 Triggers ,可以搭配以下四種 event 觸發動作,如簡訊寫信或HTTP endpoint (AWS SNS) 或是呼叫 AWS Lambda function 做事:
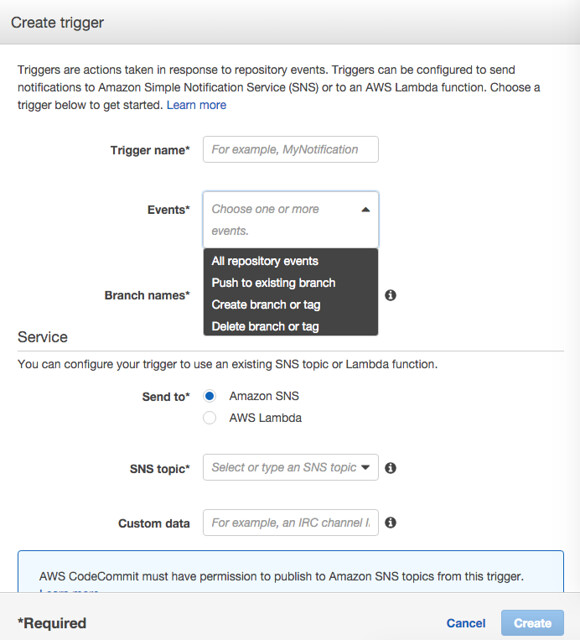
其中以 AWS SNS 為例,還必須先去 AWS SNS 建立的對應服務才行,也能 Test trigger 一下,看起來是把資料都埋在 Message 裡頭:
{
"Type" : "Notification",
"MessageId" : "580672ce-b036-5484-b1ca-3daf00303ba3",
"TopicArn" : "arn:aws:sns:us-east-1:HelloWorld",
"Subject" : "TEST: AWS CodeCommit us-east-1 push: study-codecommit",
"Message" : "{\"Records\":[{\"awsRegion\":\"us-east-1\",\"codecommit\":{\"references\":[{\"commit\":\"0000000000000000000000000000000000000000\",\"ref\":\"refs/heads/TestReference\"}]},\"customData\":\"codecommit\",\"eventId\":\"36e338ce-a719-4188-93bb-aa6c28298a71\",\"eventName\":\"TriggerEventTest\",...}]}",
...
}
AWS 筆記 - 使用 Simple Notification Service (SNS)
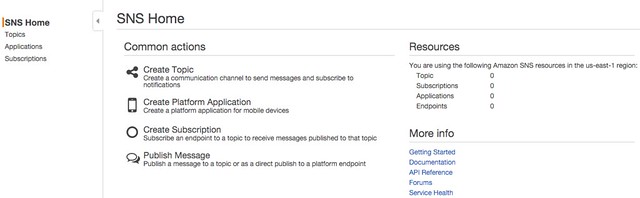
共有 4種動作可挑選,以 Create Topic 為例,先輸入完 Topic 名稱後,可以在挑選 Subscription:
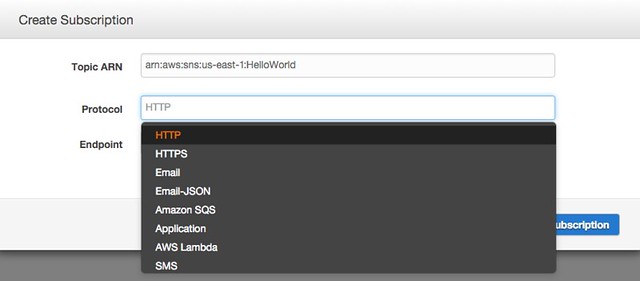
以 HTTP/HTTPS 為例,就是會去 query 一個網址,而 SMS 則會寄簡訊。而 HTTP/HTTPS 也不是隨便設置完就好,還必須認證該 HTTP endpoint 是由你所擁有的,過程為:
Create Subscription -> HTTP/HTTPS -> 輸入 HTTP Endpoint -> Request confirmations -> 這時 AWS 就會發 HTTP POST 資料過去,請記得印出來,把 SubscribeURL 取出來用 -> Confirm Subscription 輸入剛剛的 SubscribeURL 即可完成驗證
這時在 HTTP endpoint 會收到 HTTP POST 資料,以 PHP 為例:
<?php


file_put_contents('/tmp/sns_check', file_get_contents('php://input'));
{

  "Type" : "SubscriptionConfirmation",

  "MessageId" : "9f5f6846-5227-4ef9-b94d-c172ef6c9c23",

  "Token" : "xxxxxx",

  "TopicArn" : "arn:aws:sns:us-east-1:HelloWorld",

  "Message" : "You have chosen to subscribe to the topic arn:aws:sns:us-east-1:HelloWorld.\nTo confirm the subscription, visit the SubscribeURL included in this message.",

  "SubscribeURL" : "https://sns.us-east-1.amazonaws.com/?Action=ConfirmSubscription&TopicArn=arn:aws:sns:us-east-1:HelloWorld&Token=xxxxx

",

  ...

}
若一直沒有去做驗證,會一直卡在 PendingConfirmation 狀態,而沒確認的將於三天後自動刪除。
最後,也可以在AWS SNS介面上發動通知事件(Publish a message),以 raw format 為例,填寫的資料會出現在 Message 中:
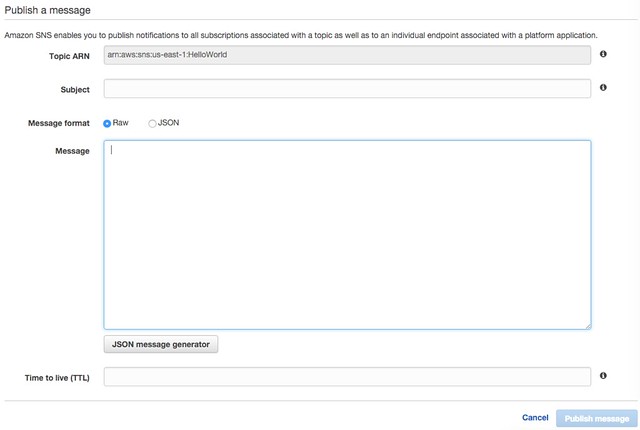
若輸入的 raw = yoyo 字眼,那 HTTP endpoint 收到的 HTTP Post 資料為:
{

  "Type" : "Notification",

  "MessageId" : "f737bee7-7567-5f29-b230-f186ddaa84cc",

  "TopicArn" : "arn:aws:sns:us-east-1:HelloWorld",

  "Subject" : "haha",

  "Message" : "yoyo",

   ...

  }

}
訂閱:
文章 (Atom)