2015年8月21日 星期五

Javascript 開發筆記 - 透過 Google Maps Routing API 畫路徑 (Directions Service)

Google Maps Directions Service

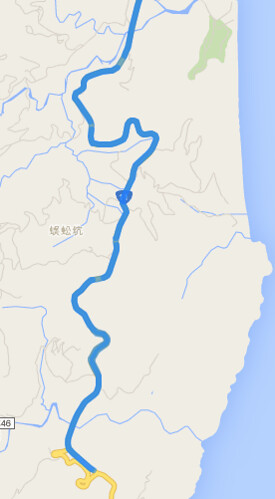
使用 GPS Location 畫圖時,點太多太精細,容易畫很慢,點太少太粗糙時,發現畫出的線會很糟,例如截彎取直的現象。雖然正解應該是先把精細路徑畫出圖來用,例如每個 zoom level 都畫好路線圖,而非動態畫線、畫點。但就是想偷懶透過 Google Maps API 來畫圖 XD 因此就研究了一下 Directions Service:https://developers.google.com/maps/documentation/javascript/directions
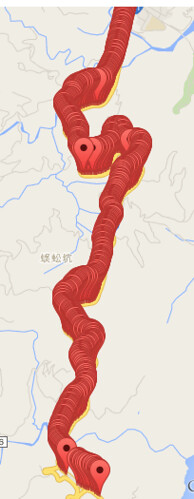
2000個點

假設原路線共有 2000 個精細點,接著取 200 個 sample 點出來,接著想想看怎樣用 Google Maps API 來畫圖。如果單純把這兩百個點畫連線,就會出現截彎取直的現象,因此,想到 Google 導航,透過導航機制自動幫你把路線畫得服服貼貼,畢竟 GPS 收集時也還有誤差問題,真正要做的好,還得把 GPS 位置修到路徑上,有許多眉眉角角。

在使用 Google Maps Directions Service 時,要留意限制,例如有 OVER_QUERY_LIMIT、MAX_WAYPOINTS_EXCEEDED 等限制,不是你想做就可以做:

  • OVER_QUERY_LIMIT indicates the webpage has sent too many requests within the allowed time period.
  • MAX_WAYPOINTS_EXCEEDED indicates that too many DirectionsWaypoints were provided in the DirectionsRequest. The maximum allowed waypoints is 8, plus the origin, and destination. Google Maps API for Work customers are allowed 23 waypoints, plus the origin, and destination. Waypoints are not supported for transit directions.

因此,需要將 200 個點,切成若干次 request ,每一個 request 含頭尾只能有 8 個座標點,其中給予頭尾就可以導航了,而其中的 6 個中繼點只是可以精細導航路線不會飄走。大概是這樣的概念處理資料,200個點,以 8 個點為單位 = 25 次 requests ,會踩到 OVER_QUERY_LIMIT 。儘管可以再透過 call api 的頻率來解決,但我又偷懶把 200 個點限縮成 5~6 次的 requests,然後再連續的 GPS 中,透過平均個數抽 6 個點出來,讓一個 request 還是有八個點,只是更不精細。

總之,程式碼大概長這樣:

<html>
<head>
<script src="https://code.jquery.com/jquery-2.1.4.min.js"></script>
<script src="https://maps.googleapis.com/maps/api/js?signed_in=true&callback=initMap" async defer></script>
<script>
var routes = [];
var points = [];
function initMap() {
var map = new google.maps.Map(document.getElementById('map'), {
zoom: 15,
center: {lat: 23.900422, lng: 121.603807}
});

var prev = null;
for (var i=0, cnt=data['results'].length; i<cnt ; ++i) {
var point = new google.maps.LatLng(data['results'][i]['location'].lat,data['results'][i]['location'].lng);
points.push({
location: point,
stopover: false, // 是否顯示
});

// add marker
if (0) {
var marker = new google.maps.Marker({
map: map,
position: point,
});
}
if (prev) {
// use multiple routes
routes.push({
origin: prev,
destination: point,
travelMode: google.maps.TravelMode.DRIVING
});
}
prev = point;
}

var directionsService = new google.maps.DirectionsService;
// multiple routes
// https://developers.google.com/maps/documentation/javascript/directions
if (0) {
for (var i=0, cnt=routes.length ; i<cnt ; ++i) {
console.log(i);
directionsService.route(routes[i], function(result, status) {
if (status == google.maps.DirectionsStatus.OK) {
var directionsDisplay = new google.maps.DirectionsRenderer({
suppressMarkers: true
});
directionsDisplay.setMap(map);
directionsDisplay.setDirections(result);
}
} );
}
}

// use multiple stops
// https://developers.google.com/maps/documentation/javascript/directions#Waypoints
var max_steps = 36;
for (var i=0, cnt=points.length; i < cnt ; i += max_steps) {
var stops = []; // max should be 8
var next_stop = Math.floor(max_steps / (8-2) );
for (var j=i+next_stop ; j<(max_steps - next_stop) && j < (cnt - 1) ; j += next_stop)  // 去頭去尾, 頭擺在 origin
stops.push(points[j]);
var request = {
origin: points[i].location,
destination: i+(max_steps - 1) < cnt ? points[i+max_steps-1].location : points[cnt-1].location,
waypoints: stops,
travelMode: google.maps.TravelMode.DRIVING,
};
directionsService.route(request, function(result, status) {
if (status == google.maps.DirectionsStatus.OK) {
var directionsDisplay = new google.maps.DirectionsRenderer({
suppressMarkers: true // 單純畫路線,不要顯示 marker
});
directionsDisplay.setMap(map);
directionsDisplay.setDirections(result);
} else {
console.log( status ); // OVER_QUERY_LIMIT, MAX_WAYPOINTS_EXCEEDED
}
} );
}
}

var data =
{
  "results": [
      {
         "elevation" : 17.00912857055664,
         "location" : {
            "lat" : 23.900397,
            "lng" : 121.603762
         },
         "resolution" : 610.8129272460938
      },
      {
         "elevation" : 20.88261413574219,
         "location" : {
            "lat" : 23.898869,
            "lng" : 121.603903
         },
         "resolution" : 610.8129272460938
      },
      {
         "elevation" : 22.29166030883789,
         "location" : {
            "lat" : 23.896661,
            "lng" : 121.60384
         },
         "resolution" : 610.8129272460938
      },
      {
         "elevation" : 20.24537467956543,
         "location" : {
            "lat" : 23.895185,
            "lng" : 121.60387
         },
         "resolution" : 610.8129272460938
      },
      {
         "elevation" : 30.49811744689941,
         "location" : {
            "lat" : 23.891678,
            "lng" : 121.603371
         },
         "resolution" : 610.8129272460938
      },
      // ...
   ]
};
</script>
</head>
<body>
<div id="map" style="width:100%; height:100%;"></div>
</body>
</html>

2015年8月17日 星期一

風雨生信心

風雨生信心

不知不覺參加了第三次了吧?第一次參加 COSCUP 用工作人員的角色,隔年則是一般會眾,今年偷懶不搶票,用 Open Source 貢獻者拿到票 XD

最近工作上的角色也有點蛻變,漸漸地不是用純工程師的角度思考、面對問題,更能專注一些生涯細節,稱不上轉職。至於八卦消息?永遠都一直充斥著生活,聽聽就好,畢竟永遠都是別人吃麵,聽八卦的喊燙。非常感謝老闆時常的棒頭當喝,抽出一點時間分享彼此看待事情的觀感,這樣的經歷給我不少的成長。

那生活的目標?重心?大概就是家人為主,多看看稚嫩的臉龐,著實是一種幸福啊。

或許下次參加時,又是用另一個嶄新的身份吧!

2015年8月8日 星期六

iOS 開發筆記 - 呼叫外部程式來處理一些資源(URL Scheme)

把一些 resource 轉交給外部程式,常見的就是 URL Scheme 技巧。

已知 URL scheme ,判斷是否支援:

if ([[UIApplication sharedApplication] canOpenURL:url])
    [[UIApplication sharedApplication] openURL:url];


若是 file:// 開頭的,可以用這試試:

UIDocumentInteractionController *dic = [UIDocumentInteractionController interactionControllerWithURL:url];
[dic presentOptionsMenuFromRect:self.view.bounds inView:self.view animated:YES];


其他,可以用這試試:

UIActivityViewController *avc = [[UIActivityViewController alloc] initWithActivityItems:@[url] applicationActivities:nil];
[self presentViewController:avc animated:YES completion:nil];

2015年8月1日 星期六

使用 jq、awk、sort、uniq、tail、diff、comm 處理 JSON 大檔

跟朋友相約參加了黑客松,主要是分析 SPAM 資訊,由於官方提供的是一個很大檔案的 json format,大多操作都適用 jq 指令處理,盡量不寫 code 來分析 XD

首先,只對指定欄位取出資料:

$ cat data_set.input
[
   { "field1":"1" , "field2": "2", "field3": 3, "field4" : [1, 2, 3] } ,
   { "field1":"a" , "field2": "b", "field3": 4, "field4" : [1, 2] } ,
   ...
}


$ < data_set.file jq '.[] | .field1 +"-" + .field2 '
"1-2"
"a-b"
...


有時會碰到資料欄位是 number ,這時會出現 string and number cannot be added 的部分,可以這樣做:

$ < data_set.input jq '.[] | .field1 +"-" + (.field3 | tostring) '
"1-3"
"a-4"
...


有時想看某個欄位個數:

$ < data_set.input jq '.[] | .field1 +"-" + (.field4 | length | tostring) '
"1-3"
"a-2"
...


接著偷懶用 awk 整理資料:

$ < data_set.file jq '.[] | .field1 +"-" + .field2 ' | awk -F'"' '{print $2}'
1-2
a-b
...


有時需要判斷數值大小後,來決定是否輸出:

$ < data_set.file awk -F'-' '{ if($2 > 10) { print $1 }}'

輸出後,可以透過 sort 跟 uniq 整理一下:

$ < data_set.file awk -F'-' '{ if($2 > 10) { print $1 }}' | sort | uniq

有時搭配 uniq -c 計算屬性後,再用 sort -n 來排序:

$ < data_set.file awk -F'-' '{ if($2 > 10) { print $1 }}' | sort | uniq -c | sort -n

這時,輸出的結果就有指定屬性從小排到大的特性,如果第 1234 個 line 開始是你要的資料,可以搭配 tail 指令取出:

$ < data_set.file awk -F'-' '{ if($2 > 10) { print $1 }}' | sort | uniq -c | sort -n | tail -n +1234

甚至,取出後再搭配 awk 把前置數字去除,只要重要結果即可:

$ < data_set.file awk -F'-' '{ if($2 > 10) { print $1 }}' | sort | uniq -c | sort -n | tail -n +1234 | awk -F ' ' '{print $2}'

最後,如果有 lookup_pattern 跟 check_data 想要比對,記得都要把兩者做 sort,就可以用 diff 跟 comm 兩個指令:

$ sort lookup_pattern > lookup_pattern.sorted
$ sort check_data > check_data.sorted


這時想要檢查沒有落在 lookup_pattern.sorted 的清單或個數:

$ diff lookup_pattern.sorted check_data.sorted | grep "<"
$ diff lookup_pattern.sorted check_data.sorted | grep -c "<"


那如果想看有 match 到的清單:

$ comm -1 -2 lookup_pattern.sorted check_data.sorted

如此一來就類似作為清單比對的動作。若比較的條件太多時,只好寫寫 python 啦:

#!/usr/bin/python
#
# input.log、p1.log、p2.log 都是以 line 為單位的資料
#

in_data = open('input.log').read().split("\n")

pattern_data1 = open('p1.log').read().split("\n")
pattern_data2 = open('p2.log').read().split("\n")

lookup1 = {}
for i in pattern_data1:
        lookup1[i] = ''

lookup2 = {}
for i in pattern_data2:
        lookup2[i] = ''

for i in in_data:
    if i in lookup1:
         print " data in lookup1"
    elif i in lookup2:
         print " data in lookup2 && not in lookup1"

2015年7月27日 星期一

AWS 筆記 - 使用 AWS Elastic Beanstalk 發佈 Docker 維護的專案 @ Mac OS X 10.10.4

用 Docker 是有用過,但統一流程發佈出去倒沒幾次,現在就抽空碰一下 AWS Elastic Beanstalk 吧!目標就是只需提供 Docker 維護的 Project 直接交遞到 AWS 上,接著就要生出一台 app service 就是了,過程中可不是要自己先開台 EC2 、裝 Docker 環境等。

參考文件:
連續動作:

$ mkdir project && cd project
$ sudo pip install awsebcli
$ eb init
You have not yet set up your credentials or your credentials are incorrect
You must provide your credentials.
(aws-access-id): XXXXXXXXX
(aws-secret-key): XXXXXXXXX

Enter Application Name
(default is "project"):


結果發生忘了設定 IAM 權限,立馬添加 AWSElasticBeanstalkFullAccess 啦,再重新執行一次

$ eb init
Select a default region
1) us-east-1 : US East (N. Virginia)
2) us-west-1 : US West (N. California)
3) us-west-2 : US West (Oregon)
4) eu-west-1 : EU (Ireland)
5) eu-central-1 : EU (Frankfurt)
6) ap-southeast-1 : Asia Pacific (Singapore)
7) ap-southeast-2 : Asia Pacific (Sydney)
8) ap-northeast-1 : Asia Pacific (Tokyo)
9) sa-east-1 : South America (Sao Paulo)

Enter Application Name
(default is "project"):

Select a platform.
1) Node.js
2) PHP
3) Python
4) Ruby
5) Tomcat
6) IIS
7) Docker
8) Multi-container Docker
9) GlassFish
10) Go
(default is 1): 7

Do you want to set up SSH for your instances?
(y/n): y

Select a keypair.
1) changyy
2) [ Create new KeyPair ]
(default is 2):


以上就收工了 XD 在本機端的 project 裡頭,會有 .elasticbeanstalk 跟 .gitignore 的產生,接著再把一些 Dockerfile 與相關程式碼資料都搬進來吧,此例以架設 web server 為例

$ wget https://raw.githubusercontent.com/changyy/docker-study/web-server/Dockerfile
$ eb create dev-web
Creating application version archive "app-1507##_######".
Uploading project/app-1507##_######.zip to S3. This may take a while.
Upload Complete.
Environment details for: dev-web
  Application name: project
  Region: us-west-2
  Deployed Version: app-1507##_######
  Environment ID: e-#########
  Platform: 64bit Amazon Linux 2015.03 v1.4.3 running Docker 1.6.2
  Tier: WebServer-Standard
  CNAME: UNKNOWN
  Updated: 2015-07-27 03:52:28.037000+00:00
Printing Status:
INFO: createEnvironment is starting.
INFO: Using elasticbeanstalk-us-west-2-######### as Amazon S3 storage bucket for environment data.
INFO: Created load balancer named: awseb-e-p-AWSEBLoa-##########
INFO: Created security group named: awseb-e-#########-stack-AWSEBSecurityGroup-########
INFO: Created Auto Scaling launch configuration named: awseb-e-#########-stack-AWSEBAutoScalingLaunchConfiguration-NU2G8F2JA2BT
INFO: Created Auto Scaling group named: awseb-e-#########-stack-AWSEBAutoScalingGroup-############
INFO: Waiting for EC2 instances to launch. This may take a few minutes.
INFO: Created Auto Scaling group policy named: arn:aws:autoscaling:us-west-2:############:scalingPolicy:####-####-####-####-#####:autoScalingGroupName/awseb-e-#########-stack-AWSEBAutoScalingGroup-############:policyName/awseb-e-#########-stack-AWSEBAutoScalingScaleUpPolicy-####
INFO: Created Auto Scaling group policy named: arn:aws:autoscaling:us-west-2:############:####-####-####-####-#####:autoScalingGroupName/awseb-e-#########-stack-AWSEBAutoScalingGroup-############:policyName/awseb-e-#########-stack-AWSEBAutoScalingScaleDownPolicy-####
INFO: Created CloudWatch alarm named: awseb-e-#########-stack-AWSEBCloudwatchAlarmHigh-############
INFO: Created CloudWatch alarm named: awseb-e-#########-stack-AWSEBCloudwatchAlarmLow-############
INFO: Successfully pulled ubuntu:14.04
INFO: Successfully built aws_beanstalk/staging-app
INFO: Docker container ############ is running aws_beanstalk/current-app.
INFO: Added EC2 instance 'i-############' to Auto Scaling Group 'awseb-e-#########-stack-AWSEBAutoScalingGroup-############'.
INFO: Adding instance 'i-############' to your environment.
INFO: Successfully launched environment: dev-web


如此一來,服務就跑起來了 :P 整個過程 AWS Elastic Beanstalk 使用了 S3 儲存開發環境、開了一台 EC2 機器、啟用一個 ELB 單位、添加兩個 cloudwatch 關注服務情況(開新機器或關機器)以及一個 Auto scaling group 來確保服務的不中斷。

如此一來,可以再用此指令開啟瀏覽位置

$ eb open

接著就會開啟 browser 瀏覽了,不需自行在找尋找位置。

另外,有興趣的可以用以下指令研究:

$ eb status
Environment details for: dev-web
  Application name: project
  Region: us-west-2
  Deployed Version: 4a06
  Environment ID: e-######
  Platform: 64bit Amazon Linux 2015.03 v1.4.3 running Docker 1.6.2
  Tier: WebServer-Standard
  CNAME: dev-web-######.elasticbeanstalk.com
  Updated: 2015-07-27 06:15:45.859000+00:00
  Status: Ready
  Health: Green


$ eb logs
...
-------------------------------------
/var/log/docker-ps.log
-------------------------------------
'docker ps' ran at Mon Jul 27 06:34:11 UTC 2015:
CONTAINER ID        IMAGE                              COMMAND               CREATED             STATUS              PORTS                     NAMES
#########        aws_beanstalk/staging-app:latest   "/usr/sbin/apache2ctl -D FOREGROUND"   19 minutes ago      Up 19 minutes       80/tcp, 443/tcp   furious_feynman  
...


$ eb config
...


$ eb terminate
The environment "dev-web" and all associated instances will be terminated.
To confirm, type the environment name:


以上就差不多了,若有興趣的可以試一下另一個 dockfile: https://github.com/changyy/docker-study/tree/web-ssh-server,除了要下載 Dockfile 外,還要下載 start_service.sh ,其中後者可以參考 Docker 官方文件,改用 Supervisor 也行(https://docs.docker.com/articles/using_supervisord/)。機器開啟後,多了 ssh server 在執行。這時先去 EC2 查詢是哪一台機器,用 ssh ec2-user@server_ip 登入看看。