2014年6月30日 星期一

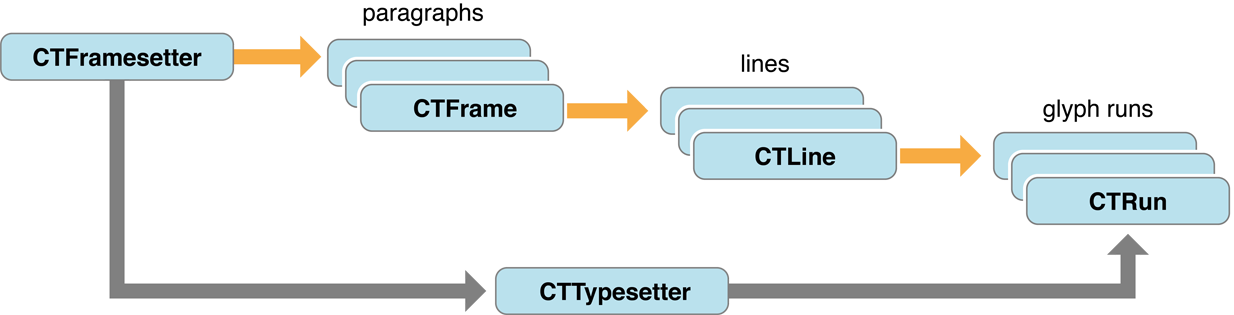
iOS 開發筆記 - 初探 Core Text 架構:paragraphs, lines, glyph runs and glyph


Core Text is an advanced, low-level technology for laying out text and handling fonts. The Core Text API, introduced in Mac OS X v10.5 and iOS 3.2, is accessible from all OS X and iOS environments.

先搞懂 String 在 iOS 系統內是如何被畫到 UIView 上頭:
CTFramesetter -> CTFrame (paragraphs) -> CTLine (lines) -> CTRun (glyph runs)
簡易的範例:

NSString *utf8String = @"0你1我2他";
NSAttributedString *attrString = [[NSAttributedString alloc] initWithString:utf8String];
CTLineRef line = CTLineCreateWithAttributedString((CFMutableAttributedStringRef) attrString);
CFIndex glyphLength = CTLineGetGlyphCount(line);
CFArrayRef runArray = CTLineGetGlyphRuns(line);
CFIndex runArrayLength = CFArrayGetCount(runArray);

for (CFIndex runIndex = 0; runIndex < runArrayLength; runIndex++) {
CTRunRef run = (CTRunRef) CFArrayGetValueAtIndex(runArray,  runIndex);
CTFontRef runFont = CFDictionaryGetValue(CTRunGetAttributes(run), kCTFontAttributeName);
for (CFIndex runGlyphIndex = 0; runGlyphIndex < CTRunGetGlyphCount(run); runGlyphIndex++) {
CFRange thisGlyphRange = CFRangeMake(runGlyphIndex, 1);
CGGlyph glyph;
CGPoint position;
CTRunGetGlyphs(run, thisGlyphRange, &glyph);
CTRunGetPositions(run, thisGlyphRange, &position);

//CGContextShowGlyphsAtPositions(context, &glyph, &position, 1);
}
}

NSLog(@"intput: %lu, runArrayLength: %@, glyphLength:%@", [utf8String length], @(runArrayLength), @(glyphLength));


結果:

intput: 6, runArrayLength: 6, glyphLength:6

其中每一個 run 代表同一個 attributed string ,此例數字、中文交替,所以共有 6 個 run。另一個例子:

NSString *utf8String = @"0你1我我2他";
intput: 7, runArrayLength: 6, glyphLength:7


由於有兩個"我"在同一個 run 中,所以只有 6 個 run。

[Linux] 簡易備份加密 MySQL / MySQLDump 資料 @ Ubuntu 14.04

採用 mysqldump 備份 MySQL 資料,可搭配 --where " timestamp < '2014-06-01' AND timestamp >= '2014-05-01' " 等月份備份方式;使用 md5sum 驗證;使用 tar 和 openssl des3 加密:

  • $ mysqldump -u root -p myDatabase myTable --where " timestamp < '2014-06-01' AND timestamp >= '2014-05-01' " > mydatabase_mytable.2014-06.sql
  • $ find * -name "*.sql" -exec sh -c 'test -e {}.md5sum || md5sum {} > {}.md5sum' \; 
  • $ find * -name "*.sql" -exec sh -c 'tar -zcf - {} {}.md5sum | openssl des3 -salt -k MyPassword | dd of={}.tgz.des3' \;
連續動作:
  • $ find * -name "*.sql" -exec sh -c 'test -e {}.md5sum || md5sum {} > {}.md5sum' \; && md5sum -c *.md5sum > /dev/null && find * -name "*.sql" -exec sh -c 'test -e {}.tgz.des3 || tar -zcf - {} {}.md5sum | openssl des3 -salt -k MyPassword | dd of={}.tgz.des3' \;
如此一來,即可透過 crontab 定期一直加密新增的 *.sql 檔案(大概要處理一下 md5sum 的指令驗證那塊),加密後就可以隨意丟一堆雲端儲存服務了吧

2014年6月27日 星期五

[PHP] 使用 CURL 測試 Remote Resource Availability @ Ubuntu 14.04

有些程式跑在對岸,就該測測網路是否可取得啦

<?php
function checkRemoteResourceAvailability($target_url) {
        $ch = curl_init($target_url);
        curl_setopt($ch, CURLOPT_NOBODY, true);
        $status = curl_exec($ch) !== false && curl_getinfo($ch, CURLINFO_HTTP_CODE) == 200;
        curl_close($ch);
        return $status;
}

echo checkRemoteResourceAvailability('http://tw.yahoo.com/favicon.ico') ? "ok" : "not available";

2014年6月25日 星期三

[Linux] Apache/GeoIP/mod_geoip: 依據 Client IP Country 回傳指定 Server Location @ Ubuntu 14.04、Apache 2.4.7

$ apt-cache show libapache2-mod-geoip
Package: libapache2-mod-geoip
Priority: optional
Section: universe/web
Installed-Size: 86
Maintainer: Ubuntu Developers <ubuntu-devel-discuss@lists.ubuntu.com>
Original-Maintainer: Prach Pongpanich <prachpub@gmail.com>
Architecture: amd64
Version: 1.2.8-2
Depends: apache2-api-20120211, libc6 (>= 2.3.4), libgeoip1
Filename: pool/universe/liba/libapache2-mod-geoip/libapache2-mod-geoip_1.2.8-2_amd64.deb
Size: 18748
MD5sum: fc16528f6d8acabaf8d40c70fe47b1b2
SHA1: 457df303c09556297a8b1f6887fe7a901d8bd063
SHA256: 26eabfe728014a506186f2856a3149f00e7bfcb6db9226dbfe13976ab3b4d584
Description-en: GeoIP support for apache2
 This is an apache2 module for finding the country that a web request
 originated from. It uses the GeoIP library and database to perform
 the lookup. The module allows manipulation of client requests from within
 Apache based on the country of origin.
 .
 This module only works on Apache 2 servers.
Description-md5: e4085008663af571952df21045e8534a
Homepage: http://www.maxmind.com/app/mod_geoip
Bugs: https://bugs.launchpad.net/ubuntu/+filebug
Origin: Ubuntu

$ sudo apt-get install libapache2-mod-geoip

$ ls -la /usr/share/GeoIP/
total 3852
-rw-r--r--   1 root root  827301 Apr  7 14:20 GeoIP.dat
-rw-r--r--   1 root root 3105495 Apr  7 14:21 GeoIPv6.dat


基本上安裝完就等同啟動 mod_geoip ,可以在 /etc/apache2/mods-enabled 看到 geoip.conf, geoip.load 蹤影。

編輯 Apache configure file:

<IfModule mod_geoip.c>
        GeoIPEnable On
        <IfModule mod_rewrite.c>
                RewriteEngine On
                RewriteCond %{ENV:GEOIP_COUNTRY_CODE} ^CN$
                RewriteRule ^(.*)$ http://example.com.cn$1 [L]
        </IfModule>
</IfModule>


如此一來,當 Client IP 判斷是 CN 時,透過 Web Server 導向 CN 區的機器。

使用這招的目的是...大陸架設服務時,需要"備案",在備案還沒通過時,使用 domainname 連線過去的機器會被 ban 掉,這時候可以先稍微用已備案的或是 IP 來頂替了。

當備案成功後,就可以大方地使用 GeoDNS 的解法,讓使用者不必先連到指定機器再轉址。

最後,如果要留一些 debug 模式,可以多加上 hostname 的判斷,限定特定 hostname 才會依照使用者 IP 位置轉址。

<IfModule mod_geoip.c>
        GeoIPEnable On
        <IfModule mod_rewrite.c>
                RewriteEngine On
                RewriteCond %{HTTP_HOST} .
                RewriteCond %{HTTP_HOST} ^www\.example\.com$
                RewriteCond %{ENV:GEOIP_COUNTRY_CODE} ^CN$
                RewriteRule ^(.*)$ http://www.example.com.cn$1 [L]
        </IfModule>
</IfModule>


參考資料:

AWS 筆記 - 透過 AWS CLI 取得指定 ELB 下的所有機器的 Public IP @ Ubuntu 14.04

基於 deploying 需求,希望能夠得知指定 ELB 下的機器列表,再搭配 ssh keyfile 進行動作,以此降低人工部分,所以就需要用用 aws cli 啦,不然完全從 web ui 大多都能滿足一些操作手法。

關鍵兩個 aws cli 用法:
  • $ aws elb describe-load-balancers --load-balancer-name YourELBName
  • $ aws ec2 describe-instances --instance-ids YourEC2InstanceID
相關 AIM 權限:
  • elasticloadbalancing:DescribeLoadBalancers
  • ec2:DescribeInstances
使用 PHP 連續動作:

<?php
define("AWS_ELB_NAME", "YourELBName");

$elb_servers_public_ip = array();
$elb_info = @json_decode(@shell_exec("aws elb describe-load-balancers --load-balancer-name ".AWS_ELB_NAME), true);
if(isset($elb_info['LoadBalancerDescriptions'][0]['Instances']))
{
foreach( $elb_info['LoadBalancerDescriptions'][0]['Instances'] as $ec2_instance )
{
foreach( $ec2_instance as $ec2_id )
{
$ec2_info = @json_decode(@shell_exec("aws ec2 describe-instances --instance-ids $ec2_id 2>/dev/null"), true);
if(isset($ec2_info['Reservations'][0]['Instances'][0]['PublicIpAddress']))
array_push($elb_servers_public_ip, $ec2_info['Reservations'][0]['Instances'][0]['PublicIpAddress']);
}
}
}
print_r($elb_servers_public_ip);


其他心得:

雖然 aws ec2 describe-instances 可以一次查詢多筆,但是不知為何 aws elb describe-load-balancers 回傳的 instances 卻也有可能出現不存在的機器,這時透過 aws ec2 describe-instances 查詢多筆資料時,就會回傳機器不存在的訊息,得不到想要的資料,只好改成迴圈一筆一筆地問。