2016年7月27日 星期三

Microsoft Azure 管理筆記 - 建立自訂的映像檔 (create a custom image)

最近一直沿用在 AWS 的維護經驗,對應到 Azure 的服務部署,不斷的產生概念上的衝突 XD
總之,太多用 AWS 了,還是從 AWS 的角度來寫個筆記吧。

首先,有些服務不能老是從一台乾淨的 linux server + script 部署出來,有時效的問題,因此就有了自建映像檔的需求,以 AWS 來說,就是 amazon machine image (AMI) 的部分。

然而,在 2016 年的夏天,Azure 的管理介面已經有分新舊版的差異 XD

新版:https://portal.azure.com
舊版:https://manage.windowsazure.com

其中在 Azure 開機器時,也會分 Virtual Machines 跟 Virtual machines (classic) 兩種,其中前者就是新一代的 resource 管理方式,資源管控設計是不錯的,可以做到很細微。但是,對於建立自訂的映像檔的部分,只有 Virtual machines (classic) 在新版選單上有。

Virtual machines (classic):

azure_vm_classic_create_image

Virtual machines:
azure_vm_without_create_image

根據與微軟技術傳教士的討論,據說新版有在開發了 Orz 希望能夠趕快提供這服務。

總之,若不想要用指令 create image 的話,可以先挑 Virtual machines (classic) 來使用。然而,建立完的 image 該怎樣叫出來開機器,新舊版操作介面都是可以處理的。

舊版 https://manage.windowsazure.com -> 新增 -> 運算 -> 虛擬機器 -> 從資源庫 -> 我的映像
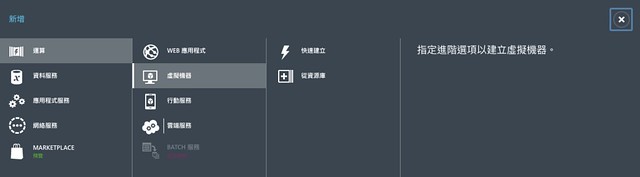
auzre_vm_launch

新版 https://portal.azure.com -> 左下方 Browser -> VM image (classic) -> 挑選剛剛製作好的 Image -> 選 Create VM 即可。

以上就是初探 Azure 自訂映像檔、使用映像檔的流程。目前 Azure 頗像 2009 年的 AWS 服務,當年 AWS Web UI 也有很多功能還沒做出來,當時就是要 call api 做事,我想 Azure 新版 Portal 就是處於這個現狀。為了維護交接的成本,我會偏向盡可能用 Web UI 做事,因為不是每個人都願意去處理 command line 的。

此外,再提一下,新版 Virtual machines 則是以 create a custom template image 關鍵字去找,而大部分的自訂 image 包含常見的 VHD (Virtual Hard Disk) 字眼,只是這個領域比較偏 Windows 的用法。

2016年7月20日 星期三

NGNIX 與數個 PHP CodeIgniter 專案部署問題:使用虛擬目錄切該各個專案

最近處理某個老專案,裡頭有多個 PHP CI Project,配置在同一台 Web Server,原本採用 Apache Web Server 設定相安無事,直到搬到 Nginx 才發現頭很痛 XD 若使用 Nginx 部署一個 CI Project 是很容易的,但使用虛擬目錄則會面臨一些問題。

這個原因是建構在部署專案時,採用 Apache Alais 跟 Requests Rewrite 方式,非常便利 Requests URI 導向至指定的 PHP CI Project:

# Apache Web Server
Alias /prefix/project /path/ci/project
<Directory /path/ci/project>
Options FollowSymLinks
DirectoryIndex index.php
AllowOverride None
Require all granted
<IfModule mod_rewrite.c>
RewriteEngine On
RewriteBase /prefix/project
RewriteCond %{REQUEST_URI} ^system.*
RewriteRule ^(.*)$ /index.php?/$1 [L]
RewriteCond %{REQUEST_URI} ^application.*
RewriteRule ^(.*)$ /index.php?/$1 [L]
RewriteCond %{REQUEST_FILENAME} !-f
RewriteCond %{REQUEST_FILENAME} !-d
RewriteRule ^(.*)$ index.php?/$1 [L]
        </IfModule>
</Directory>


其中 /prefix 是個虛擬的目錄,然而,在 Nginx 環境中,若要採用類似的架構時,就會需要處理一些問題,包含要做 requests uri 或 php script filename 的更新等,若 PHP CI Project 有提供 Web UI 時,就還得處理 css/js/image 的 requests 導向。

最終的解法:

# static files
location ^~ /prefix/project/assets/ {
alias "/path/ci/project/assets/";
}

# php requests
location ^~ /prefix/project {
root "path/ci/project";
try_files $uri $uri/ /prefix/project/index.php?$query_string;

location ~ \.php$ {
fastcgi_pass unix:/var/run/php5-fpm.sock;
fastcgi_split_path_info ^(.+\.php)(.*)$;
fastcgi_read_timeout 180;
fastcgi_buffer_size 64k;
fastcgi_buffers 512 32k;
fastcgi_busy_buffers_size 128k;
fastcgi_temp_file_write_size 256k;
fastcgi_index  index.php;
include fastcgi_params;

set $target_fastcgi_script_name $fastcgi_script_name;
if ($target_fastcgi_script_name ~ ^/prefix/project/(.*)$) {
set $target_fastcgi_script_name /$1;
}
fastcgi_param SCRIPT_FILENAME $document_root$target_fastcgi_script_name;
}
}


此外,若想多了解 nginx location 的優先順序,可以參考這則: Nginx location priority - Stack Overflow

2016年7月4日 星期一

Bootstrap 筆記 - 讓 table 以 <tr> 為單位支援 click event

這功能其實不難,但順手筆記一下自己選的解法:

<table class="table table-striped table-hover">
<thead>
<tr>
<td cols="3">
<img class="img-responsive" src="something"/>
</td>
</tr>
</thead>
<tbody>
<tr data-href="link">
<td>Data1</td>
<td>Data2</td>
<td><a href="link">Data3</a></td>
</tr>
</tbody>
</table>


搭配 Javascript(jQuery):

<script>
$(document).ready(function() {
$(".table > tbody > tr").css('cursor', 'pointer').click(function() {
var link = $(this).data("href").trim();
if (link.length > 0)
window.document.location = link;
return false;
});
});
</script>


簡單的說,就是在某個 <td> 欄位裡埋入 <a> tag,但在 <tr> 裡的屬性多個 data-href 來記錄,最後再用 Javascript 埋入 <tr> click event。

看起來好像多埋了 <a> tag ,其主因是為了 SEO。

2016年7月2日 星期六

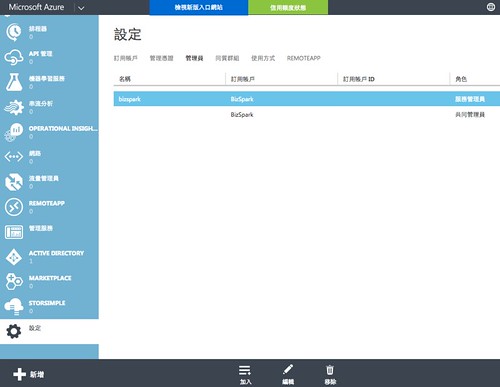
Microsoft Azure 管理筆記 - 建立共同管理者 (AWS IAM效果)

Azure帳號-共同管理1

太習慣用 AWS 了,開始用用 Azure 服務,其 UIUX 太潮了,操勞到眼眶快泛淚才挖到一些設定方式 XD 就筆記一下。

想要用 AWS IAM 的架構,設置多位共同管理者,需要先請其他管理者新註冊 Live account:

https://account.live.com/

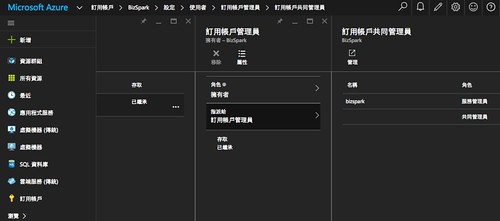
接著,主帳號登入 Azure 畫面後,從左下方的訂用帳戶 -> 挑選訂用帳戶 -> 設定 -> 使用者 -> 選擇"訂用帳戶管理員" -> 指派給"訂用帳號管理員" -> 管理 ,就會跳轉到 https://manage.windowsazure.com 網頁

所以啊,若很懶走新的介面,就直接到 https://manage.windowsazure.com 頁面 -> 設定 -> 管理員 -> 點選下方的 "加入" 即可完成添加共同管理員的動作 Orz 並且返回 portal.azure.com 介面則會看到剛添加的共同管理員了。

Azure帳號-共同管理2

2016年6月30日 星期四

[Mac] 使用 Screen 與 RS232 裝置互動,進行 log 分析 @ Mac 10.11.5

今天又跑去偷看 embedded linux 的 console 了,用法(/dev/tty.usbserial 跟 driver 有關):

$ screen /dev/tty.usbserial 115200

若需要仔細看 screen output 時,可以把加大 screen output buffer 或是把 log 寫到檔案

加大 screen buffer size (支援200000 line 輸出) :

ctrl + a + : + scrollback 200000

若覺得還要用 ctrl + a + [ 去追 log 實在很不方便,就是試試把log寫出來吧

ctrl + a + H

如此就會蹦出個 screenlog.0 檔案,可以搭配 vim, tail -f + grep 來使用,例如追蹤 download、upgrade 字眼:

$ tail -f screenlog.0 | grep "download\|upgrade"

如此交叉使用,應該可以解 bug 吧...