如果想要豐富一個應用程式時,那很容易需要去控制多個操作畫面。例如我想要此程式有兩個功能,理論上就會有兩個按鈕供你按下,然後從主畫面要切換過去,而處理這個動作的部份,靠的就是 Tab Bar Controller!而對於某一個功能中,可能會有一連串的動作要執行,因此畫面也會切換甚至有階層性的關係,這個部分就常使用到 Navigation Controller!在此以 2 個功能作為 demo ,並且每個功能有 1 或 2 個畫面要切換處理。
建立一個新的 Project ,[Xcode]->[Create a New Xcode Project]->[iPhone OS]->[Application]->[Window-based Application] 取名為 MyApp 。
接著,實作上要 bottom up 去想,假設有兩個功能,分別稱作 A 跟 B 功能,其中 A 有 2 個畫面,稱作 A1 跟 A2,B只有一個畫面,那麼實作上就要先規劃這 3 個 View ,在此先實作此 3 個 View ,分別叫做 A1View、A2View 跟 BView :
[Xcode]->[File]->[New File]->[Cocoa Touch Class]->[UIViewController subclass] 並且勾選 With XIB for user interface ,如此一來就可以使用 Interface Builder 來拖拉元件上去!
依序建立 A1View、A2View 跟 BView 後,首先來規劃 A 這個功能,讓他在上頭呈現一個 Button 按下之後可以切換到 A2 畫面,首先先來寫一下程式對應的部份:
A1View.h
#import <UIKit/UIKit.h>
@interface A1View : UIViewController {
}
- (IBAction)goToA2View:(id)sender;
@end
@interface A1View : UIViewController {
}
- (IBAction)goToA2View:(id)sender;
@end
A1View.m
#import "A1View.h"
#import "A2View.h"
@implementation A1View
- (IBAction)goToA2View:(id)sender {
A2View *a2View = [[A2View alloc] init];
[self.navigationController pushViewController:a2View animated:NO];
[a2View release];
}
/*
// The designated initializer. Override if you create the controller programmatically and want to perform customization that is not appropriate for viewDidLoad.
- (id)initWithNibName:(NSString *)nibNameOrNil bundle:(NSBundle *)nibBundleOrNil {
if (self = [super initWithNibName:nibNameOrNil bundle:nibBundleOrNil]) {
// Custom initialization
}
return self;
}
*/
/*
// Implement viewDidLoad to do additional setup after loading the view, typically from a nib.
- (void)viewDidLoad {
[super viewDidLoad];
}
*/
/*
// Override to allow orientations other than the default portrait orientation.
- (BOOL)shouldAutorotateToInterfaceOrientation:(UIInterfaceOrientation)interfaceOrientation {
// Return YES for supported orientations
return (interfaceOrientation == UIInterfaceOrientationPortrait);
}
*/
- (void)didReceiveMemoryWarning {
// Releases the view if it doesn't have a superview.
[super didReceiveMemoryWarning];
// Release any cached data, images, etc that aren't in use.
}
- (void)viewDidUnload {
// Release any retained subviews of the main view.
// e.g. self.myOutlet = nil;
}
- (void)dealloc {
[super dealloc];
}
@end
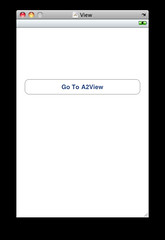
接著請點擊 A1View.xib 藉以呼叫 Interface Builder 出來,並拖拉一個 Button 擺在上頭,並且按住 ctrl 點選剛剛那個 Button ,會出現一條線,把它拉到 A1View.xib 的讓他跟 A1View 的 File's Owner 並選擇剛剛實作的 goToA2View 啦,以此讓 UI 上的物件跟程式事件結合
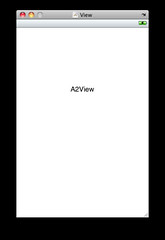
接著一樣對 A2View.xib ,但僅需拉一些元件出來,方便辨識是 A2View 即可,在此以一個 Label 印出字而已,在此不印出 A2View.h 和 A2View.m 程式碼,因為完全是預設的程式碼而已,可參考 A1View.h 和 A1View.m ,將上頭著色部分去除,以即將 A1View 更新為 A2View 即可。
接著,也順便弄一下 BView 吧!單純像 A2View 一樣,只對 BView.xib 去增加一個用來分辨的 View 的元件,如 Slider 等。
最後,則是串起這一連串 View 的 MyAppAppDelegate 啦!
MyAppAppDelegate.h
#import <UIKit/UIKit.h>
@interface MyAppAppDelegate : NSObject <UIApplicationDelegate> {
UIWindow *window;
UINavigationController *navBar;
UITabBarController *tabBar;
}
@property (nonatomic, retain) IBOutlet UIWindow *window;
@end
@interface MyAppAppDelegate : NSObject <UIApplicationDelegate> {
UIWindow *window;
UINavigationController *navBar;
UITabBarController *tabBar;
}
@property (nonatomic, retain) IBOutlet UIWindow *window;
@end
MyAppAppDelegate.m
#import "MyAppAppDelegate.h"
#import "A1View.h"
#import "BView.h"
@implementation MyAppAppDelegate
@synthesize window;
- (void)applicationDidFinishLaunching:(UIApplication *)application {
navBar = [[UINavigationController alloc] init];
A1View * a1View = [[A1View alloc] init];
a1View.title = @"AView";
[navBar pushViewController: a1View animated:NO];
[a1View release];
BView *bView = [[BView alloc] init];
UITabBarItem *item = [[UITabBarItem alloc] init];
item.title = @"BView";
bView.tabBarItem = item;
[item release];
tabBar = [[UITabBarController alloc] init];
tabBar.viewControllers = [NSArray arrayWithObjects: navBar , bView, nil];
[bView release];
[window addSubview:tabBar.view];
//[window addSubview:navBar.view];
// Override point for customization after application launch
[window makeKeyAndVisible];
}
- (void)dealloc {
[navBar release];
[tabBar release];
[window release];
[super dealloc];
}
@end
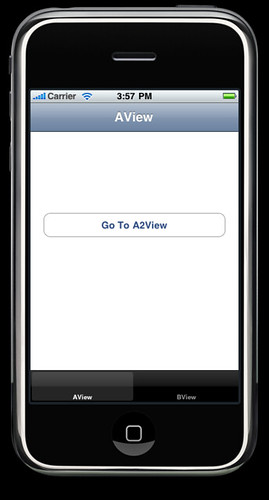
運行的主畫面,預設在 AView ,上頭有 Navigation Controller ,下方有 Tab Bar Controller:
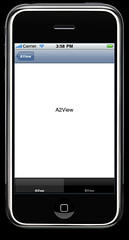
按下 Go to A2View,左上方有出現按鈕可以 Back 回去:
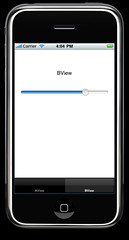
按下 Tab Bar 切換到 BView:
以上是一個簡單的實作例子,用以了解如何控制程式頁面的切換囉!除此之外,在 Navigation 上頭也可以分別加一些左右 Button 而底部的 Tab Bar 也可以美化按鈕,在此就不多討論囉。
請教一下 如果想在BView中加入TableView的話 應該怎麼加呢?
回覆刪除我找的範例 只有直接在本身的View Base做 且一點還會跳回主畫面
感謝你分享這篇教學 讓我了解了控制流程
版主回覆:(10/01/2012 12:58:55 AM)
我以前的用法的確也只是在本身的 BView 做成 UITableViewController 而已, 我倒沒試過其他的 :D 所以暫時無經驗可分享囉