2016年8月8日 星期一

Command line 批次顯示圖片寬高 @ Mac OS X 10.11.6

使用 sips 指令即可:

$ sips
sips 10.4.4 - scriptable image processing system.
This tool is used to query or modify raster image files and ColorSync ICC profiles.
Its functionality can also be used through the "Image Events" AppleScript suite.
Try 'sips --help' or 'sips --helpProperties' for help using this tool


用法:

$ find . -name "*.jpg" -exec sips -g pixelHeights -g pixelWidth {} \;

2016年8月4日 星期四

Microsoft Azure 管理筆記 - 使用 Image (Resource Manage - template.json) 快速建構、搬遷 Data Center

這個概念是這樣,為了服務世界各地的朋友們,可能一開始在日本服務,過了一陣子想要在美西服務,這時在 AWS 上可以很便利地將 AMI 複製到其他 Region ,而對 Azure 咧?概念是一樣,但在 Azure Resource Manage 的思維下,做法多了很多步。

參考資料:
步驟如下(在此有做 storage account 的切換,若是要沿用同一個 storage account 可以不用做第三步):
  1. 建立新的 Resource:US,歸屬定 West US
  2. 建立 Virtual Network、Subnet
  3. 建立 Storage account,此乃資料儲存帳號
  4. 將原本所在的 Image (vhd) 複製到新的 Storage account
  5. 建立 Network Interface Controller
  6. 將原本的 template.json 修改,把storage account更新至新的區域
  7. 即可建置新機器
細部流程,大多以 Azure cli 運行:

建立位於 West US 的 Resource Group: US

$ azure group create US westus --subscription MySubscription
info:    Executing command group create
+ Getting resource group US                                                  
+ Creating resource group US                                                
info:    Created resource group US
data:    Id:                  /subscriptions/MySubscription/resourceGroups/US
data:    Name:                US
data:    Location:            westus
data:    Provisioning State:  Succeeded
data:    Tags: null
data:  
info:    group create command OK


建立 Virtual Network (也可多用 -a 10.1.0.0/16 來限制 address prefix)

$ azure network vnet create US USVirtualNetwork westus  --subscription MySubscription
info:    Executing command network vnet create
warn:    Using default address prefix: 10.0.0.0/8
+ Looking up the virtual network "USVirtualNetwork"                          
+ Creating virtual network "USVirtualNetwork"                                
data:    Id                              : /subscriptions/MySubscription/resourceGroups/US/providers/Microsoft.Network/virtualNetworks/USVirtualNetwork
data:    Name                            : USVirtualNetwork
data:    Type                            : Microsoft.Network/virtualNetworks
data:    Location                        : westus
data:    Provisioning state              : Succeeded
data:    Address prefixes:
data:      10.0.0.0/8
info:    network vnet create command OK


建立 Subnet

$ azure network vnet subnet create US USVirtualNetwork default -a 10.1.0.0/16 --subscription MySubscription
info:    Executing command network vnet subnet create
+ Looking up the virtual network "USVirtualNetwork"                          
+ Looking up the subnet "default"                                            
+ Creating subnet "default"                                                  
data:    Id                              : /subscriptions/MySubscription/resourceGroups/US/providers/Microsoft.Network/virtualNetworks/USVirtualNetwork/subnets/default
data:    Name                            : default
data:    Provisioning state              : Succeeded
data:    Address prefix                  : 10.1.0.0/16
info:    network vnet subnet create command OK


接著建議從 Azure Portal Web UI 建立 storage account ,大多採預設即可,需留意區域位置以及採用的 resource group,此例帳號名稱為 myusstorageaccount,而使用 azure 操作 storage 行為時,必須使用 storage access key,於是就 azure cli 先列出一下(也可以在 Azure Portal 找到)

$ azure storage account keys list myusstorageaccount --resource-group US --subscription MySubscription
info:    Executing command storage account keys list
+ Getting storage account keys                                              
data:    Name  Key             Permissions
data:    ----  --------------  -----------
data:    key1  111111111111==  Full    
data:    key2  222222222222==  Full    
info:    storage account keys list command OK


建立 system container(後續 AZURE_STORAGE_ACCOUNT 跟 AZURE_STORAGE_ACCESS_KEY 都會接在指令前面,方便 debug 用途)

$ AZURE_STORAGE_ACCOUNT=myusstorageaccount AZURE_STORAGE_ACCESS_KEY=111111111111== azure storage container create system
info:    Executing command storage container create
+ Creating storage container system                                          
+ Getting storage container information                                      
data:    {
data:        name: 'system',
data:        metadata: {},
data:        etag: '"################"',
data:        lastModified: 'Thu, 04 Aug 2016 12:01:14 GMT',
data:        lease: { status: 'unlocked', state: 'available' },
data:        requestId: '############################',
data:        publicAccessLevel: 'Off'
data:    }
info:    storage container create command OK


接著,要把 Image copy 過來,這邊有些小細節要留意的,第一存取權限,第二這是非同步複製的。對於存取權限部分,請先將來源的 storage account 裡的 system container 的存取權限更新為 Blob 模式(此模式是必須知道完整的 URL 才能下載),預設是 private 模式(需搭配AZURE_STORAGE_ACCOUNT/AZURE_STORAGE_ACCESS_KEY才能),還有另一個是 Container 模式(這也是公開的,比 Blob 模式多了 listing 功能)。由於 azure storage blob 指令操作,對於 source 是 private 權限一直沒有成功 orz 且範例都是 Blob 的,只好忍痛跟著用了 Orz

以下是 source 為 private 權限,但 copy 一直沒成功(狀態會顯示success),但找不到資料的:

$ AZURE_STORAGE_ACCOUNT=myusstorageaccount AZURE_STORAGE_ACCESS_KEY=111111111111== azure storage blob copy start https://sourceaccount.blob.core.windows.net/system/Microsoft.Compute/Images/vhds/my-vm-osDisk.12345-23456-34567-45678.vhd system -a sourceaccount -k sourceaccount_KEY
info:    Executing command storage blob copy start
- Start copying blob https://sourceaccount.blob.core.windows.net/system/Microsoft.Compute/Images/vhds/my-vm-osDisk.12345-23456-34567-45678.vhd
data:    Copy ID                               Status
data:    ------------------------------------  -------
data:    ####################################  success
info:    storage blob copy start command OK


而將 source 更新為 Blob 存取權限後,就可以看到 Status 會顯示 pending 且約2~3分鐘,連 Azure Portal Web UI / Azure cli 都會找到!

$ AZURE_STORAGE_ACCOUNT=myusstorageaccount AZURE_STORAGE_ACCESS_KEY=111111111111== azure storage blob copy start https://sourceaccount.blob.core.windows.net/system/Microsoft.Compute/Images/vhds/my-vm-osDisk.12345-23456-34567-45678.vhd system
info:    Executing command storage blob copy start
- Start copying blob https://sourceaccount.blob.core.windows.net/system/Microsoft.Compute/Images/vhds/my-vm-osDisk.12345-23456-34567-45678.vhd
data:    Copy ID                               Status
data:    ------------------------------------  -------
data:    ####################################  pending
info:    storage blob copy start command OK

$ AZURE_STORAGE_ACCOUNT=myusstorageaccount AZURE_STORAGE_ACCESS_KEY=111111111111== azure storage blob show
info:    Executing command storage blob show
Container name:  system
Blob name:  Microsoft.Compute/Images/vhds/my-vm-osDisk.12345-23456-34567-45678.vhd
+ Getting storage blob information                                          
data:    Property       Value                                                                                            
data:    -------------  ----------------------------------------------------------------------------------------------------
data:    container      system                                                                                            
data:    name           Microsoft.Compute/Images/vhds/my-vm-osDisk.12345-23456-34567-45678.vhd
data:    blobType       PageBlob                                                                                          
data:    contentLength  1234567890                                                                                      
data:    contentType    application/octet-stream                                                                          
data:    contentMD5     ############==                                                                          
info:    storage blob show command OK


當複製完畢後(其實我也看不懂 azure storage blob show 的回報,也沒寫複製進度...),剩下就是建構一台機器的流程,包含建立 public ip、網路卡(NIC)、使用 template.json 發布。

如果你沒有把 Image 搬過來,直接用原本 template.json 開機器,會看到以下訊息(若同一個 storage account 則沒有問題):

error:   Deployment provisioning state was not successful
error:   Source and destination storage accounts for disk my-vm-osDisk.12345-23456-34567-45678.vhd are different.


若資料還沒搬完,會看到:

error:   Deployment provisioning state was not successful
error:   The resource operation completed with terminal provisioning state 'Failed'.
error:   Disk image https://myusstorageaccount.blob.core.windows.net/system/Microsoft.Compute/Images/vhds/my-vm-osDisk.12345-23456-34567-45678.vhd is in Pending state. Please retry when image is ready.


建立 IP:

$ azure network public-ip create US ip-my-server -l westus --subscription MySubscription

建立網卡:

$ azure network nic create US nic-my-server -k default -m USVirtualNetwork -l westus --subscription MySubscription

或給予 public ip:

$ azure network nic create US nic-my-server -k default -m USVirtualNetwork -l westus --subscription MySubscription -p ip-my-server

建立機器:

$ azure group deployment create US -f my-servier-template.json --subscription MySubscription -p '{"vmName":{"value":"my-server"},"networkInterfaceId":{"value":"/subscriptions/MySubscription/resourceGroups/US/providers/Microsoft.Network/networkInterfaces/nic-my-server"}}'

2016年8月2日 星期二

Microsoft Azure 管理筆記 - 使用 Azure CLI 自訂映像檔的維護方式

大部分的潮流都是走 PaaS 架構,然而,有些歷史的包袱只能走 IaaS 的架構 XD 而建立 Image 更是最基本的方式,甚至搭配 rsync 完成發布。而對於 Resource manage 機器來說,每次透過 capture 建立 Image 後,等於報廢回收,所以寫了個簡單的步驟記憶一下:
  1. 登入機器清除基本設定檔: $ sudo waagent -deprovision+user
  2. 透過 azure cli 執行 Shutdown:$ azure vm deallocate -g MyResource -n MyCurrentServer --subscription MySubscription
  3. 透過 azure cli 執行 Generalized:$ azure vm generalize MyResource MyCurrentServer --subscription MySubscription
  4. 透過 azure cli 執行 Capture:$ azure vm capture MyResource MyCurrentServer MyImageName -t MyImageName-Date.json --subscription MySubscription
做完後,原機器就可以下去領便當,可以把它 Delete 囉。

若預設產生的 MyImageName-Date.json 不夠用時,會自行添加資料,因此維護上就會出現麻煩,每次產生新的 template 中,其實只有 storageProfile 的設定,可以用 jq 跟 vimdiff 方便更新一下:

$ jq '' < MyImageName-old.json > old-formated.json
$ jq '' < MyImageName-Date.json > date-formated.json
$ vimdiff old-formated.json date-formated.json


把 old-formated.json 裡的 storageProfile 更新完成即可。

$ mv old-formated.json MyImageName-Date-formated.json

未來要建置原先那台機器時,就可以用以下指令在重建出來:

$ azure group deployment create MyResource -f MyImageName-Date-formated.json --subscription MySubscription

其他提醒:
  1. template.json 有描述 VHD 的資訊,若用上述 azure group deployment create 時,會彈跳出已存在的錯誤訊息,這時除了更新 template.json 資訊外,也可以到 Azure Portal -> Browse -> Storage account -> Blobs -> 沿路去找資料,把舊的、沒在用的砍掉再重跑
  2. 每次建立映像檔時,在 Azure Portal -> Browse -> Storage account -> Blobs -> system -> Microsoft.Compute -> Images -> vhds  會有 Image.vhd 跟 template.json 檔案,想清掉舊的可以去刪掉
  3. 製作完 Image 後的 server ,可以直接把它刪掉,但他的 NIC應當還會在,下次建立時,就可以沿用舊的網卡,通常 private ip 可以沿用,若有 public ip 的,若是 dynamic 配置則會變動
  4. 想使用同一個 template 開機器時,若多道指令一直跑時,指使用同一個 template file 時,會出現 Unable to edit or replace deployment 'filename-template.json' 
    : previous deployment from 'DATETIME' is still active. Please see https://aka.ms/arm-deploy for usage details. 偷懶的解法就是複製出來用 Orz 不知是不是 azure 採用 local file lock 等機制
  5. 若要採用 Availability Set 時,必須一開機就設定了,解法製作兩份 template.json ,一份用來維護 Image ,另一份就是開機就擺進 Availability Set,只需在 resources 中,多添加 : { "availabilitySet": { "id" : "/subscriptions/MySubscription/resourceGroups/MyResource/providers/Microsoft.Compute/availabilitySets/MyAvailabilitySet" } }, 來處理即可

Microsoft Azure 管理筆記 - 使用 Azure CLI 建立自訂的映像檔與開新機器的方式 (create a custom image/launch a server)

由於 Azure Portal 對 Resource manager 機器尚為提供 Web UI 可以方便點擊處理,就還是下海摸一下 command line 啦。

參考文件:

對 server 建立 image 過程中,server 狀態改變後會無法重啟,得用建立好的 Resource template 重新建立,需分外留意!機器就這樣下去領便當了 囧 (Azure/azure-powershell: UN-generalize a VM)

首先,遠端登入機器,執行此道指令

$ sudo waagent -deprovision+user

此命令會嘗試清除系統,使之適合重新佈建。這項作業會執行下列工作:

移除 SSH 主機金鑰 (如果組態檔中的 Provisioning.RegenerateSshHostKeyPair 是 'y')
清除 /etc/resolv.conf 中的名稱伺服器設定
移除 /etc/shadow 中的 root 使用者密碼 (如果組態檔中的 Provisioning.DeleteRootPassword 是 'y')
移除快取的 DHCP 用戶端租用
將主機名稱重設為 localhost.localdomain
刪除最後佈建的使用者帳戶 (取自於 /var/lib/waagent) 和相關聯的資料。


接著,再回到自己的常用的機器,改用 azure cli 對該機器設置以下流程:

$ azure config mode arm
info:    Executing command config mode
info:    New mode is arm
info:    config mode command OK


// Shutdown a virtual machine in a resource group and release the compute resources
$ azure vm deallocate -g MyResource -n MyCurrentVM --subscription MySubscription
info:    Executing command vm deallocate
+ Looking up the VM "MyCurrentVM"                            
+ Deallocating the virtual machine "MyCurrentVM"            
info:    vm deallocate command OK


// Set the state of a VM in a resource group to Generalized.
$ azure vm generalize MyResource MyCurrentVM --subscription MySubscription
info:    Executing command vm generalize
+ Looking up the VM "MyCurrentVM"                            
+ Generalizing the virtual machine "MyCurrentVM"            
info:    vm generalize command OK


$ azure vm capture MyResource MyCurrentVM MyImageID -t MyImageID-base.json --subscription MySubscription
info:    Executing command vm capture
+ Looking up the VM "MyCurrentVM"                            
+ Capturing the virtual machine "MyCurrentVM"                
info:    Saved template to file "MyImageID-base.json"
info:    vm capture command OK


接著,可以建立新開機器!只是開機器前又得好好管理"Resouce"建立,由於我已經有常用的 Resource 跟 Location 了,在此只需建立 IP 跟 NIC 即可!

$ azure network public-ip create MyResource MyImageID-ip-1 -l westus --subscription MySubscription
info:    Executing command network public-ip create
warn:    Using default --idle-timeout 4
warn:    Using default --allocation-method Dynamic
warn:    Using default --ip-version IPv4
+ Looking up the public ip "MyImageID-ip-1"                              
+ Creating public ip address "MyImageID-ip-1"                            
data:    Id                              : /subscriptions/MySubscription/resourceGroups/MyResource/providers/Microsoft.Network/publicIPAddresses/MyImageID-ip-1
data:    Name                            : MyImageID-ip-1
data:    Type                            : Microsoft.Network/publicIPAddresses
data:    Location                        : westus
data:    Provisioning state              : Succeeded
data:    Allocation method               : Dynamic
data:    IP version                      : IPv4
data:    Idle timeout in minutes         : 4
info:    network public-ip create command OK


$ azure network nic create MyResource MyImageID-nic-1 -k default -m MyResource -p MyImageID-ip-1 -l westus --subscription MySubscription
info:    Executing command network nic create
+ Looking up the network interface "MyImageID-nic-1"                    
+ Looking up the subnet "default"                                            
+ Looking up the public ip "MyImageID-ip-1"                              
+ Creating network interface "MyImageID-nic-1"                          
data:    Id                              : /subscriptions/MySubscription/resourceGroups/MyResource/providers/Microsoft.Network/networkInterfaces/MyImageID-nic-1
data:    Name                            : MyImageID-nic-1
data:    Type                            : Microsoft.Network/networkInterfaces
data:    Location                        : westus
data:    Provisioning state              : Succeeded
data:    Internal domain name suffix     : #############.dx.internal.cloudapp.net
data:    Enable IP forwarding            : false
data:    IP configurations:
data:      Name                          : default-ip-config
data:      Provisioning state            : Succeeded
data:      Private IP address            : 10.0.0.6
data:      Private IP version            : IPv4
data:      Private IP allocation method  : Dynamic
data:      Public IP address             : /subscriptions/MySubscription/resourceGroups/MyResource/providers/Microsoft.Network/publicIPAddresses/MyImageID-ip-1
data:      Subnet                        : /subscriptions/MySubscription/resourceGroups/MyResource/providers/Microsoft.Network/virtualNetworks/MyResource/subnets/default
data:  
info:    network nic create command OK


建立機器吧!

$ azure --version
0.10.2 (node: 4.2.4)


$ azure group deployment create MyResource -f MyImageID-base.json --subscription MySubscription
$ azure group deployment create MyResource -f MyImageID-base.json --subscription MySubscription -p '{"vmName":{"value":"MyVM"},"adminUserName":{"value":"ubuntu"},"adminPassword":{"value":"MyPassword"},"networkInterfaceId":{"value":"/subscriptions/MySubscription/resourceGroups/MyResource/providers/Microsoft.Network/networkInterfaces/MyImageID-nic-base"}}'


然而,因為預設產出的 template 定義了以下資訊,以至於開機器必須填寫以下資訊:

$ cat template.json | jq '.parameters'
{
  "vmName": {
    "type": "string"
  },
  "vmSize": {
    "type": "string",
    "defaultValue": "Standard_A1"
  },
  "adminUserName": {
    "type": "string"
  },
  "adminPassword": {
    "type": "securestring"
  },
  "networkInterfaceId": {
    "type": "string"
  }
}


用在這邊:

$ cat template.json | jq '.resources[0].properties.osProfile'
{
  "computerName": "[parameters('vmName')]",
  "adminUsername": "[parameters('adminUsername')]",
  "adminPassword": "[parameters('adminPassword')]"
}


接著,稍微修改來支援 ssh keypair 登入方式,將 template.json 中的 parameters 多增加個 adminPublicKey/adminPublicKeyPath:

$ cat template.json | jq '.parameters'
{
  "vmName": {
    "type": "string"
  },
  "vmSize": {
    "type": "string",
    "defaultValue": "Standard_A1"
  },
  "adminUserName": {
    "type": "string"
  },
  "adminPassword": {
    "type": "securestring",
    "defaultValue": null
  },
  "networkInterfaceId": {
    "type": "string"
  },
  "adminPublicKey": {
    "type": "array"
  },
  "adminPublicKeyPath": {
    "type": "string"
  }
}


並修改 properties.osProfile 區:

$ cat template.json | jq '.resources[0].properties.osProfile'
{
  "computerName": "[parameters('vmName')]",
  "adminUsername": "[parameters('adminUsername')]",
  "adminPassword": "[parameters('adminPassword')]",
  "linuxConfiguration": {
    "disablePasswordAuthentication": true,
    "ssh": {
      "publicKeys": [
         {
           "path": "[parameters('adminPublicKeyPath')]",
           "keyData": "[parameters('adminPublicKey')]"
         }
      ]
    }
  }
}


如此一來,就開機能用 keypair 登入機器:

$ azure group deployment create MyResource -f MyImageID-base.json --subscription MySubscription -p '{"adminPassword":{"value":""},"vmName":{"value":"MyVM"},"adminUserName":{"value":"ubuntu"},"adminPublicKey":{"value":"ssh-rsa ########"},"adminPublicKeyPath":{"value":"/home/ubuntu/.ssh/authorized_keys"},"networkInterfaceId":{"value":"/subscriptions/MySubscription/resourceGroups/MyResource/providers/Microsoft.Network/networkInterfaces/MyImageID-nic-base"}}'

2016年7月27日 星期三

Microsoft Azure 管理筆記 - 仿 AWS 使用 Load Balancer (Azure: Load Balancer/Availability Set)

以 AWS 來說,部署服務會想要用 Auto Scaling 搭配 Load Balancer 來達成 high availability 的架構,而 Load Balancer 扮演著將 requests 導向至一群機器。就 Azure 的服務情況,拆解後包括 Availability Set、Load Balancer 項目。

以把玩的流程來看,需要先搞懂 Availability Set,其建置流程包括 Fault domains 跟 Update domains 關鍵字(可以參考這篇完整介紹 Azure Exam Prep – Fault Domains and Update Domains )

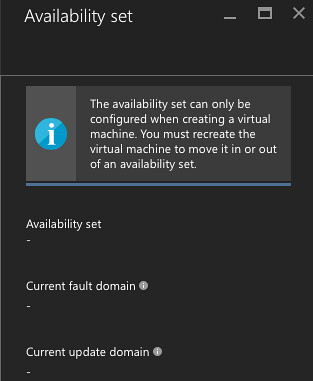
azure_try_to_move_into_aset

接著,在 Availability Set 中添加一台機器(沒機器時,Load balancer 無法設定),這步只能在新開機器時設定,不能對已經開啟的機器設定。

透過新增機器時,設定 Availability Set:
New -> Virtual machine -> Create -> 基本設定後, 在第三步 Settings - Availability 項目中,可以指定 Availability Set。
建置完後,緊接著建立 Load Balancer,建完後在其 Load Balancer -> Settings -> Backend pools -> Add a virtual machine -> Availability Set -> 挑選剛剛建立的 Availability Set(若 Set 裡沒機器,則會無法挑選!)-> 挑選裡頭的機器!

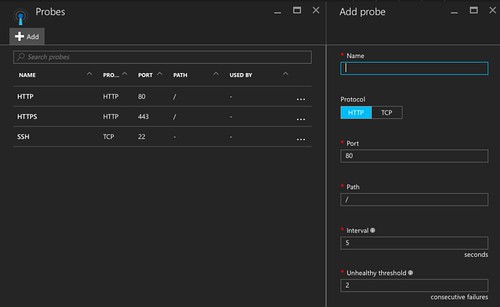
azure_lb_probes

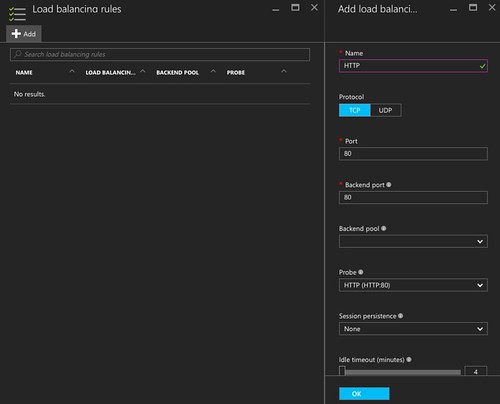
azure_lb_rules

接著處理 requests 導向問題,例如開放 HTTP 80/443, TCP 22 port:
Load Balancer -> Settings -> Probes: 這就像 AWS Load Balancer 檢查某端口服務是否正常
Load Balancer -> Settings -> Load balancing rules: 正式把 requests 導向給後端機器群
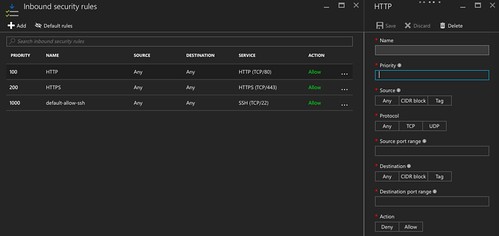
azure_vm_network_security_group

此外,別忘了對剛剛建立的 VM 設定好防火牆(Network security group, 如 VM -> VM Settings -> Network interface -> settings -> )
Network security group -> Settings -> Inbound security rules (有需要可以在設定 Outbound security group),例如預設有開通 22 port ,此時就只需再添加 80, 443 port
如此一來,當 Load balancer 的 probes 檢驗通常順暢後,就可以對 load balancer 送資料試試了。

檢驗流程:
  1. 先檢查 VM 是否運作正常,如有 public ip 就從外面測試 telnet vm_ip port 做檢查,可以先裝個 nginx 或用 sudo python -m SimpleHTTPServer 443 / sudo python -m SimpleHTTPServer 80 應急一下
  2. 對 Load balancer 檢驗,如 telnet load_balanacer_ip port
以上則完成 AWS Load balancer 建置。