2016年1月17日 星期日

試試 Let's Encrypt 免費的 HTTPS/SSL 憑證服務 @ Ubuntu 14.04、Nginx

之前有一台機器不小心誤裝 Ubuntu 14.10 ,然後 Ubuntu 15.10 一出現就沒得更新了!一直晾在那邊!終於把它清乾淨,重新開始,還是裝個 Ubuntu 14.04 吧。以前在 Namecheap 買 domain name,當時是有很便宜的 SSL 方案(一年兩美金),但我連自己產生 key 的密碼都忘了,懶得再重新產生,就試試 Let's Encrypt 吧!由於 Nginx 尚未有配套措施,一切純手工處理:

$ git clone https://github.com/letsencrypt/letsencrypt /opt/letsencrypt
$ cd /opt/letsencrypt && ./letsencrypt-auto certonly -a manual --rsa-key-size 4096 --email admin@your-email-domain -d your-domain


接著會要求你設置驗證方式,例如在 Web server document root 埋一個檔案,讓 Let's Encrypt 可以驗證 domain 真的是屬於你的。驗證後就搞定,呈現也下資訊:

IMPORTANT NOTES:
 - If you lose your account credentials, you can recover through
   e-mails sent to admin@your-email-domain.
 - Congratulations! Your certificate and chain have been saved at
   /etc/letsencrypt/live/your-domain/fullchain.pem. Your cert will
   expire on 2016-04-16. To obtain a new version of the certificate in
   the future, simply run Let's Encrypt again.
 - Your account credentials have been saved in your Let's Encrypt
   configuration directory at /etc/letsencrypt. You should make a
   secure backup of this folder now. This configuration directory will
   also contain certificates and private keys obtained by Let's
   Encrypt so making regular backups of this folder is ideal.
 - If you like Let's Encrypt, please consider supporting our work by:

   Donating to ISRG / Let's Encrypt:   https://letsencrypt.org/donate
   Donating to EFF:                    https://eff.org/donate-le


接著,就來試試 nginx ssl 設定:

$ sudo vim /etc/nginx/conf.d/default.conf
server {
    listen       80;

    listen  443 ssl;
    ssl_certificate /etc/letsencrypt/live/your-domain/fullchain.pem;
    ssl_certificate_key /etc/letsencrypt/live/your-domain/privkey.pem;
    ssl_session_cache shared:SSL:1m;
    ssl_session_timeout  5m;
    ssl_ciphers  HIGH:!aNULL:!MD5;
    ssl_prefer_server_ciphers   on;

    server_name  localhost;
...

$ sudo service nginx restart


搞定

2016年1月14日 星期四

[Linux] 建置 Perl 5.10.0 及 BugZilla 3.0.5 測試環境 @ Ubuntu 14.04

最近接收公司的 Mail Server,其中有一台 Server 在跑 Bugzilla 3.0.5 版本以及跑在 Perl 5.10.0 的環境,然而新的 Mail server 限制外寄走 SMTP + AUTH + SSL 的方式,這時就踩到 Bugzilla 3.0.5 不支援 SMTP AUTH 也不支援 STMP SSL。

我先翻了 Bugzilla 4.4.11 來看,其中 bugzilla-4.4.11/Bugzilla/Mailer.pm 有看到埋了以下功能:

    // bugzilla-4.4.11/Bugzilla/Mailer.pm
    if ($method eq "SMTP") {
        push @args, Host  => Bugzilla->params->{"smtpserver"},
                    username => Bugzilla->params->{"smtp_username"},
                    password => Bugzilla->params->{"smtp_password"},
                    Hello => $hostname,
                    ssl => Bugzilla->params->{'smtp_ssl'},
                    Debug => Bugzilla->params->{'smtp_debug'};
    }


而 Bugzilla 3.0.5 來看:

    //original: bugzilla-3.0.5/Bugzilla/Mailer.pm
    if ($method eq "SMTP") {
        push @args, Host  => Bugzilla->params->{"smtpserver"},
                    Hello => $hostname,
                    Debug => Bugzilla->params->{'smtp_debug'};
    }


很清楚沒看到 Auth 跟 SSL 得設置,很可惜的,當我替 Bugzilla 3.0.5 加入 username/password/ssl 後:

    //modified: bugzilla-3.0.5/Bugzilla/Mailer.pm
    if ($method eq "SMTP") {
        push @args, Host  => Bugzilla->params->{"smtpserver"},
                    username => 'MySMTPAccount',
                    password => 'MySMTPPassword',
                    Hello => $hostname,
                    ssl => 1,
                    Debug => Bugzilla->params->{'smtp_debug'};
    }


就蹦出這個錯誤訊息:

undef error - Can't locate object method "new" via package "Net::SMTP::SSL" at /usr/lib/perl5/site_perl/5.10.0/Email/Send/SMTP.pm line 57.

因此翻一下 5.10.0/Email/Send/SMTP.pm 後,就會看到 SSL 的問題 Orz 只好架設完整的 Perl 跟 Bugzilla 環境來試試了!

想要挑個沒有 Perl 環境,以方便架設 Perl 5.10.0 時,發現有點難搞,好險有 perlbrew 這工具:

$ sudo apt-get install perlbrew

$ perl -v

This is perl 5, version 18, subversion 2 (v5.18.2) built for x86_64-linux-gnu-thread-multi
(with 41 registered patches, see perl -V for more detail)

$ perlbrew init
$ perlbrew --notest install 5.10.0
Installing /home/ubuntu/perl5/perlbrew/build/perl-5.10.0 into ~/perl5/perlbrew/perls/perl-5.10.0

This could take a while. You can run the following command on another shell to track the status:

  tail -f ~/perl5/perlbrew/build.perl-5.10.0.log

perl-5.10.0 is successfully installed.

$ perlbrew use 5.10.0

A sub-shell is launched with 5.10.0 as the activated perl. Run 'exit' to finish it.

bash-4.3$


好的,接下來準備架設 Bugzilla 3.0.5 版:

bash-4.3$  wget https://ftp.mozilla.org/pub/webtools/archived/bugzilla-3.0.5.tar.gz
bash-4.3$  cd bugzilla-3.0.5
bash-4.3$  perl checksetup.pl


就會看到一堆模組需要安裝,接著就手動把上述的指令都跑一跑:

$ sudo apt-get install build-essential mysql-server libmysqlclient-dev libgd-dev libssl-dev imagemagick libmagickcore-dev

$ perl -MCPAN -e 'install "Template"'
$ perl -MCPAN -e 'install "Email::MIME::Modifier"'
$ perl -MCPAN -e 'install "Email::Send"'
$ perl -MCPAN -e 'install "Email::MIME"'
$ perl -MCPAN -e 'install "DBI"'
$ perl -MCPAN -e 'install "DBD::mysql"'

$ perl -MCPAN -e 'install "LWP::UserAgent"'
$ perl -MCPAN -e 'install "GD::Graph"'
$ perl -MCPAN -e 'install "GD::Text"'
$ perl -MCPAN -e 'install "Template::Plugin::GD::Image"'
$ perl -MCPAN -e 'install "GD"'
$ perl -MCPAN -e 'install "Email::Reply"'
$ perl -MCPAN -e 'install "Email::MIME::Attachment::Stripper"'
$ perl -MCPAN -e 'install "Net::LDAP"'
$ perl -MCPAN -e 'install "HTML::Parser"'
$ perl -MCPAN -e 'install "HTML::Scrubber"'
$ perl -MCPAN -e 'install "MIME::Parser"'
$ perl -MCPAN -e 'install "XML::Twig"'
$ perl -MCPAN -e 'install "Chart::Base"'
$ perl -MCPAN -e 'install "Image::Magick"'
$ perl -MCPAN -e 'install "PatchReader"'
$ perl -MCPAN -e 'install "SOAP::Lite"'
$ perl -MCPAN -e 'install "mod_perl2"'


結果一堆 make test 都不過 Orz 只好痛苦改成這樣:

$ perl -MCPAN -e "CPAN::Shell->notest('install', 'YAML')"
$ perl -MCPAN -e "CPAN::Shell->notest('install', 'ExtUtils::MakeMaker')"
$ perl -MCPAN -e "CPAN::Shell->notest('install', 'CGI')"
$ perl -MCPAN -e "CPAN::Shell->notest('install', 'Template')"
$ perl -MCPAN -e "CPAN::Shell->notest('install', 'Email::MIME::Modifier')"
$ perl -MCPAN -e "CPAN::Shell->notest('install', 'Email::Send')"
$ perl -MCPAN -e "CPAN::Shell->notest('install', 'Email::MIME')"
$ perl -MCPAN -e "CPAN::Shell->notest('install', 'DBI')"
$ perl -MCPAN -e "CPAN::Shell->notest('install', 'DBD::mysql')"
$ perl -MCPAN -e "CPAN::Shell->notest('install', 'LWP::UserAgent')"
$ perl -MCPAN -e "CPAN::Shell->notest('install', 'GD::Graph')"
$ perl -MCPAN -e "CPAN::Shell->notest('install', 'GD::Text')"
$ perl -MCPAN -e "CPAN::Shell->notest('install', 'Template::Plugin::GD::Image')"
$ perl -MCPAN -e "CPAN::Shell->notest('install', 'GD')"
$ perl -MCPAN -e "CPAN::Shell->notest('install', 'Email::Reply')"
$ perl -MCPAN -e "CPAN::Shell->notest('install', 'Net::LDAP')"
$ perl -MCPAN -e "CPAN::Shell->notest('install', 'Email::MIME::Attachment::Stripper')"
$ perl -MCPAN -e "CPAN::Shell->notest('install', 'HTML::Parser')"
$ perl -MCPAN -e "CPAN::Shell->notest('install', 'HTML::Scrubber')"
$ perl -MCPAN -e "CPAN::Shell->notest('install', 'XML::Twig')"
$ perl -MCPAN -e "CPAN::Shell->notest('install', 'Chart::Base')"
$ perl -MCPAN -e "CPAN::Shell->notest('install', 'Image::Magick')"
$ perl -MCPAN -e "CPAN::Shell->notest('install', 'PatchReader')"
$ perl -MCPAN -e "CPAN::Shell->notest('install', 'SOAP::Lite')"
$ perl -MCPAN -e "CPAN::Shell->notest('install', 'mod_perl2')"


若 CGI.pm 還是一直有問題,就硬上:

$ wget http://search.cpan.org/CPAN/authors/id/L/LE/LEEJO/CGI-4.25.tar.gz
$ tar -xvf CGI-4.25.tar.gz
$ cd CGI-4.25
$ make
$ make install


終於:

bash-4.3$ perl checksetup.pl
* This is Bugzilla 3.0.5 on perl 5.10.0
* Running on Linux 3.13.0-48-generic #80-Ubuntu SMP Thu Mar 12 11:16:15 UTC 2015

Checking perl modules...
Checking for          CGI.pm (v3.33)   ok: found v4.25
Checking for        TimeDate (v2.21)   ok: found v2.24
Checking for             DBI (v1.41)   ok: found v1.634
Checking for       PathTools (v0.84)   ok: found v3.2501
Checking for Template-Toolkit (v2.12)   ok: found v2.26
Checking for      Email-Send (v2.00)   ok: found v2.201
Checking for      Email-MIME (v1.861)  ok: found v1.936
Checking for Email-MIME-Modifier (v1.442)  ok: found v1.936

Checking available perl DBD modules...
Checking for          DBD-Pg (v1.45)    not found
Checking for       DBD-mysql (v2.9003) ok: found v4.033

The following Perl modules are optional:
Checking for              GD (v1.20)   ok: found v2.56
Checking for     Template-GD (any)     ok: found v1.56
Checking for           Chart (v1.0)    ok: found v2.4.10
Checking for         GDGraph (any)     ok: found v1.51
Checking for      GDTextUtil (any)     ok: found v0.86
Checking for        XML-Twig (any)     ok: found v3.49
Checking for      MIME-tools (v5.406)  ok: found v5.507
Checking for     libwww-perl (any)     ok: found v6.15
Checking for     PatchReader (v0.9.4)  ok: found v0.9.6
Checking for      PerlMagick (any)      not found
Checking for       perl-ldap (any)     ok: found v0.65
Checking for       SOAP-Lite (any)     ok: found v1.19
Checking for     HTML-Parser (v3.40)   ok: found v3.71
Checking for   HTML-Scrubber (any)     ok: found v0.15
Checking for Email-MIME-Attachment-Stripper (any)     ok: found v1.317
Checking for     Email-Reply (any)     ok: found v1.204
Checking for        mod_perl (v1.999022)  not found


大概還有兩個沒裝好,但有點懶在處理了,開始設定 Bugzilla 的部分:

bash-4.3$ vim localconfig
$webservergroup = 'www-data';
$db_driver = 'mysql';
$db_host = 'localhost';
$db_name = 'bugs';
$db_user = 'bugs';
$db_pass = 'bugs';


建立 MySQL 資料:

$ mysql -u root -p -e 'CREATE DATABASE bugs';
$ mysql -u root -p -e 'CREATE USER "bugs"@"%" IDENTIFIED BY "bugs"'
$ mysql -u root -p -e 'GRANT ALL ON *.* TO "bugs"@"%"'


正式安裝 Bugzilla 以及設定管理者資訊:

bash-4.3$ perl checksetup.pl
...


設定 Web server ,此例使用 Apache:

$ sudo apt-get install apache2 libapache2-mod-fcgid
$ sudo a2enmod cgi cgid
$ sudo vim /etc/apache2/sites-available/000-default.conf
AddHandler cgi-script .cgi .pl
Alias /bugzilla/ /home/ubuntu/bugzilla-3.0.5/
<Directory "/home/ubuntu/bugzilla-3.0.5">
        Options +ExecCGI
        AllowOverride All
        #SetHandler cgi-script
        #AddHandler cgi-script .cgi
        Order allow,deny
        Allow from all
        Require all granted
</Directory>
$ sudo service apache2 restart
$ sudo chown -R www-data:www-data bugzilla-3.0.5


將系統內建的 Perl 版本更新為 5.10.0 版本:

bash-4.3$ which perl
/home/ubuntu/perl5/perlbrew/perls/perl-5.10.0/bin/perl
bash-4.3$ sudo mv /usr/bin/perl /usr/bin/perl-5.18
bash-4.3$ sudo ln -s /home/ubuntu/perl5/perlbrew/perls/perl-5.10.0/bin/perl /usr/bin/perl


就可以瀏覽 http://ip/bugzilla/ 啦

最後,才真正開始面對最初待解的問題 Orz 仍需安裝更多軟體:

perl -MCPAN -e "CPAN::Shell->notest('install', 'IO::Socket::SSL')"
perl -MCPAN -e "CPAN::Shell->notest('install', 'Net::SMTP::SSL')"
perl -MCPAN -e "CPAN::Shell->notest('install', 'Net::SMTP::TLS')"
perl -MCPAN -e "CPAN::Shell->notest('install', 'Net::SSLeay')"


結論?!其實 SMTP + SSL + AUTH 還是沒有成功 XD 為了專心測試,反而獨立成解決 Perl 5.10.0 的 Email::Send 模組寄信問題,記錄在另一篇:[Perl] 測試及修正 Perl 5.10.0 的 Email:Send 支援 SMTP + TLS + AUTH 寄信方式 @ perlbrew 5.10.0 / Ubuntu 14.04

[Perl] 測試及修正 Perl 5.10.0 的 Email:Send 支援 SMTP + TLS + AUTH 寄信方式 @ perlbrew 5.10.0 / Ubuntu 14.04
上次一摸 Perl 有點久了 Orz 這個問題主要是發生在舊版 Bugzilla 3.0.5 on Perl 5.10.0 環境上,想要走 SMTP + TLS + AUTH 的寄信方式,只是核心部分抽出來驗證後,只須如此就能打造測試環境了:

$ sudo apt-get install perlbrew libssl-dev
$ perlbrew init
$ perlbrew --notest install 5.10.0
$ perlbrew user 5.10.0
bash-4.3$ perl -v

This is perl, v5.10.0 built for x86_64-linux

Copyright 1987-2007, Larry Wall

bash-4.3$ perl -MCPAN -e "CPAN::Shell->notest('install', 'TimeDate')"
bash-4.3$ perl -MCPAN -e "CPAN::Shell->notest('install', 'Date::Format')"
bash-4.3$ perl -MCPAN -e "CPAN::Shell->notest('install', 'Email::Address')"
bash-4.3$ perl -MCPAN -e "CPAN::Shell->notest('install', 'Email::MIME')"
bash-4.3$ perl -MCPAN -e "CPAN::Shell->notest('install', 'Email::Send')"
bash-4.3$ perl -MCPAN -e "CPAN::Shell->notest('install', 'Net::SMTP::TLS')"


如此一來,就可以寫簡單的 Perl 程式測試寄信,此例是處理騰訊企業郵箱的寄信方式:

bash-4.3$ vim send.pl
#!/usr/bin/perl

# http://search.cpan.org/dist/Email-Send/lib/Email/Send.pm
use Date::Format qw(time2str);
use Encode::MIME::Header;
use Email::Address;
use Email::MIME;
use Email::MIME::Modifier;
use Email::Send;
use MIME::Base64;

push @args,
        #Host  => 'hwsmtp.exmail.qq.com:465',
        #Host  => 'smtp.exmail.qq.com:465',
        #Host  => 'smtp.exmail.qq.com:587',
        #Host  => 'smtp.exmail.qq.com',
        Host  => 'hwsmtp.exmail.qq.com',
        username => 'account@my.domainname',
        password => 'password_for_account',
        Hello => 'localhost',
        #ssl => 1,
        tls => 1,
        Debug => 1;

$body = "Hello World";
$method = 'SMTP';
$from = 'account@my.domainname';
$to = 'account@my.domainname';
$subject = "Test Mail";

my $email = ref($msg) ? $msg : Email::MIME->new($body);
$email->header_set('MIME-Version', '1.0') if !$email->header('MIME-Version');
$email->header_set('From', $from);
$email->header_set('To', $to);
$email->header_set('Date', time2str("%a, %e %b %Y %T %z", time()));
$email->header_set('Subject', $subject);
foreach my $part ($email->parts) {
        $part->charset_set('UTF-8');
        #$part->encoding_set('quoted-printable') if !is_7bit_clean($part->body);
}

my $mailer = Email::Send->new({ mailer => $method, mailer_args => \@args });
my $retval = $mailer->send($email);

print $retval;


執行看看:

bash-4.3$ perl send.pl
invalid SSL_version specified at /home/ubuntu/perl5/perlbrew/perls/perl-5.10.0/lib/site_perl/5.10.0/IO/Socket/SSL.pm line 568


人工修正:

bash-4.3$ vim /home/ubuntu/perl5/perlbrew/perls/perl-5.10.0/lib/site_perl/5.10.0/IO/Socket/SSL.pm
將 2210行註解舊的,並更新成新的 Regular Expressiong
#m{^(!?)(?:(SSL(?:v2|v3|v23|v2/3))|(TLSv1(?:_?[12])?))$}i
m{^(!?)(?:(SSL(?:v2|v3|v23|v2/3))|(TLSv1[12]?))}i


再次執行:

bash-4.3$ perl test/send.pl
Message sent


因此,這只是單純 Perl 5.10.0 的 SSL.pm 的 TLS 規則影響,造成使用騰訊企業郵箱時,透過 SMTP + TLS + AUTH 寄信時無法成功。而這篇的目的只是記錄透過 Perl Email::Send 寄信走認證的筆記 XD 另外, Email::Send 走 SSL + AUTH 一直沒成功過 Orz

2016年1月6日 星期三

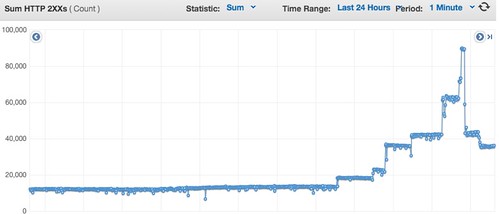
當 IoT 寫出 bug 時,將產生 DDoS 效應

IOT DDOS

協助同事軟體更新時發生的 bug 進行配套措施,原先為了軟體更新而必須關閉另一個服務,沒想到關閉另一個服務反而造成 device 流程進入不斷詢問該服務是否正常的迴圈中,反而看到另一個 bug。就這樣被 DDOS 了 Orz

由於這套伺服器架構並沒有採用 Auto Scaling ,反而可以好好觀察到底服務會撐多久,很幸運的,機器們一直處於 CPU 100% 好一陣子,但服務並沒有被中斷,只是單純緩慢了點。

後來就順勢開始人工加機器,以為 requests/min 成長停住了!止血了!殊不知,這只是 ELB 的效應,他還在暖身 XD 等 ELB 熱身完畢後,流量又開始爆起來。

所幸這個 bug 將隨著裝置不斷更新後而解除,估計再撐一下吧!

2016年1月2日 星期六

[PHP] 架設 Phabricator - Open Source tools code for review, task management, and project communication @ Ubuntu 14.04

這原本是 Facebook 內部的工具,負責開發的工程師離開 FB 後成立公司來維護它,我對他的感覺就像 Redmine 這類工具。第一次接觸是在 2015 年秋天,但直到年底我才自己架設它,其實過程不會很複雜,但不是 apt-get 就能安裝完的,多少還是筆記一下吧。此外,想要快速把玩可以試試官方提供的 script - install_ubuntu.sh ,更多安裝簡介:Installation Guide

這邊只簡單紀錄自己安裝的過程,其中 MySQL DB server 採用 AWS RDS,而 web server 使用 nginx 跟 php5-fpm:

$ cat /etc/apt/sources.list.d/nginx_org_packages_ubuntu.list
deb http://nginx.org/packages/ubuntu/ trusty nginx
deb-src http://nginx.org/packages/ubuntu/ trusty nginx
$ wget -O - http://nginx.org/keys/nginx_signing.key | sudo apt-key add -
$ sudo apt-get -qq update && sudo apt-get install git dpkg-dev php5 php5-mysql php5-gd php5-dev php5-curl php-apc php5-cli php5-json php5-fpm
$ sudo apt-get install nginx
$ lsb_release -a
No LSB modules are available.
Distributor ID:    Ubuntu
Description:    Ubuntu 14.04.2 LTS
Release:    14.04
Codename:    trusty
$ php -v
PHP 5.5.9-1ubuntu4.14 (cli) (built: Oct 28 2015 01:34:46)
Copyright (c) 1997-2014 The PHP Group
Zend Engine v2.5.0, Copyright (c) 1998-2014 Zend Technologies
    with Zend OPcache v7.0.3, Copyright (c) 1999-2014, by Zend Technologies

$ mkdir /opt && cd /opt
$ git clone https://github.com/phacility/libphutil.git
$ git clone https://github.com/phacility/arcanist.git
$ git clone https://github.com/phacility/phabricator.git


設定 https web server & php 環境:

$ cat /etc/nginx/conf.d/phabricator.conf
server {
listen       443;
server_name  localhost;
client_max_body_size 8M;

location / {
root   /opt/phabricator/webroot;
index  index.php;
rewrite ^/(.*)$ /index.php?__path__=/$1 last;
}
location = /favicon.ico {
try_files $uri =204;
}
location /index.php {
root "/opt/phabricator/webroot";
fastcgi_pass unix:/var/run/php5-fpm.sock;
fastcgi_split_path_info ^(.+\.php)(.*)$;
fastcgi_index index.php;
include fastcgi_params;
fastcgi_param SCRIPT_FILENAME $document_root$fastcgi_script_name;
}
ssl on;
ssl_certificate /etc/ssl/nginx/server.crt ;
ssl_certificate_key /etc/ssl/nginx/server.key ;
}

$ cat /etc/nginx/nginx.conf
user www-data;
...

$ cat /etc/php5/fpm/pool.d/www.conf
user = www-data
group = www-data
listen = /var/run/php5-fpm.sock
listen.owner = www-data
listen.group = www-data
...

$ cat /etc/php5/fpm/php.ini
upload_max_filesize = 60M
memory_limit = 512M
post_max_size = 60M
date.timezone = Asia/Taipei
opcache.validate_timestamps=false
...


設定 Phabricator 部分:

$ sudo /opt/phabricator/bin/config set mysql.host server-name.ap-northeast-1.rds.amazonaws.com
$ sudo /opt/phabricator/bin/config set mysql.user root
$ sudo /opt/phabricator/bin/config set mysql.pass password
$ sudo /opt/phabricator/bin/storage upgrade

Fix these schema issues? [y/N] Y
Fixing schema issues...
Done.                                                                      
Completed fixing all schema issues.

$ sudo /opt/phabricator/bin/config set phabricator.base-uri 'https://my-domain-name/'
$ sudo /opt/phabricator/bin/config set security.alternate-file-domain https://my-domain-name/
$ sudo /opt/phabricator/bin/config set phpmailer.smtp-user my-smtp-user
$ sudo /opt/phabricator/bin/config set phpmailer.smtp-password my-smtp-password
$ sudo /opt/phabricator/bin/config set phpmailer.smtp-port 25
$ sudo /opt/phabricator/bin/config set phpmailer.smtp-host my-domain-name
$ sudo /opt/phabricator/bin/phd start
$ cat /etc/rc.local
sudo /opt/phabricator/bin/phd start
$ sudo mkdir /var/repo && sudo chown www-data /var/repo
$ cat /opt/phabricator/conf/local/local.json
{
  "phpmailer.smtp-user": "my-smtp-user",
  "phpmailer.smtp-password": "my-smtp-password",
  "phpmailer.smtp-port": 25,
  "phpmailer.smtp-host": "my-domain-name",
  "security.alternate-file-domain": "https://my-domain-name/",
  "phabricator.base-uri": "https://my-domain-name/",
  "mysql.pass": "password",
  "mysql.user": "root",
  "mysql.host": "server-name.ap-northeast-1.rds.amazonaws.com"
}


剩下的可以從網頁上設定,網頁管理做得很不錯的,例如 metamta.default-address、metamta.domain 等,有些 issue 是 MySQL DB server 的,只是 AWS RDB 並不能修改。整體上架設還算輕鬆啦,唯一的缺點是在 DB server 內會開很多資料庫,建議可以專門用一個 DB server 來維護。