2012年2月23日 星期四

Android 開發教學筆記 - 研究 Renderscript 以 Carousel 為例 @ PandaBoard


這個 Carousel 例子是一個類似翻頁動作的特效,仔細看一下,是不是覺得自己在一個圓心中間,被很多照片包圍住呢?這個例子是 10 張照片,等於你走進了一個 10 面牆的房間,隨著你觸動移動事件,等於房間每面牆近似以你為中心旋轉。猜測原理後,就可以去驗證實做了。


six
此圖為正六邊形。左下角用來推邊長 len,右上角用來推各點 P1, P2, ... 的座標,θ就是兩頂點的夾角,此外,定義右下角是第一象限,左下是第二。


首先,讓我驗證這是個正 n 邊形的效果,主要是看到這段程式碼:


@ initBitmaps(): // Calculate the length of the polygon
len = RADIUS * 2 * sin(M_PI/NUM_ITEMS);


這是計算正 n 邊形的邊長公式,其中 n = NUM_ITEMS,此例就是 10 張照片


接著,開始計算正 n 邊形各頂點的三維座標資訊:


此例是把 y 軸當作 0 來看代 (x,y,z) = ( sinθ * RADIUS, 0, -cosθ * RADIUS)


@ initBitmaps(): // Calculate the vertices of rectangles
vertices[i*3] = sin(angle * M_PI / 180) * RADIUS;
vertices[i*3 + 1] = 0;
vertices[i*3 + 2] = -cos(angle * M_PI / 180) * RADIUS;


畫出正 n 邊形:


@ displayCarousel(): // Draw the rectangles
for (int i = 0; i < 10; i++) {
        ...
        rsgDrawQuadTexCoords(...);
        ...
}


rsgDrawQuadTexCoords 則是輸入長方形四個座標點,但是每一個頂點傳入的參數還有多了兩個,該數值通常定義為 (u, v),其中 u = 0 代表左邊,反之右邊,而 v =0 代表上面,反之下面,因此此例依序透過 (u, v) = (0, 1), (0, 0), (1, 0), (1, 1)來描述頂點位置。其中 (0, 1) 和 (0, 0) 使用的頂點座標位置分別是 ( r*sinθ , -(len/2), -r*cosθ ) 和 ( r*sinθ , len/2, -r*cosθ ),還記得最初定義得座標系嗎? y 軸是縱軸,此例第一張照片左上角座標為 ( r*sinθ , len/2, -r*cosθ ),左下角為 ( r*sinθ , -(len/2), -r*cosθ ),至於第一張圖的右上角跟右下角得座標,那就是用正 n 邊形第二個頂點來計算,以此規則算出 10 張照片的座標位置


至於觸動時的旋轉效果,則是透過 rotate 的功能實作的:


@ displayCarousel():
// Load vertex matrix as model matrix
rs_matrix4x4 matrix;
rsMatrixLoadTranslate(&matrix, 0.0f, 0.0f, -400.0f); // camera position
rsMatrixRotate(&matrix, rot, 0.0f, 1.0f, 0.0f); // camera rotation
rsgProgramVertexLoadModelMatrix(&matrix);


先把 camera(觀看照片的位置?) 位置移到 (0,0,-400) 位置,由於此正 n 邊形半徑為 828,因此距離照片 428 各單位。接著讓 camera 的位置對 (0,1,0) 向量旋轉,就達成這個效果囉


其他資訊:


rsMatrixLoadPerspective 對應 OpenGL:gluPerspective,以 void gluPerspective( GLdouble fovy, GLdouble aspect, GLdouble zNear, GLdouble zFar); 來說,分別為視角、寬高(長)比、前景和背景,查 wiki 可知人的視角大約 120 度,魚眼是 180 度,在此例是 30 度視角為例,接著寬高(長)比沒啥問題,而 near 和 far 的參數,若有玩單眼相機的話,應該不會太陌生,在網路上找資料的結果,通常前景是用一個大於 0 的數值,如 0.1f 等。


rsMatrixLoadTranslate 對應 OpenGL: glTranslate,以 void glTranslated(GLdouble x, GLdouble y, GLdouble z); 來說,就是切換到 (x,y,z) 座標


rsMatrixRotate 對應 OpenGL: glRotate,以 void glRotated(GLdouble angle, GLdouble x, GLdouble y, GLdouble z); 來說,代表以 (x,y,z) 向量為軸心,旋轉 angle 弧度。此外,(0,1,0) 和 (0,100,0) 都是一樣的向量,網路資料是說用 (0,1,0) 所造成的運算量較低。


而 rsMatrixLoadTranslate 和 rsMatrixRotate 定義可在 Renderscript Reference 查詢。


2012年2月19日 星期日

[Python] 使用 Google App Engine 之資料模型(Data Model)筆記 @ Windows 7


操作簡單的 GAE 後,開始來摸摸資料儲存的部分。對於 GAE DB 的部分,操作不難,跟 Django 很像,先定義一個 Data Model (資料庫的資料表),接著就可以操作了!此例僅簡單帶過,更豐富的操作方式請參考官網 GAE - 資料模型


建立 NewsData 資料模型:


from google.appengine.ext import db


class NewsData(db.Model):
        check = db.StringProperty()
        url = db.StringProperty()
        title = db.StringProperty()
        date = db.DateProperty()


新增一筆資料:


import datetime
item = NewsData(chech='1',url='http://localhost',title='TestNews',date=datetime.datetime.now().date())
item.put()


查詢資料:


使用 Data Model 查詢:


q = NewsData.all()
results = q.fetch(3)
for p in results:
        print '<a href="%s">%s</a>' % (p.url,p.title)


使用 GqlQuery 之 SQL 語法:


# 查詢 3 天內的新聞
q = db.GqlQuery("SELECT * FROM NewsData WHERE date > :1 ORDER BY date DESC", datetime.datetime.now().date() - datetime.timedelta(days=3) )
results = q.fetch(3)
for p in results:
        print '<a href="%s">%s</a>' % (p.url,p.title)


上述都很淺顯易懂,接著能嘗試簡易的 MVC 架構,把 DB Modle 定義在 mydb.py 檔,由 myput.py 和 myquery.py 作為 CGI 來操作(MVC的 VC 偷懶合在一起 XD)。


目錄結構:


app.yaml
favicon.ico
index.yaml
main.py
mydb.py
myquery.py
myput.py


app.yaml:


application: engineapp
version: 1
runtime: python
api_version: 1


handlers:
- url: /favicon\.ico
  static_files: favicon.ico
  upload: favicon\.ico


- url: /query
  script: myquery.py


- url: /put
  script: myput.py


- url: .*
  script: main.py


mydb.py:


from google.appengine.ext import db
class NewsData(db.Model):
        check = db.StringProperty()
        url = db.StringProperty()
        title = db.StringProperty()
        date = db.DateProperty(auto_now_add=True)


myput.py:


# -*- coding: utf-8 -*-
print 'Content-Type: text/html'
print ''


import mydb
import cgi, hashlib, datetime, urllib
from google.appengine.ext import db


request = cgi.FieldStorage()


newsDate = datetime.datetime.now().date()
newsTitle = 'defaultTitle' if request is None or 'title' not in request or request['title'].value == '' else cgi.escape(request['title'].value)
newsURL = 'http://localhost' if request is None or 'url' not in request or request['url'].value == '' else request['url'].value
newsCheck = hashlib.md5(str(newsTitle)+str(newsURL)).hexdigest()


if mydb.NewsData.all().filter('check =',newsCheck).get() is None:
        item = mydb.NewsData(check=newsCheck,url=unicode(newsURL,'utf-8'),title=unicode(newsTitle,'utf-8'),date=newsDate)
        item.put()
        print 'Put'
else:
        print 'No Operation'


myquery.py:


# -*- coding: utf-8 -*-
print 'Content-Type: text/html'
print ''


import mydb
import datetime
from google.appengine.ext import db


print """
<html>
        <head>
                <meta http-equiv="Content-Type" content="text/html; charset=utf-8">
        </head>
        <body>
"""


q = db.GqlQuery("SELECT * FROM NewsData WHERE date > :1 ORDER BY date DESC", datetime.datetime.now().date() - datetime.timedelta(days=3) )
results = q.fetch(50)
for p in results:
        url = p.url
        date = p.date
        check = p.check
        title = p.title
        print '<a href="%s">[%s] %s(%s)</a><br />' % ( url.encode('utf-8'), date, title.encode('utf-8'), check.encode('utf-8') )


print """
        </body>
</html>
"""


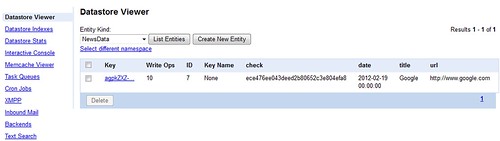
如此一來,透過瀏覽 http://localhost:port/put (或 http://localhost:port/put?title=123&url=www.google.com ) 新增資料,透過 http://localhost:port/query 顯示資料。除此之外,還可以透過 Google App Engine Launcher 的 SDK Console ,直接用瀏覽器去查看資料庫的東西,實在方便:


GAE11


這邊容易碰到的問題是 DB 內資料的編碼問題,我在 myput.py 把 CGI 得到的東西用 unicode(data,'utf-8') 的存進資料庫,在 myquery.py 時,則是用 data.encode('utf-8') 處理印出的部分。


2012年2月18日 星期六

[Python] 使用 Google App Engine (GAE) 筆記 @ Windows 7


很久以前就註冊了帳號,但一直都沒認真使用 :P 而後 GAE 又多了 Cron Jobs,我還是沒有用。最近提起勁來用一下吧!此篇只著重在 local 端的 python 練習。


練習的功能:


  • 設定 CLI 相容環境(command mode 可以測試 script.py 而不用每次都從瀏覽器執行)

  • 使用 urllib2 取得網路資料

  • 使用 re 取得資料(Regular Expression 處理字串)

  • 使用 urlfetch 存取網路服務(google.appengine.api) 

  • 實現 urlfetch with cookie 功能

  • 使用 plurk api 發布消息


流程:


先在 Windows 7 環境上,使用 googleappengine lib 寫寫 python 程式,接著從某個 url 取得資料,再用 re 處理字串,然後使用 plurk api 發布訊息。上述流程沒問題後,改成 CGI 模式,因此可透過 GAE 來執行,最後設定 cron jobs


安裝 GAE 相關開發環境:


  • GoogleAppEngine-1.6.2.msi

  • python-2.5.msi

  • npp.5.9.8.Installer.exe

  • google-appengine-docs-20120131.zip (GAE離線文件)


一切都用預設安裝,別忘了設定環境變數,在 cmd mode 下才可以直接打 python 來做事
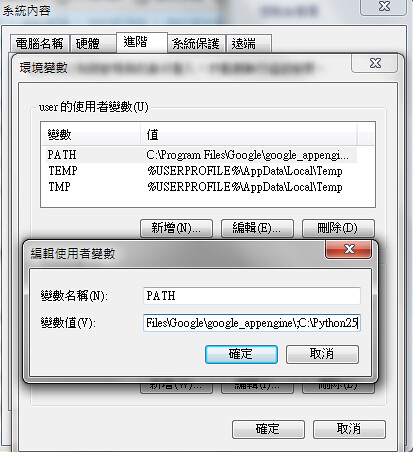

GAE00


建立一個 GAE Project:


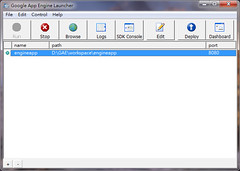
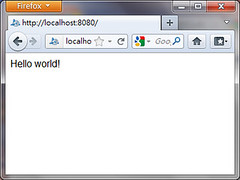
僅本地端,除了 Project 位置外(D:\GAE\workspace\engineapp),全部都預設,弄完就開起來測試一下,理論上應該可以輕易地用瀏覽器瀏覽這 hello world 程式
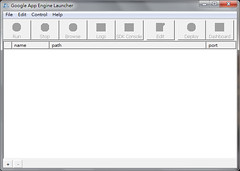
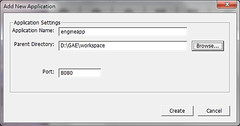
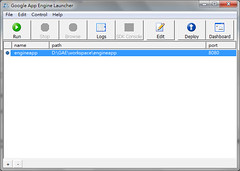
GAE01 GAE02 GAE03 GAE04 GAE05


新增一支 script (plurk.py):


在 Project 位置建立一個 plurk.py 空檔案,接著就切到 command mode 來測試:


C:\> D:
D:\> cd GAE\workspace\engineapp
D:\GAE\workspace\engineapp>python plurk.py
(...沒東西...) 


設置 script 可使用 GAE Libs:


# -*- coding: utf-8 -*-
"""
# ImportError: No module named google.appengine.api
import sys, os
DIR_PATH = 'C:\Program Files\Google\google_appengine'
EXTRA_PATHS = [
DIR_PATH,
        os.path.join(DIR_PATH, 'lib', 'antlr3'),
        os.path.join(DIR_PATH, 'lib', 'django'),
        os.path.join(DIR_PATH, 'lib', 'django_0_96','django'),
        os.path.join(DIR_PATH, 'lib', 'django_1_2','django'),
        os.path.join(DIR_PATH, 'lib', 'django_1_3','django'),
        os.path.join(DIR_PATH, 'lib', 'simplejson'),
        os.path.join(DIR_PATH, 'lib', 'fancy_urllib'),
        os.path.join(DIR_PATH, 'lib', 'ipaddr'),
        os.path.join(DIR_PATH, 'lib', 'webob'),
        os.path.join(DIR_PATH, 'lib', 'yaml', 'lib'),
]
sys.path = EXTRA_PATHS + sys.path


# AssertionError: No api proxy found for service "urlfetch"
from google.appengine.api import apiproxy_stub_map
from google.appengine.api import datastore_file_stub
from google.appengine.api import mail_stub
from google.appengine.api import urlfetch_stub
from google.appengine.api import user_service_stub


APP_ID = u'test_app'
#os.environ['AUTH_DOMAIN'] = AUTH_DOMAIN # gmail.com
#os.environ['USER_EMAIL'] = LOGGED_IN_USER # account@gmail.com


apiproxy_stub_map.apiproxy = apiproxy_stub_map.APIProxyStubMap()
# Use a fresh stub datastore.
stub = datastore_file_stub.DatastoreFileStub(APP_ID, '/dev/null', '/dev/null')
apiproxy_stub_map.apiproxy.RegisterStub('datastore_v3', stub)
# Use a fresh stub UserService.
apiproxy_stub_map.apiproxy.RegisterStub('user',user_service_stub.UserServiceStub())
# Use a fresh urlfetch stub.
apiproxy_stub_map.apiproxy.RegisterStub('urlfetch', urlfetch_stub.URLFetchServiceStub())
# Use a fresh mail stub.
apiproxy_stub_map.apiproxy.RegisterStub('mail', mail_stub.MailServiceStub())
"""


把這一段擺在 plurk.py 的最上面,如此一來,當你是在 command mode 上執行時,把這段註解打開即可使用(把一開始跟最後的 """ 去掉即可)


 接著撰寫 Plurk API 要用的範例程式:


 參考 [PHP] 使用官方 Plurk API 實作簡單的機器人 - 靠機器人救 Karma!以 Yahoo News 為例 架構,改成 GAE Python 版,分別實作三個主要 function:


    • def getNews()


      • 取得新聞


    • def doAct()


      • 執行 url/api 


    • def getTinyURL(src)


      • 取得縮網址


程式碼:


# return responseContent
def doAct( targetURL, method='POST', data={}, cookie = None, header=None ):
        rawHeader = {'User-Agent':'Mozilla/4.0 (compatible; MSIE 6.0; Windows NT 5.1)'}
        if header:
        rawHeader = header


        # load cookie
        try:
                if cookie <> None:
                cookieData = '' # {}
                for c in cookie.values():
                        #cookieData[c.key]=c.value
                        cookieData += c.key + "=" + c.value
                if len(cookieData) > 0 :
                        rawHeader['Cookie'] = cookieData
        except Excetion, e:
                pass


        # post data
        try:
                if data and len(data) > 0 :
                        data = urllib.urlencode( data )
                else:
                        data = None
        except Excetion, e:
                data = None

        rawMehtod = urlfetch.POST if method != 'GET' else urlfetch.GET
        response = urlfetch.fetch(url=targetURL,payload=data,method=rawMehtod,headers=rawHeader,deadline=10)

        if cookie <> None:
                cookie.load(response.headers.get('set-cookie', ''))
        return response.content if response <> None and response.content <> None else ''


# return {'status':'ok','data':[ {'title':NewsTitle, 'url':NewsURL } , ... ]}
def getNews():
        out = {'status':'fail','data':None}
        try:
                # setting
                newsURL = 'http://tw.yahoo.com/'
                newsPatternBeginChecker = '<label class="img-border clearfix">'
                newsPatternEndChecker = '<ol class="newsad clearfix">'
                newsRePatternNewsExtract = '<h3[^>]*>[^<]*<a href="(.*?)"[^>]*>(.*?)</a></h3>'
                #newsRePatternNewsExtract = r'<h3[^>]*>[^<]*<a href="(?P<url>.*?)"[^>]*>(?P<title>.*?)</a></h3>'
                newsReOptionsNewsExtract = re.DOTALL
                newsPatternURLChecker = 'http:'


                raw = urllib2.urlopen(newsURL).read()
                checker = str(raw).find(newsPatternBeginChecker)
                if checker < 0:
                        out['data'] = 'newsPatternBeginChecker fail'
                        return out
                raw = raw[checker+len(newsPatternBeginChecker):]
                checker = raw.find(newsPatternEndChecker)
                if checker < 0:
                        out['data'] = 'newsPatternEndChecker fail'
                        return out
                raw = raw[:checker]
                #print "##",raw,"##"
                m = re.findall( newsRePatternNewsExtract, raw, newsReOptionsNewsExtract )
                if m:
                        out['data'] = []
                        for data in m:
                                urlChecker = data[0].find(newsPatternURLChecker)
                                if urlChecker >= 0:
                                        out['data'].append( {'title':data[1],'url':data[0][urlChecker:]} )
                                if len(out['data']) > 0:
                                        out['status'] = 'ok'
                                else:
                                        out['data'] = 'not found'
        except Exception, e:
                out['data'] = str(e)
        return out


# return short url via tinyurl.com
def getTinyURL(src):
        try:
                raw = urllib2.urlopen('http://tinyurl.com/api-create.php?'+urllib.urlencode({'url':src})).read()
                return raw.strip()
        except Exception, e:
                pass
        return None


呼叫方式:


# main
plurkAPIKey = 'YourPlurkAPIKey'
plurkID = 'YourPlurkID'
plurkPasswd = 'YourPlurkPassword'
getNewsData = getNews()


runLog = []
if getNewsData['status'] == 'ok':
        # try login
        baseCookie = Cookie.SimpleCookie()
        loginData = {'api_key':plurkAPIKey,'username':plurkID,'password':plurkPasswd}
        checkLogin = doAct( 'http://www.plurk.com/API/Users/login', 'POST', loginData, baseCookie )
        try:
                obj = simplejson.loads(checkLogin)
                if 'error_text' in obj:
                        runLog.append( 'login error: '+str(obj['error_text']) )
        except Exception,e :
                runLog.append( 'login exception: '+str(e) )
        if len(runLog) == 0:
                # try post
                for news_info in getNewsData['data']:
                        formated_message = '[News] '+news_info['url']+' ('+news_info['title']+')'
                        if len(formated_message) > 140:
                                shortURL = getTinyURL(news_info['url'])
                                if shortURL <> None:
                                        formated_message = '[News] '+shortURL+' ('+news_info['title']+')'

                        if len(formated_message) <= 140:
                                writeData = {'api_key':plurkAPIKey,'qualifier':'shares','content':formated_message}
                                checkPost = doAct( 'http://www.plurk.com/API/Timeline/plurkAdd' , 'POST' , writeData, baseCookie )

                                try:
                                        obj = simplejson.loads(checkPost)
                                        if 'error_text' in obj and obj['error_text'] <> None:
                                                runLog.append( 'post error: '+str(obj['error_text'])+', Message:'+formated_message )
                                except Exception, e:
                                        runLog.append( 'post exception: '+str(e)+', Message:'+formated_message )
        else:
                runLog.append( 'getNews error:'+getNewsData['data'])


若單純測試 Plurk API 的話,只要依序執行這兩段即可:


 # try login
baseCookie = Cookie.SimpleCookie()
loginData = {'api_key':plurkAPIKey,'username':plurkID,'password':plurkPasswd}
print doAct( 'http://www.plurk.com/API/Users/login', 'POST', loginData, baseCookie )
# try post
writeData = {'api_key':plurkAPIKey,'qualifier':'shares','content':'Hello World'}
print doAct( 'http://www.plurk.com/API/Timeline/plurkAdd' , 'POST' , writeData, baseCookie ) 


 弄成 CGI 模式:


# ...依序把上面的程式碼都湊在一起後,接著下面這段...


# CGI FORMAT for HTML
print 'Content-Type: text/html'
print ''
# report
print '<html><head><meta http-equiv="content-type" content="text/html; charset=utf-8"/></head><body>'
if len(runLog) > 0:
        print "<pre>"
        #print runLog
        print "</pre>"
        for err in runLog:
                print '<p>'+ err + '</p>'
else:
        print 'OK'
print '</body></html>'


 如此一來,就是相容於瀏覽器跟 command mode 的環境:


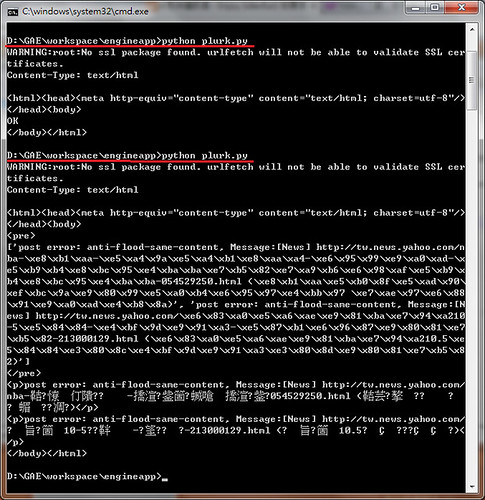
此為連續執行 2~3 次的結果,因為 Plurk 會擋重複訊息,所以第二次輸出的結果不一樣

GAE06


設定 GAE Project (engineapp):


 設定對應的 URL 位置:


engineapp\app.yaml:


application: engineapp
version: 1
runtime: python
api_version: 1


handlers:
- url: /favicon\.ico
static_files: favicon.ico
upload: favicon\.ico


- url: /PlrukPost
script: plurk.py


- url: .*
script: main.py


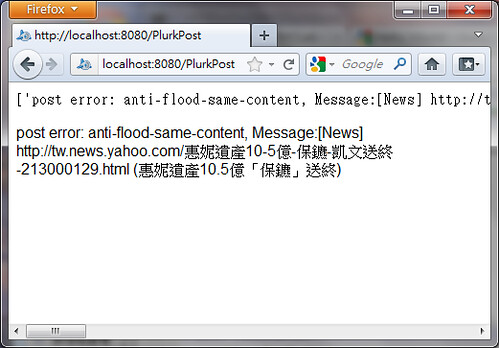
如此就可以用網頁瀏覽:

GAE07


設定 Cron Jobs:


engineapp\cron.yaml:


cron:
- description: news job
url: /PlurkPost
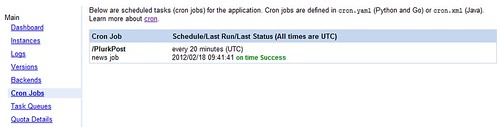
schedule: every 20 minutes


這樣每 20 分鐘就會去瀏覽該網頁一次,自然就會執行工作一次,此部分需要上傳到 GAE 上才能

GAE08


Deploy 筆記:


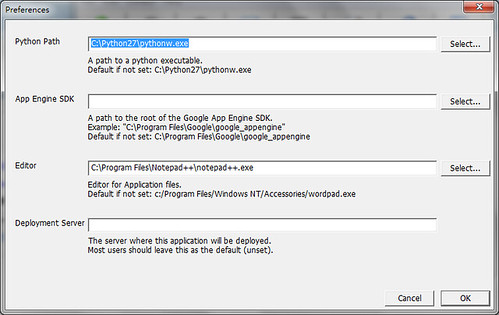
在 Google App Engine 的文件上,以 Python 2.5 為例,然而在使用 Deploy 時,會看到 ssl module not found 的訊息,因此無法上傳到 server。最簡單的解法就是安裝一下 Python 2.7 版,接著在 Google App Engine Launcher -> Edit -> Preferences 指定 Python Path ,就能夠順利上傳囉!

GAE09


查詢無線網路 AP 密碼 @ Windows 7

wifi-check-passwd wifi-check-passwd


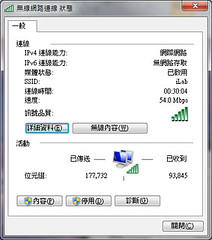
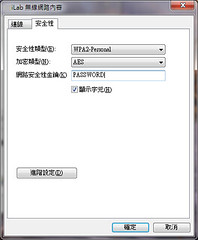
不小心忘記無線 AP 密碼,所幸對 Windows 7 來說很容易查到,筆記兩張圖就行了。無線網路連線 -> 指定 wifi ap 右鍵"內容" -> 安全性 -> 顯示字元。


2012年2月15日 星期三

Android 開發教學筆記 - 初探 Renderscript 以 HelloCompute 為例 @ PandaBoard

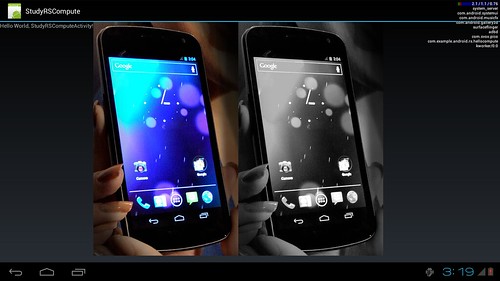
tw.study.rs_screenout


最近把玩 Renderscript(RS),這東西在 2011 年初被提了出來,但最近才仔細看文件,也隨著 Android 4 可以看到完整的系統實現原始碼等,目前 RS 可用在 Android 3.x 和 Android 4.x 系統上。RS 的本意著重在三個層面,依序是 "Portability" 、"Performance" 和 "Usability"。我把他想成建立一個框架,讓你寫程式可以不用擔心硬體狀況、又不用擔心 Java VM 拖速度並且開發上可以簡單快速,當然,連帶的缺點就是必須學習這個框架的用法等。除此之外,RS 用的語法是 C 語言(C99 standard),流程看似與 JNI/NDK 很接近,但最特別的是整個架構的設計,並透過 llvm 技術,讓你的程式不只跑在 CPU 上頭,還可以跑在 GPU 或 DSP 上,目標就是提供跨硬體設備的機制,包含不同架構的 CPU 等,這就不見得單純用 JNI/NDK 可以作到的事。最後,關於 RS 的使用時機?可以用在大量運算(平行運算?)上,大部分的是用2D/3D影像處理當作例子,對於遊戲開發應該有不少幫助。


此練習仿造 Android 4.0 之 HelloCompute 範例,此範例是將一張 JPEG 圖片進行灰階影像特效。由於程式碼精簡,所以就拿來當作第一個 RS 的練習,可熟悉 RS 流程。


主要流程:


建立 Android Project -> 建立 RenderScript -> 設定使用 RenderScript 的時機。


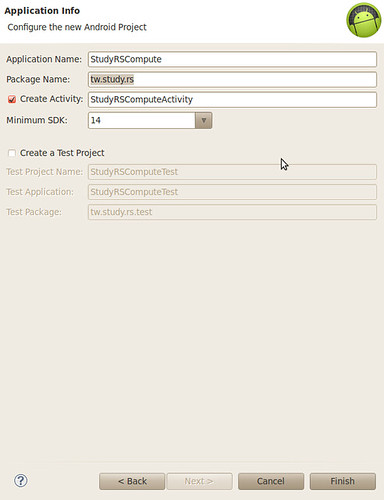
建立 Android Project:


Project Name: StudyRSCompute
Build Target: Android 4.0
Package Name: tw.study.rs 


tw.study.rs


建立 RenderScript (MyRSCompute.rs):


src/tw.sutdy.rs -> New -> File -> MyRSCompute.rs


#pragma version(1)
#pragma rs java_package_name(tw.study.rs)


const static float3 gMonoMult = {0.299f, 0.587f, 0.114f};


void root(const uchar4 *v_in, uchar4 *v_out) {
    float4 f4 = rsUnpackColor8888(*v_in);
    float3 mono = dot(f4.rgb, gMonoMult);
    *v_out = rsPackColorTo8888(mono);
}


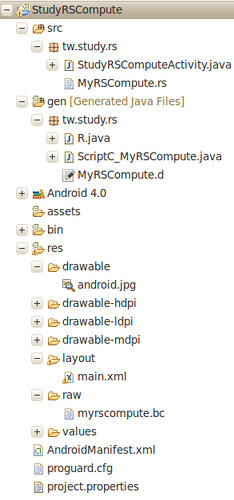
按下 build 後,可以在 res->raw 看到 myrscompute.bc,另外,在 gen->tw.study.rs 也能看到 ScriptC_MyRSCompute.java 和 MyRSCompute.d 的產生,並且在 R.java 中可以看到 raw 裡頭有 myrscompute 的定義。


建立測試圖檔:


接著找一張圖,此例用 http://zh.wikipedia.org/wiki/Android 裡的圖片 http://upload.wikimedia.org/wikipedia/commons/thumb/a/ad/Galaxy_Nexus_smartphone.jpg/371px-Galaxy_Nexus_smartphone.jpg,更名為 android.jpg


在 res 中,建立 drawable 目錄,並將 android.png 擺入且 build 後,在 gen->tw.study.rs->R.java 中可以看到圖檔的定義


建立圖檔 layout (res->layout->main.xml):


<?xml version="1.0" encoding="utf-8"?>
<LinearLayout xmlns:android="http://schemas.android.com/apk/res/android"
    android:layout_width="fill_parent"
    android:layout_height="fill_parent"
    android:orientation="horizontal" >


    <TextView
        android:layout_width="wrap_content"
        android:layout_height="wrap_content"
        android:text="@string/hello" />

    <ImageView
        android:id="@+id/displayin"
        android:layout_width="wrap_content"
        android:layout_height="wrap_content" />


    <ImageView
        android:id="@+id/displayout"
        android:layout_width="wrap_content"
        android:layout_height="wrap_content" />


</LinearLayout>


撰寫呼叫 RS 的時機 (StudyRSComputeActivity.java):


package tw.study.rs;


import android.app.Activity;
import android.os.Bundle;
import android.graphics.Bitmap;
import android.graphics.BitmapFactory;
import android.renderscript.Allocation;
import android.renderscript.RenderScript;
import android.widget.ImageView;


public class StudyRSComputeActivity extends Activity {
    private Bitmap mBitmapIn;
    private Bitmap mBitmapOut;


    private RenderScript mRS;
    private Allocation mInAllocation;
    private Allocation mOutAllocation;
    private ScriptC_MyRSCompute mScript;

    /** Called when the activity is first created. */
    @Override
    public void onCreate(Bundle savedInstanceState) {
        super.onCreate(savedInstanceState);
        setContentView(R.layout.main);

        mBitmapIn = loadBitmap(R.drawable.android);
        mBitmapOut = Bitmap.createBitmap(mBitmapIn.getWidth(), mBitmapIn.getHeight(), mBitmapIn.getConfig());


        ImageView in = (ImageView) findViewById(R.id.displayin);
        in.setImageBitmap(mBitmapIn);


        ImageView out = (ImageView) findViewById(R.id.displayout);
        out.setImageBitmap(mBitmapOut);


        createScript();
    }

    private void createScript() {
        mRS = RenderScript.create(this);


        mInAllocation = Allocation.createFromBitmap(mRS, mBitmapIn,
        Allocation.MipmapControl.MIPMAP_NONE,
        Allocation.USAGE_SCRIPT);
        mOutAllocation = Allocation.createTyped(mRS, mInAllocation.getType());


        mScript = new ScriptC_MyRSCompute(mRS, getResources(), R.raw.myrscompute);


        mScript.forEach_root(mInAllocation, mOutAllocation);
        mOutAllocation.copyTo(mBitmapOut);
    }

    private Bitmap loadBitmap(int resource) {
        final BitmapFactory.Options options = new BitmapFactory.Options();
        options.inPreferredConfig = Bitmap.Config.ARGB_8888;
        return BitmapFactory.decodeResource(getResources(), resource, options);
    }
}


 整個 Package PackageExplore:


PackageExplore_tw_study_rs


猜想的架構:


在 MyRSCompute.rs 中,只有一個 root 函數,該函數接收單位是一個像素資訊(4個浮點數),並且把收到的像素 v_in 作灰階,經向量 dot 處理後,將結果存在 v_out;在 StudyRSComputeActivity 中,在 onCreate 時,把預備好的圖檔讀進來,並轉成 Bitmap 結構,隨即透過 createScript 呼叫 RS,在 createScript 中,先建立 Renderscript 執行環境,包括用 Allocation 進行 Java 層變數的初始化,這些變數之後才可以傳給 RS 用,接著在 Java 層用 forEach_root 的方式呼叫 RS 進行處理(平行處理?),最後再把處理完的資料在存回 Bitmap 變數,在 ImageView 顯示出來。


其他心得:


學會處理圖片灰階特效,也才發現圖片特效有平行處理的可行性架構。RS 有提供很多數學函數,請參考 RS Runtime API Reference