
最近把玩 Renderscript(RS),這東西在 2011 年初被提了出來,但最近才仔細看文件,也隨著 Android 4 可以看到完整的系統實現原始碼等,目前 RS 可用在 Android 3.x 和 Android 4.x 系統上。RS 的本意著重在三個層面,依序是 "Portability" 、"Performance" 和 "Usability"。我把他想成建立一個框架,讓你寫程式可以不用擔心硬體狀況、又不用擔心 Java VM 拖速度並且開發上可以簡單快速,當然,連帶的缺點就是必須學習這個框架的用法等。除此之外,RS 用的語法是 C 語言(C99 standard),流程看似與 JNI/NDK 很接近,但最特別的是整個架構的設計,並透過 llvm 技術,讓你的程式不只跑在 CPU 上頭,還可以跑在 GPU 或 DSP 上,目標就是提供跨硬體設備的機制,包含不同架構的 CPU 等,這就不見得單純用 JNI/NDK 可以作到的事。最後,關於 RS 的使用時機?可以用在大量運算(平行運算?)上,大部分的是用2D/3D影像處理當作例子,對於遊戲開發應該有不少幫助。
此練習仿造 Android 4.0 之 HelloCompute 範例,此範例是將一張 JPEG 圖片進行灰階影像特效。由於程式碼精簡,所以就拿來當作第一個 RS 的練習,可熟悉 RS 流程。
主要流程:
建立 Android Project -> 建立 RenderScript -> 設定使用 RenderScript 的時機。
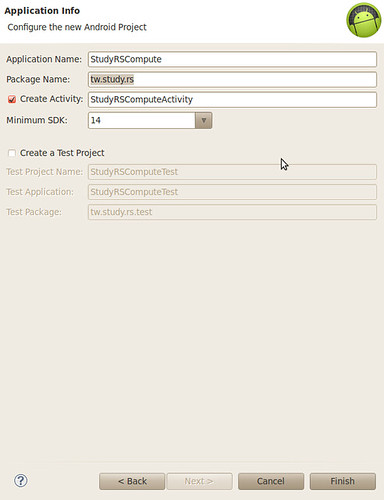
建立 Android Project:
Project Name: StudyRSCompute
Build Target: Android 4.0
Package Name: tw.study.rs
建立 RenderScript (MyRSCompute.rs):
src/tw.sutdy.rs -> New -> File -> MyRSCompute.rs
#pragma version(1)
#pragma rs java_package_name(tw.study.rs)
const static float3 gMonoMult = {0.299f, 0.587f, 0.114f};
void root(const uchar4 *v_in, uchar4 *v_out) {
float4 f4 = rsUnpackColor8888(*v_in);
float3 mono = dot(f4.rgb, gMonoMult);
*v_out = rsPackColorTo8888(mono);
}
按下 build 後,可以在 res->raw 看到 myrscompute.bc,另外,在 gen->tw.study.rs 也能看到 ScriptC_MyRSCompute.java 和 MyRSCompute.d 的產生,並且在 R.java 中可以看到 raw 裡頭有 myrscompute 的定義。
建立測試圖檔:
接著找一張圖,此例用 http://zh.wikipedia.org/wiki/Android 裡的圖片 http://upload.wikimedia.org/wikipedia/commons/thumb/a/ad/Galaxy_Nexus_smartphone.jpg/371px-Galaxy_Nexus_smartphone.jpg,更名為 android.jpg
在 res 中,建立 drawable 目錄,並將 android.png 擺入且 build 後,在 gen->tw.study.rs->R.java 中可以看到圖檔的定義
建立圖檔 layout (res->layout->main.xml):
<?xml version="1.0" encoding="utf-8"?>
<LinearLayout xmlns:android="http://schemas.android.com/apk/res/android"
android:layout_width="fill_parent"
android:layout_height="fill_parent"
android:orientation="horizontal" >
<TextView
android:layout_width="wrap_content"
android:layout_height="wrap_content"
android:text="@string/hello" />
<ImageView
android:id="@+id/displayin"
android:layout_width="wrap_content"
android:layout_height="wrap_content" />
<ImageView
android:id="@+id/displayout"
android:layout_width="wrap_content"
android:layout_height="wrap_content" />
</LinearLayout>
撰寫呼叫 RS 的時機 (StudyRSComputeActivity.java):
package tw.study.rs;
import android.app.Activity;
import android.os.Bundle;
import android.graphics.Bitmap;
import android.graphics.BitmapFactory;
import android.renderscript.Allocation;
import android.renderscript.RenderScript;
import android.widget.ImageView;
public class StudyRSComputeActivity extends Activity {
private Bitmap mBitmapIn;
private Bitmap mBitmapOut;
private RenderScript mRS;
private Allocation mInAllocation;
private Allocation mOutAllocation;
private ScriptC_MyRSCompute mScript;
/** Called when the activity is first created. */
@Override
public void onCreate(Bundle savedInstanceState) {
super.onCreate(savedInstanceState);
setContentView(R.layout.main);
mBitmapIn = loadBitmap(R.drawable.android);
mBitmapOut = Bitmap.createBitmap(mBitmapIn.getWidth(), mBitmapIn.getHeight(), mBitmapIn.getConfig());
ImageView in = (ImageView) findViewById(R.id.displayin);
in.setImageBitmap(mBitmapIn);
ImageView out = (ImageView) findViewById(R.id.displayout);
out.setImageBitmap(mBitmapOut);
createScript();
}
private void createScript() {
mRS = RenderScript.create(this);
mInAllocation = Allocation.createFromBitmap(mRS, mBitmapIn,
Allocation.MipmapControl.MIPMAP_NONE,
Allocation.USAGE_SCRIPT);
mOutAllocation = Allocation.createTyped(mRS, mInAllocation.getType());
mScript = new ScriptC_MyRSCompute(mRS, getResources(), R.raw.myrscompute);
mScript.forEach_root(mInAllocation, mOutAllocation);
mOutAllocation.copyTo(mBitmapOut);
}
private Bitmap loadBitmap(int resource) {
final BitmapFactory.Options options = new BitmapFactory.Options();
options.inPreferredConfig = Bitmap.Config.ARGB_8888;
return BitmapFactory.decodeResource(getResources(), resource, options);
}
}
整個 Package PackageExplore:
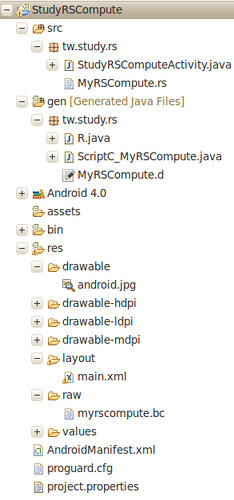
猜想的架構:
在 MyRSCompute.rs 中,只有一個 root 函數,該函數接收單位是一個像素資訊(4個浮點數),並且把收到的像素 v_in 作灰階,經向量 dot 處理後,將結果存在 v_out;在 StudyRSComputeActivity 中,在 onCreate 時,把預備好的圖檔讀進來,並轉成 Bitmap 結構,隨即透過 createScript 呼叫 RS,在 createScript 中,先建立 Renderscript 執行環境,包括用 Allocation 進行 Java 層變數的初始化,這些變數之後才可以傳給 RS 用,接著在 Java 層用 forEach_root 的方式呼叫 RS 進行處理(平行處理?),最後再把處理完的資料在存回 Bitmap 變數,在 ImageView 顯示出來。
其他心得:
學會處理圖片灰階特效,也才發現圖片特效有平行處理的可行性架構。RS 有提供很多數學函數,請參考 RS Runtime API Reference。
沒有留言:
張貼留言