2012年2月18日 星期六

[Python] 使用 Google App Engine (GAE) 筆記 @ Windows 7


很久以前就註冊了帳號,但一直都沒認真使用 :P 而後 GAE 又多了 Cron Jobs,我還是沒有用。最近提起勁來用一下吧!此篇只著重在 local 端的 python 練習。


練習的功能:


  • 設定 CLI 相容環境(command mode 可以測試 script.py 而不用每次都從瀏覽器執行)

  • 使用 urllib2 取得網路資料

  • 使用 re 取得資料(Regular Expression 處理字串)

  • 使用 urlfetch 存取網路服務(google.appengine.api) 

  • 實現 urlfetch with cookie 功能

  • 使用 plurk api 發布消息


流程:


先在 Windows 7 環境上,使用 googleappengine lib 寫寫 python 程式,接著從某個 url 取得資料,再用 re 處理字串,然後使用 plurk api 發布訊息。上述流程沒問題後,改成 CGI 模式,因此可透過 GAE 來執行,最後設定 cron jobs


安裝 GAE 相關開發環境:


  • GoogleAppEngine-1.6.2.msi

  • python-2.5.msi

  • npp.5.9.8.Installer.exe

  • google-appengine-docs-20120131.zip (GAE離線文件)


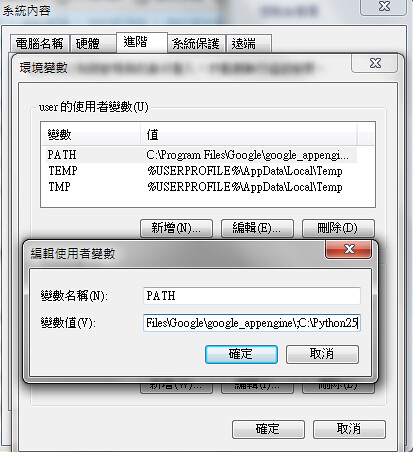
一切都用預設安裝,別忘了設定環境變數,在 cmd mode 下才可以直接打 python 來做事

GAE00


建立一個 GAE Project:


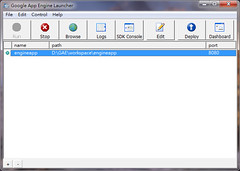
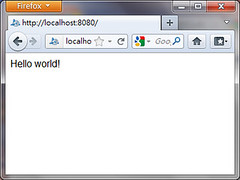
僅本地端,除了 Project 位置外(D:\GAE\workspace\engineapp),全部都預設,弄完就開起來測試一下,理論上應該可以輕易地用瀏覽器瀏覽這 hello world 程式
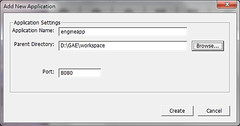
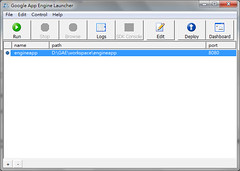
GAE01 GAE02 GAE03 GAE04 GAE05


新增一支 script (plurk.py):


在 Project 位置建立一個 plurk.py 空檔案,接著就切到 command mode 來測試:


C:\> D:
D:\> cd GAE\workspace\engineapp
D:\GAE\workspace\engineapp>python plurk.py
(...沒東西...) 


設置 script 可使用 GAE Libs:


# -*- coding: utf-8 -*-
"""
# ImportError: No module named google.appengine.api
import sys, os
DIR_PATH = 'C:\Program Files\Google\google_appengine'
EXTRA_PATHS = [
DIR_PATH,
        os.path.join(DIR_PATH, 'lib', 'antlr3'),
        os.path.join(DIR_PATH, 'lib', 'django'),
        os.path.join(DIR_PATH, 'lib', 'django_0_96','django'),
        os.path.join(DIR_PATH, 'lib', 'django_1_2','django'),
        os.path.join(DIR_PATH, 'lib', 'django_1_3','django'),
        os.path.join(DIR_PATH, 'lib', 'simplejson'),
        os.path.join(DIR_PATH, 'lib', 'fancy_urllib'),
        os.path.join(DIR_PATH, 'lib', 'ipaddr'),
        os.path.join(DIR_PATH, 'lib', 'webob'),
        os.path.join(DIR_PATH, 'lib', 'yaml', 'lib'),
]
sys.path = EXTRA_PATHS + sys.path


# AssertionError: No api proxy found for service "urlfetch"
from google.appengine.api import apiproxy_stub_map
from google.appengine.api import datastore_file_stub
from google.appengine.api import mail_stub
from google.appengine.api import urlfetch_stub
from google.appengine.api import user_service_stub


APP_ID = u'test_app'
#os.environ['AUTH_DOMAIN'] = AUTH_DOMAIN # gmail.com
#os.environ['USER_EMAIL'] = LOGGED_IN_USER # account@gmail.com


apiproxy_stub_map.apiproxy = apiproxy_stub_map.APIProxyStubMap()
# Use a fresh stub datastore.
stub = datastore_file_stub.DatastoreFileStub(APP_ID, '/dev/null', '/dev/null')
apiproxy_stub_map.apiproxy.RegisterStub('datastore_v3', stub)
# Use a fresh stub UserService.
apiproxy_stub_map.apiproxy.RegisterStub('user',user_service_stub.UserServiceStub())
# Use a fresh urlfetch stub.
apiproxy_stub_map.apiproxy.RegisterStub('urlfetch', urlfetch_stub.URLFetchServiceStub())
# Use a fresh mail stub.
apiproxy_stub_map.apiproxy.RegisterStub('mail', mail_stub.MailServiceStub())
"""


把這一段擺在 plurk.py 的最上面,如此一來,當你是在 command mode 上執行時,把這段註解打開即可使用(把一開始跟最後的 """ 去掉即可)


 接著撰寫 Plurk API 要用的範例程式:


 參考 [PHP] 使用官方 Plurk API 實作簡單的機器人 - 靠機器人救 Karma!以 Yahoo News 為例 架構,改成 GAE Python 版,分別實作三個主要 function:


    • def getNews()


      • 取得新聞


    • def doAct()


      • 執行 url/api 


    • def getTinyURL(src)


      • 取得縮網址


程式碼:


# return responseContent
def doAct( targetURL, method='POST', data={}, cookie = None, header=None ):
        rawHeader = {'User-Agent':'Mozilla/4.0 (compatible; MSIE 6.0; Windows NT 5.1)'}
        if header:
        rawHeader = header


        # load cookie
        try:
                if cookie <> None:
                cookieData = '' # {}
                for c in cookie.values():
                        #cookieData[c.key]=c.value
                        cookieData += c.key + "=" + c.value
                if len(cookieData) > 0 :
                        rawHeader['Cookie'] = cookieData
        except Excetion, e:
                pass


        # post data
        try:
                if data and len(data) > 0 :
                        data = urllib.urlencode( data )
                else:
                        data = None
        except Excetion, e:
                data = None

        rawMehtod = urlfetch.POST if method != 'GET' else urlfetch.GET
        response = urlfetch.fetch(url=targetURL,payload=data,method=rawMehtod,headers=rawHeader,deadline=10)

        if cookie <> None:
                cookie.load(response.headers.get('set-cookie', ''))
        return response.content if response <> None and response.content <> None else ''


# return {'status':'ok','data':[ {'title':NewsTitle, 'url':NewsURL } , ... ]}
def getNews():
        out = {'status':'fail','data':None}
        try:
                # setting
                newsURL = 'http://tw.yahoo.com/'
                newsPatternBeginChecker = '<label class="img-border clearfix">'
                newsPatternEndChecker = '<ol class="newsad clearfix">'
                newsRePatternNewsExtract = '<h3[^>]*>[^<]*<a href="(.*?)"[^>]*>(.*?)</a></h3>'
                #newsRePatternNewsExtract = r'<h3[^>]*>[^<]*<a href="(?P<url>.*?)"[^>]*>(?P<title>.*?)</a></h3>'
                newsReOptionsNewsExtract = re.DOTALL
                newsPatternURLChecker = 'http:'


                raw = urllib2.urlopen(newsURL).read()
                checker = str(raw).find(newsPatternBeginChecker)
                if checker < 0:
                        out['data'] = 'newsPatternBeginChecker fail'
                        return out
                raw = raw[checker+len(newsPatternBeginChecker):]
                checker = raw.find(newsPatternEndChecker)
                if checker < 0:
                        out['data'] = 'newsPatternEndChecker fail'
                        return out
                raw = raw[:checker]
                #print "##",raw,"##"
                m = re.findall( newsRePatternNewsExtract, raw, newsReOptionsNewsExtract )
                if m:
                        out['data'] = []
                        for data in m:
                                urlChecker = data[0].find(newsPatternURLChecker)
                                if urlChecker >= 0:
                                        out['data'].append( {'title':data[1],'url':data[0][urlChecker:]} )
                                if len(out['data']) > 0:
                                        out['status'] = 'ok'
                                else:
                                        out['data'] = 'not found'
        except Exception, e:
                out['data'] = str(e)
        return out


# return short url via tinyurl.com
def getTinyURL(src):
        try:
                raw = urllib2.urlopen('http://tinyurl.com/api-create.php?'+urllib.urlencode({'url':src})).read()
                return raw.strip()
        except Exception, e:
                pass
        return None


呼叫方式:


# main
plurkAPIKey = 'YourPlurkAPIKey'
plurkID = 'YourPlurkID'
plurkPasswd = 'YourPlurkPassword'
getNewsData = getNews()


runLog = []
if getNewsData['status'] == 'ok':
        # try login
        baseCookie = Cookie.SimpleCookie()
        loginData = {'api_key':plurkAPIKey,'username':plurkID,'password':plurkPasswd}
        checkLogin = doAct( 'http://www.plurk.com/API/Users/login', 'POST', loginData, baseCookie )
        try:
                obj = simplejson.loads(checkLogin)
                if 'error_text' in obj:
                        runLog.append( 'login error: '+str(obj['error_text']) )
        except Exception,e :
                runLog.append( 'login exception: '+str(e) )
        if len(runLog) == 0:
                # try post
                for news_info in getNewsData['data']:
                        formated_message = '[News] '+news_info['url']+' ('+news_info['title']+')'
                        if len(formated_message) > 140:
                                shortURL = getTinyURL(news_info['url'])
                                if shortURL <> None:
                                        formated_message = '[News] '+shortURL+' ('+news_info['title']+')'

                        if len(formated_message) <= 140:
                                writeData = {'api_key':plurkAPIKey,'qualifier':'shares','content':formated_message}
                                checkPost = doAct( 'http://www.plurk.com/API/Timeline/plurkAdd' , 'POST' , writeData, baseCookie )

                                try:
                                        obj = simplejson.loads(checkPost)
                                        if 'error_text' in obj and obj['error_text'] <> None:
                                                runLog.append( 'post error: '+str(obj['error_text'])+', Message:'+formated_message )
                                except Exception, e:
                                        runLog.append( 'post exception: '+str(e)+', Message:'+formated_message )
        else:
                runLog.append( 'getNews error:'+getNewsData['data'])


若單純測試 Plurk API 的話,只要依序執行這兩段即可:


 # try login
baseCookie = Cookie.SimpleCookie()
loginData = {'api_key':plurkAPIKey,'username':plurkID,'password':plurkPasswd}
print doAct( 'http://www.plurk.com/API/Users/login', 'POST', loginData, baseCookie )
# try post
writeData = {'api_key':plurkAPIKey,'qualifier':'shares','content':'Hello World'}
print doAct( 'http://www.plurk.com/API/Timeline/plurkAdd' , 'POST' , writeData, baseCookie ) 


 弄成 CGI 模式:


# ...依序把上面的程式碼都湊在一起後,接著下面這段...


# CGI FORMAT for HTML
print 'Content-Type: text/html'
print ''
# report
print '<html><head><meta http-equiv="content-type" content="text/html; charset=utf-8"/></head><body>'
if len(runLog) > 0:
        print "<pre>"
        #print runLog
        print "</pre>"
        for err in runLog:
                print '<p>'+ err + '</p>'
else:
        print 'OK'
print '</body></html>'


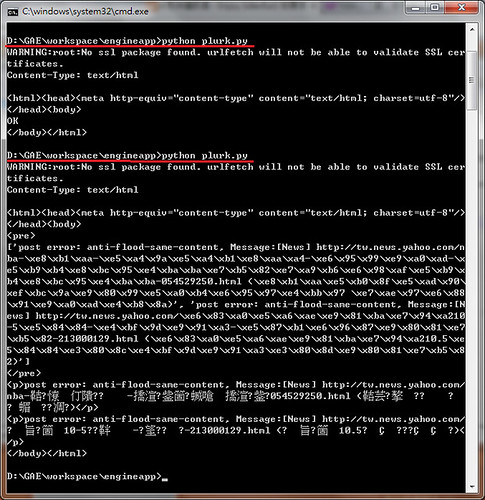
 如此一來,就是相容於瀏覽器跟 command mode 的環境:


此為連續執行 2~3 次的結果,因為 Plurk 會擋重複訊息,所以第二次輸出的結果不一樣

GAE06


設定 GAE Project (engineapp):


 設定對應的 URL 位置:


engineapp\app.yaml:


application: engineapp
version: 1
runtime: python
api_version: 1


handlers:
- url: /favicon\.ico
static_files: favicon.ico
upload: favicon\.ico


- url: /PlrukPost
script: plurk.py


- url: .*
script: main.py


如此就可以用網頁瀏覽:
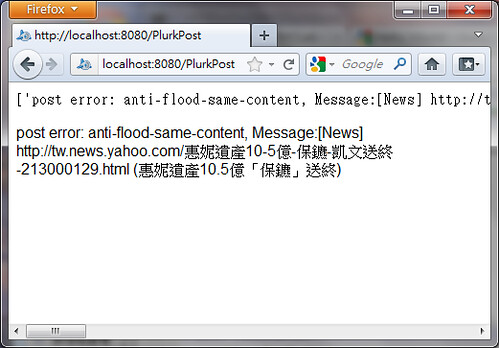

GAE07


設定 Cron Jobs:


engineapp\cron.yaml:


cron:
- description: news job
url: /PlurkPost
schedule: every 20 minutes


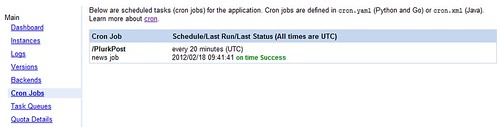
這樣每 20 分鐘就會去瀏覽該網頁一次,自然就會執行工作一次,此部分需要上傳到 GAE 上才能

GAE08


Deploy 筆記:


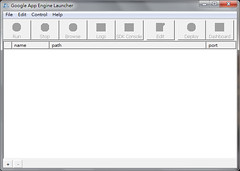
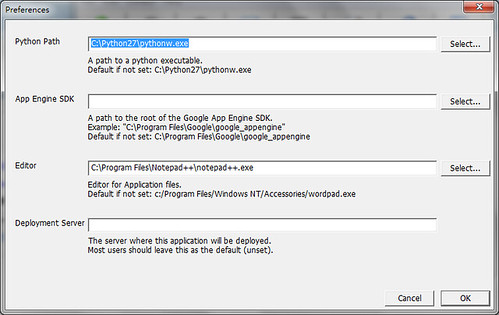
在 Google App Engine 的文件上,以 Python 2.5 為例,然而在使用 Deploy 時,會看到 ssl module not found 的訊息,因此無法上傳到 server。最簡單的解法就是安裝一下 Python 2.7 版,接著在 Google App Engine Launcher -> Edit -> Preferences 指定 Python Path ,就能夠順利上傳囉!

GAE09


查詢無線網路 AP 密碼 @ Windows 7

wifi-check-passwd wifi-check-passwd


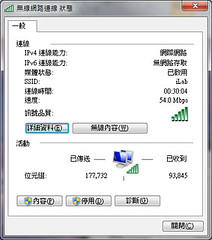
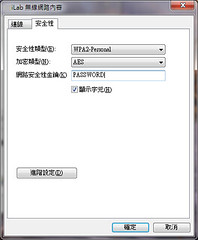
不小心忘記無線 AP 密碼,所幸對 Windows 7 來說很容易查到,筆記兩張圖就行了。無線網路連線 -> 指定 wifi ap 右鍵"內容" -> 安全性 -> 顯示字元。


2012年2月15日 星期三

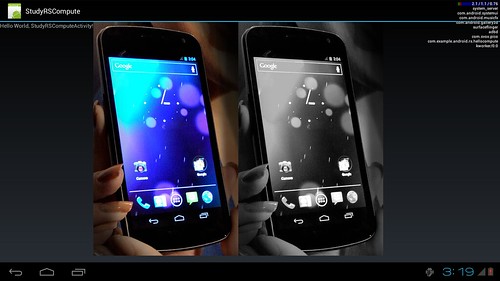
Android 開發教學筆記 - 初探 Renderscript 以 HelloCompute 為例 @ PandaBoard

tw.study.rs_screenout


最近把玩 Renderscript(RS),這東西在 2011 年初被提了出來,但最近才仔細看文件,也隨著 Android 4 可以看到完整的系統實現原始碼等,目前 RS 可用在 Android 3.x 和 Android 4.x 系統上。RS 的本意著重在三個層面,依序是 "Portability" 、"Performance" 和 "Usability"。我把他想成建立一個框架,讓你寫程式可以不用擔心硬體狀況、又不用擔心 Java VM 拖速度並且開發上可以簡單快速,當然,連帶的缺點就是必須學習這個框架的用法等。除此之外,RS 用的語法是 C 語言(C99 standard),流程看似與 JNI/NDK 很接近,但最特別的是整個架構的設計,並透過 llvm 技術,讓你的程式不只跑在 CPU 上頭,還可以跑在 GPU 或 DSP 上,目標就是提供跨硬體設備的機制,包含不同架構的 CPU 等,這就不見得單純用 JNI/NDK 可以作到的事。最後,關於 RS 的使用時機?可以用在大量運算(平行運算?)上,大部分的是用2D/3D影像處理當作例子,對於遊戲開發應該有不少幫助。


此練習仿造 Android 4.0 之 HelloCompute 範例,此範例是將一張 JPEG 圖片進行灰階影像特效。由於程式碼精簡,所以就拿來當作第一個 RS 的練習,可熟悉 RS 流程。


主要流程:


建立 Android Project -> 建立 RenderScript -> 設定使用 RenderScript 的時機。


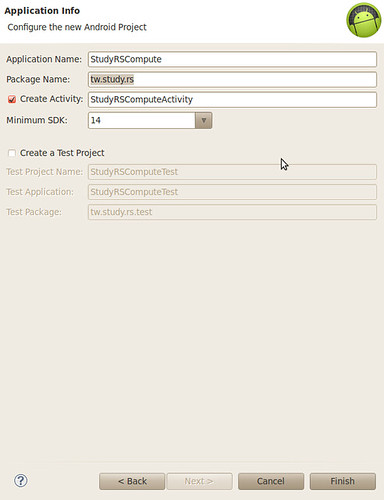
建立 Android Project:


Project Name: StudyRSCompute
Build Target: Android 4.0
Package Name: tw.study.rs 


tw.study.rs


建立 RenderScript (MyRSCompute.rs):


src/tw.sutdy.rs -> New -> File -> MyRSCompute.rs


#pragma version(1)
#pragma rs java_package_name(tw.study.rs)


const static float3 gMonoMult = {0.299f, 0.587f, 0.114f};


void root(const uchar4 *v_in, uchar4 *v_out) {
    float4 f4 = rsUnpackColor8888(*v_in);
    float3 mono = dot(f4.rgb, gMonoMult);
    *v_out = rsPackColorTo8888(mono);
}


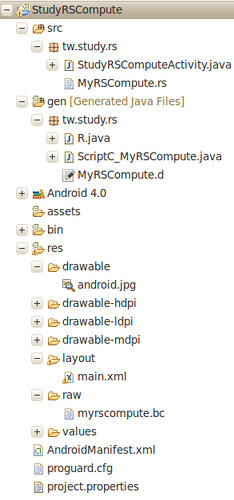
按下 build 後,可以在 res->raw 看到 myrscompute.bc,另外,在 gen->tw.study.rs 也能看到 ScriptC_MyRSCompute.java 和 MyRSCompute.d 的產生,並且在 R.java 中可以看到 raw 裡頭有 myrscompute 的定義。


建立測試圖檔:


接著找一張圖,此例用 http://zh.wikipedia.org/wiki/Android 裡的圖片 http://upload.wikimedia.org/wikipedia/commons/thumb/a/ad/Galaxy_Nexus_smartphone.jpg/371px-Galaxy_Nexus_smartphone.jpg,更名為 android.jpg


在 res 中,建立 drawable 目錄,並將 android.png 擺入且 build 後,在 gen->tw.study.rs->R.java 中可以看到圖檔的定義


建立圖檔 layout (res->layout->main.xml):


<?xml version="1.0" encoding="utf-8"?>
<LinearLayout xmlns:android="http://schemas.android.com/apk/res/android"
    android:layout_width="fill_parent"
    android:layout_height="fill_parent"
    android:orientation="horizontal" >


    <TextView
        android:layout_width="wrap_content"
        android:layout_height="wrap_content"
        android:text="@string/hello" />

    <ImageView
        android:id="@+id/displayin"
        android:layout_width="wrap_content"
        android:layout_height="wrap_content" />


    <ImageView
        android:id="@+id/displayout"
        android:layout_width="wrap_content"
        android:layout_height="wrap_content" />


</LinearLayout>


撰寫呼叫 RS 的時機 (StudyRSComputeActivity.java):


package tw.study.rs;


import android.app.Activity;
import android.os.Bundle;
import android.graphics.Bitmap;
import android.graphics.BitmapFactory;
import android.renderscript.Allocation;
import android.renderscript.RenderScript;
import android.widget.ImageView;


public class StudyRSComputeActivity extends Activity {
    private Bitmap mBitmapIn;
    private Bitmap mBitmapOut;


    private RenderScript mRS;
    private Allocation mInAllocation;
    private Allocation mOutAllocation;
    private ScriptC_MyRSCompute mScript;

    /** Called when the activity is first created. */
    @Override
    public void onCreate(Bundle savedInstanceState) {
        super.onCreate(savedInstanceState);
        setContentView(R.layout.main);

        mBitmapIn = loadBitmap(R.drawable.android);
        mBitmapOut = Bitmap.createBitmap(mBitmapIn.getWidth(), mBitmapIn.getHeight(), mBitmapIn.getConfig());


        ImageView in = (ImageView) findViewById(R.id.displayin);
        in.setImageBitmap(mBitmapIn);


        ImageView out = (ImageView) findViewById(R.id.displayout);
        out.setImageBitmap(mBitmapOut);


        createScript();
    }

    private void createScript() {
        mRS = RenderScript.create(this);


        mInAllocation = Allocation.createFromBitmap(mRS, mBitmapIn,
        Allocation.MipmapControl.MIPMAP_NONE,
        Allocation.USAGE_SCRIPT);
        mOutAllocation = Allocation.createTyped(mRS, mInAllocation.getType());


        mScript = new ScriptC_MyRSCompute(mRS, getResources(), R.raw.myrscompute);


        mScript.forEach_root(mInAllocation, mOutAllocation);
        mOutAllocation.copyTo(mBitmapOut);
    }

    private Bitmap loadBitmap(int resource) {
        final BitmapFactory.Options options = new BitmapFactory.Options();
        options.inPreferredConfig = Bitmap.Config.ARGB_8888;
        return BitmapFactory.decodeResource(getResources(), resource, options);
    }
}


 整個 Package PackageExplore:


PackageExplore_tw_study_rs


猜想的架構:


在 MyRSCompute.rs 中,只有一個 root 函數,該函數接收單位是一個像素資訊(4個浮點數),並且把收到的像素 v_in 作灰階,經向量 dot 處理後,將結果存在 v_out;在 StudyRSComputeActivity 中,在 onCreate 時,把預備好的圖檔讀進來,並轉成 Bitmap 結構,隨即透過 createScript 呼叫 RS,在 createScript 中,先建立 Renderscript 執行環境,包括用 Allocation 進行 Java 層變數的初始化,這些變數之後才可以傳給 RS 用,接著在 Java 層用 forEach_root 的方式呼叫 RS 進行處理(平行處理?),最後再把處理完的資料在存回 Bitmap 變數,在 ImageView 顯示出來。


其他心得:


學會處理圖片灰階特效,也才發現圖片特效有平行處理的可行性架構。RS 有提供很多數學函數,請參考 RS Runtime API Reference


2012年2月13日 星期一

[VIM] 清除預設 vimrc 和 plugin 設定

與別人用同一個帳號共用主機時,最怕對方把 vim 設定的漂漂亮亮,華麗到我動個鍵盤就會卡了一下 Orz 為了不要動到別人的設定,請教高手同學後,剛好同學之前也有在測試 vim 設定,所以學會用 -u 指令來清掉且切換 vimrc 設定檔,接著還可以用 --noplugin 取消一堆 plugins 等等,一整個介面就清爽起來啦!


最後就設定一下 my.cshrc ,登入後 source 一下,就爽快一下。


$ vim my.cshrc


alias vim       'vim -u /path/my.vimrc --noplugin -N' 


$ vim /path/my.vimrc


autocmd FileType php set omnifunc=phpcomplete#CompletePHP
if has("multi_byte")
  set encoding=utf-8
  set fileencodings=big5,cp950,utf-8,gbk,cp936,iso-2022-jp,sjis,euc-jp,japan,euc-kr,ucs-bom,utf-bom,latin1,iso8859-1
  set termencoding=big5
  set fileencoding=big5
" for UTF-8 environment
" set termencoding=utf-8
" set fileencoding=utf-8
else
  set enc=taiwan
  set fileencoding=taiwan
endif

syntax on
set nu
set hls 


 如此一來,登入機器後,用 $ source /path/my.cshrc 後,從此 vim 設定就依照 /path/my.vimrc 的方式啦。


2012年2月11日 星期六

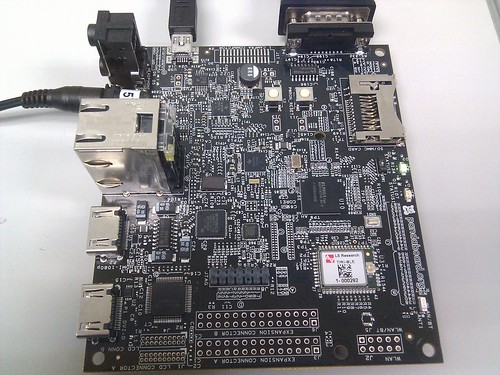
PandaBoard 教學筆記 - 安裝 Android 4.0 ICS via VirtualBox @ Ubuntu 10.04

Android ICS


玩了幾天 BeagleBoard-xM(Rev.C) 後,開始切換到 PandaBoard(Rev.B) 啦,從硬體規格來看,PandaBoard 好上許多,多了內建無線網卡外,CPU 是 Dual-core ARM® Cortex™-A9 MPCore™ with Symmetric Multiprocessing (SMP) at 1.2 GHz each,比 BeagleBoard-xM 的 ARM® Cortex™-A8 1.0GHz 好不少,跑 Android ICS 可以順多了!另外,最大的好處是安裝 Android 流程方便,編譯步驟在 AOSP 都有提到,也不需像 BeagleBoard 透過過於繁複的指令來處理 SD 卡,就像惡搞 Android 手機一樣,採用 fastboot 指令來處理,十分方便,缺點大概會讓入門者少學到 SD 卡處理的事情。


以下是操作環境:


OS:Ubuntu 10.04 64-Bit Desktop (主要是在 VirtualBox 裡,Guest OS 跟 Host OS 都一樣)
Target:Panda Board ES Rev. B1 + 4GB microSD


在 VirtualBox 環境碰到的問題:


板子偵測時有時無?


由於採用 VirtualBox 時,必須手動把 USB 裝置附加上去,因此需留意有那個項目可以使用,然而在 VirtualBox 的視窗上,一下可以看到板子,一下又找不到板子,這樣可好了,對我初學的我開始懷疑是線壞了還是板子壞了,在網路上搜尋的結果大多是說板子的power不夠,像是要用 Y 型 USB 接線,或是外接 5V 電源,但這兩樣我早就做好了,情況還是一樣,並可以在 /var/log/messages 看到 USB 一下接上,一下又斷掉。


$ tail -f /var/log/messages
...
kernel: [   21.750370] usb 1-1: new high speed USB device using ehci_hcd and address 8
kernel: [   21.952310] usb 1-1: configuration #1 chosen from 1 choice
kernel: [   24.440886] usb 1-1: USB disconnect, address 8
kernel: [   25.730824] usb 1-1: new high speed USB device using ehci_hcd and address 9
kernel: [   25.953153] usb 1-1: configuration #1 chosen from 1 choice
kernel: [   28.431670] usb 1-1: USB disconnect, address 9
...


可能現象及處理方式:


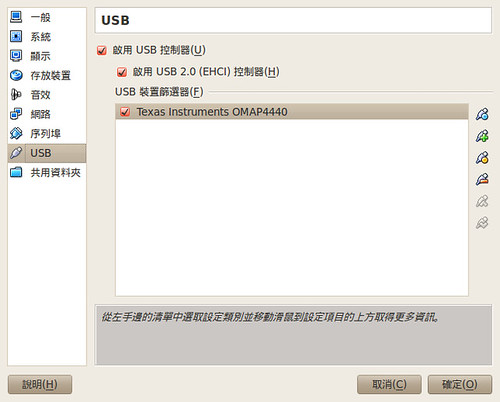
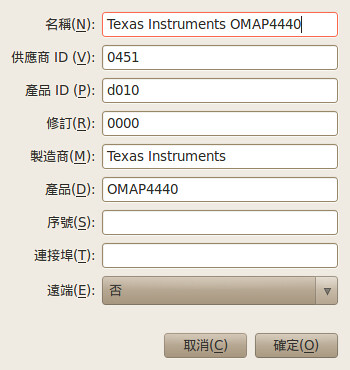
對非使用 VirtualBox 環境者,並不需要處理他,我猜是硬體的設計吧?讓此硬體處於可被偵測狀態,但不知為何理由要不斷斷線(省電?等待指令?),無論如何,對於 VirtualBox 使用者而言,需要小作處理,讓板子可以自動附加到 VM 中,不然一直靠手動就糗大了。首先在 VirtualBox 的 VM 開啟前先作設定 USB 相關設定,趁可以偵測到時,把他弄成自動附加即可。


PandaBoard@VirtualBox


Texas Instruments OMAP4440-USB 篩選器詳細資料


其他:


記得把目前得使用者加到 vboxusers group 裡喔 (/etc/group vboxusers:x:XXX:YourHostAccount)


主要流程:


編譯 Android ICS:


大致上流程如 AOSP 所提的環境及編法,只是在編譯前,要先安置好 PandaBoard 所需的硬體資訊,這對編過 AOSP for Android 手機的人來說應該不陌生(以 Nexus One 為例,早期需透過 extract-files.sh 取出),對於 PandaBoard 來說,請直接在 http://code.google.com/android/nexus/drivers.html#panda 下載


$ mkdir ~/bin ~/projects/android-ics
$ curl https://dl-ssl.google.com/dl/googlesource/git-repo/repo > ~/bin/repo
$ chmod 755 ~/bin/repo
$ export PATH=$PATH:~/bin/repo
$ cd ~/projects/android-ics
$ repo init -u https://android.googlesource.com/platform/manifest
$ repo sync
$ source build/envsetup.sh
$ lunch full_panda-eng
$ make fastboot
$ wget https://dl.google.com/dl/android/aosp/imgtec-panda-itl41d-dfebf249.tgz  (這是 Android 4.0.1 (ITL41D) 版本)
$ tar -xvf imgtec-panda-itl41d-dfebf249.tgz
wget https://dl.google.com/dl/android/aosp/imgtec-panda-iml74k-cfb7bdad.tgz  (這是 Android 4.0.3 (IML74K) 版本)
$ tar -xvf imgtec-panda-iml74k-cfb7bdad.tgz
$ wget https://dl.google.com/dl/android/aosp/imgtec-panda-imm76i-67545da7.tgz (這是 Android 4.0.4 (IMM761) 版本,建議上官網查看最新版)
$ tar -xvf imgtec-panda-imm76i-67545da7.tgz
$ ./extract-imgtec-panda.sh
輸入 I ACCEPT
$ make -j 2 (看自己是幾核心 CPU,我在 VM 配置 2 CPU)
依硬體狀況漫長等待後,沒意外就都有編好了


設置 PandaBoard:


Init


一開始把記憶卡拔掉,接上電源及 USB 線後,可以看到靠近 SD 卡插槽有一個燈在亮(對VirtualBox來說,USB裝置可以間斷地偵測到Texas Instruments OMAP4440設備),接著透過 usbboot 指令把 bootload 餵進去後,就可以看到另一個燈閃動(對VirtualBox來說,USB裝置可以穩定偵測到Texas Instruments panda設備,請記的手動附加一下)


$ cd ~/projects/android-ics
$ sudo device/ti/panda/usbboot device/ti/panda/bootloader.bin
using built-in 2ndstage.bin
reading ASIC ID
CHIP: 4440
IDEN: 0000000000000000000000000000000000000000
MPKH: 0000000000000000000000000000000000000000000000000000000000000000
CRC0: ########
CRC1: 00000000
sending 2ndstage to target... ########
waiting for 2ndstage response...
sending image to target...


檢查是否偵測到裝置(對VirtualBox使用者,需手動附加偵測到的 Texas Instruments panda 設備):


$ sudo out/host/linux-x86/bin/fastboot devices
################        fastboot


接上 SD 卡後:


$ sudo out/host/linux-x86/bin/fastboot oem format
...
OKAY [  0.420s]
finished. total time: 0.421s
$ sudo out/host/linux-x86/bin/fastboot flash xloader device/ti/panda/xloader.bin
sending 'xloader' (23 KB)...
OKAY [  0.024s]
writing 'xloader'...
OKAY [  0.248s]
finished. total time: 0.272s
$ sudo out/host/linux-x86/bin/fastboot flash bootloader device/ti/panda/bootloader.bin
sending 'bootloader' (157 KB)...
OKAY [  0.110s]
writing 'bootloader'...
OKAY [  0.303s]
finished. total time: 0.413s
$ sudo out/host/linux-x86/bin/fastboot erase cache
erasing 'cache'...
OKAY [102.520s]
finished. total time: 102.520s
$ sudo out/host/linux-x86/bin/fastboot -p panda flash userdata
sending 'userdata' (10504 KB)...
OKAY [  6.411s]
writing 'userdata'...
OKAY [  9.763s]
finished. total time: 16.174s
$ sudo out/host/linux-x86/bin/fastboot -p panda flashall
--------------------------------------------
Bootloader Version...: U-Boot 1.1.4-g157fe435
Baseband Version.....:
Serial Number........: ################
--------------------------------------------
checking product...
OKAY [  0.006s]
sending 'boot' (3750 KB)...
OKAY [  2.331s]
writing 'boot'...
OKAY [  2.381s]
sending 'system' (146598 KB)...
OKAY [ 89.414s]
writing 'system'...
OKAY [119.862s]
rebooting...

finished. total time: 215.212s 


接著正確寫入後系統會自行重開機,大概 15 分左右就好了!記得要插好 USB 滑鼠,因為 Android 初始化沒多久就會黑屏休息,需要用滑鼠移動一下讓他清醒


各指令對應的 ttyUSB0 的輸出:


卸下 SD 卡開機:


[ aboot second-stage loader ]

MSV=00000000
jumping to 0x82000000...

U-Boot 1.1.4-g157fe435 (Oct 21 2011 - 09:46:20)

Load address: 0x80e80000
DRAM:  1024 MB
Flash:  0 kB
Using default environment

In:    serial
Out:   serial
Err:   serial

efi partition table:
Read not permitted as Card on SLOT-0 not Initialized
efi partition table not found
Net:   KS8851SNL
Panda: GPIO_113 pressed: entering fastboot....
I2C read: I/O error
Device Serial Number: ################
Fastboot entered...


$ sudo out/host/linux-x86/bin/fastboot oem format


blocks 15661056

new partition table:
     256     128K xloader
     512     256K bootloader
    2048       8M recovery
   18432       8M boot
   34816     512M system
 1083392     256M cache
 1607680     512M userdata
 2656256    2254M media


$ sudo out/host/linux-x86/bin/fastboot flash xloader device/ti/panda/xloader.bin


Starting download of 23824 bytes

downloading of 23824 bytes finished
writing to partition 'xloader'
Initializing 'xloader'
Writing 'xloader'
Writing 'xloader' DONE!


$ sudo out/host/linux-x86/bin/fastboot flash bootloader device/ti/panda/bootloader.bin


Starting download of 161236 bytes
....
downloading of 161236 bytes finished
writing to partition 'bootloader'
Initializing 'bootloader'
Writing 'bootloader'
Writing 'bootloader' DONE!


$ sudo out/host/linux-x86/bin/fastboot erase cache


Initializing 'cache'
Erasing 'cache'
Erasing 'cache' DONE!


$ sudo out/host/linux-x86/bin/fastboot -p panda flash userdata


Starting download of 10756436 bytes
...
downloading of 10756436 bytes finished
writing to partition 'userdata'
Initializing 'userdata'
fastboot: userdata is in sparse format
sparse: write to mmc slot[0] @ 1607680

sparse: out-length-0x512 MB
Writing sparsed: 'userdata' DONE!


$ sudo out/host/linux-x86/bin/fastboot -p panda flashall


Starting download of 3840000 bytes
...
downloading of 3840000 bytes finished
writing to partition 'boot'
Initializing 'boot'
Writing 'boot'
Writing 'boot' DONE!
Starting download of 150116688 bytes
...
downloading of 150116688 bytes finished
writing to partition 'system'
Initializing 'system'
fastboot: system is in sparse format
sparse: write to mmc slot[0] @ 34816


其他:


第一次使用 8GB 記憶卡,但是在 fastboot -p panda flashall 指令時,看到卡在 system.img 的寫入,網路上也看不到解法?後來甚至把 flashall 改成一步步時,仍卡在 fastboot flash system system.img 的部分,最後則是乾脆換一張 4GB 記憶卡,沒錯,這樣就沒問題了!看來玩硬體就是容易把生命浪費在其他硬體身上 XD 重點那張 8GB microSD (+轉卡) 是新卡啊,還是那種要拆包裝的耶。