2010年12月15日 星期三

Android 開發教學筆記 - 使用 Regular Expression、Network Connection 和 Thread

getNews


打算寫一個稍微複雜的小程式,練習的項目:


  • 使用 Regular Expression

  • 使用 Network Connection

  • 使用 Thread


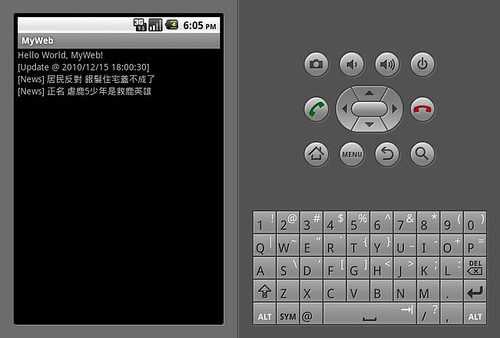
以三個項目為出發點,把以前的老題目拿出來:定期抓台灣 Yahoo 首頁的兩則焦點新聞,顯示在 Android 模擬上。因此,先想一下排版問題,大概就三個 TextView,分別為 更新時間 和 兩則新聞。


建立 project


[Eclipse]->[File]->[New]->[Android Project]

Project name: MyWeb
Build Target: Android 2.2
Application name: MyWeb
Package name: com.test.Web
Create Activity: MyWeb
Min SDK Version: 8


設定使用網路權限


點選 AndroidManifest.xml 檔案,在 <manifest> 裡增加 <uses-permission android:name="android.permission.INTERNET" />


<?xml version="1.0" encoding="utf-8"?>
<manifest xmlns:android="http://schemas.android.com/apk/res/android"
      package="com.test.web"
      android:versionCode="1"
      android:versionName="1.0">
    <application android:icon="@drawable/icon" android:label="@string/app_name">
        <activity android:name=".MyWeb"
                  android:label="@string/app_name">
            <intent-filter>
                <action android:name="android.intent.action.MAIN" />
                <category android:name="android.intent.category.LAUNCHER" />
            </intent-filter>
        </activity>

    </application>
    <uses-sdk android:minSdkVersion="8" />
    <uses-permission android:name="android.permission.INTERNET" />
</manifest>


設定排版


點選 main.xml 檔案,增加 3 個 TextView,分別為"更新時間"、"新聞1"和"新聞2"。


<?xml version="1.0" encoding="utf-8"?>
<LinearLayout xmlns:android="http://schemas.android.com/apk/res/android"
    android:orientation="vertical"
    android:layout_width="fill_parent"
    android:layout_height="fill_parent"
    >
<TextView  
    android:layout_width="fill_parent"
    android:layout_height="wrap_content"
    android:text="@string/hello"
    />
<TextView android:id="@+id/UpdateDate" android:layout_width="fill_parent" android:layout_height="wrap_parent"></TextView>    
<TextView android:id="@+id/News1" android:layout_width="fill_parent" android:layout_height="wrap_content"></TextView>
<TextView android:id="@+id/News2" android:layout_width="fill_parent" android:layout_height="wrap_content"></TextView>

</LinearLayout>


MyWeb.java


package com.test.web;

import android.app.Activity;
import android.os.Bundle;
import android.os.Handler;
import android.widget.TextView;

import java.util.ArrayList;
import java.util.Date;
import java.text.DateFormat;
import java.text.SimpleDateFormat;

import com.test.web.GetYahooNews;

public class MyWeb extends Activity {
    Handler jobs;
    /** Called when the activity is first created. */
    @Override
    public void onCreate(Bundle savedInstanceState) {
        super.onCreate(savedInstanceState);
        setContentView(R.layout.main);
        jobs = new Handler();
        new Thread( new GetYahooNews( this )).start();
    }

    public void updateNews( final ArrayList<String> news )
    {
        jobs.post( new Runnable(){
            public void run()
            {
                TextView showTextView;

                if( news != null && news.size() >= 2 )
                {
                    if( ( showTextView = (TextView) findViewById(R.id.News1) ) != null )
                        showTextView.setText("[News] "+(String)news.get(0));
                    if( news.size() == 4 && ( showTextView = (TextView) findViewById(R.id.News2) ) != null )
                        showTextView.setText("[News] "+(String)news.get(2));
                }
                if( ( showTextView = (TextView) findViewById(R.id.UpdateDate) ) != null )
                {
                    DateFormat dateFormat = new SimpleDateFormat("yyyy/MM/dd HH:mm:ss");
                    showTextView.setText( "[Update @ " + dateFormat.format(new Date() ) + "]" );
                }
            }
        });
    }
}


GetYahooNews.java


package com.test.web;

import java.io.*;
import java.util.ArrayList;
import java.util.regex.*;
import java.net.HttpURLConnection;
import java.net.URL;

import android.util.Log;

import com.test.web.MyWeb;

public class GetYahooNews implements Runnable {
    MyWeb activity;
    
    GetYahooNews( MyWeb n)
    {
        this.activity = n;
    }
    public static void report( String message )
    {
        //System.out.println( "[Report] " + message );
        Log.d( "Report" , message );
    }
    public static ArrayList<String> getHotNews()
    {
        ArrayList<String> news = new ArrayList<String>();
        HttpURLConnection con = null;
        try
        {
//*
            URL url = new URL("http://tw.yahoo.com");
            con = (HttpURLConnection) url.openConnection();            
            con.setReadTimeout(10000);
            con.setConnectTimeout(15000);
            con.setRequestMethod("GET" );
            con.addRequestProperty("User-Agent","Mozilla/5.0 (Windows; U; Windows NT 5.2; en-GB; rv:1.9.2.9) Gecko/20100824 Firefox/3.6.9");
            con.setDoInput(true);
            con.connect();

            BufferedReader reader = new BufferedReader(new InputStreamReader(con.getInputStream(), "UTF-8" ));
// */
//            BufferedReader reader = new BufferedReader(new InputStreamReader( new FileInputStream("fetch.html"), "UTF-8" ));

            String n, result="";
//            while( ( n = reader.readLine() ) != null )
//                result += n;

            StringBuilder htmlContent = new StringBuilder();
            while ((n = reader.readLine()) != null)
               htmlContent.append(n);

            result = htmlContent.toString();

//            BufferedWriter out = new BufferedWriter( new FileWriter("fetch.html") );out.write(result);out.close();
            
            String pattern;
            int at;

            pattern = "<label class=\"img-border clearfix\">";
            if( ( at = result.indexOf(pattern) ) < 0 )
            {
                news.add( "format error 1" );
                report( "format error 1" );
                return news;
            }
            result = result.substring( at );

            pattern = "<ol class=\"newsad clearfix\">";
            if( ( at = result.indexOf(pattern) ) < 0 )
            {
                news.add( "format error 2" );
                report( "format error 2" );
                return news;
            }
            result = result.substring( 0 , at  );

            pattern = "<h3[^>]*>[^<]*<a href=\"(.*?)\"[^>]*>(.*?)</a></h3>";
            Pattern p = Pattern.compile( pattern , Pattern.CASE_INSENSITIVE | Pattern.DOTALL );
            Matcher m = p.matcher( result );

            while( m.find() )
            {
//                report( "\n==== Get === \n" + m.group() + "\n" );
//                report( "URL: " + m.group(1) );
//                report( "Title: " + m.group(2) );
                String newsTitle = ""+ m.group(2);
                String newsUrl = "" + m.group(1);
                if( ( at = newsUrl.indexOf( "http:" ) ) > 0 )
                    newsUrl = newsUrl.substring( at );
                news.add( newsTitle );
                news.add( newsUrl );
            }
        }catch(Exception e)
        {
            news.add( "Exception:"+e );
        }
        finally
        {
            if ( con != null )
                con.disconnect();
        }
        return news;
    }
    public void run()
    {
        try
        {
            while( true )
            {
                try
                {
//                    ArrayList<String> demo = new ArrayList<String>();demo.add("Yo1");demo.add("Yo2");demo.add("Yo3");demo.add("Yo4");activity.updateNews( demo );
                    activity.updateNews( getHotNews() );
                    Thread.sleep( 1000 * 60 * 60 * 2  );    // 2 hrs
                }
                catch(Exception e)
                {
                    report( "run while Exception:"+e );
                    break;
                }
            }
        }
        catch( Exception e )
        {
            report( "run Exception:"+e );
        }
    }
}


在 MyWeb 裡有一樣東西比較特別,叫做 Handler,可以把他當作管理 Thread 的用法,在官網的描述裡,比較重要的敘述:


There are two main uses for a Handler: (1) to schedule messages and runnables to be executed as some point in the future; and (2) to enqueue an action to be performed on a different thread than your own.


在這邊使用 Handler,是讓更新 UI 的部份能夠透過 Runnable 來處理事件,如果不使用的話,會有無法更新 UI 的現象,暫時還沒了解底層的問題。


接著是 MyWeb 裡的 updateNews 函數,其參數是使用 final 的描述,加上這個描述後,可以讓接下來的 new Runnalbe 裡,可以直接用傳進來的參數,如果不用 final 也有解法啦,就是自己在定義一個實做 Runnable 的物件,然後把參數都傳遞好,稍微麻煩一點:


public void updateNewsPrev( ArrayList<String> news )
{
    class UIUpdate implements Runnable
    {
        ArrayList<String> news;
        UIUpdate( ArrayList<String> in )
        {
            news = in;
        }
        public void run()
        {
            TextView showTextView;
            if( news != null && news.size() >= 2 )
            {
                if( ( showTextView = (TextView) findViewById(R.id.News1) ) != null )
                    showTextView.setText("[News] "+(String)news.get(0));
                if( news.size() == 4 && ( showTextView = (TextView) findViewById(R.id.News2) ) != null )
                    showTextView.setText("[News] "+(String)news.get(2));
            }
            if( ( showTextView = (TextView) findViewById(R.id.UpdateDate) ) != null )
            {
                DateFormat dateFormat = new SimpleDateFormat("yyyy/MM/dd HH:mm:ss");
                showTextView.setText( "[Update @ " + dateFormat.format(new Date() ) + "]" );
            }
        }
    }
    jobs.post( new UIUpdate( news ) );
}


接下來是 GetYahooNews 的部份,其中 getHotNews 函數是擷取台灣 Yahoo 首頁的兩則新聞出來,以此當作資料,接著就只是單純的當個 Runnalbe 在跑,並且設定 2 小時跑一次,跑完一次會呼叫 MyWeb 的 updateNews 去更新 UI 部份。至於怎樣從 GetYahooNews 呼叫 MyWeb 呢?那就是一開始在使用 GetYahooNews 時,就把 MyWeb 傳進去給他記住,在此使用 activity 變數紀錄。

Android 開發教學筆記 - 使用 String 和 StringBuilder 的差別

在練習使用 HttpURLConnection 來取得指定 URL 網址內容時,發現透過 Android 模擬器跑得非常非常緩慢,但我把相同的 Java Code 用桌機的環境執行,卻十分快速,讓我不禁感到奇怪,難道這是模擬器的問題嗎?還是初始化網路連線所耗的資源問題呢?


後來看到一則文章:Re: [android-developers] Re: First HTTP/S requests are slow. [Android 1.5] - msg#03831,看到了解法!


原來我寫得程式碼:


String n, result="";
while( ( n = reader.readLine() ) != null )
    result += n;


文章提到的寫法:


String n, result="";
StringBuilder htmlContent = new StringBuilder();
while ((n = reader.readLine()) != null)
    htmlContent.append(n);
result = htmlContent.toString();


這兩者的速度至少差 20 倍啊!讓我寫得程式從原先要等約 130 秒,瞬間變成只要等五秒,真是太神奇了。我的 CPU 是 AMD X4 945 + 4GB 記憶體,也不見得會跑很慢才是,因此找了不少文章,才發現是寫法與模擬器的影響吧。程式還包括網路連線,變數很多,很難找出此點。


完整的程式碼:


HttpURLConnection con = null;
try
{
    URL url = new URL("http://tw.yahoo.com");
    con = (HttpURLConnection) url.openConnection();            
    con.setReadTimeout(10000);
    con.setConnectTimeout(15000);
    con.setRequestMethod("GET" );
    con.addRequestProperty("User-Agent","Mozilla/5.0 (Windows; U; Windows NT 5.2; en-GB; rv:1.9.2.9) Gecko/20100824 Firefox/3.6.9");
    con.setDoInput(true);
    con.connect();

    BufferedReader reader = new BufferedReader(new InputStreamReader(con.getInputStream(), "UTF-8" ));

    String n, result="";

//    while( ( n = reader.readLine() ) != null )
//        result += n;

    StringBuilder htmlContent = new StringBuilder();
    while ((n = reader.readLine()) != null)
       htmlContent.append(n);
    result = htmlContent.toString();
}
}catch(Exception e)
{
}
finally
{
    if ( con != null )
        con.disconnect();
}


Android 開發教學筆記 - 排版更新或顯示問題

花了幾個小時,才發現這個蠢問題,特別紀錄一下。


在實作 Android 程式時,新增了 3 個 TextView,想要在特定情況下一起更新三個欄位,但很奇妙的只有第一個 TextView 會顯示出來,後面來兩個 TextView 卻看不到。花時間不斷地確認,最後才發現錯誤的地方是在 layout 的部份:


<TextView android:id="@+id/UpdateDate" android:layout_width="fill_parent" android:layout_height="fill_parent"></TextView>
<TextView android:id="@+id/News1" android:layout_width="fill_parent" android:layout_height="fill_parent"></TextView>
<TextView android:id="@+id/News2" android:layout_width="fill_parent" android:layout_height="fill_parent"></TextView>


有發現到了嗎?因為 layout_height 都是 fill_parent 的數值,將導致只又 UpdateDate 這個 TextView 會佔滿剩下的螢幕空間,導致 News1 和 News2 不會顯示出來,再加上一開始沒有給初始值,剛好沒看到這個現象。


修正方式,改使用 wrap_content 即可:


<TextView android:id="@+id/UpdateDate" android:layout_width="fill_parent" android:layout_height="wrap_content"></TextView>
<TextView android:id="@+id/News1" android:layout_width="fill_parent" android:layout_height="wrap_content"></TextView>
<TextView android:id="@+id/News2" android:layout_width="fill_parent" android:layout_height="wrap_content"></TextView>


紀錄一下,提醒自己。


2010年12月14日 星期二

[Java] Regular Expression 與 HttpURLConnection 練習

年初,用 PHP 寫了這個,[PHP] 使用官方 Plurk API 實作簡單的機器人 - 靠機器人救 Karma!以 Yahoo News 為例,年終時,給他拿來當作 Android 程式的練習題目,結果弄了半天,發現 Java 語法熟練度很差,因此乾脆跑回去練習 Java 了!需搞懂的就是如何使用 Regular Expression 和網路的連線處理。


簡易範例:


import java.io.*;
import java.util.regex.*;
import java.net.HttpURLConnection;
import java.net.URL;

class Test
{
    public static void report( String message )
    {
        System.out.println( "[Report] " + message );
    }
    public static void main(String argv[])
    {
        HttpURLConnection con = null;
        try
        {
//*
            URL url = new URL("http://tw.yahoo.com");
            con = (HttpURLConnection) url.openConnection();
            con.setReadTimeout(10000);
            con.setConnectTimeout(15000);
            con.setRequestMethod("GET" );
            con.addRequestProperty("User-Agent","Mozilla/5.0 (Windows; U; Windows NT 5.2; en-GB; rv:1.9.2.9) Gecko/20100824 Firefox/3.6.9");
            con.setDoInput(true);
            con.connect();

            BufferedReader reader = new BufferedReader(new InputStreamReader(con.getInputStream(), "UTF-8" ));
// */
//            BufferedReader reader = new BufferedReader(new InputStreamReader( new FileInputStream("fetch.html"), "UTF-8" ));
            String n , result = "";
            while( ( n = reader.readLine() ) != null )
                result += n;

//            BufferedWriter out = new BufferedWriter( new FileWriter("fetch.html") );out.write(result);out.close();
//            System.out.println( "Result:" + result );

            String pattern;
            int at;

            pattern = "<label class=\"img-border clearfix\">";
            if( ( at = result.indexOf(pattern) ) < 0 )
            {
                report( "format error 1" );
                return;
            }
            result = result.substring( at );

            pattern = "<ol class=\"newsad clearfix\">";
            if( ( at = result.indexOf(pattern) ) < 0 )
            {
                report( "format error 2" );
                return;
            }
            result = result.substring( 0 , at  );

            pattern = "<h3[^>]*>[^<]*<a href=\"(.*?)\"[^>]*>(.*?)</a></h3>";
            Pattern p = Pattern.compile( pattern , Pattern.CASE_INSENSITIVE | Pattern.DOTALL );
            Matcher m = p.matcher( result );

            while( m.find() )
            {
                report( "\n==== Get === \n" + m.group() + "\n" );
                report( "URL: " + m.group(1) );
                report( "Title: " + m.group(2) );
            }
        }
        catch( Exception e )
        {
            report( "Error:" + e );
        }
        finally
        {
            if ( con != null )
                con.disconnect();
        }
    }
}


執行結果:


$ javac Test.java && java Test
[Report]
==== Get ===
<h3><a href="news/a/h1/t/*http://tw.news.yahoo.com/article/url/d/a/101214/5/2iy8o.html" title="最新!美元弱 新台幣升破30">最新!美元弱 新 台幣升破30</a></h3>

[Report] URL: news/a/h1/t/*http://tw.news.yahoo.com/article/url/d/a/101214/5/2iy8o.html
[Report] Title: 最新!美元弱 新台幣升破30
[Report]
==== Get ===
<h3><a href="news/a/h2/t/*http://tw.news.yahoo.com/article/url/d/a/101214/2/2iy6j.html" title="情人多愛你 手碰觸方式露餡">情人多愛你 手碰 觸方式露餡</a></h3>

[Report] URL: news/a/h2/t/*http://tw.news.yahoo.com/article/url/d/a/101214/2/2iy6j.html
[Report] Title: 情人多愛你 手碰觸方式露餡


說真的,細算的話,五年前 Java 是我最常用的語言,至少用了一年多,但如今什麼都忘光光了!


2010年12月13日 星期一

Android 開發教學筆記 - 簡單設定 Google Maps

參考資料:


想要在 Android 上頭使用 Google Maps 的功能,有幾道流程:


  1. 申請 Android Maps API Key

  2. 建立使用 Google APIs 的模擬器

  3. 建立使用 Google Maps API 的 projects (在此 Build Target 使用 Google APIs/Google Inc./2.2/8 )

  4. 設定 Android Application 環境,使用 INTERNET permissions 及相關使用的 lib

  5. 設定 MapView 的 layout

  6. 設定程式碼


首先關於取得 Google Maps API Key,此部份跟一般申請上的不一樣,需使用 Android 的申請 Sign Up for the Android Maps API - Android Maps API - Google Code,此時會需要一組認證指紋(MD5),而這組序號用在開發程式的階段(debug mode),而當你要將程式上架時,必須在用另一組(release mode),細節請參考 Getting the MD5 Fingerprint of the SDK Debug Certificate,在此就依 debug mode 申請一組:


$ keytool -list -keystore ~/.android/debug.keystore
...
Certificate fingerprint (MD5): 94:1E:43:49:87:73:BB:E6:A6:88:D7:20:F1:8E:B5:98


其中認證指紋(MD5)為 94:1E:43:49:87:73:BB:E6:A6:88:D7:20:F1:8E:B5:98 (此為範例,請輸入自己產生的),帶著這組就可以去申請 Android Maps API Key 囉,請輸入到 My certificate's MD5 fingerprint 欄位。送出後,頁面將顯示 "您的金鑰" 、 "金鑰適合所有使用以下指紋憑證所簽署的應用程式" 和 "此處提供您 xml 配置的範例",共三筆資。請保存好,這邊只會使用"您的金鑰"。


建立 Android API 模擬器,如果你已經有設定一台可運行 Google APIs 2.2 的話,那可以略過此步。


[Eclipse]->[Window]-> [Android SDK and AVD Manager]->[New]

Name: Map
Target: Google APIs(Google Inc.) - API Level 8
    
按下 Create AVD 及建立完成


建立一個專案


[Eclipse]->[File]->[New]->[Android Project]

Project name: MyMap
Build Target: Google APIs, Google Inc., 2.2, 8
Application name: MyMap
Package name: com.test.map
Create Activity: MyMap
Min SDK Version: 8

設定完就可以按 Finish 囉


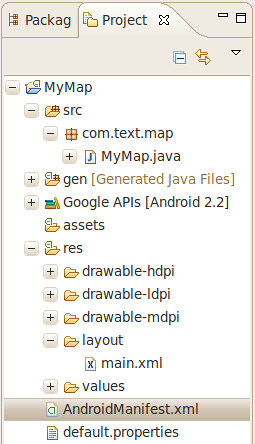
Android Project Structure


緊接著設定 Application 的權限和相關 lib 部份,請在左邊點選 AndroidManifest.xml 檔案,此時右邊視窗則顯示該檔相關的設定,可以在底部找到 Manifest/Application/Permissions/Instrumentation/AndroidManifest.xml 等子頁面切換,在此切換 AndroidManifest.xml 分頁,直接編輯此 xml 檔案,在 <application> 裡頭增加 <uses-library android:name="com.google.android.maps" /> 資訊,在 <manifest> 裡增加 <uses-permission android:name="android.permission.INTERNET" />,分別代表要使用函式庫:(com.google.android.maps)和需要使用網路資源(android.permission.INTERNET)


<?xml version="1.0" encoding="utf-8"?>
<manifest xmlns:android="http://schemas.android.com/apk/res/android"
      package="com.test.map"
      android:versionCode="1"
      android:versionName="1.0">
    <application android:icon="@drawable/icon" android:label="@string/app_name">
        <activity android:name=".MyMap"
                  android:label="@string/app_name">
            <intent-filter>
                <action android:name="android.intent.action.MAIN" />
                <category android:name="android.intent.category.LAUNCHER" />
            </intent-filter>
        </activity>
        <uses-library android:name="com.google.android.maps" />
    </application>
    <uses-sdk android:minSdkVersion="8" />
    <uses-permission android:name="android.permission.INTERNET" />
</manifest>


設定完應用程式執行環境後,接著設定排版部份(layout),透過左邊視窗請點選 main.xml 檔案,直接用下面的資訊覆蓋掉:


<?xml version="1.0" encoding="utf-8"?>
<RelativeLayout xmlns:android="http://schemas.android.com/apk/res/android"
    android:id="@+id/mainlayout"
    android:orientation="vertical"
    android:layout_width="fill_parent"
    android:layout_height="fill_parent" >

    <com.google.android.maps.MapView
        android:id="@+id/mapview"
        android:layout_width="fill_parent"
        android:layout_height="fill_parent"
        android:clickable="true"
        android:apiKey="Your Maps API Key"
    />

</RelativeLayout>


其中 Your Maps API Key 請改填"您的金鑰",如此一來即完成排版的部份


最後,則是修改程式碼的部份,請點選 MyMap.java 檔案


  1. 增加 import com.google.android.maps.*;

  2. 將 public class MyMap extends Activity 修改為 public class MyMap extends MapActivity

  3. 實做必要函數 boolean isRouteDisplayed()


完整程式碼:


package com.test.map;

import android.app.Activity;
import android.os.Bundle;
import com.google.android.maps.*;

public class MyMap extends MapActivity {
    /** Called when the activity is first created. */
    @Override
    public void onCreate(Bundle savedInstanceState) {
        super.onCreate(savedInstanceState);
        setContentView(R.layout.main);
    }
    @Override
    protected boolean isRouteDisplayed() {
        return false;
    }

}


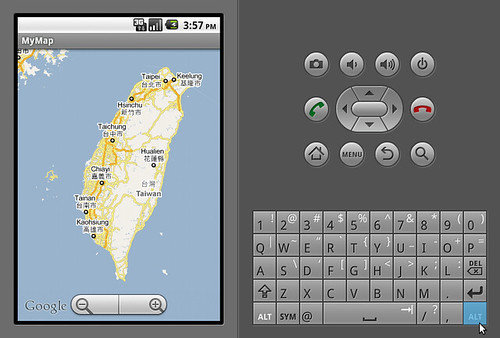
如此一來,則可以執行,並看到模擬器顯示 Google Maps 囉!


AndroidMaps


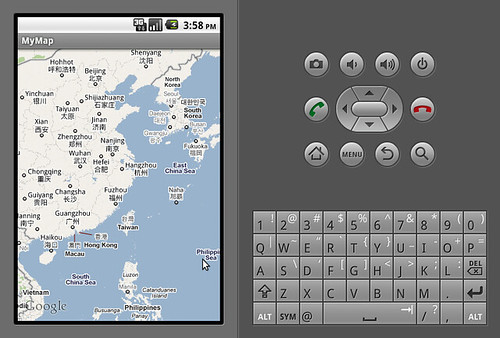
上述算是一個簡單的設定流程,但僅供了解流程而已,因為產生的程式除了呈現一個 Google Maps 外,沒有太多的互動,因此,如果想要增加一些使用者互動部份,如 Zoom In/Zoom Out,請在 onCreate 加上兩行程式碼:


MapView mapView = (MapView) findViewById(R.id.mapview);
mapView.setBuiltInZoomControls(true);


請記得加到 setContentView(R.layout.main); 後面,如果加在前面會導致程式 crash 喔,可以看看 setBuiltInZoomControls method for MapView causes application to crash 的敘述,避免 crash 也可以改成:


MapView mapView;
if( ( mapView = (MapView) findViewById(R.id.mapview) ) != null )
    mapView.setBuiltInZoomControls(true);


但沒擺在 setContentView(R.layout.main); 後面,還是沒用的喔。


AndroidMapsZoom


其他資料: