顯示具有 set 標籤的文章。 顯示所有文章

2016年7月27日 星期三

Microsoft Azure 管理筆記 - 仿 AWS 使用 Load Balancer (Azure: Load Balancer/Availability Set)

以 AWS 來說,部署服務會想要用 Auto Scaling 搭配 Load Balancer 來達成 high availability 的架構,而 Load Balancer 扮演著將 requests 導向至一群機器。就 Azure 的服務情況,拆解後包括 Availability Set、Load Balancer 項目。

以把玩的流程來看,需要先搞懂 Availability Set,其建置流程包括 Fault domains 跟 Update domains 關鍵字(可以參考這篇完整介紹 Azure Exam Prep – Fault Domains and Update Domains )
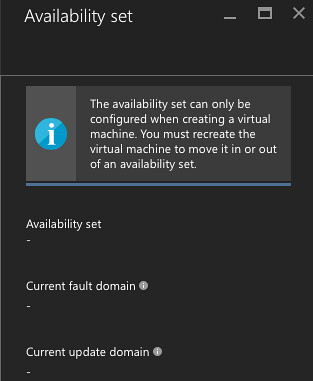
azure_try_to_move_into_aset

接著,在 Availability Set 中添加一台機器(沒機器時,Load balancer 無法設定),這步只能在新開機器時設定,不能對已經開啟的機器設定。

透過新增機器時,設定 Availability Set:
New -> Virtual machine -> Create -> 基本設定後, 在第三步 Settings - Availability 項目中,可以指定 Availability Set。
建置完後,緊接著建立 Load Balancer,建完後在其 Load Balancer -> Settings -> Backend pools -> Add a virtual machine -> Availability Set -> 挑選剛剛建立的 Availability Set(若 Set 裡沒機器,則會無法挑選!)-> 挑選裡頭的機器!
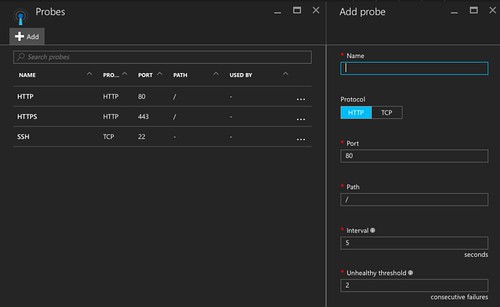
azure_lb_probes

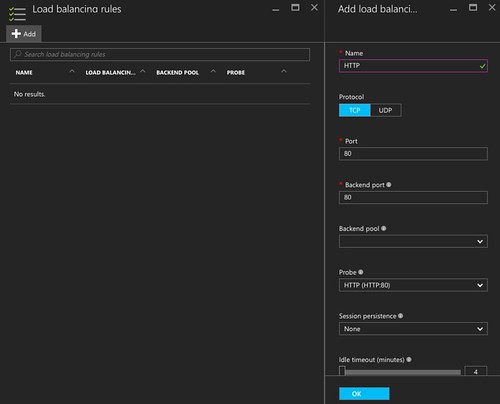
azure_lb_rules

接著處理 requests 導向問題,例如開放 HTTP 80/443, TCP 22 port:
Load Balancer -> Settings -> Probes: 這就像 AWS Load Balancer 檢查某端口服務是否正常
Load Balancer -> Settings -> Load balancing rules: 正式把 requests 導向給後端機器群
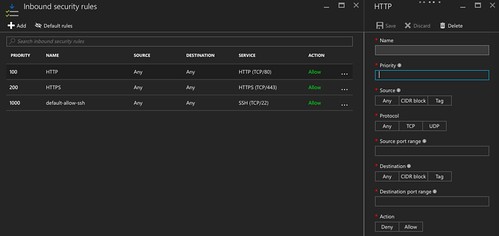
azure_vm_network_security_group

此外,別忘了對剛剛建立的 VM 設定好防火牆(Network security group, 如 VM -> VM Settings -> Network interface -> settings -> )
Network security group -> Settings -> Inbound security rules (有需要可以在設定 Outbound security group),例如預設有開通 22 port ,此時就只需再添加 80, 443 port
如此一來,當 Load balancer 的 probes 檢驗通常順暢後,就可以對 load balancer 送資料試試了。

檢驗流程:
  1. 先檢查 VM 是否運作正常,如有 public ip 就從外面測試 telnet vm_ip port 做檢查,可以先裝個 nginx 或用 sudo python -m SimpleHTTPServer 443 / sudo python -m SimpleHTTPServer 80 應急一下
  2. 對 Load balancer 檢驗,如 telnet load_balanacer_ip port
以上則完成 AWS Load balancer 建置。

2014年7月27日 星期日

iOS 開發筆記 - Admob SDK: Must set the rootViewController property of GADBannerView before calling loadRequest

又有一陣子沒把玩 Admob 了 XD 每次把玩的方式不同,這次看到錯誤訊息:
<Google> Must set the rootViewController property of GADBannerView before calling loadRequest:
以及:
didFailToReceiveAdWithError:Error
其他訊息:
<Google> To get test ads on this device, call: request.testDevices = @[ GAD_SIMULATOR_ID ];
現況與解法:

@interface YourViewController() <GADBannerViewDelegate>

@property (nonatomic, strong) GADBannerView *banner;

@end

@implementation YourViewController

- (GADBannerView *)banner {
    if (!_banner) {
        // 468*60
        _banner = [[GADBannerView alloc] initWithAdSize:kGADAdSizeFullBanner];
        _banner.adUnitID = @"ca-app-pub-###############";
    }
    return _banner;
}

- (void)viewDidLoad {
    [super viewDidLoad];

    self.banner.frame = CGRectMake(0, self.view.frame.size.height > self.view.frame.size.width ? self.view.frame.size.width - 60 : self.view.frame.size.height - 60, 468, 60 );
    self.banner.delegate = self;
    [self.view addSubview:self.banner];

    // <Google> Must set the rootViewController property of GADBannerView before calling loadRequest:
    self.banner.rootViewController = self;

    GADRequest* req = [GADRequest request];
    // <Google> To get test ads on this device, call: request.testDevices = @[ GAD_SIMULATOR_ID ];
    req.testDevices = @[GAD_SIMULATOR_ID];
    [self.banner loadRequest:req];


    NSLog(@"self.banner: %@", self.banner);
}

- (void)adViewDidReceiveAd:(GADBannerView *)view
{
    NSLog(@"adViewDidReceiveAd");
}

- (void)adView:(GADBannerView *)view
didFailToReceiveAdWithError:(GADRequestError *)error
{
    NSLog(@"didFailToReceiveAdWithError:%@", error);
}

@end