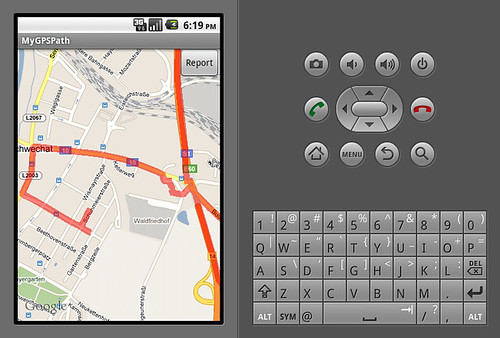
紅色線即為GPS logs 的路徑
想要練習把一連串的 GPS logs 畫在 Google Map 上,首先要解決的問題有兩種:
- 哪裡找 GPS logs
- 要怎樣在 Google Maps 上畫線
關於第一個問題,可以在 OpenStreetMap 上找到測資,有個頁面是 GPS 軌跡,在那邊可以取得別人公開的 GPS logs,此例為 2011_01_03_Schwechat_Brno.gpx,然而下載的資料格式是 xml 檔案,而測試僅需使用經緯度,因此要稍微處理一下,以 Ubuntu 系統為例:
$ wget http://www.openstreetmap.org/trace/896382/data
$ grep -P '<trkpt lat="([0-9.]+)" lon="([0-9.]+)"' 896382.gpx | awk -F '"' '{ print $2, $4; }' > /tmp/test.data
如此一來,/tmp/test.data 就是只有經緯度的資料,但是行車紀錄的過程,可能停留在某處,而導致資料重複的問題,在此可以透過 hash 的概念,再更新 awk 的使用:
$ grep -P '<trkpt lat="([0-9.]+)" lon="([0-9.]+)"' 896382.gpx | awk -F '"' '{ if(!hash[$2$4] ){ hash[$2$4] = 1; print $2,$4; } }'
然後我又比較偷懶,想乾脆轉成 double array 來使用,故流程多了點:
$ grep -P '<trkpt lat="([0-9.]+)" lon="([0-9.]+)"' 896382.gpx | awk -F '"' 'BEGIN{out=""}{ if(!hash[$2$4] ){ hash[$2$4] = 1; if( out != "" ) out = out "," ; out = out""$2","$4; } }END{print "double logs[]={"out"};";}' > java.log
這時候 java.log 檔案內就是一個 double array 的宣告,把他複製起來擺到程式裡吧 :P 畢竟這只是個測試,先不用開檔讀資料的建法。
接著就是建立 Android Project 囉
[Eclipse]->[File]->[New]->[Android Project]
Project name: MyGPSPath
Build Target: Google APIs/2.2/8
Application name: MyWidget
Package name: com.test.map.path
Create activity: MyGPSPath
Min SDK Version: 8
修改 AndroidManifest.xml,增加使用網路的權限以及使用 Google Maps lib
<?xml version="1.0" encoding="utf-8"?>
<manifest xmlns:android="http://schemas.android.com/apk/res/android"
package="com.test.map.path"
android:versionCode="1"
android:versionName="1.0">
<application android:icon="@drawable/icon" android:label="@string/app_name">
<activity android:name=".MyGPSPath"
android:label="@string/app_name">
<intent-filter>
<action android:name="android.intent.action.MAIN" />
<category android:name="android.intent.category.LAUNCHER" />
</intent-filter>
</activity>
<uses-library android:name="com.google.android.maps" />
</application>
<uses-sdk android:minSdkVersion="8" />
<uses-permission android:name="android.permission.INTERNET" />
</manifest>
修改 layout,使用 MapView 並且填寫 Google Map API Key,另外新增一個按鈕,以供 debug 使用
<?xml version="1.0" encoding="utf-8"?>
<RelativeLayout xmlns:android="http://schemas.android.com/apk/res/android"
android:id="@+id/mainlayout"
android:orientation="vertical"
android:layout_width="fill_parent"
android:layout_height="fill_parent" >
<com.google.android.maps.MapView
android:id="@+id/mapview"
android:layout_width="fill_parent"
android:layout_height="fill_parent"
android:clickable="true"
android:apiKey="GOOGLE_MAP_API_KEY"
/>
<Button
android:text="Report"
android:id="@+id/GetReport"
android:layout_width="wrap_content"
android:layout_height="wrap_content"
android:layout_alignParentRight="true">
</Button>
</RelativeLayout>
程式碼:
package com.test.map.path;
import java.util.List;
import com.google.android.maps.*;
import android.app.AlertDialog;
import android.content.DialogInterface;
import android.graphics.Canvas;
import android.graphics.Color;
import android.graphics.Paint;
import android.graphics.Path;
import android.graphics.Point;
import android.os.Bundle;
import android.view.View;
import android.widget.Button;
public class MyGPSPath extends MapActivity {
StringBuilder debugOut;
MapView mapView;
// 從 openstreetmap 取出的 gps logs, 在此僅擺上頭尾兩點
double logs[]={48.138050017878413,16.481179967522621,/* ... , */ 49.179430995136499,16.558635039255023};
@Override
protected boolean isRouteDisplayed() {
return false;
}
/** Called when the activity is first created. */
@Override
public void onCreate(Bundle savedInstanceState) {
super.onCreate(savedInstanceState);
setContentView(R.layout.main);
debugOut = new StringBuilder();
if( ( mapView = (MapView) findViewById(R.id.mapview) ) != null )
{
mapView.setBuiltInZoomControls(true);
mapView.setTraffic(true);
}
Button b;
if( ( b = (Button) findViewById(R.id.GetReport) ) != null )
{
b.setOnClickListener(new View.OnClickListener() {
@Override
public void onClick(View v) {
debugOut.append("logs length:"+logs.length+"\nbegin at:"+logs[0]+","+logs[1]+"\n");
AlertDialog alertDialog = new AlertDialog.Builder(MyGPSPath.this).create();
alertDialog.setTitle("debug");
alertDialog.setMessage(debugOut);
alertDialog.setButton("OK", new DialogInterface.OnClickListener(){
public void onClick(DialogInterface dialog, int which)
{
dialog.cancel();
}
} );
alertDialog.show();
}
});
}
List<com.google.android.maps.Overlay> ol = mapView.getOverlays();
ol.clear();
ol.add(new MyMapOverlay());
mapView.invalidate();
MapController mapController = mapView.getController();
if( mapController != null )
{
mapController.animateTo(new GeoPoint( (int) (logs[0]* 1000000) , (int)(logs[1]* 1000000) ) );
mapController.setZoom(8);
}
}
class MyMapOverlay extends com.google.android.maps.Overlay
{
private Point getPixelXYFromGeoValue( Projection p , double lat, double lng )
{
GeoPoint in = new GeoPoint((int) (lat * 1000000) , (int) (lng * 1000000) );
Point out = new Point();
p.toPixels(in, out);
return out;
}
@Override
public boolean draw(Canvas canvas, MapView mapView,boolean shadow, long when)
{
super.draw(canvas, mapView, shadow);
//if( !shadow )
{
Projection p = mapView.getProjection();
Point out;
Path myPath = new Path();
for( int i=0; i<logs.length ; i+=2 )
{
out = getPixelXYFromGeoValue( p, logs[i], logs[i+1] );
if( i == 0 )
myPath.moveTo(out.x, out.y);
else if( i+2 != logs.length )
myPath.lineTo(out.x, out.y);
else
myPath.setLastPoint(out.x, out.y);
}
Paint myPaint = new Paint();
myPaint.setColor(Color.RED);
myPaint.setStyle(Paint.Style.STROKE);
myPaint.setStrokeWidth(10);
myPaint.setAlpha(70);
canvas.drawPath(myPath, myPaint);
}
return true;
}
}
}
成果:
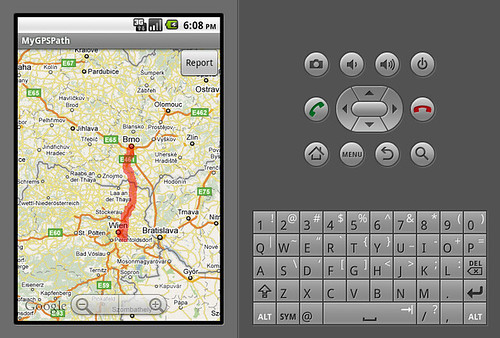
紅色線則是這條 GPS logs 所繪製出來的路徑
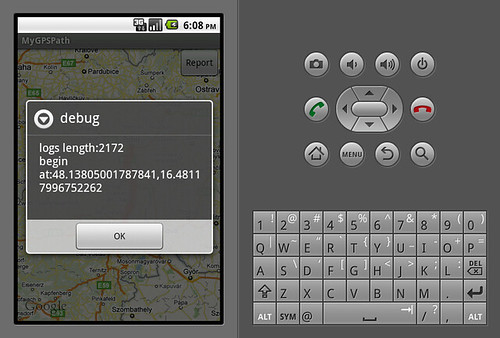
按下右上角的按鈕,可以顯示一些訊息,如點的個數和起點位置,另外也可以擺一些 debug 訊息也不錯
其他部份,還有很多待改善的地方,例如 GPS logs 過長時,移動地圖所造成的重繪之效率問題
您好,想請教一下,
回覆刪除如果我想在每個座標點的地方標記一點,
或是在上面圖釘一個圖案,
請問我該怎麼做呢?
試了很久都弄不出來,
想說上來請教看看。
謝謝。