2012年5月29日 星期二

[LLVM] 編譯、使用 Clang Plugin @ Ubuntu 10.04 64Bit


圖: http://llvm.org/Logo.html


身為速食工作者,我本身不太喜歡浪費太多時間在瑣碎的細節,在加上本業非 Compiler 背景,只是從 Google 那邊翻到一些編譯、執行 Clang Plugin 的方式,順便筆記下來,畢竟網路上的資料真的不多,也該為繁體中文留下點足跡吧。


操作環境:


OS: Ubuntu Server 64Bit
llvm src location: ~/llvm
clang src location: ~/llvm/tools/clang
gcc: gcc (Ubuntu 4.4.3-4ubuntu5) 4.4.3


首先依照 LLVM 官網介紹的方式,下載 LLVM、clang 等相關程式碼,接著編譯,之後換到 llvm/tools/clang/example 目錄中,裡頭有一個 clang plugin 範例程式 PrintFunctionNames,僅需切換進入此目錄打 make 後,即可編出來 (細節都寫在llvm/tools/clang/examples/PrintFunctionNames/README.txt)


其中,有兩種編譯方式,第一種是直接在 llvm 目錄下,執行 configure 後再打 make -j4 即可編譯出 llvm 和 clang,接著切換到 llvm/tools/clang/examples/PrintFunctionNames 裡頭在執行 make 後,東西就產生了;另一個編法是用 cmake 把 source 跟產出分開,例如 mkdir ~/build && cd ~/build && cmake ~/llvm && make -j4 後,接著切換到 ~/build/tools/clang/examples/PrintFunctionNames,執行 make 後,產出物在 ~/build/lib/PrintFunctionNames.so。由於使用官方推薦的 configure 方式有碰到問題,所以我就改用 cmake 方式,也意外發現 cmake 編得比較快(不知有沒遺漏什麽)。


編譯完,就可以用 clang -ccl -load /path/libPrintFunctionNames.so -plugin print-fns some-input-file.c 執行。(若用 cmake 編出的是 /path/PrintFunctionNames.so)


大部分的 clang plugin 範例就是從 PrintFunctionNames 改來的,介紹一下 PrintFunctionNames 的使用方式:


$ vim t1.c
int main() {
return 0;
}

$ clang -ccl -load /path/PrintFunctionNames.so -plugin print-fns t1.c
top-level-decl: "__va_list_tag"
top-level-decl: "__builtin_va_list"
top-level-decl: "main"

$ vim t2.c
#include
int main(int argc,char *argv[] ) {
printf("Hello World!\n");
return 0;
}

$ clang -ccl -load /path/PrintFunctionNames.so -plugin print-fns t2.c
top-level-decl: "__va_list_tag"
/path/t2.c:1:10: fatal error: 'stdio.h' file not found
#include
^
top-level-decl: "__builtin_va_list"
top-level-decl: "main"
1 error generated.

這是因為 clang 不知哪邊找 stdio.h 檔,所以就透過 -I 指令去指定吧(過程中還需 stddef.h)


$ clang -cc1 -I/usr/include -I/usr/lib/gcc/x86_64-linux-gnu/4.4.3/include -load /path/PrintFunctionNames.so -plugin print-fns ~/t2.c
top-level-decl: "__va_list_tag"
top-level-decl: "__builtin_va_list"
top-level-decl: "size_t"
...
top-level-decl: "ctermid"
top-level-decl: "flockfile"
top-level-decl: "ftrylockfile"
top-level-decl: "funlockfile"
top-level-decl: "main"

其中 -I/usr/include 是找 stdio.h,而 I/usr/lib/gcc/x86_64-linux-gnu/4.4.3/include 是找 stddef.h (依個人安裝位置不同)


然而,每次執行都用 clang -load *.so -plugin ... 指令進行有點麻煩,所以另一種使用方式就是寫隻 main 程式,在裡頭呼叫 clang 相關函數物件來操作,這樣的好處是可以編出一隻 tool 來用,也不用每次執行時下很長的指令了:


$ mkdir ~/print-fns-tools
$ cp ~/llvm/tools/clang/examples/PrintFunctionNames/PrintFunctionNames.cpp ~/print-fns-tools/main.cpp
$ vim ~/print-fns-tools/main.cpp

// 在檔案最後面新增程式碼
#include "llvm/Support/Host.h"
#include "clang/Parse/ParseAST.h"
#include "clang/Basic/FileManager.h"


#include "clang/Frontend/HeaderSearchOptions.h"
#include "clang/Frontend/Utils.h"


#include <iostream>
int main(int argc, char *argv[]) {
        clang::CompilerInstance *ci = new clang::CompilerInstance();
        ci->createDiagnostics(0,NULL);
        clang::TargetOptions to;
        to.Triple = llvm::sys::getDefaultTargetTriple();
        clang::TargetInfo *pti = TargetInfo::CreateTargetInfo(ci->getDiagnostics(), to);
        ci->setTarget(pti);
        ci->createFileManager();
        ci->createSourceManager( ci->getFileManager() );
        ci->createPreprocessor();
        ci->createASTContext();


        if( argc < 2 ) {
                std::cout << "Usage: " << argv[0] << " [-I /usr/include] file.c " << std::endl;
                return 0;
        } else if ( argc >= 4 ) {
                clang::HeaderSearchOptions headerSearchOptions;
                for( int i=1 ; i<argc-1 ; ++i )
                        if( argv[i][0] == '-' && argv[i][1] == 'I' && i+1 < argc ) {
                                std::cout << "Search header: " << argv[i+1] << std::endl;
                                headerSearchOptions.AddPath( argv[++i] , clang::frontend::Angled, false, false, false );
                        }


                clang::PreprocessorOptions preprocessorOptions;
                clang::FrontendOptions frontendOptions;
                clang::InitializePreprocessor( ci->getPreprocessor(), preprocessorOptions, headerSearchOptions, frontendOptions );
        }


        std::cout << "Target: " << argv[argc-1] << std::endl;
        ci->getSourceManager().createMainFileID( ci->getFileManager().getFile(argv[argc-1]) );


        PrintFunctionsConsumer *mConsumer = new PrintFunctionsConsumer();
        ParseAST(ci->getPreprocessor(), mConsumer, ci->getASTContext());


        delete ci;
        delete mConsumer;


        return 0;
}


直接編譯 main.cpp (假設環境變數中可以取得 clang++、llvm-config 指令,否則取代成 /path/clang++、/path/llvm-config 的用法):


$ cd print-fns-tools/
$ clang++ `llvm-config --cxxflags` -fno-rtti main.cpp -lclangFrontend -lclangDriver -lclangSerialization -lclangParse -lclangSema -lclangAnalysis -lclangRewrite -lclangEdit -lclangAST -lclangLex -lclangBasic -lLLVMMC -lLLVMSupport `llvm-config --ldflags --libs cppbackend`


操作使用:


$ ./a.out
Usage: ./a.out [-I /usr/include] file.c

$ ./a.out t1.c
Target: t1.c
top-level-decl: "__va_list_tag"
top-level-decl: "__builtin_va_list"
top-level-decl: "main"

$ ./a.out t2.c
Target: t2.c
top-level-decl: "__va_list_tag"
a.out: /path/llvm/tools/clang/lib/Frontend/TextDiagnosticPrinter.cpp:158: virtual void clang::TextDiagnosticPrinter::HandleDiagnostic(clang::DiagnosticsEngine::Level, const clang::Diagnostic&): Assertion `TextDiag && "Unexpected diagnostic outside source file processing"' failed.
Stack dump:
0. t2.c:1:2: current parser token 'include'
Aborted

$ ./a.out -I /usr/include -I /usr/lib/gcc/x86_64-linux-gnu/4.4.3/include t2.c
Search header: /usr/include
Search header: /usr/lib/gcc/x86_64-linux-gnu/4.4.3/include
Target: t2.c
top-level-decl: "__va_list_tag"
top-level-decl: "__builtin_va_list"
top-level-decl: "size_t"
...
top-level-decl: "ftrylockfile"
top-level-decl: "funlockfile"
top-level-decl: "main"

總結一下,原先使用 clang -plugin 的方式啟動,本身有 clang 這個環境可以操作,而單純寫成一隻 toolbase 方式,則需要初始化 clang 的操作環境,這就是在 main 裡頭做的事,包含建立一個 Compiler Instance 及其初始化、設定 header search 位置、要處理的 file.c 等等,如此一來就完成了。


其他筆記(用 clang++ 編譯時出現訊息): 


  • undefined reference to `typeinfo for clang::ASTConsumer'


    • 編譯時加上 "-fno-rtti" 參數即可解決


  • error: no member named 'getDefaultTargetTriple' in namespace 'llvm::sys'
    to.Triple = llvm::sys::getDefaultTargetTriple();


    • 加上 #include "llvm/Support/Host.h" 即可解決


  • error: member access into incomplete type 'clang::FileManager'
    note: forward declaration of 'clang::FileManager'


    • 加上 #include "clang/Basic/FileManager.h" 即可解決 


最後一提,網路上資源不見得少,但因為語系與背景不同,常常關鍵字下很久都找不到,無意間還找到 Google 員工在去年論壇討論串裡,正抱怨著 clang plugin 很難寫 XDD 當下我才發現,大家都是普通人 XDDD 此外,有興趣可以多多參考這裡:https://github.com/loarabia/Clang-tutorial,裡頭有簡單又豐富的程式碼、makefile 喔。


2012年5月28日 星期一

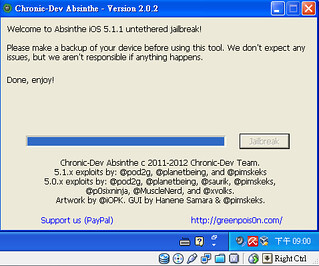
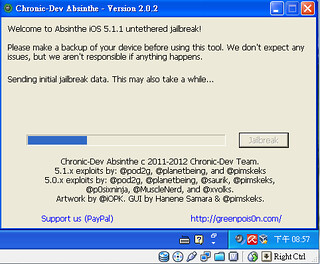
[iOS] 使用 absinthe-win-2.0.2 來 Jailbreak iPad 1 iOS 5.1.1 @ VirtualBox


圖:http://greenpois0n.com/


這年頭 Jailbreak 越來越方便 XD 最重要的是漸漸可以用 VirtualBox 完工了!甚至 JB 程式不只 WindowsMac 版,還推出了 Linux 版。真是有夠威。建議要使用的人還是連去官網下載吧(還用Google Docs哩)!以免不小心抓到木馬。


jailbreak jailbreak_done


此次環境:


Guest OS:Windows XP SP3
Host OS:Windows 7 64Bit
Target:iPad 1 WiFi 版 with iOS 5.1.1 (9B206)


首先把 iPad 1 升到 iOS 5.1.1,再來使用 VirtualBox 來進行 JB,在 C:\ 點選剛下載好的 absinthe-win-2.0.2.exe 後自動解壓縮一個目錄,接著再進去點選該執行檔即可。(如果 iPad 1 已在 JB 狀態下了,無法透過網路升級時,可直接下載 iPad1,1_5.1.1_9B206_Restore.ipsw 並透過 iTunes 回復方式來升級)


如果使用上執行進度卡住時,可以試試把 VirtualBox 重新接上 iPad 看看,畢竟 iPad 裝置有 3 個 status,每一個狀態被偵測的項目是不一樣的,如 Apple Inc. Apple Mobile Device (Recovery Mode)、Apple Inc. Apple Mobile Device (DFU Mode)、Apple Inc. iPad [0001] 等等或是把 iPad 各個狀態都在 VirtualBox 設定好 USB 自動偵測使用應該也能解掉,此外也要留意 Host 上頭若有裝 iTunes 程式,要小心這些程式佔用資源,將導致 VirtualBox 無法取用 iPad 喔,解法大概就用 taskmgr 去把 AppleMobileDeviceService.exe 、iPosService.exe 等相關的關掉在試看看吧


2012年5月26日 星期六

[LLVM] LLVM、Clang、Clang Plugin、Clang Rewriter 筆記 @ Ubuntu 64bit

Source: http://en.wikipedia.org/wiki/LLVM
圖片來源:http://llvm.org/Logo.html


第一次看到 Open source project 覺得 LOGO 很殺 XD 這也代表 LLVM 真的有某個層度的威力!LLVM 全名為 Low Level Virtual Machine,翻譯為底層虛擬機器,並且從 wiki 介紹可以略知一二,就是透過虛擬技術來作最佳化。


  • http://llvm.org/

  • http://en.wikipedia.org/wiki/LLVM


    • LLVM (formerly Low Level Virtual Machine) is a compiler infrastructure written in C++ that is designed for compile-time, link-time, run-time, and "idle-time" optimization of programs written in arbitrary programming languages.


  • http://zh.wikipedia.org/zh-tw/LLVM


    • LLVM ,命名最早源自於底層虛擬機器(Low Level Virtual Machine)的縮寫[1]。它是一個編譯器的基礎建設,以C++寫成。它是為了任意一種程式語言寫成的程式,利用虛擬技術,創造出編譯時期,鏈結時期,執行時期以及「閒置時期」的最佳化。


談論到虛擬機器,對資訊領域最親近的程式語言是 Java,以及 Java bytecode、Java Virtual Machine (JVM) 和跨平台的關係。將 Java 程式碼 (.java) 編譯成 bytecode (.class) 後,透過 JVM 可執行結果,加上多種平台都有 JVM (Windows/Linux/Mac),提供開發者只需撰寫一份程式碼、僅需編譯一次,接著就可以拿著編譯完的結果到各類有支援 JVM 的平台執行,成果就達成了跨平台。若粗淺地看 LLVM 的話,也有類似的關係,只是這時架構稍微調整成:


N 種程式語言 (front ends) > 產生 LLVM Bitcode > 產生 M 個程式執行環境 (back ends)


而 LLVM 能做的事不止於此,還可進行程式效能最佳化處理等等。


首先提一下安裝 LLVM 的部分好了,參考官方文件的介紹,在此選擇 Ubuntu 64bit 環境:


$ uname -a
Linux 2.6.32-38-server #83-Ubuntu SMP Wed Jan 4 11:26:59 UTC 2012 x86_64 GNU/Linux
$ dmesg | grep -i cpu
Intel(R) Xeon(R) CPU E5420 @ 2.50GHz

下載程式碼:


$ cd ~/ && svn co http://llvm.org/svn/llvm-project/llvm/trunk llvm
$ cd ~/llvm/tools/ && svn co http://llvm.org/svn/llvm-project/cfe/trunk clang
$ cd ~/llvm/projects && svn co http://llvm.org/svn/llvm-project/compiler-rt/trunk compiler-rt
$ cd ~/llvm/projects && svn co http://llvm.org/svn/llvm-project/test-suite/trunk test-suite

採用官方編譯方式:


$ cd ~/ && mkdir -p build out && cd ~/build && ../llvm/configure --prefix=$HOME/out
$ time make -j8
real 9m55.952s
user 47m7.270s
sys 5m49.610s

採用 cmake 編譯方式:


$ sudo apt-get install cmake
$ cd ~/ && mkdir -p build out && cd ~/build && cmake -DCMAKE_INSTALL_PREFIX:PATH=$HOME/out ../llvm
$ time make -j8
real 5m39.994s
user 37m23.290s
sys 4m27.790s

原先是某次用 configure 編譯會過不了(trunk版本常碰到的現象),就嘗試用 CMAKE ,結果一用發現編得更快,從此我就都用 CMAKE 了 XDDD (或許有少編啥東西 :P 但不影響我研究,就沒計較了) 須留意編譯 Clang plugin 的部分,如果 llvm 採用 configure 編法,那只需切換到 clang plugin project 中執行 make 即可,其他細節可參考 PrintFunctionNames 裡的 README,如果採用 CMAKE 編法,記得要跑去 CMake 產生得相對目錄結構中,執行 make 才會編出來,並且編出來的位置是擺在在 lib 中(此例是~/build/lib)。


研究一下 clang 的用處好了,最直觀的用途是像 gcc 的編譯器功能(並非全部功能都支援, 這跟LLVM架構有關),把 source code 編譯成執行檔,而 compiler 有很多種,例如 one-pass 跟 multi-pass compiler,我想 LLVM 架構應該算 multi-pass 的,由 clang 作為 front end 的部份,將程式碼編譯成 LLVM Bitcode,接著在經由 LLVM 架構,搭配 back ends 端產出各種平台的 native code。而 clang 的功能不只於此,參考 Google 發表的相關文章 C++ at Google: Here Be Dragons,可以透過 clang 來處理一些錯誤偵錯,例如 bool *charge_acct 變數,操作上不小心弄成 charge_acct = false 的問題(正確使用應該是 charge_acct = NULL 或 *charge_acct = false),更多介紹請參考 Chromium Style Checker Errors。簡言之,透過 clang 可以幫忙掃 source code 找一些容易忽略的錯誤,並且輸出人性化的訊息。相關產品: Clang Static Analyzer


由於 Clang 可以分析 source code,那就存在很多玩法,且架構上提供 clang plugin 用法。範例程式:clang/examples/PrintFunctionNames/PrintFunctionNames.cpp,翻閱一下,可以看到一些關鍵字:PluginASTActionASTConsumer,其中 AST 在 Compiler 界全名為 Abstract Syntax Tree,就是把程式碼建立一個 tree 結構,方便分析。


至於寫一個 Clang Plugin 要做的事:(可從範例程式 PrintFunctionNames 複製一份再來修改)


  1. 撰寫 PluginASTAction


    • 關於 PluginASTAction 架構可參考 http://clang.llvm.org/doxygen/classclang_1_1PluginASTAction.html, 簡言之,包括 CreateASTConsumer 與 ParseArgs,其中 ParseArgs 可透過參數來初始化 plugin 操作環境或是區分要執行那個動作,而 CreateASTConsumer 則是核心項目,也就是依工作目的建立自己的 ASTConsumer。


  2. 撰寫 ASTConsumer


  3. 註冊操作時使用的名稱


    • 此 PrintFunctionNames 為 print-fns


  4. 編譯產生 xxx.so 或在 Mac 為 xxx.dylib 檔


    • 此 PrintFunctionNames  為 PrintFunctionNames.so 或 libPrintFunctionNames.so


  5. 操作使用 clang -cc1 -load /path/xxx.so -plugin YourPluginName YourInputFile 或 clang -cc1 -load /path/xxx.so -plugin YourPluginName -plugin-arg-YourPluginName YourArgs YourInputFile


    • clang -cc1 -load /path/PrintFunctionNames.so -plugin print-fns some-input-file.c

    • clang -cc1 -load /path/PrintFunctionNames.so -plugin print-fns -plugin-arg-print-fns -an-error some-input-file.c


在 PrintFunctionNames 例子來說,在 PluginASTAction::ParseArgs 有一個簡易判斷參數的架構;在 ASTConsumer 裡頭,使用 HandleTopLevelDecl 功能,用來輸出程式碼內的 top level function name。因此,若要寫 Clang Plugin 的話,可以從 PrintFunctionNames 的架構修改。接著更複雜的應用就是 source-to-source translation,可用 Google 搜尋 clang source to source translation 或 clang rewriter 看看,最經典的例子是 lib/Rewrite/RewriteObjC.cpp


使用 clang rewriter 進行 source to source translation,將 ObjC 程式碼轉成 C 語言:


$ sudo apt-get install llvm clang g++
$ vim Hello.m
#import
int main( int argc, const char *argv[] ) {
printf( "hello world\n" );
return 0;
}
$ clang -rewrite-objc Hello.m
$ cat Hello.cpp
#ifndef __OBJC2__
#define __OBJC2__
#endif
struct objc_selector; struct objc_class;
struct __rw_objc_super {
struct objc_object *object;
struct objc_object *superClass;
__rw_objc_super(struct objc_object *o, struct objc_object *s) : object(o), superClass(s) {}
};
#ifndef _REWRITER_typedef_Protocol
typedef struct objc_object Protocol;
#define _REWRITER_typedef_Protocol
#endif
#define __OBJC_RW_DLLIMPORT extern
__OBJC_RW_DLLIMPORT void objc_msgSend(void);
__OBJC_RW_DLLIMPORT void objc_msgSendSuper(void);
__OBJC_RW_DLLIMPORT void objc_msgSend_stret(void);
__OBJC_RW_DLLIMPORT void objc_msgSendSuper_stret(void);
__OBJC_RW_DLLIMPORT void objc_msgSend_fpret(void);
__OBJC_RW_DLLIMPORT struct objc_class *objc_getClass(const char *);
__OBJC_RW_DLLIMPORT struct objc_class *class_getSuperclass(struct objc_class *);
__OBJC_RW_DLLIMPORT struct objc_class *objc_getMetaClass(const char *);
__OBJC_RW_DLLIMPORT void objc_exception_throw( struct objc_object *);
__OBJC_RW_DLLIMPORT void objc_sync_enter( struct objc_object *);
__OBJC_RW_DLLIMPORT void objc_sync_exit( struct objc_object *);
__OBJC_RW_DLLIMPORT Protocol *objc_getProtocol(const char *);
#ifndef __FASTENUMERATIONSTATE
struct __objcFastEnumerationState {
unsigned long state;
void **itemsPtr;
unsigned long *mutationsPtr;
unsigned long extra[5];
};
__OBJC_RW_DLLIMPORT void objc_enumerationMutation(struct objc_object *);
#define __FASTENUMERATIONSTATE
#endif
#ifndef __NSCONSTANTSTRINGIMPL
struct __NSConstantStringImpl {
int *isa;
int flags;
char *str;
long length;
};
#ifdef CF_EXPORT_CONSTANT_STRING
extern "C" __declspec(dllexport) int __CFConstantStringClassReference[];
#else
__OBJC_RW_DLLIMPORT int __CFConstantStringClassReference[];
#endif
#define __NSCONSTANTSTRINGIMPL
#endif
#ifndef BLOCK_IMPL
#define BLOCK_IMPL
struct __block_impl {
void *isa;
int Flags;
int Reserved;
void *FuncPtr;
};
// Runtime copy/destroy helper functions (from Block_private.h)
#ifdef __OBJC_EXPORT_BLOCKS
extern "C" __declspec(dllexport) void _Block_object_assign(void *, const void *, const int);
extern "C" __declspec(dllexport) void _Block_object_dispose(const void *, const int);
extern "C" __declspec(dllexport) void *_NSConcreteGlobalBlock[32];
extern "C" __declspec(dllexport) void *_NSConcreteStackBlock[32];
#else
__OBJC_RW_DLLIMPORT void _Block_object_assign(void *, const void *, const int);
__OBJC_RW_DLLIMPORT void _Block_object_dispose(const void *, const int);
__OBJC_RW_DLLIMPORT void *_NSConcreteGlobalBlock[32];
__OBJC_RW_DLLIMPORT void *_NSConcreteStackBlock[32];
#endif
#endif
#define __block
#define __weak

#include
struct __NSContainer_literal {
void * *arr;
__NSContainer_literal (unsigned int count, ...) {
va_list marker;
va_start(marker, count);
arr = new void *[count];
for (unsigned i = 0; i < count; i++)
arr[i] = va_arg(marker, void *);
va_end( marker );
};
~__NSContainer_literal() {
delete[] arr;
}
};
extern "C" __declspec(dllimport) void * objc_autoreleasePoolPush(void);
extern "C" __declspec(dllimport) void objc_autoreleasePoolPop(void *);

struct __AtAutoreleasePool {
__AtAutoreleasePool() {atautoreleasepoolobj = objc_autoreleasePoolPush();}
~__AtAutoreleasePool() {objc_autoreleasePoolPop(atautoreleasepoolobj);}
void * atautoreleasepoolobj;
};

#define __OFFSETOFIVAR__(TYPE, MEMBER) ((long long) &((TYPE *)0)->MEMBER)
#include

int main( int argc, const char *argv[] ) {
printf( "hello world\n" );
return 0;
}
static struct IMAGE_INFO { unsigned version; unsigned flag; } _OBJC_IMAGE_INFO = { 0, 2 };

$ g++ -o Hello Hello.cpp
$ ./Hello
hello world

至於如何寫 Clang Rewriter 呢,就是直接參考 lib/Rewrite/RewriteObjC.cpp 這隻幾千行的程式碼吧!裡頭已經有豐富的資料可以參考,此例主要的有兩個 class :


class RewriteObjC : public ASTConsumer
class RewriteObjCFragileABI : public RewriteObjC


程式主體是 RewriteObjC,但使用時是用 RewriteObjCFragileABI:


ASTConsumer *clang::CreateObjCRewriter(const std::string& InFile, raw_ostream* OS, DiagnosticsEngine &Diags, const LangOptions &LOpts, bool SilenceRewriteMacroWarning) {
return new RewriteObjCFragileABI(InFile, OS, Diags, LOpts, SilenceRewriteMacroWarning);
}

一開始的程式進入點在 ASTConsumer constructor,隨後還有 virtual void Initialize(ASTContext &context),接著就跟 clang plugin example PrintFunctionNames 流程差不多,可以追 ASTConsumer 的 public functions 瞧瞧,如 virtual bool HandleTopLevelDecl(DeclGroupRef D) 等。


因此,撰寫的主體大概擺在 bool HandleTopLevelDecl(DeclGroupRef D) 裡頭,此例在 RewriteObjC 的宣告及 HandleTopLevelDecl 定義處:


// Top Level Driver code.
virtual bool HandleTopLevelDecl(DeclGroupRef D) {
for (DeclGroupRef::iterator I = D.begin(), E = D.end(); I != E; ++I) {
if (ObjCInterfaceDecl *Class = dyn_cast<ObjCInterfaceDecl>(*I)) {
if (!Class->isThisDeclarationADefinition()) {
RewriteForwardClassDecl(D);
break;
}
}

if (ObjCProtocolDecl *Proto = dyn_cast<ObjCProtocolDecl>(*I)) {
if (!Proto->isThisDeclarationADefinition()) {
RewriteForwardProtocolDecl(D);
break;
}
}

HandleTopLevelSingleDecl(*I);
}
return true;
}

另外一塊就是 void RewriteObjC::HandleTopLevelSingleDecl(Decl *D):


//===----------------------------------------------------------------------===//
// Top Level Driver Code
//===----------------------------------------------------------------------===//

void RewriteObjC::HandleTopLevelSingleDecl(Decl *D) {
//
//...
//

// If we have a decl in the main file, see if we should rewrite it.
if (SM->isFromMainFile(Loc)) // SM = SourceManager ; Loc = SourceLocation
return HandleDeclInMainFile(D);
}

別忘了瞧瞧 HandleDeclInMainFile 做了甚麼事囉!裡頭有豐富的 type checking 以及對應的處理機制,最後,則是文字取代的部分:


void ReplaceText(SourceLocation Start, unsigned OrigLength, StringRef Str) {
// If removal succeeded or warning disabled return with no warning.
if (!Rewrite.ReplaceText(Start, OrigLength, Str) || SilenceRewriteMacroWarning)
return;
Diags.Report(Context->getFullLoc(Start), RewriteFailedDiag);
}

如此一來,對 Clang Rewriter 的架構也熟悉了!


2012年5月24日 星期四

[OSX] 使用開機光碟安裝、重灌 Mac OS X Lion @ Mac mini

01

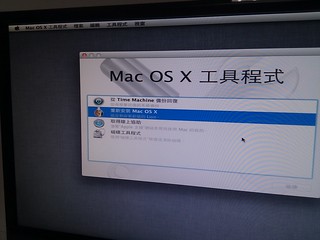
最近很忙,很久沒開啟 Mac mini 了,順便就把它升到 Lion 了。只是從 Mac Snow Leopard 10.6.8 升到 Lion 後,很多東西都保留了下來,對於大部分的人都很夠用,但我又開始在想,如果想要重灌該怎辦?這安裝方式不像以前購買 Mac mini 附的安裝光碟,可以從桌面上點選幾下就可以光碟開機、刪除硬碟資料並安裝 Mac OS X,所以,我找了一陣子才發現該怎樣光碟開機 :P 偏偏我的鍵盤是 PS/2 轉接 USB 後再加個 KVM,重開機的熱鍵少說也試了十多次吧 :P

關於 Mac OS X 開機熱鍵:Intel 型 Mac 開機組合鍵

實在是光碟開機一直沒成功,就改用 Startup Manager 方式,也就是開機時 + Option 鍵的方式(一般鍵盤是 ALT 鍵),試了幾次比較能抓住訣竅 XD 就是聽到開機聲音後馬上接著按(不要等音效播完),如此一來就能進去設定選單。

04

接著就接近以前 Snow Leopard 安裝光碟一樣,可以先把硬碟處理一下,再接著重裝 Lion 囉!

06

附帶一提,如果從 Startup Manager 進去,並點選 OS X Lion Recovery HD 進去,清完硬碟後,直接點選重新安裝 Lion 時,此時會要求透過網路從 App Store 下載,這時若有 USB 安裝方式的話,可以選擇重新選擇啟動硬碟並選擇安裝來源的媒介,這樣就可以透過 USB 或光碟來安裝了,就不需要重新從網路下載。

[OSX] Mac OS X Lion 軟體清單及偏好設定 @ Mac mini

Mac OS X Lion

前幾天裝了 Ubuntu 12.04 Desktop 版後,發現內鍵的桌布配色真不錯,雖然只是裝在 Virtualbox 裡頭,也令人感到清新。今晚就手癢也把 Mac mini 重灌完啦,神清氣爽。

每次安裝的軟體及設定越來越少了?不知算不算走回 command-line 的生活呢?


  • 文字編輯


    • 偏好設定 -> 預設純文字 && 字型大小 14

    • 保留在 Dock 上

  • 終端機


    • 偏好設定 -> 設定 -> Pro 預設 && 字型大小 14

    • 保留在 Dock 上

  • Yahoo! KeyKey (Yahoo!奇摩輸入法)


    • 系統偏好設定 -> 語言與文字 -> 輸入來源 -> 勾選 Yahoo 奇摩輸入法

  • Skype


    • 偏好 -> 音效影像 -> 麥克風&揚聲器 -> USB PnP Sound Devices (由於我多買一支 USB 音效卡,額外再設定 Skype 播放收音的位置)

    • 偏好 -> 警示 -> 細節 -> 聯絡人可接聽/聯絡人狀態轉為無法接通 -> 取消 播放音效 & 顯示內建的通知訊息

    • 偏好 -> 隱私 -> 取消 "允許 Skype 使用非個人身分資訊作為第三方廣告服務用途"

    • 保留在 Dock 上 & 登入自動啟動

  • Pidgin

  • Filezilla

  • Firefox


    • 工具 -> 附加元件 -> firebug、新同文堂

    • 檢視 -> 工具列 ->顯示書籤列、取消同文堂

    • 偏好 -> 一般 -> 設定首頁

    • 偏好 -> 個人隱私 -> 不被追蹤、不保留歷史紀錄

    • 安裝 Flash player

  • Google Chrome


    • 設定 -> 顯示首頁按鈕、顯示書籤列、設定首頁、取消翻譯閱讀網頁、取消記錄與詢問密碼

    • 擴充功能 -> 新同文堂、XMarks Bookmark Sync、Google 閱讀器通知程式 (由 Google 提供)、Google Mail Checker