2018年5月7日 星期一

處理 Google Cloud Messaging for Android (GCM) token 重複問題 (canonical_ids)

事情是這樣的,拖了很久才開始處理這段 XD 拖到連 GCM 都要下線了:

As of April 10, 2018, Google has deprecated GCM. The GCM server and client APIs are deprecated and will be removed as soon as April 11, 2019. Migrate GCM apps to Firebase Cloud Messaging (FCM), which inherits the reliable and scalable GCM infrastructure, plus many new features. See the migration guide to learn more.

為何要處理?主因是一隻 android mobile device 很有可能因為隱私狀態改變、重新安裝軟體後,導致 GCM token 變更,如果當年沒有設計 global uuid 來辨識移動裝置的話(像是綁個人帳號、用 wifi mac_address 等),那 token 肯定會收到一卡車多,這時要發送訊息時,就可能出現多個 token 對應到同一位使用者,造成用戶被 Push  轟炸 (這些在 Firebase 設計理念上都有改善了,例如可以單純對全部 android user 發訊息等等),特別是 QA 常常安裝反安裝程式...

原先我們依賴著 wifi mac_address ,但在某版 Android 發現他是可變的 Orz (忘了是隱私提升還是某OEM廠的bug) 對於維護 GCM token ,就只剩下一條路:試著對他發送訊息,檢查回應是不是有變化。

連續動作:

$check_failed_db_ids = array();
$tokens = array(
array( 'id' => 'db record id', 'token' => 'GCM token'),
// ...
);

$payload = array(
'registration_ids' => array(),
'dry_run' => true,
'data' => array(
'body' => 'test'
),
);

while(count($tokens) > 0) {
//
// Step 1: init
//
$payload['registration_ids'] = array();
$current_task = array_splice($tokens, 0, 900);
foreach($current_task as $items) {
array_push($payload['registration_ids'], $items['token']);
}

//
// Step 2: call gcm api
//
$ch = curl_init();
curl_setopt($ch, CURLOPT_URL, "https://android.googleapis.com/gcm/send");
curl_setopt($ch, CURLOPT_HTTPHEADER, array(
"Authorization: key=".$api_key,
'Content-Type: application/json'
));
curl_setopt($ch, CURLOPT_POST , true);
curl_setopt($ch, CURLOPT_POSTFIELDS, json_encode($payload));
curl_setopt($ch, CURLOPT_RETURNTRANSFER, true);
//curl_setopt($ch, CURLOPT_VERBOSE, true);
$ret = curl_exec($ch);
curl_close($ch);

$ret_json = @json_decode($ret, true);
if (isset($ret_json['results'])) {
$echo_cnt = count($ret_json['results']);
for ($i=0;$i<$echo_cnt; ++$i) {
// 通常有 error 都可以考慮去掉了;當有 registration_id 則是代表已轉換 token
// 完整範例跟解釋:https://developers.google.com/cloud-messaging/http#example-responses
if (isset($ret_json['results'][$i]['error']) || isset($ret_json['results'][$i]['registration_id'])) {
array_push($check_failed_db_ids, $i);

}
}
}

//
// Step 3: update db record & reset $check_failed_db_ids
//
// ...

}

2018年4月20日 星期五

[SEO] Google search console 與使用 wget 建立 sitemap @ macOS 10.13.14

最近公司換了網域,導流量過程中需要安置個 sitemap 來增加曝光,就先查了一下 Google 牌的定義:

https://support.google.com/webmasters/answer/183668?hl=zh-Hant

不錯不錯,可以提交純文字,那就搭配個 wget 吧!

$ time wget --spider --recursive --no-verbose --output-file=log.txt https://example.com/
...
real 87m25.965s
user 0m1.836s
sys 0m4.081s


真久,接著再靠 grep 跟 awk 即可:

$ grep -op "URL:http[s]://\(.*\) " ~/log.txt | awk '{print(substr($1,5));}' > sitemap.txt

搞定!

2018年4月3日 星期二

[PHP] 微信開放平台開發筆記 - WeChat Web 應用與 OAuth2 client

今年才感到 Wechat app 崛起,得知用戶已破10億,甚至微信支付交易筆數早已超車支付寶1.5倍,已乃覺三十里 Orz 想要用境外身份申請,才發現很多都辦不成,像是境外要用公司身份才行,甚至騰訊公開平台的管理者都還得綁有中國銀行卡(金融卡)才搞得定 <囧> 多虧對岸同事的幫忙,可以小試身手一下。

騰訊公開平台的 OAuth2 文件: https://open.weixin.qq.com/cgi-bin/showdocument?action=dir_list&t=resource/res_list&verify=1&id=open1419316505&token=&lang=zh_CN

需要的留意的是騰訊公開平台的 Web 應用只允許填入一個 hostname/domain 作為 callback handler ,所以,也有人想得很快,透過在統一地方處理完畢後,在拋去其他地方,如:https://github.com/HADB/GetWeixinCode

在此利用一樣的架構,不過是在 backend 處理 XD 主要是服務常分成 production/alpha/dev site,就把它統一建構在 Production site ,但 Dev site 要登入時,跳去 production site 處理後,再把資料回拋到 dev site(當然也可以申請多個 WeChat Web 應用,每個 site 擁有自己的 Web app)

整個過程都算順利,唯一不太順的地方是 OAuth state 這個參數的使用,原先埋了要跳去其他地方的 callback url 或其他資訊,但測了幾輪發現 state 內若有一些敏感資訊(&)時,回來都會出錯,於是就多加個 base64_encode 來解了(也可以考慮把必要的資料儲存在 cookie)

發動處:

<?php

$init_url = 'https://open.weixin.qq.com/connect/qrconnect?'. http_build_query( array(
        'scope' => 'snsapi_login,snsapi_userinfo',
        'response_type' => 'code',
        'redirect_uri' => 'https://auth.my-domain/wechat/callback',
        'state' => base64_encode( http_build_query(array(
                'give_me_code' => 1,
                'callback' => 'https://service.my-domain/wechat/handle-code',
        )) ),
        'appid' => $weixin_app_id,
));


負責處理 WeChat OAuth2 回傳資料(code):https://auth.my-domain/wechat/callback

<?php

$ch = curl_init();
curl_setopt($ch, CURLOPT_URL, 'https://api.weixin.qq.com/sns/oauth2/access_token');
curl_setopt($ch, CURLOPT_FOLLOWLOCATION, true);
curl_setopt($ch, CURLOPT_RETURNTRANSFER, true);
curl_setopt($ch, CURLOPT_POST, true);
curl_setopt($ch, CURLOPT_POSTFIELDS, http_build_query( array(
'appid' => $weixin_app_id,
'secret' => $weixin_app_secret,
'code' => $code,
'grant_type' => 'authorization_code',
)));
$ret = @json_decode(curl_exec($ch), true);
             
$state = $_GET['state'];
$state_param = array();
if (!empty($state)) {
$state = @base64_decode($state);
parse_str($state, $state_param);
}

isset($state_param['callback']) && (
preg_match('#http[s]://(.*?)\.my-domain/#i', $state_param['callback'], $match)
) ) {
if (!empty($_GET['code'])) {
if (isset($state_param['give_me_code']) && $state_param['give_me_code'] == '1')
header('Location: '.$state_param['callback'].'?'.http_build_query(array('code' => $_GET['code'])) );
// ...
} else {
header('Location: '.$state_param['callback'].'?'.http_build_query(array('error' => 'no code')) );
}
return;
}


處理 code:

$ch = curl_init();
curl_setopt($ch, CURLOPT_URL, 'https://api.weixin.qq.com/sns/oauth2/access_token');
curl_setopt($ch, CURLOPT_FOLLOWLOCATION, true);
curl_setopt($ch, CURLOPT_RETURNTRANSFER, true);
curl_setopt($ch, CURLOPT_POST, true);
curl_setopt($ch, CURLOPT_POSTFIELDS, http_build_query( array(
'appid' => $weixin_app_id,
'secret' => $weixin_app_secret,
'code' => $ret_code,
'grant_type' => 'authorization_code',
)));

$ret = @json_decode(curl_exec($ch), true);

if (isset($ret['access_token']) && isset($ret['refresh_token']) && isset($ret['openid']) && isset($ret['unionid'])) {
$ch = curl_init();
curl_setopt($ch, CURLOPT_URL, 'https://api.weixin.qq.com/sns/userinfo');
curl_setopt($ch, CURLOPT_FOLLOWLOCATION, true);
curl_setopt($ch, CURLOPT_RETURNTRANSFER, true);
curl_setopt($ch, CURLOPT_POST, true);
curl_setopt($ch, CURLOPT_POSTFIELDS, http_build_query( array(
'access_token' => $ret['access_token'],
'openid' => $ret['openid'],
)));
$profile_ret = @json_decode(curl_exec($ch), true);
}

// $profile_ret['nickname']
// $profile_ret['headimgurl']


原先在 callback handler 上,順便做完 code 檢驗,但後來覺得這樣要傳出去的資料太多(且感到不安),所以還是統一把 code 拋出去,缺點是其他服務就必須都紀錄 WeChat Web 應用的資料(app_id/secret_key)等等,但可以避免受到 DNS 攻擊而把用戶的 access_token 給了出去。

[Android] 使用 Chrome Browser - Web Inspector 查看 App WebView 行為

之前用了一陣子,然後又忘了,還是寫一下筆記:

  1. 要把 Android app 內使用的 Webview 開啟 setWebContentsDebuggingEnabled
    • WebView.setWebContentsDebuggingEnabled(true);
  2. Android phone 也要開啟 developer mode 和 adb debug
  3. 使用 Chrome browser -> 開發人員選項 -> more tools -> remote devices

順利的話,就會看到手機彈跳出一些視窗,按一按授權就看在 chrome browser 上追蹤 App 內 webview 的行為,像是追蹤其他國家內的網頁資源有被有被 ban 掉 XD

請直接參考:https://developers.google.com/web/tools/chrome-devtools/remote-debugging/?hl=zh-tw

未來可以規劃 release apk 不開啟 setWebContentsDebuggingEnabled ,而 dev apk 再開啟即可。

2018年4月1日 星期日

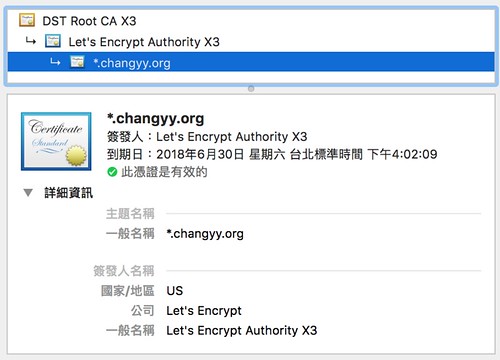
[Linux] Let's Encrypt 與 Wildcard 憑證,申請免費 SSL 憑證/HTTPS服務 @ Ubuntu 14.04

*.changyy.org

之前看強者同事已經幫公司網域申請完畢了,我才想到自己的網站一直沒打通 XD 趁個週日練一下吧!

看一下 Let's encrypt 網站簡介:https://letsencrypt.org/docs/client-options/
建議用 Certbot !

挑了一下 Nginx 與 Ubuntu server:

$ sudo apt-get install software-properties-common
$ sudo add-apt-repository ppa:certbot/certbot
$ sudo apt-get update
$ sudo apt-get install python-certbot-nginx


然後就只要指道幾令即可:

$ sudo certbot --manual certonly  -d *.changyy.org --server https://acme-v02.api.letsencrypt.org/directory

過程會要求你添加 DNS TXT record,添加完再按 Enter 驗證。

最後產出:

/etc/letsencrypt/live/changyy.org/fullchain.pem
/etc/letsencrypt/live/changyy.org/privkey.pem


來個 /etc/nginx/conf.d/ssl.changyy.org.conf

server {
    listen       80;
    listen  443 ssl;
    ssl_certificate /etc/letsencrypt/live/changyy.org/fullchain.pem;
    ssl_certificate_key /etc/letsencrypt/live/changyy.org/privkey.pem;

    server_name  ssl.changyy.org;

    access_log  /var/log/nginx/ssl.changyy.org-access.log  main;

    location / {
        root   /usr/share/nginx/html;
        index  index.php index.html index.htm;
    }
    error_page   500 502 503 504  /50x.html;
    location = /50x.html {
        root   /usr/share/nginx/html;
    }
}


收工!若是使用 Cloudflare 託管 DNS 的話,也可以透過 Certbot 一口氣都做完事喔:

Welcome to certbot-dns-cloudflare’s documentation!

另外,對我而言,這個服務最想用的就是 private ip server 啦!像是 NAS 等等的,只要透過手動設定即可搞定!