2014年2月13日 星期四

[Linux] /etc/rc.local : Syntax error: Bad fd number @ Ubuntu 12.04

最近把一堆工作塞在 /etc/rc.local ,發現有些指令明明在 command 下執行無誤,但搬進去 /etc/rc.local 後,測試 sudo sh /etc/rc.local 時,會收到 Syntax error: Bad fd number 訊息。

追了一下是因為系統 /bin/sh -> dash 的問題,所以一些語法要調整。

出錯 commands:

$ command >& /tmp/log &

改成:

$ command > /tmp/log 2>&1 &

iOS 開發筆記 - App Submission Feedback (Resolution Center) - non-consumable In-App Purchase(s)

最近一直收到 App Submission Feedback 信件轟炸,直到今天我終於搞懂這些 reviewer 的意思了 Orz 乃覺三十里!!

主因是使用了 non-consumable products,接著每次都收到一模模一樣樣的回應:

We found that your app offers In-App Purchase(s) that can be restored but does not include the required "Restore" feature to allow users to restore the previously purchased In-App Purchase(s), as specified in the Hosting Non-Consumable In-App Purchases section of the iTunes Connect Developer Guide:

"Users purchase non-consumable products only once, so if you host your own non-consumables, you need to provide a way for users to restore them. (You implement the restoreCompletedTransactions method in Store Kit to do so)."

To restore previously purchased In-App Purchase products, it would be appropriate to provide a "Restore" button and initiate the restore process when the "Restore" button is tapped by the user.

For more information on restoring In-App Purchases, see the section, Restoring Transactions, in the In-App Purchase Programming Guide.

A screenshot has been attached for your reference.

直到測試幾番後,終於搞懂他們在想什麼,也就是 non-consumable IAP products 必須提供類似 Restore button 才行,也不是沒實作,而是購買後才顯示出來,第一次還沒購買時,並不會顯示 Restore 字樣,就這樣一直調整 IAP 流程,每次調整都還是收到這樣的回應,直到把 non-consumable IAP products 一開始就加上 Restore button 時才通過。

2014年2月12日 星期三

[Linux] System Monitor / Load Indicator @ Ubuntu 12.04 desktop

indicator-multiload

印象中以前用 Ubuntu 10.04 時,常把 System Monitor Loading 顯示在右上角,但用了 Ubuntu 12.04 時,由於 Desktop GUI 更新後,遲遲找不到用法 XD 今天才把它解掉 Orz

$ sudo apt-get install indicator-multiload

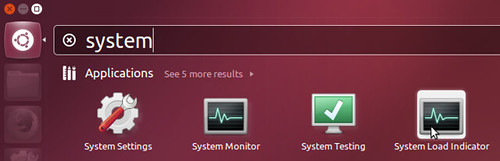
接著在 Dash Home 搜尋 System 就可以看到 System Load indicator。

設定登入啟動:

$ cp /usr/share/applications/indicator-multiload.desktop ~/.config/autostart
2014年2月11日 星期二

[Linux] VPN L2TP client + DHCP server + NAT iptables @ Ubuntu 12.04 desktop

VPN client + DHCP server + NAt

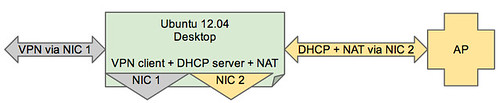
試了一個小型的網路架構,原本打定把 AP 刷成 DD-WRT 後,即可將 WAN 設定成 VPN 走法,可惜 AP 實在不穩,就改拉一台 PC 來用。此例用一台 Ubuntu 12.04 Desktop 當作 VPN client,此外,為了讓其他 clients 不需要處理 VPN 的連線,因此,讓這台 Ubuntu desktop 又充當 DHCP server,藉以再接一台 AP 出來,供眾人使用,眾人只需要連上 AP 後,就可以走指定的 VPN 通道。

為此,先介紹 Ubuntu 12.04 這檯機器,需要兩張網卡,分別為 NIC 1 跟 NIC 2 ,以下則用 eth0 跟 eth1 區分,而 VPN 走的網卡是 ppp0 (可以連通 VPN 後,用 ifconfig 查看)。其中 eth0 的網路是自動取得 IP 的。

設定 eth1 網卡:

$ sudo vim /etc/network/interfaces
auto eth1
iface eth1 inet static
address 192.168.168.1
netmask 255.255.255.0
network 192.168.168.0

broadcast 192.168.168.255


架設 DHCP server:

$ sudo apt-get install isc-dhcp-server
$ sudo vim /etc/default/isc-dhcp-server
INTERFACES="eth1"
$ sudo vim /etc/dhcp/dhcpd.conf
option domain-name "example.org";
option domain-name-servers 8.8.8.8;
subnet 192.168.168.0 netmask 255.255.255.0 {
  range dynamic-bootp 192.168.168.50 192.168.168.100;
  option routers 192.168.168.1;
}
$ sudo service isc-dhcp-server restart


設定 NAT 與 iptables:

$ echo "1" > /proc/sys/net/ipv4/ip_forward
$ sudo vim /etc/rc.local

echo "1" | tee /proc/sys/net/ipv4/ip_forward

OIF="eth0"
VIF="ppp0"
IIF="eth1"
INNET="192.168.168.0/24"

iptables -F
iptables -X
iptables -t nat -F
iptables -t nat -X

iptables -A INPUT -i lo -j ACCEPT
iptables -A OUTPUT -o lo -j ACCEPT

iptables -t nat -A POSTROUTING -o $OIF -s $INNET -j MASQUERADE
iptables -t nat -A POSTROUTING -o $VIF -j MASQUERADE

如此一來,即可收工。

[Linux] VPN L2TP client mode @ Ubuntu 12.04 Desktop

持續惡搞網路中,這次換把一台 Ubuntu desktop 當成 VPN Client 去連線。

$ sudo apt-add-repository ppa:werner-jaeger/ppa-werner-vpn
$ sudo apt-get update
$ sudo apt-get install l2tp-ipsec-vpn

註:若採用 Ubuntu 12.04 內建的 apt-get source list 安裝 l2tp-ipsec-vpn 後,卻連不上 :P

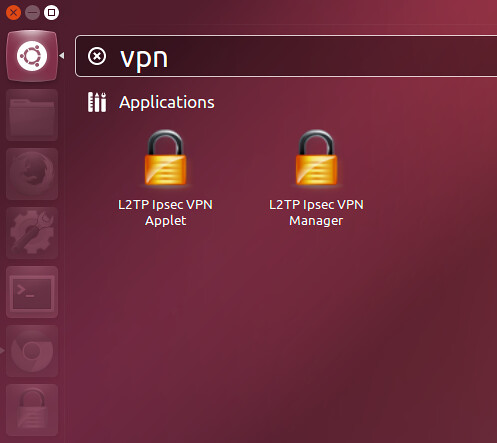
接著到左上角的 Dash Home 搜尋 VPN 來用:

vpn_client_setting_0

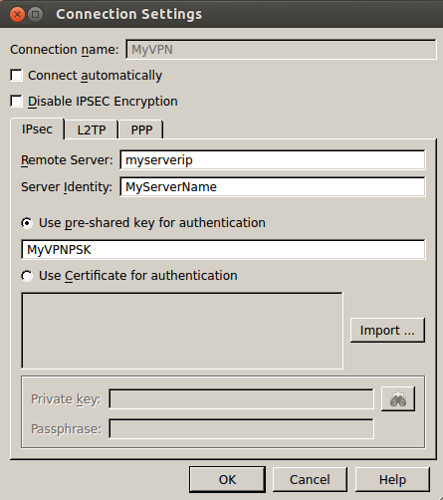
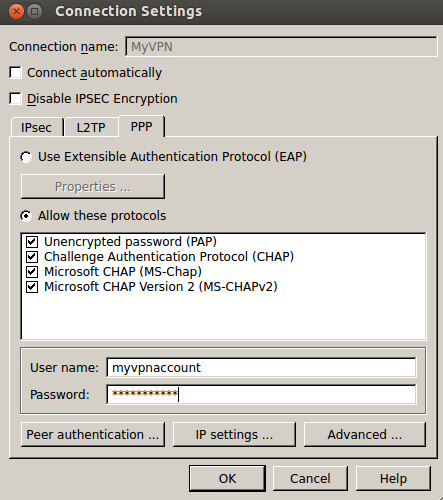
接著,就可以依序填寫資料:

vpn_client_setting_1

vpn_client_setting_2

填寫完記得按 "OK" 與 "Close" 後,再去右上角的 L2TP Ipsec VPN Applet 去點選連線囉!

如果,進行的不順利,可以試著跑去 VPN Server 上,查看 logs ,而 logs 預設沒有啟動,要去修改:

$ sudo vim /etc/ipsec.conf
config setup
  # ...
  # Use this to log to a file, or disable logging on embedded systems (like openwrt)
  plutostderrlog=/var/log/ipsec.log

$ sudo touch /var/log/ipsec.log
$ sudo service ipsec restart
ipsec_setup: Stopping Openswan IPsec...
ipsec_setup: Starting Openswan IPsec 2.6.37...
$ sudo tail -f /var/log/ipsec.log
added connection description "L2TP-PSK-noNAT"
listening for IKE messages
adding interface eth0/eth0 x.x.x.x:500
adding interface eth0/eth0 x.x.x.x:4500
adding interface lo/lo 127.0.0.1:500
adding interface lo/lo 127.0.0.1:4500
loading secrets from "/etc/ipsec.secrets"
loading secrets from "/var/lib/openswan/ipsec.secrets.inc"
...


如此一來,有人連線就會噴訊息囉。