簡單的說,不需 UI 更新的,可以挑 Thread 來使用,需要動到 UI 的操作的,請用 Handler 的方式處理。
2012年7月18日 星期三

2012年7月5日 星期四
Android 開發筆記 - 批次、大量設定按鈕事件偵測(setOnClickListener)
最近的案子很特別,除了一堆 Activity 外,每一個 Activity 裡頭又有一堆 Button/ImageButton 要處理,如果是依照一般教學文:
Button b = null;
if( ( b = (Button)findViewById( R.id.button01) ) != null )
b.setOnClickListener( new Button.OnClickListener(){ /* ... */ } );
if( ( b = (Button)findViewById( R.id.button02) ) != null )
b.setOnClickListener( new Button.OnClickListener(){ /* ... */ } );
...
假設有 20~30 個按鈕,就得用 findViewById 處理 20~30 次,程式碼就又臭又長。另一種作法則是把每個 Button/ImageButton 都設定為同一個 Button.OnClickListener 來管理,透過 View.getId() 來偵測,的確可以省記憶體,但還是不免要把 layout 上一堆按鈕都先 findViewById 一下,後來跟同事閒聊時,恰好提到用動態新增按鈕的方式,於是被 loop 關鍵字提醒一下,就來惡搞了:
void initOnClickListener() {
int my_ids[] = {
R.id.button01, R.id.button02, R.id.button03, ...
};
Button b = null;
for( int i=0 ; i< ids.length ; ++i )
if( ( b = (Button)findViewById( my_ids[i]) ) != null )
b.setOnClickListener(this);
}
public void onClick(View v) {
switch( v.getId() ) {
case R.id.button01:
break;
case R.id.button02:
break;
// ...
}
}
其中的 this 就是指 MyActivity extends Activity implements OnClickListener,如此一來可以用最簡短的程式碼,很方便的初始化 layout 上頭的按鈕,也不用每個按鈕都 new Button.OnClickListener 出來,也會省記憶吧。這樣管理 Button/ImageButton 還滿方便的,只需把要偵測的按鈕,將其 R.id.name 擺在 array 裡頭,跑 loop 來解決就好啦。如果有用 PagerAdapter/ViewPager 實作 iOS PageControl 的話,更可以用多階層來管理:
final int cntView = 3;
int my_ids[][] = {
{
R.id.view1_btn1 , R.id.view1_btn2 , R.id.view1_btn3, ...
} ,
{
R.id.view2_btn1 , R.id.view2_btn2 , R.id.view2_btn3, ...
} ,
{
R.id.view3_btn1 , R.id.view3_btn2 , R.id.view3_btn3, ...
}
};
for( int i=0 ; i<cntView ; ++i ) {
for( int j=0 ; j<my_ids[i].length ; ++j ) {
if( ( b = (Button)mPageView.get(i).findViewById( my_ids[i]) ) != null )
b.setOnClickListener( this );
}
}
其中 mPageView 用來記錄每個 page 的 Activity 囉。
2012年7月4日 星期三
Android 開發筆記 - HTTP、HTTPS、GET、POST、Cookie
寫 Mobile app 不免要網路連線一下,這時候最簡易的方式就是像 php 的 file_get_contents 函數,只要呼叫一下,就得到想要的東西。然而,在測試 https 時,發現對方憑證並非經過第三方認證的,因此噴出錯誤訊息:android javax.net.ssl.SSLPeerUnverifiedException: No peer certificate,這資安保護的確還不錯,但對開發、測試實在不方便,在網路上有找到的解法是實作一個 SSLSocketFactory 來解決,雖然不知是不是正解,但至少可以 work 了 :P (總覺得應該要能某個參數設定一下就行,就像 php curl 的 CURLOPT_SSL_VERIFYPEER 和 CURLOPT_SSL_VERIFYHOST 參數)
發送 http GET request:
//
// List<NameValuePair> params = new LinkedList<NameValuePair>(); // ArrayList<NameValuePair>();
// params.add(new BasicNameValuePair("a", "1"));
// params.add(new BasicNameValuePair("b", "2"));
// System.out.println( get_url_contents( "http://www.google.com.tw" , null ) );
// System.out.println( get_url_contents( "http://www.google.com.tw" , params ) );
//
String get_url_contents( String url , List<NameValuePair> params ) {
try {
HttpClient client = new DefaultHttpClient();
HttpResponse response = client.execute( new HttpGet( params == null || params.size() == 0 ? url : url + "?" + URLEncodedUtils.format(params, "utf-8") ) );
HttpEntity result = response.getEntity();
if( result != null ) {
//return EntityUtils.toString(result); // 有編碼問題
InputStream mInputStream = result.getContent();
String out = getStringFromInputStream(mInputStream);
mInputStream.close();
return out;
}
} catch (Exception e) {
e.printStackTrace();
}
return null;
}
發送 http POST request:
String post_url_contents( String url, List<NameValuePair> params ) {
try {
HttpClient client = new DefaultHttpClient();
HttpPost mHttpPost = new HttpPost(url);
if( params != null && params.size() > 0 )
mHttpPost.setEntity(new UrlEncodedFormEntity(params,HTTP.UTF_8));
HttpResponse response = client.execute(mHttpPost);
HttpEntity result = response.getEntity();
if( result != null ) {
//return EntityUtils.toString(result); // 有編碼問題
InputStream mInputStream = result.getContent();
String out = getStringFromInputStream(mInputStream);
mInputStream.close();
return out;
}
} catch (Exception e) {
e.printStackTrace();
}
return null;
}
使用 Cookie 的方式:
// CookieStore cookieStore = new BasicCookieStore();
String get_url_contents( String url , List<NameValuePair> params , CookieStore cookieStore ) {
try {
HttpClient client = new DefaultHttpClient();
HttpResponse response = null;
if( cookieStore == null )
response = client.execute( new HttpGet( params == null || params.size() == 0 ? url : url + "?" + URLEncodedUtils.format(params, "utf-8") ) );
else {
HttpContext mHttpContext = new BasicHttpContext();
mHttpContext.setAttribute(ClientContext.COOKIE_STORE, cookieStore);
response = client.execute( new HttpGet( params == null || params.size() == 0 ? url : url + "?" + URLEncodedUtils.format(params, "utf-8") ) , mHttpContext );
}
HttpEntity result = response.getEntity();
if( result != null ) {
//return EntityUtils.toString(result); // 有編碼問題
InputStream mInputStream = result.getContent();
String out = getStringFromInputStream(mInputStream);
mInputStream.close();
return out;
}
} catch (Exception e) {
e.printStackTrace();
}
return null;
}
其他:
String getStringFromInputStream(InputStream in) {
byte []data = new byte[1024];
int length;
if( in == null )
return null;
ByteArrayOutputStream mByteArrayOutputStream = new ByteArrayOutputStream();
try {
while( (length = in.read(data)) != -1 )
mByteArrayOutputStream.write(data, 0, length);
} catch (IOException e) {
e.printStackTrace();
}
return new String(mByteArrayOutputStream.toByteArray());
}
解決 android javax.net.ssl.SSLPeerUnverifiedException: No peer certificate:
程式碼:
import java.io.IOException;
import java.net.Socket;
import java.net.UnknownHostException;
import java.security.KeyManagementException;
import java.security.KeyStore;
import java.security.KeyStoreException;
import java.security.NoSuchAlgorithmException;
import java.security.UnrecoverableKeyException;
import java.security.cert.CertificateException;
import java.security.cert.X509Certificate;
import javax.net.ssl.SSLContext;
import javax.net.ssl.TrustManager;
import javax.net.ssl.X509TrustManager;
import org.apache.http.HttpVersion;
import org.apache.http.client.HttpClient;
import org.apache.http.conn.ClientConnectionManager;
import org.apache.http.conn.scheme.PlainSocketFactory;
import org.apache.http.conn.scheme.Scheme;
import org.apache.http.conn.scheme.SchemeRegistry;
import org.apache.http.conn.ssl.SSLSocketFactory;
import org.apache.http.impl.client.DefaultHttpClient;
import org.apache.http.impl.conn.tsccm.ThreadSafeClientConnManager;
import org.apache.http.params.BasicHttpParams;
import org.apache.http.params.HttpParams;
import org.apache.http.params.HttpProtocolParams;
import org.apache.http.protocol.HTTP;
public class MySSLSocketFactory extends SSLSocketFactory {
SSLContext mSSLContext = SSLContext.getInstance("TLS");
@Override
public Socket createSocket() throws IOException {
return mSSLContext.getSocketFactory().createSocket();
}
@Override
public Socket createSocket(Socket socket, String host, int port, boolean autoClose) throws IOException, UnknownHostException {
return mSSLContext.getSocketFactory().createSocket(socket, host, port, autoClose);
}
public MySSLSocketFactory(KeyStore truststore) throws NoSuchAlgorithmException, KeyManagementException, KeyStoreException, UnrecoverableKeyException {
super(truststore);
TrustManager mTrustManager = new X509TrustManager() {
@Override
public void checkClientTrusted(X509Certificate[] chain, String authType) throws CertificateException {
}
@Override
public void checkServerTrusted(X509Certificate[] chain, String authType) throws CertificateException {
}
@Override
public X509Certificate[] getAcceptedIssuers() {
return null;
}
};
mSSLContext.init(null, new TrustManager[] { mTrustManager }, null);
}
public static HttpClient createMyHttpClient() {
try {
KeyStore trustStore = KeyStore.getInstance(KeyStore.getDefaultType());
trustStore.load( null, null);
SSLSocketFactory mSSLSocketFactory = new MySSLSocketFactory(trustStore);
mSSLSocketFactory.setHostnameVerifier(SSLSocketFactory.ALLOW_ALL_HOSTNAME_VERIFIER);
HttpParams params = new BasicHttpParams();
HttpProtocolParams.setVersion(params, HttpVersion.HTTP_1_1);
HttpProtocolParams.setContentCharset(params, HTTP.UTF_8);
SchemeRegistry registry = new SchemeRegistry();
registry.register(new Scheme("http", PlainSocketFactory.getSocketFactory(), 80));
registry.register(new Scheme("https", mSSLSocketFactory, 443));
ClientConnectionManager ccm = new ThreadSafeClientConnManager(params, registry);
return new DefaultHttpClient(ccm, params);
} catch (KeyStoreException e) {
e.printStackTrace();
} catch (NoSuchAlgorithmException e) {
e.printStackTrace();
} catch (CertificateException e) {
e.printStackTrace();
} catch (IOException e) {
e.printStackTrace();
} catch (KeyManagementException e) {
e.printStackTrace();
} catch (UnrecoverableKeyException e) {
e.printStackTrace();
}
return new DefaultHttpClient();
}
}
使用:
//HttpClient client = new DefaultHttpClient();
HttpClient client = MySSLSocketFactory. createMyHttpClient();
參考資料:
Android Series: GET, POST and Multipart POST requests
android javax.net.ssl.SSLPeerUnverifiedException: No peer certificate
2012年7月3日 星期二
Android 開發筆記 - 模仿 iOS UINavigationController 效果
為了給使用者有一致性的體驗,在 Android 環境上,實作 iOS UINavigationController 效果。
實作的方式很...直觀,就是每個 Activity 最上頭都擺在一個區域(header)來達成啦 XD
例如 header.xml:
<LinearLayout xmlns:android="http://schemas.android.com/apk/res/android"
android:layout_width="fill_parent"
android:layout_height="50dp"
android:background="@drawable/background">
<FrameLayout
android:layout_width="fill_parent"
android:layout_height="fill_parent"
android:gravity="center"
android:background="@null">
<TextView
android:layout_width="fill_parent"
android:layout_height="fill_parent"
android:text="@string/title"
android:gravity="center"
android:textAppearance="?android:attr/textAppearanceMedium" />
<ImageButton
android:id="@+id/btn_right"
android:layout_width="wrap_content"
android:layout_height="wrap_content"
android:src="@drawable/btn_right"
android:background="@null"
android:contentDescription="@null"
android:layout_gravity="center_vertical|right"/>
</FrameLayout>
</LinearLayout>
而其他的 Activity layout 可以在開頭就用類似方式 include 進來:
<?xml version="1.0" encoding="utf-8"?>
<LinearLayout xmlns:android="http://schemas.android.com/apk/res/android"
android:layout_width="wrap_content"
android:layout_height="wrap_content"
android:gravity="center_horizontal"
android:orientation="vertical">
<include android:id="@+id/header"
layout="@layout/header"
android:layout_height="wrap_content"
android:layout_width="fill_parent"/>
…
</LinearLayout>
Android 開發筆記 - 模仿 iOS UITabBarController 效果
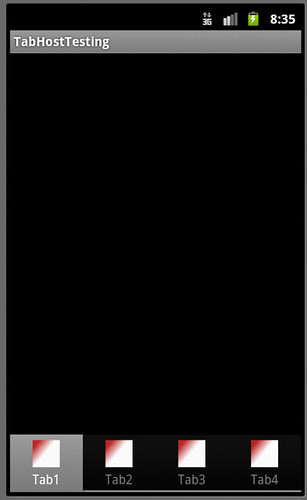
為了讓使用者有一致性的體驗,在 Android 環境中,可以使用 TabWidget/TabHost 來達成 iOS UITabBarController 的效果。
在 Eclipse 中的 Graphical layout 中,拖曳 TabHost 到預設的 main.xml 中,自動會幫你產生一個 3 個 tab 的 layout,接著精簡一下,打算用程式動態新增 tabs ,所以只留下框架:
<?xml version="1.0" encoding="utf-8"?>
<TabHost xmlns:android="http://schemas.android.com/apk/res/android"
android:id="@+id/tabhost"
android:layout_width="match_parent"
android:layout_height="match_parent" >
<RelativeLayout
android:layout_width="match_parent"
android:layout_height="match_parent"
android:orientation="vertical" >
<TabWidget
android:id="@android:id/tabs"
android:layout_width="match_parent"
android:layout_height="wrap_content"
android:layout_alignParentBottom="true">
</TabWidget>
<FrameLayout
android:id="@android:id/tabcontent"
android:layout_width="match_parent"
android:layout_height="match_parent" >
</FrameLayout>
</RelativeLayout>
</TabHost>
新增一個 TabHostActivity 繼承 android.app.ActivityGroup:
public class TabHostActivity extends ActivityGroup {
public void onCreate(Bundle savedInstanceState) {
super.onCreate(savedInstanceState);
setContentView(R.layout.main);
TabHost.TabSpec spec = null;
TabHost mTabHost = (TabHost)findViewById(R.id.tabhost);
mTabHost.setup(this.getLocalActivityManager());
spec = mTabHost.newTabSpec("Tab1").
setIndicator("Tab1", getResources().getDrawable(R.drawable.tab)).
setContent(new Intent().setClass(this, MyActivity.class));
mTabHost.addTab(spec);
spec = mTabHost.newTabSpec("Tab2").
setIndicator("Tab2", getResources().getDrawable(R.drawable.tab)).
setContent(new Intent().setClass(this, MyActivity.class));
mTabHost.addTab(spec);
spec = mTabHost.newTabSpec("Tab3").
setIndicator("Tab3", getResources().getDrawable(R.drawable.tab)).
setContent(new Intent().setClass(this, MyActivity.class));
mTabHost.addTab(spec);
spec = mTabHost.newTabSpec("Tab4").
setIndicator("Tab4", getResources().getDrawable(R.drawable.tab)).
setContent(new Intent().setClass(this, MyActivity.class));
mTabHost.addTab(spec);
//mTabHost.setCurrentTab(0);
//mTabHost.setCurrentTab(3);
}
}
客製化 Tab 的樣貌,例如 TabHost 的背景(在 xml 指定 tabhost background 即可)、Tab 選到的背景色等:
for (int i = 0; i < mTabHost.getTabWidget().getChildCount(); i++){
//mTabHost.getTabWidget().getChildAt(i).getLayoutParams().height = 60;
//mTabHost.getTabWidget().getChildAt(i).setPadding(25, 25, 25, 25);
//mTabHost.getTabWidget().getChildAt(i).setBackgroundResource(R.drawable.background_selected);
}
mTabHost.setOnTabChangedListener( new OnTabChangeListener() {
@Override
public void onTabChanged(String tabId) {
int index = mTabHost.getCurrentTab();
for( int i=0 ; i<mTabHost.getTabWidget().getChildCount(); ++i ) {
if( i == index )
mTabHost.getTabWidget().getChildAt(i).setBackgroundResource(R.drawable.background_selected);
else
mTabHost.getTabWidget().getChildAt(i).setBackgroundResource(0);
}
}
} );
// MyActivity mActivity = mTabHost.getTabContentView().getChildAt(index).getContext();
如果 Tab 圖太大,則會蓋到字,要小心使用。
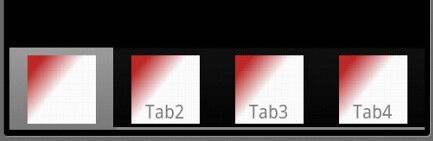
此外,更可以使用 xml 描述按鈕變化:
<?xml version="1.0" encoding="utf-8"?>
<selector xmlns:android="http://schemas.android.com/apk/res/android">
<!-- pressed -->
<item android:state_pressed="true" android:drawable="@drawable/tab_pressed" />
<!-- focused -->
<item android:state_focused="true" android:drawable="@drawable/tab_focused" />
<!-- selected -->
<item android:state_selected="true" android:drawable="@drawable/tab_selected" />
<!-- default -->
<item android:drawable="@drawable/tab" />
</selector>
以程式動態開發 Tab 的缺點是無法用 Graphical Layout 觀看 TabHost 的樣貌,必須執行程式才看的到,但好處是可以動態新增 Tab 個數。
訂閱:
文章 (Atom)