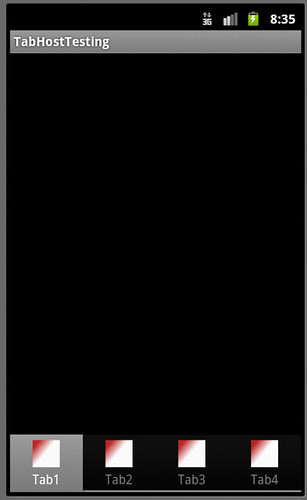
為了讓使用者有一致性的體驗,在 Android 環境中,可以使用 TabWidget/TabHost 來達成 iOS UITabBarController 的效果。
在 Eclipse 中的 Graphical layout 中,拖曳 TabHost 到預設的 main.xml 中,自動會幫你產生一個 3 個 tab 的 layout,接著精簡一下,打算用程式動態新增 tabs ,所以只留下框架:
<?xml version="1.0" encoding="utf-8"?>
<TabHost xmlns:android="http://schemas.android.com/apk/res/android"
android:id="@+id/tabhost"
android:layout_width="match_parent"
android:layout_height="match_parent" >
<RelativeLayout
android:layout_width="match_parent"
android:layout_height="match_parent"
android:orientation="vertical" >
<TabWidget
android:id="@android:id/tabs"
android:layout_width="match_parent"
android:layout_height="wrap_content"
android:layout_alignParentBottom="true">
</TabWidget>
<FrameLayout
android:id="@android:id/tabcontent"
android:layout_width="match_parent"
android:layout_height="match_parent" >
</FrameLayout>
</RelativeLayout>
</TabHost>
新增一個 TabHostActivity 繼承 android.app.ActivityGroup:
public class TabHostActivity extends ActivityGroup {
public void onCreate(Bundle savedInstanceState) {
super.onCreate(savedInstanceState);
setContentView(R.layout.main);
TabHost.TabSpec spec = null;
TabHost mTabHost = (TabHost)findViewById(R.id.tabhost);
mTabHost.setup(this.getLocalActivityManager());
spec = mTabHost.newTabSpec("Tab1").
setIndicator("Tab1", getResources().getDrawable(R.drawable.tab)).
setContent(new Intent().setClass(this, MyActivity.class));
mTabHost.addTab(spec);
spec = mTabHost.newTabSpec("Tab2").
setIndicator("Tab2", getResources().getDrawable(R.drawable.tab)).
setContent(new Intent().setClass(this, MyActivity.class));
mTabHost.addTab(spec);
spec = mTabHost.newTabSpec("Tab3").
setIndicator("Tab3", getResources().getDrawable(R.drawable.tab)).
setContent(new Intent().setClass(this, MyActivity.class));
mTabHost.addTab(spec);
spec = mTabHost.newTabSpec("Tab4").
setIndicator("Tab4", getResources().getDrawable(R.drawable.tab)).
setContent(new Intent().setClass(this, MyActivity.class));
mTabHost.addTab(spec);
//mTabHost.setCurrentTab(0);
//mTabHost.setCurrentTab(3);
}
}
客製化 Tab 的樣貌,例如 TabHost 的背景(在 xml 指定 tabhost background 即可)、Tab 選到的背景色等:
for (int i = 0; i < mTabHost.getTabWidget().getChildCount(); i++){
//mTabHost.getTabWidget().getChildAt(i).getLayoutParams().height = 60;
//mTabHost.getTabWidget().getChildAt(i).setPadding(25, 25, 25, 25);
//mTabHost.getTabWidget().getChildAt(i).setBackgroundResource(R.drawable.background_selected);
}
mTabHost.setOnTabChangedListener( new OnTabChangeListener() {
@Override
public void onTabChanged(String tabId) {
int index = mTabHost.getCurrentTab();
for( int i=0 ; i<mTabHost.getTabWidget().getChildCount(); ++i ) {
if( i == index )
mTabHost.getTabWidget().getChildAt(i).setBackgroundResource(R.drawable.background_selected);
else
mTabHost.getTabWidget().getChildAt(i).setBackgroundResource(0);
}
}
} );
// MyActivity mActivity = mTabHost.getTabContentView().getChildAt(index).getContext();
如果 Tab 圖太大,則會蓋到字,要小心使用。
此外,更可以使用 xml 描述按鈕變化:
<?xml version="1.0" encoding="utf-8"?>
<selector xmlns:android="http://schemas.android.com/apk/res/android">
<!-- pressed -->
<item android:state_pressed="true" android:drawable="@drawable/tab_pressed" />
<!-- focused -->
<item android:state_focused="true" android:drawable="@drawable/tab_focused" />
<!-- selected -->
<item android:state_selected="true" android:drawable="@drawable/tab_selected" />
<!-- default -->
<item android:drawable="@drawable/tab" />
</selector>
以程式動態開發 Tab 的缺點是無法用 Graphical Layout 觀看 TabHost 的樣貌,必須執行程式才看的到,但好處是可以動態新增 Tab 個數。


沒有留言:
張貼留言