2021年7月7日 星期三

[Linux] 修復 Ubuntu 12.04 無法安裝軟體 - W: Failed to fetch 404 @ Ubuntu 12.04

老機器環境:

$ lsb_release -a
No LSB modules are available.
Distributor ID: Ubuntu
Description: Ubuntu 12.04.5 LTS
Release: 12.04
Codename: precise

主要是在 server 運行 apt-get update 時,會出現一堆 404 問題:

W: Failed to fetch http://archive.ubuntu.com/ubuntu/dists/precise-backports/multiverse/binary-i386/Packages 404

追了一下應當是 12.04 已經不維護了。運氣不錯,有找到 old-releases.ubuntu.com 位置:
  • https://archive.ubuntu.com/ubuntu/
  • https://old-releases.ubuntu.com/ubuntu/
接著就動手換掉 /etc/apt/sources.lis 即可,包括來源 server 換完後,記得要再把 /var/lib/apt/lists 先移除:

$ sudo mv /var/lib/apt/lists /var/lib/apt/lists-backup
$ sudo mkdir -p /var/lib/apt/lists
$ sudo apt-get update

如此就會修復相關資訊,可以在靠 apt-get 安裝軟體了。

此外,若剛好在除錯時,刪除了已安裝過的軟體,接著做了上述後,又要安裝時,會碰到資訊對不上的問題,如:

dpkg:error processing package XXX (--configure):
subprocess installed post-installation script returned error exit status 10

解法就是清除 /var/lib/dpkg/info/ 下相關套件的資料後,重新安裝或是跑完後續流程:

$ sudo mkdir /var/lib/dpkg/info/backup
$ sudo mv /var/lib/dpkg/info/XXX* /var/lib/dpkg/info/backup/
$ sudo apt-get install -f

2021年7月3日 星期六

[開箱] 電子書閱讀器 Kobo Elipsa 10.3 吋

Kobo 10.2吋 電子書閱讀器

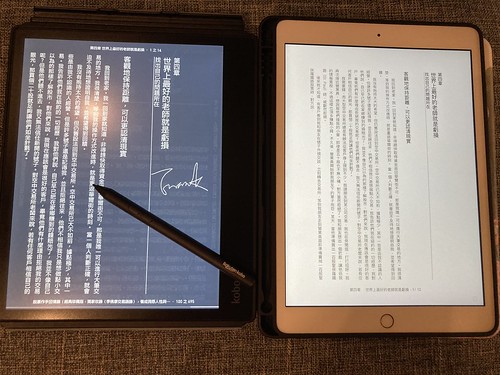
在 Kobo 也花了五千買電子書了 XD 一開始還滿喜歡用 PC app 觀看,想說還是買一台電子書閱讀器來用用吧!之前買過 Kindle 6吋的經驗,加上沒外出看書的需求,還是想大尺寸一點,剛好跟朋友哈拉 Kobo 沒出過大尺寸的,沒想到哈拉後沒幾週就看到推出 10.3吋的閱讀器,當時很快就下單,沒有想太多。

Kobo 10.2吋 電子書閱讀器

把玩的心得:
  • 裸機不含保護殼還滿輕的: 384g
  • 加上保護殼跟筆: 744g
Kobo 10.2吋 電子書閱讀器

大概 2010年 前研究電子書領域時,就曾跟某書店高層開會過,分享過心得,認為一瓶水 600g 是可以接受的範圍(替換掉女生包包內的東西),因此很期待 iPad 問世,我覺得加保護殼真的會覺得小重 QQ 但一台破萬也讓人不得不保護啊 XD 或許這就是 amazon kindle 6吋主流的原因吧?最終還是方便為主。

Kobo 10.2吋 電子書閱讀器

回過頭來,我自己使用 Kobo Elipsa 10.3 吋的心得,小缺點:
  • 首次登入 kobo 時,會輸入帳密,輸入後發現螢幕上會有鍵盤的殘影(但不影響使用)
  • 把 Kindle Paperwhite 6 翻頁速度快些,但跟 iPad 體驗上還是有一段落差
  • 觸控筆採用 AAAA 6號電池,稍微不好買,網路訂最方便(2個50元)
  • 據說 Kobo 一直以來都有各個裝置同步不即時的問題,甚至已經接近無法同步的體驗
優點:
  • 比 iPad 輕,只有讀書跟寫筆記功能,專心讀書
  • 不加保護殼時,質感不錯(可惜實務上應當還是會裝著保護殼)
  • 搭配 Kobo 觸控筆,比我想像中驚艷不少,像是梳理閱讀時可以隨便畫,很讚(看起來 iPad app 看不到?)
Kobo 10.2吋 電子書閱讀器

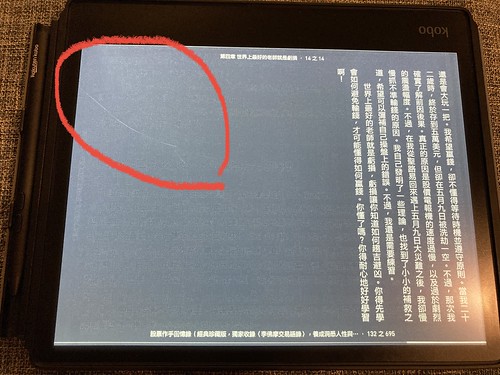
其他意外...則是把電子書擺在桌上,小孩拿起 kobo 筆畫一畫,就發生慘案了 <囧> 只能說這就是意外吧...目前看起來還不影響閱讀,讓他去吧...還是把電子書當作耗材,書中的資訊才是核心啊。

Kobo 電子書 刮傷

2021年6月27日 星期日

Node.js 筆記 - 以 HTTP API 提供 ffmpeg 轉檔,以 jpg 轉成 png 為例 @ node.js v10.24.1, macOS 11.4

最近接獲一個任務研究了一下 Javascript 與 H264 的解決方案,首先會立馬想到 ffmpeg 方案,就研究了以下 JS 專案:
其中 ffmpeg.wasm 無法在 node.js v10 運行。在不考慮 node.js 升級的前提上,就來把玩其他三者,而 tinyh264 的源頭是 h264bsd 專案,在 h264bsd 專案中有 js solution 可以挖出來跑,包括裡頭有 github.com/oneam/h264bsd/blob/master/js/test_node.js 這隻程式很小巧美麗,可以欣賞一下。而裡頭把玩最多的是 ffmpeg.js 這專案,有興趣可以看看他的 Makefile ,很簡單清楚,比較特別是他分別產出 ffmpeg-webm.js 和 ffmpeg-mp4.js ,兩者不同的地方是 ffmpeg 支援的 encoder/muxer 不同,可能是為了精簡 js code size 因此就拆成 webm 跟 mp4 的用法。這邊把玩的是善用 ffmpeg.js Makefile 去重編 ffmpeg-*.js 增加 demuxer/decoder 和 encoder/muxer。

這邊滿適合看一下 ffmpeg 框架:


接著,工作上的任務是讓 input 支援 h264,而 output 支援 jpg/png 等。這邊把範圍限縮到 input 支援 jpg ,輸出支援 png 來筆記。最後包裝個 HTTP API 出來筆記一下,結果花最多時間是在確認如何從檔案系統讀出檔案資料,以及透過 http.request 將圖片資料下載回來 Orz 還派上 md5sum 來檔案內容是否正常。

而 ffmpeg.js 真的設計得不錯,用起來很方便,可以參考 local-file-cmd.js 用法:

const ffmpeg = require('./ffmpeg-20210624_1550/ffmpeg-mp4.js');
//const ffmpeg = require('./ffmpeg-default/ffmpeg-mp4.js');
const fs = require('fs');
const crypto = require('crypto');

let from_local_file = '/tmp/test.jpg';
let raw_data = fs.readFileSync(from_local_file);
let testData = Uint8Array.from(raw_data);
const md5sum = crypto.createHash('md5');
md5sum.update(raw_data);
console.log('[INFO][from_local_file][size:'+raw_data.length+'][md5:'+md5sum.digest('hex')+'][path:'+from_local_file+']');

const result = ffmpeg({
MEMFS: [{name: 'test.jpg', data: testData}],
arguments: ['-i', 'test.jpg', 'test.png']
})
const out = result.MEMFS[0];
const outputContent = Buffer.from(out.data);

console.log('[INFO] Done. Input size: ' + raw_data.length +', testData size: '+testData.length+', output size: '+outputContent.length);

更多資訊:changyy/study-wasm-ffmpeg-jpg-to-png

2021年6月12日 星期六

Node.js 筆記 - 使用 Puppeteer 監控瀏覽網頁的 Requests 跟 HTML Code @ macOS 11.4, node v14.14.0, npm 6.14.5

緣起於在追蹤網站架構時,每次都靠 chrome browser 開發人員工具去追蹤特定的 request 還好,若需要大量瀏覽找尋一些蛛絲馬跡時,就會很煩!以前很閒時,就會跳下去寫 chrome extension 或是熱衷於 C++ 時,就會寫一點點  Chromium Embedded Framework 來寫個小型瀏覽器,最後想起來試試看 Puppeteer 吧!

使用 Puppeteer 很輕鬆,除了是很常見的 Javascript 語言外,Puppeteer 套件提供了網頁端常見的事件偵測、所發的 Request 清單。就這樣拼拼湊湊即可完工:

(async () => {
const browser = await puppeteer.launch({headless: false});
//const page = await browser.newPage();
const context = await browser.createIncognitoBrowserContext();
const page = await context.newPage();
await page.emulate(device);
await page.setRequestInterception(true);

// https://pptr.dev/#?product=Puppeteer&version=v10.0.0&show=api-event-domcontentloaded
// https://developer.mozilla.org/en-US/docs/Web/API/Window/DOMContentLoaded_event
//
// The DOMContentLoaded event fires when the initial HTML document has been completely loaded and parsed, without waiting for stylesheets, images, and subframes to finish loading.
//
page.on('domcontentloaded', () => {
console.log('on.domcontentloaded');
});

// https://pptr.dev/#?product=Puppeteer&version=v10.0.0&show=api-event-domcontentloaded
// https://developer.mozilla.org/en-US/docs/Web/API/Window/load_event
//
// The load event is fired when the whole page has loaded, including all dependent resources such as stylesheets and images. This is in contrast to DOMContentLoaded, which is fired as soon as the page DOM has been loaded, without waiting for resources to finish loading.
//
page.on('load', async () => {
console.log('on.load');
watchTags(page, watch_tags);
});

// https://pptr.dev/#?product=Puppeteer&version=v10.0.0&show=api-event-framenavigated
// https://pptr.dev/#?product=Puppeteer&version=v10.0.0&show=api-class-frame
page.on('framenavigated', frame => {
console.log('on.framenavigated: '+frame.url());
});

// https://pptr.dev/#?product=Puppeteer&version=v10.0.0&show=api-event-request
// https://pptr.dev/#?product=Puppeteer&version=v10.0.0&show=api-class-httprequest
page.on('request', request => {
watchRequest(page.url(), request.url());
if (skip_resource_type[ request.resourceType() ])
request.abort();
else
request.continue();
});

// https://pptr.dev/#?product=Puppeteer&version=v10.0.0&show=api-event-response
// https://pptr.dev/#?product=Puppeteer&version=v10.0.0&show=api-class-httpresponse
page.on('response', response => {
//console.log('on.response: '+response.url());
});

while (true) {
if (url_init.length > 0) {
const target_url = url_init.shift();
await page.goto(target_url, {
waitUntil: 'networkidle0',
});
console.log('networkidle0');
}
if (url_init.length > 0)
await sleep(5000);
else
await sleep(50);
}
await browser.close();
})();

如此,搭配 command line 使用,就可很快的監控想要的 request 規則,或是 HTML DOM Tree 的變化,例如監控 <script> 的讀取位置在哪:

% node index.js -url "https://tw.yahoo.com" -tag "script.src"
...
on.load
[WATCH][TAG] script: src
Web URL: [https://tw.yahoo.com/]
[
  { src: 'https://s.yimg.com/wi/ytc.js' },
  {
    src: 'https://tw.mobi.yahoo.com/polyfill.min.js?features=array.isarray%2Carray.prototype.every%2Carray.prototype.foreach%2Carray.prototype.indexof%2Carray.prototype.map%2Cdate.now%2Cfunction.prototype.bind%2Cobject.keys%2Cstring.prototype.trim%2Cobject.defineproperty%2Cobject.defineproperties%2Cobject.create%2Cobject.freeze%2Carray.prototype.filter%2Carray.prototype.reduce%2Cobject.assign%2Cpromise%2Crequestanimationframe%2Carray.prototype.some%2Cobject.getownpropertynames%2Clocale-data-en-us%2Cintl%2Clocale-data-zh-hant-tw&version=2.1.23'
  },
  { src: 'https://s.yimg.com/aaq/yc/2.9.0/zh.js' },
  {
    src: 'https://s.yimg.com/ud/fp/js/vendor.174522d6d76b51858b93.min.js'
  },
  { src: 'https://s.yimg.com/ud/fp/js/common.js' },
  { src: 'https://s.yimg.com/oa/consent.js' },
  { src: 'https://consent.cmp.oath.com/cmpStub.min.js' },
  { src: 'https://consent.cmp.oath.com/cmp.js' },
  { src: 'https://s.yimg.com/ss/rapid3.js' },
  { src: 'https://s.yimg.com/rq/darla/boot.js' },
  {
    src: 'https://s.yimg.com/ud/fp/js/main.6622c6aeda051386afaa.min.js'
  },
  { src: 'https://mbp.yimg.com/sy/os/yaft/yaft-0.3.22.min.js' },
  {
    src: 'https://mbp.yimg.com/sy/os/yaft/yaft-plugin-aftnoad-0.1.3.min.js'
  },
  { src: 'https://s.yimg.com/aaq/vzm/perf-vitals_1.0.0.js' },
  {
    src: 'https://fc.yahoo.com/sdarla/php/client.php?dm=1&lang=zh-Hant-TW'
  },
  {
    src: 'https://s.yimg.com/aaq/c/e7fecc0.caas-abu_highlander.min.js'
  }
]
...

2021年6月4日 星期五

[Linux] 升級 Red Hat Enterprise Server 的 OpenSSL, OpenSSH 服務 @ Red Hat Enterprise Linux Server release 5.3

這是一台滿舊的機器,大概 10 年前吧。同事想要 git clone 時,出現了失敗問題,追蹤一下是機器的 openssl 過舊,由於機器有他的任務在,不好意思亂更新系統資源,怕爆!所以採用 tarball 的安裝方式。

openssl 太舊時,連用 wget/curl 去下載 https 來源時都會失敗的,只好靠 http 或是 scp 搬東西進去。

$ lsb_release -a
Distributor ID: RedHatEnterpriseServer
Description: Red Hat Enterprise Linux Server release 5.3 (Tikanga)
Release: 5.3
Codename: Tikanga

$ openssl version
OpenSSL 0.9.8e-fips-rhel5 01 Jul 2008

只好挑個 /opt/tarball 安裝啦,沒想到要編譯 openssl 又會碰到 perl 版本不夠新:

$ wget http://www.cpan.org/src/5.0/perl-5.10.0.tar.gz
$ cd ~/perl-5.10.0
$ ./configure.gnu --prefix=/opt/tarball
$ make -j4 install

接著再安裝個 zlib ,採用 static 方式方便後續大家使用:

$ wget http://zlib.net/zlib-1.2.11.tar.gz
$ cd ~/zlib-1.2.11
$ ./configure --prefix=/opt/tarball --static
$ make install

編譯 openssl:

$ wget http://www.openssl.org/source/openssl-1.1.1k.tar.gz 
$ cd ~/openssl-OpenSSL_1_1_1k 
$ PATH=/opt/tarball/bin:$PATH ./config --prefix=/opt/tarball
$ make -j4 install

編譯 openssh 工具包:https://github.com/openssh/openssh-portable/releases

$ cd ~/openssh-portable-V_8_6_P1
$ autoreconf
$ LD_LIBRARY_PATH=/opt/tarball/lib:$LD_LIBRARY_PATH ./configure --prefix=/opt/tarball/ --with-ssl-dir=/opt/tarball
$ LD_LIBRARY_PATH=/opt/tarball/lib:$LD_LIBRARY_PATH make -j4 install
$ file /opt/tarball/bin/ssh
/opt/tarball/bin/ssh: ELF 32-bit LSB shared object, Intel 80386, version 1 (SYSV), for GNU/Linux 2.6.9, stripped

接著偷懶拉 code 方式:

$ GIT_SSH_COMMAND="LD_LIBRARY_PATH=/opt/tarball/lib:$LD_LIBRARY_PATH /opt/tarball/bin/ssh" git clone ...

或是在環境變數添加好:

LD_LIBRARY_PATH=/opt/tarball/lib:$LD_LIBRARY_PATH 
PATH=/opt/tarball/bin:$PATH

搞定!