這筆記來自於
CS 193P iPhone Application Development 2010 Winter
課程 - 9. Data in Your iPhone App (February 2, 2010)
無論寫什模樣大小的程式,都是需處理資料儲存的問題,例如依使用者的偏好、遊戲進行的進度,甚至可以增加程式的容錯性等等,這些都需要處理資料儲存的問題。在 iPhone Apps 裡,最簡單的存取資料的方式就是使用 Property List ,也就是應用程式常見的 *.plist 檔案,這非常適合用在小量資料的儲存,但倘若資料量進入了 KB 階段,還可以用用 SQLite 囉!至於什麼時候則不適用 SQLite 呢?以下是投影片提到的:
- Multi-gigabytes databases
- High concurrency (multiple writers)
- Client-server applicaitons
- “Appropriate Uses for SQLite”
所幸的 iPhone 也可以跑 C 程式,所以也還是可以維持用 C 處理檔案的部份啦,唯一要留意的是了解自己寫的程式,他們儲存資料的相對位置囉。
在進入資料的存取操作前,先簡介一下,對 APP 而言的目錄結構:
<Applocation Home>
MyApp.app
MyApp
MainWindow.nib
SomeImage.png
Documents
Library
Caches
Preferences
並且基於安全問題,限制只能在自己的家目錄進行檔案存取的行為,並且可以利用以下的方式取得對應位置:
- Basic
- NSString *homePath = NSHomeDirectory();
- NSString *tmpPath = NSTemporaryDirectory();
- NSString *filePath = [[NSBundle mainBundle] pathForResource:@"index" ofType:@"html"];
NSString *fileDirPath = [filePath stringByDeletingLastPathComponent];
- Document
- NSArray *paths = NSSearchPathForDirectoriesInDomains(NSDocumentDirectory, NSUserDomainMask, YES);
- NSString *documentsPath = [paths objectAtIndex:0];
- 例子
- Application Home>/Documents/my.db
- NSArray *paths =
NSSearchPathForDirectoriesInDomains(NSDocumentDirectory,
NSUserDomainMask, YES);
NSString *documentsPath = [paths objectAtIndex:0];
NSString *dbPath = [documentsPath stringByAppendingPathComponent:@"my.db"];
- 補充
- 第一次執行程式時,有些情境會替程式準備好預備用的資料,這時就必須進行適當的處理,把原先以預備好的資料複製對應的位置,例如一開始在打包程式時,已經有先做好一個 default.db ,裡面已經有些 table 資料等等,當程式第一次執行時,那就把它複製到對應的位置,如 my.db 等,往後則都是對 my.db 進行操作囉!
- BOOL check_exists = [[NSFileManager defaultManager] fileExistsAtPath:dbPath];
使用 Property Lists:
用途:處理小量資料
用法:
// Writing
- (BOOL)writeToFile:(NSString *)aPath atomically:(BOOL)flag;
- (BOOL)writeToURL:(NSURL *)aURL atomically:(BOOL)flag;
// Reading
- (id)initWithContentsOfFile:(NSString *)aPath;
- (id)initWithContentsOfURL:(NSURL *)aURL;
或是更強大的 NSPropertyListSerialization
+ (NSData *)dataFromPropertyList:(id)plist format:(NSPropertyListFormat)format errorDescription:(NSString **)errorString;
+ (id)propertyListFromData:(NSData *)data mutabilityOption:(NSPropertyListMutabilityOptions)opt format:(NSPropertyListFormat *)format errorDescription:(NSString **)errorString;
例如將 Array 或 Dictionary 內容寫到檔案,將會以 XML 格式儲存,可使用 initWithContentsOfFile 轉回來:
// write an array to disk
NSArray *my_array = ...
[my_array writeToFile:@"my_array.plist" atomically:YES];
// write a dictionary to disk
NSDictionary *my_dict = ...
[my_dict writeToFile:@"my_dict.plist" atomically:YES];
參考資料:
使用 SQLite:
完整的範例程式:
- [Xcode]->[Create a new Xcode project]->[iPhone
OS]->[Application]->[Window-based Application]-> 此例以 MyDataHandle
為例
- [Xcode]->[File]->[Cocoa Touch Class]->[UIViewController
subclass] (勾選 UITableViewController subclass) -> 此例以 MyTableList 為例
- 加入 sqlite3 的函式庫
- [MyDataHandle]->[Frameworks]->按右鍵 Add -> Existing Frameworks -> 選擇加入 libsqlite3.dylib
程式碼:
MyDataHandleAppDelegate.h
#import <UIKit/UIKit.h>
#import "MyTableList.h"
@interface MyDataHandleAppDelegate : NSObject <UIApplicationDelegate> {
UIWindow *window;
MyTableList *table;
}
@property (nonatomic, retain) IBOutlet UIWindow *window;
@end
MyDataHandleAppDelegate.m
#import "MyDataHandleAppDelegate.h"
@implementation MyDataHandleAppDelegate
@synthesize window;
- (void)applicationDidFinishLaunching:(UIApplication *)application {
table = [[MyTableList alloc] initWithStyle:UITableViewStylePlain];
[window addSubview:table.view];
// Override point for customization after application launch
[window makeKeyAndVisible];
}
- (void)dealloc {
[table release];
[window release];
[super dealloc];
}
@end
MyTableList.h
#import <UIKit/UIKit.h>
@interface MyTableList : UITableViewController {
NSMutableArray *dataSource;
}
@end
MyTableList.m
#import "MyTableList.h"
#import <sqlite3.h>
#define SQL_CREATE_TABLE "CREATE TABLE IF NOT EXISTS my_table( filed1 char(20) );"
#define SQL_INSERT_ITEM "INSERT INTO my_table VALUES( 'Hello World' );"
#define SQL_QUERY "SELECT * FROM my_table;"
static int CallBackFetchRowHandling( void * context , int count , char **value, char **column ) {
NSMutableArray *dataSource = (NSMutableArray*) context;
for ( int i=0 ; i<count ; ++i ) {
//NSLog( @"%s" , value[i] );
//[dataSource addObject:[NSString stringWithUTF8String:value[i]]];
[dataSource addObject: [NSString stringWithFormat:@"[db] %s", value[i]]];
}
return SQLITE_OK;
}
@implementation MyTableList
- (void)dataReload {
// get db path
NSArray *paths = NSSearchPathForDirectoriesInDomains(NSDocumentDirectory, NSUserDomainMask, YES);
NSString *documentsPath = [paths objectAtIndex:0];
NSString *dbPath = [documentsPath stringByAppendingPathComponent:@"my.db"];
// check db exists
BOOL firstUse = ![[NSFileManager defaultManager] fileExistsAtPath:dbPath];
//NSLog( firstUse ? @"First-use" : @"Not" );
// open & init & read data
sqlite3 *db;
char *err_report;
if ( sqlite3_open( [dbPath UTF8String] , &db ) == SQLITE_OK ) {
//NSLog( @"%s" , dbPath );
if ( firstUse ) {
[dataSource addObject:@"== init my.db =="];
if( sqlite3_exec( db , SQL_CREATE_TABLE , NULL , NULL , &err_report ) != SQLITE_OK )
NSLog( @"%s" , err_report );
if( sqlite3_exec( db , SQL_INSERT_ITEM , NULL , NULL , &err_report ) != SQLITE_OK )
NSLog( @"%s" , err_report );
}
if ( sqlite3_exec( db , SQL_QUERY , CallBackFetchRowHandling , dataSource , &err_report ) != SQLITE_OK ) {
NSLog( @"%s" , err_report );
}
} else {
NSLog( @"Cannot open databases: %s" , dbPath);
}
sqlite3_close( db );
}
- (id)initWithStyle:(UITableViewStyle)style {
// Override initWithStyle: if you create the controller programmatically and want to perform customization that is not appropriate for viewDidLoad.
if (self = [super initWithStyle:style]) {
dataSource = [[NSMutableArray alloc] init];
// from property list
NSArray *paths = NSSearchPathForDirectoriesInDomains(NSDocumentDirectory, NSUserDomainMask, YES);
NSString *documentsPath = [paths objectAtIndex:0];
NSString *plistPath = [documentsPath stringByAppendingPathComponent:@"my.plist"];
if ([[NSFileManager defaultManager] fileExistsAtPath:plistPath] ) {
NSArray *data = [[NSArray alloc] initWithContentsOfFile:plistPath];
[dataSource addObjectsFromArray:data];
[data release];
} else {
[dataSource addObject:@"== init my.plist =="];
NSArray *data = [[NSArray alloc] initWithObjects:@"[plist] Hello World", nil];
[data writeToFile:plistPath atomically:YES];
[dataSource addObjectsFromArray:data];
[data release];
}
// from databases
[self dataReload];
}
return self;
}
- (void)didReceiveMemoryWarning {
// Releases the view if it doesn't have a superview.
[super didReceiveMemoryWarning];
// Release any cached data, images, etc that aren't in use.
}
- (void)viewDidUnload {
// Release any retained subviews of the main view.
// e.g. self.myOutlet = nil;
}
#pragma mark Table view methods
- (NSInteger)numberOfSectionsInTableView:(UITableView *)tableView {
return 1;
}
// Customize the number of rows in the table view.
- (NSInteger)tableView:(UITableView *)tableView numberOfRowsInSection:(NSInteger)section {
return [dataSource count];
}
// Customize the appearance of table view cells.
- (UITableViewCell *)tableView:(UITableView *)tableView cellForRowAtIndexPath:(NSIndexPath *)indexPath {
static NSString *CellIdentifier = @"Cell";
UITableViewCell *cell = [tableView dequeueReusableCellWithIdentifier:CellIdentifier];
if (cell == nil) {
cell = [[[UITableViewCell alloc] initWithStyle:UITableViewCellStyleDefault reuseIdentifier:CellIdentifier] autorelease];
}
// Set up the cell...
cell.textLabel.text = [dataSource objectAtIndex:indexPath.row];
return cell;
}
- (void)tableView:(UITableView *)tableView didSelectRowAtIndexPath:(NSIndexPath *)indexPath {
// Navigation logic may go here. Create and push another view controller.
// AnotherViewController *anotherViewController = [[AnotherViewController alloc] initWithNibName:@"AnotherView" bundle:nil];
// [self.navigationController pushViewController:anotherViewController];
// [anotherViewController release];
}
- (void)dealloc {
[dataSource release];
[super dealloc];
}
@end
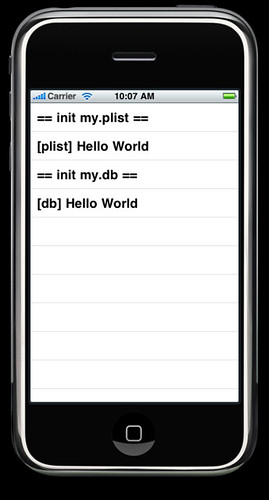
程式第一次執行時,因為沒有 my.plist ,所以會印出 "== init my.plist ==" ,並且建一個 array 把資料存到 file ,至於對 db 而言,第一次因為沒有 db 資料,所以也會建一個,並印出 "== init my.db ==" ,還會去建 table 以及把資料存進去。
展示:
第一次執行:
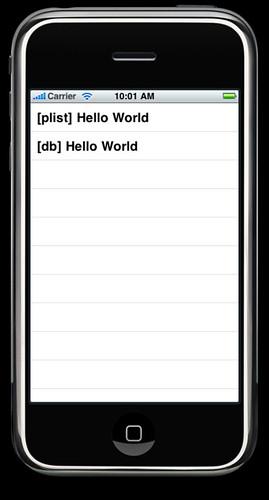
之後的執行: