2013年10月22日 星期二

[Python] 使用 PyICAP 淺玩 ICAP 與 Squid (以 Response Modification / RESPMOD 為例) @ Ubuntu 12.04

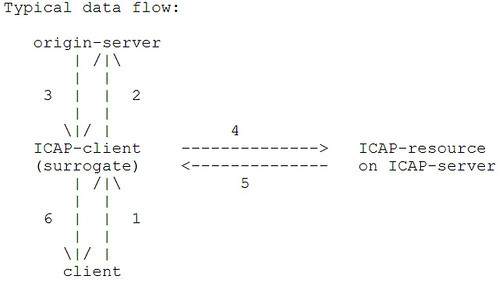
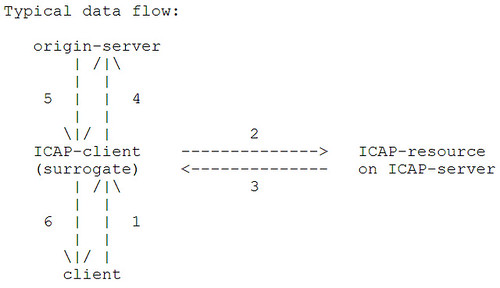
最近在研究 Internet Content Adaptation Protocol (ICAP),這東西好玩之處是可以跟 Proxy server 整再一起,當 proxy 幫 client 去要資料前後,可以透過 ICAP 來將資料加工處理一下。此協定主要可分成兩種資料流:Request Modification 和 Response Modification,直接看圖最清楚:

Request Modification:
Request Modification

Response Modification:

Response Modification

在 Ubuntu 中,可以用 apt-cache search icap 可以看到少少的套件可以把玩(用病毒掃描、限制網址瀏覽等),舉例來說,當使用者要瀏覽一個惡意網站前,可以先阻擋下來;當使用者下載完一個檔案時,可以幫忙掃描,若是病毒則可以擋下。至於我想把玩的主因之一是跟人閒聊一些免費 AP 時,很好奇它是怎樣做到幫網頁加料的,也就是用了他們家的 AP 後,瀏覽的網頁都會多個廣告,以此為目標加以進行下,此為 Response Modification 例子。

首先感謝 pyicap 這小又不簡單的 framework (ICAP 說難不難,說簡單也不簡單,詳請請看 RFC 3507),再次感謝作者佛心分享,依照著內附的 example/respmod_copy.py 小改一下,實作方向此:

  • 告訴 ICAP-client (Squid) 不要對 HTML, HTM 做 preview
  • 挑出 content-type 是 HTML 出來
  • 處理 HTTP 資料,將 gzip 的解開
  • 更新 <body> 資料
  • 將資料在壓成 gzip 後丟出去

片段程式碼(完整版):

#!/bin/env python
# -*- coding: utf8 -*-

import random
import SocketServer

from pyicap import *

import StringIO
import gzip
import re

#...

class ICAPHandler(BaseICAPRequestHandler):

def example_OPTIONS(self):
# ...
self.set_icap_header('Transfer-Complete', 'html,htm')
# ...

def example_RESPMOD(self):
# ...
if self.preview:
# ...
elif analysis_flag:
# ...
try:
orig_data = ''
if content_encoding in ('gzip', 'x-gzip', 'deflate'):
if content_encoding == 'deflate':
data = StringIO.StringIO(zlib.decompress(raw))
else:
data = gzip.GzipFile('', 'rb', 9, StringIO.StringIO(raw))
orig_data = data.read()

#formated_out = orig_data.replace( "<body>", """
formated_out = re.sub(r"(<body[^>]*>)", """
<body>
<!-- src from: http://zh-yue.wikipedia.org/wiki/%E4%B8%96%E7%95%8C%E4%B8%89%E5%A4%A7%E5%A4%9C%E6%99%AF -->
<center><img src="http://upload.wikimedia.org/wikipedia/commons/thumb/4/42/Victoria_Harbour_around_Chinese_New_Year_Night_with_Fireworks_and_Laser_Show.jpg/1024px-Victoria_Harbour_around_Chinese_New_Year_Night_with_Fireworks_and_Laser_Show.jpg" /></center>
""", orig_data )

data = StringIO.StringIO()
f = gzip.GzipFile(fileobj=data, mode='w')
f.write(formated_out)
f.close()

self.write_chunk( data.getvalue() )

need_output = False

except Exception, e:
print e

if need_output:
self.write_chunk(raw)

# ...


Squid 設定(/etc/squid3/squid.conf):

icap_enable on
icap_send_client_ip on
icap_send_client_username on
icap_client_username_encode off
icap_client_username_header X-Authenticated-User
icap_preview_enable on
icap_preview_size 1024
#icap_service service_req reqmod_precache bypass=1 icap://127.0.0.1:13440/squidclamav
#adaptation_access service_req allow all
icap_service service_resp respmod_precache bypass=1 icap://127.0.0.1:13440/example
adaptation_access service_resp allow all


成果,瀏覽一則 Yahoo 新聞時,最上頭被植入一個張圖檔(紅色框框):
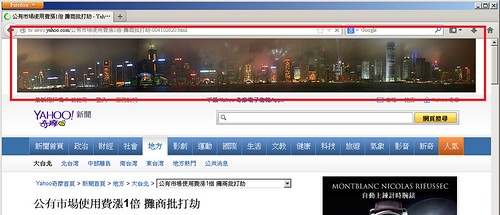
Response Modification example

[Python] 處理 HTTP gzip 的資料 @ Ubuntu 12.04

摸了一下 Python 小東西,過程中會去接收 Web server 收下的資料,其中有的會編碼為 gzip ,這時就用 python 稍微解一下:

import StringIO
import gzip

data = gzip.GzipFile('', 'rb', 9, StringIO.StringIO(raw)) # ('filename', 'read/write mode', compression level)
orig_data = data.read()


反過來,把字串 gzip 一下:

import StringIO
import gzip

data = StringIO.StringIO()
f = gzip.GzipFile(fileobj=data, mode='w')
f.write(orig_data)
f.close()

raw = data.getvalue()

2013年10月18日 星期五

[Linux] 安裝 Kernel Virtual Machine (KVM) 與純文字操作 @ Ubuntu 12.04

kvm install  nographics

最近比較常用 VirtualBox 來工作,但如果有一台好一點的機器,每次工作都要用圖形介面也稍顯麻煩,於是就嘗試將那一台好機器裝成 Ubuntu 12.04 64-Bit,接著再裝 kvm 來用,未來就單純透過 terminal 就能完成工作了(KVM也有圖形介面可以用)。

確認 CPU 是否支援虛擬化:

$ sudo apt-get install cpu-checker
$ kvm-ok
INFO: /dev/kvm exists
KVM acceleration can be used


另外,也有人常用以下指令檢查(有吐資料就行):

$ egrep '(vmx|svm)' --color=always /proc/cpuinfo

安裝 kvm:

$ sudo apt-get install kvm

檢查 kvm (此例是用一顆 Intel CPU):

$ lsmod | grep kvm
kvm_intel             137888  0
kvm                   422160  1 kvm_intel

查看一下相關模組:

$ modprobe -l | grep kvm
kernel/arch/x86/kvm/kvm.ko
kernel/arch/x86/kvm/kvm-intel.ko
kernel/arch/x86/kvm/kvm-amd.ko


安裝 kvm 相關常用工具(其中 virt-manager 是圖形化介面,此例可以不安裝):

$ sudo apt-get install libvirt-bin virt-manager virtinst

檢查此台 Host OS 機器狀態:

$ virsh nodeinfo
CPU model:           x86_64
CPU(s):              8
CPU frequency:       1600 MHz
CPU socket(s):       1
Core(s) per socket:  4
Thread(s) per core:  2
NUMA cell(s):        1
Memory size:         8024168 kB


查看網卡設定是否有 virbr 系列:

$ ifconfig | grep virbr
virbr0    Link encap:Ethernet  HWaddr 11:22:33:44:55:66


查看目前虛擬機器狀態:

$ virsh list --all
 Id Name                 State
----------------------------------


建立 VM (Guest OS) 其名為 vmproxy,安裝一台 Ubuntu 12.04 64-bit server 版:

$ sudo virt-install --connect=qemu:///system  --name vmproxy --arch=x86_64 --vcpus=2 --ram=1024 --os-type=linux --hvm --network=bridge:virbr0 --network=network:default --hvm --nographics --accelerate --location http://tw.archive.ubuntu.com/ubuntu/dists/precise/main/installer-amd64/ --disk path=/var/lib/libvirt/images/vmproxy.img,size=20 --extra-args="auto text console=tty1 console=ttyS0,115200"

其中 --location http://tw.archive.ubuntu.com/ubuntu/dists/precise/main/installer-amd64/ 代表要安裝 Ubuntu 12.04 64Bit 系列的,而 --extra-args 的參數是為了解決 KVM 接收 Guest OS console 的問題;--network=bridge:virbr0 --network=network:default 代表配置兩張網卡,一張是 virbr0 ,另一張是預設,而預設網路會走 NAT。

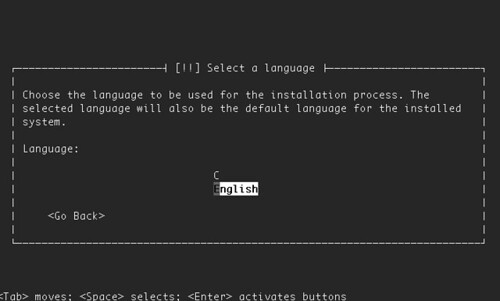
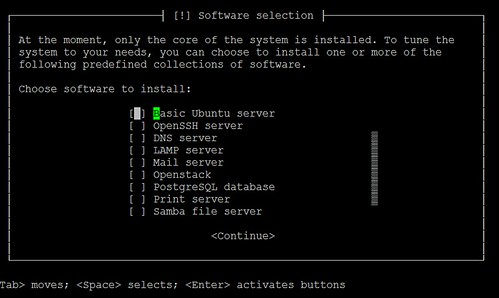
安裝過程須留意的是網路設定,依上述指令,第二張網路卡會是走 NAT 的,可以先採用這張,回頭再去設定 br0 的問題。最後的安裝畫面,記得選一下 Base Ubuntu Server 跟 Openssh server 囉。

kvm install

接著當 Guest OS 重新開機後,可以登入試試,並確認網路狀態(連外是否ok),另外有興趣也可以印一下 cpuinfo 囉。

vmlinux:~$ ifconfig
eth1      Link encap:Ethernet  HWaddr 52:54:00:a7:b7:c5
          inet addr:192.168.122.250  Bcast:192.168.122.255  Mask:255.255.255.0
...

vmlinux:~$ cat /proc/cpuinfo
processor       : 0
vendor_id       : GenuineIntel
cpu family      : 6
model           : 2
model name      : QEMU Virtual CPU version 1.0
stepping        : 3
microcode       : 0x1
cpu MHz         : 3392.292
cache size      : 4096 KB
fpu             : yes
fpu_exception   : yes
cpuid level     : 4
wp              : yes
flags           : fpu de pse tsc msr pae mce cx8 apic sep mtrr pge mca cmov pse36 clflush mmx fxsr sse sse2 syscall nx lm up rep_good nopl pni cx16 popcnt hypervisor lahf_lm
bogomips        : 6784.58
clflush size    : 64
cache_alignment : 64
address sizes   : 40 bits physical, 48 bits virtual
power management:

接著回到原先的 Host OS 可以用 virsh list 查看:

$ virsh list --all
 Id Name                 State
----------------------------------
  1 vmproxy              running


如果要強制停掉:

$ virsh destroy vmproxy

若要刪掉它的資訊:

$ virsh undefine vmproxy

做完 undefine 後,下次 virsh-install 就可以再使用此名字,但若要完整刪掉,還須清除 disk 位置(此例為 /var/lib/libvirt/images/vmproxy.img),也可用圖形界面一次處理好。

若透過 Host OS 的 port forwarding 讓外頭可以直接連入 Guest OS,則可以用用 redir 這個指令:

$ sudo apt-get install redir
$ /usr/bin/redir --lport=20022 --caddr=192.168.122.250 --cport=22 &


最後,雖然 Host OS 預設不會關機,但還是設定一下自動將 Guest OS 啟動的方式:

$ sudo vim /etc/init.d/vm-init.sh
#!/bin/sh
virsh start vmproxy
/usr/bin/redir --lport=20022 --caddr=192.168.122.250 --cport=22 &

$ sudo chmod 755 /etc/init.d/vm-init.sh
$ sudo update-rc.d -f vm-init.sh defaults

[Linux] 修正 wget 下載檔案名字 @ Ubuntu 12.04

常用 wget 下載檔案,但碰到一些會做重導的網頁或是檔名是在 HTTP HEAD 時,用瀏覽器下載可以正確取得檔名,但用 wget 只會看網址。修正方式只是叫 wget 去相信 server 回傳的檔名而已。某個角度來說,wget 預設不這樣做或許有安全性的考量?

例如下載 Ubuntu 64-bit Server LTS ISO 檔:

$ wget 'http://www.ubuntu.com/start-download?distro=server&bits=64&release=lts'
...
HTTP request sent, awaiting response... 200 OK
Length: 697303040 (665M) [application/octet-stream]
Saving to: `start-download?distro=server&bits=64&release=lts'
...


加上 --trust-server-names:

$ wget --trust-server-names 'http://www.ubuntu.com/start-download?distro=server&bits=64&release=lts'
...
HTTP request sent, awaiting response... 200 OK
Length: 697303040 (665M) [application/octet-stream]
Saving to: `ubuntu-12.04.3-server-amd64.iso'
...

2013年10月15日 星期二

[Python] urlib2 設定 User-Agent (偶爾可解掉 urllib2.HTTPError: HTTP Error 403: Forbidden )

雖然造成 403: Forbidden 的因素有很多,但有一種是網站不想讓 crawler 抓資料,但 User-agent 設定完就能解掉,所以此例拿來記錄 urllib2 設定 User-Agent 的過程(盡量先不請 pycurl 出來 XD)。

原本用法:

obj = urllib2.urlopen('http://www.google.com/')

加入 User-Agent 用法:

obj = urllib2.urlopen( urllib2.Request( 'http://www.google.com/' , None , { 'User-Agent' : 'Mozilla/5.0' } ) )

另外紀錄一下 wget 用法:

$ wget -U 'Mozilla/5.0' http://www.google.com