入口:https://developers.line.me/en/
文件:https://developers.line.me/en/docs/messaging-api/overview/
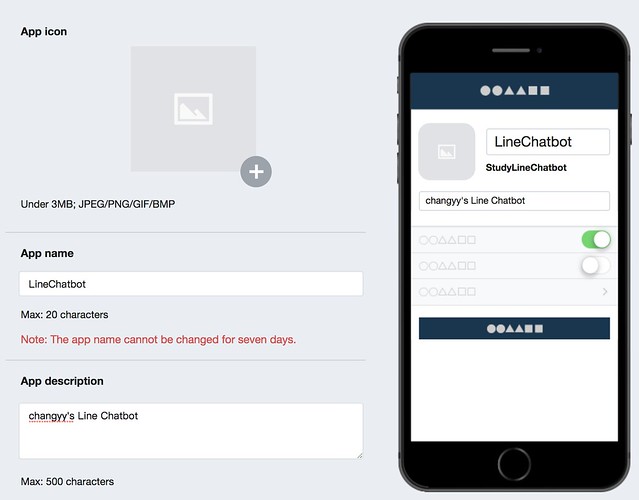
登入開發者後,先來個 Add new provider ,此例為 StudyLineChatbot ,接著選擇 Messaging API,填寫完基本資料後,再按幾下就創建了
其中,重要的資訊:
- Channel secret
- Channel access token (long-lived)
接著,Webhook URL 要填寫對接的 API 位置,該 API 必須提供 https 服務,另外再把 Auto-reply message 關閉。如此一來就完成 Line Chatbot 的設定。
接著談談 Webhook URL 的實作方式,此例用 Python 的 Flask 和 line-bot-sdk-python 完工,簡短程式 hello.py 如下(其實就是 https://github.com/line/line-bot-sdk-python README 範例程式,多增加一點輸出訊息):
from flask import Flask, request, abort


from linebot import (

    LineBotApi, WebhookHandler

)

from linebot.exceptions import (

    InvalidSignatureError

)

from linebot.models import (

    MessageEvent, TextMessage, TextSendMessage,

)


app = Flask(__name__)


line_bot_api = LineBotApi('YOUR_LINE_CHATBOT Channel access token (long-lived)')

handler = WebhookHandler('YOUR_LINE_CHATBOT Channel secret')


@app.route("/", methods=['POST'])

def callback():

    print("[INFO] Get request:")

    print(request.__dict__)

    print()


    # get X-Line-Signature header value

    signature = request.headers['X-Line-Signature']

    # get request body as text

    body = request.get_data(as_text=True)

    print("[INFO] Request Body: ---\n"+body+"\n---\n")


    # handle webhook body

    try:

        events = handler.handle(body, signature)

    except InvalidSignatureError:

        abort(400)


    print("[INFO] Handle Events \n")

    for event in events:

        if event is None:

            continue

        if not isinstance(event, MessageEvent):

            continue

        if not isinstance(event.message, TextMessage):

            continue

        line_bot_api.reply_message(

            event.reply_token,

            TextSendMessage(text=event.message.text)

        )

    return '{}'


@handler.add(MessageEvent, message=TextMessage)

def handle_message(event):

    line_bot_api.reply_message(

        event.reply_token,

        TextSendMessage(text=event.message.text)

    )


if __name__ == "__main__":

    app.run(host='0.0.0.0', port=8080)
然後,選擇在 Ubuntu server 上,透過 nginx 跟 uWSGI 設定。
Nginx:
location / {


 try_files $uri @chatbot;

}


location @chatbot {

 include uwsgi_params;

 uwsgi_pass unix:/tmp/chatbot-uwsgi.sock;

}
uWSGI:
$ vim /etc/systemd/system/chatbot.uwsgi.service

[Unit]

Description=uWSGI Emperor

After=syslog.target


[Service]

ExecStart=/usr/local/bin/uwsgi --ini /path/project/chatbot-uwsgi.ini

RuntimeDirectory=uwsgi

Restart=always

KillSignal=SIGQUIT

Type=notify

StandardError=syslog

NotifyAccess=all


[Install]

WantedBy=multi-user.target


$ vim /path/project/chatbot-uwsgi.ini

[uwsgi]

base = /path/project/


app = hello

module = %(app)

home = %(base)/venv

pythonpath = %(base)

callable = app


socket = /tmp/%n.sock

chmod-socket = 666

logto = /var/log/uwsgi/%n.log
後續都統一靠以下招數更新:
$ sudo systemctl restart chatbot.uwsgi
以及 hello.py 輸出的資料和運行結果,都可以在 /var/log/uwsgi/chatbot-uwsgi.log 找到:
[INFO] Get request:

{'environ': {'QUERY_STRING': '', 'REQUEST_METHOD': 'POST', 'CONTENT_TYPE': 'application/json;charset=UTF-8', 'CONTENT_LENGTH': '237', 'REQUEST_URI': '/', 'PATH_INFO': '/', 'DOCUMENT_ROOT': '/etc/nginx/html', 'SERVER_PROTOCOL': 'HTTP/1.1', 'REQUEST_SCHEME': 'https', 'HTTPS': 'on', 'REMOTE_ADDR': '###.###.###.###', 'REMOTE_PORT': '34994', 'SERVER_PORT': '443', 'SERVER_NAME': 'chatbot.example.com', 'HTTP_X_LINE_SIGNATURE': '#####################', 'HTTP_CONTENT_TYPE': 'application/json;charset=UTF-8', 'HTTP_CONTENT_LENGTH': '237', 'HTTP_HOST': 'chatbot.example.com', 'HTTP_ACCEPT': '*/*', 'HTTP_USER_AGENT': 'LineBotWebhook/1.0', 'wsgi.input': <uwsgi._Input object at 0x7f0d8a4477c8>, 'wsgi.file_wrapper': <built-in function uwsgi_sendfile>, 'wsgi.version': (1, 0), 'wsgi.errors': <_io.TextIOWrapper name=2 mode='w' encoding='UTF-8'>, 'wsgi.run_once': False, 'wsgi.multithread': False, 'wsgi.multiprocess': False, 'wsgi.url_scheme': 'https', 'uwsgi.version': b'2.0.17', 'uwsgi.node': b'###########', 'werkzeug.request': <Request 'https://chatbot.example.com/' [POST]>}, 'shallow': False, 'view_args': {}, 'url_rule': <Rule '/' (POST, OPTIONS) -> callback>, 'url': 'https://chatbot.example.com/'}


[INFO] Request Body: ---

{"events":[{"type":"message","replyToken":"###############","source":{"userId":"##############","type":"user"},"timestamp":###########,"message":{"type":"text","id":"###########","text":"HelloWorld"}}]}

---
沒有留言:
張貼留言