只是我看著這種教學方式,感覺有點不實在,甚至照著模仿時,迷失自己。像是忘了物件沒初始化等等的,或是沒去看為啥沒顯示出東西,這些很根本的東西容易遺忘。
以下是筆記自己的操作流程:
- [Xcode]->[Create a new Xcode project]->[iPhone OS]->[Application]->[Window-based Application]-> 填寫 MyTable 即可
- 點選到 Class 裡頭(非必要動作,只是讓新增的檔案都在 Class 目錄裡),[Xcode]->[File]->[New File]->[Cocoa Touch Class]->[UIViewController subclass] 並且只勾選 UITableViewController ,取名為 MyTableViewController
如此一來,在 Class 中就會有:
MyTableAppDelegate.h
MyTableAppDelegate.m
MyTableViewController.h
MyTableViewController.m
MyTableAppDelegate.m
MyTableViewController.h
MyTableViewController.m
接著依序先對 MyTableAppDelegate 設定,在對 MyTableViewController 處理:
MyTableAppDelegate.h
#import <UIKit/UIKit.h>
#import "MyTableViewController.h"
@interface MyTableAppDelegate : NSObject <UIApplicationDelegate> {
UIWindow *window;
MyTableViewController *myTableController;
}
@property (nonatomic, retain) IBOutlet UIWindow *window;
@end
#import "MyTableViewController.h"
@interface MyTableAppDelegate : NSObject <UIApplicationDelegate> {
UIWindow *window;
MyTableViewController *myTableController;
}
@property (nonatomic, retain) IBOutlet UIWindow *window;
@end
MyTableAppDelegate.m
#import "MyTableAppDelegate.h"
@implementation MyTableAppDelegate
@synthesize window;
- (void)applicationDidFinishLaunching:(UIApplication *)application {
myTableController = [[MyTableViewController alloc] init]; // initWithStyle:UITableViewStylePlain
[window addSubview:myTableController.view];
// Override point for customization after application launch
[window makeKeyAndVisible];
}
- (void)dealloc {
[myTableController release];
[window release];
[super dealloc];
}
@end
MyTableViewController.h
#import <UIKit/UIKit.h>
@interface MyTableViewController : UITableViewController {
NSArray *myData;
}
@end
@interface MyTableViewController : UITableViewController {
NSArray *myData;
}
@end
MyTableViewController.m
#import "MyTableViewController.h"
@implementation MyTableViewController
- (void)viewDidLoad {
[super viewDidLoad];
myData = [[NSArray alloc] initWithObjects:@"GMail" , @"YMail" , @"Hotmail" , @"NUMail" , nil];
// Uncomment the following line to display an Edit button in the navigation bar for this view controller.
// self.navigationItem.rightBarButtonItem = self.editButtonItem;
}
- (void)didReceiveMemoryWarning {
// Releases the view if it doesn't have a superview.
[super didReceiveMemoryWarning];
// Release any cached data, images, etc that aren't in use.
}
- (void)viewDidUnload {
// Release any retained subviews of the main view.
// e.g. self.myOutlet = nil;
}
#pragma mark Table view methods
- (NSInteger)numberOfSectionsInTableView:(UITableView *)tableView {
return 1;
}
// Customize the number of rows in the table view.
- (NSInteger)tableView:(UITableView *)tableView numberOfRowsInSection:(NSInteger)section {
return [myData count];
//return 0;
}
// Customize the appearance of table view cells.
- (UITableViewCell *)tableView:(UITableView *)tableView cellForRowAtIndexPath:(NSIndexPath *)indexPath {
static NSString *CellIdentifier = @"Cell";
UITableViewCell *cell = [tableView dequeueReusableCellWithIdentifier:CellIdentifier];
// Updated @ 2012-08-07
// Sample Code without "cell check" message:
// *** Terminating app due to uncaught exception 'NSInternalInconsistencyException', reason: 'UITableView dataSource must return a cell from tableView:cellForRowAtIndexPath:'
//
if (cell == nil) {
cell = [[[UITableViewCell alloc] initWithStyle:UITableViewCellStyleDefault reuseIdentifier:CellIdentifier] autorelease];
}
// Set up the cell...
cell.textLabel.text = (NSString*)[myData objectAtIndex:indexPath.row];
return cell;
}
- (void)tableView:(UITableView *)tableView didSelectRowAtIndexPath:(NSIndexPath *)indexPath {
// Navigation logic may go here. Create and push another view controller.
// AnotherViewController *anotherViewController = [[AnotherViewController alloc] initWithNibName:@"AnotherView" bundle:nil];
// [self.navigationController pushViewController:anotherViewController];
// [anotherViewController release];
}
- (void)dealloc {
[myData release];
[super dealloc];
}
@end
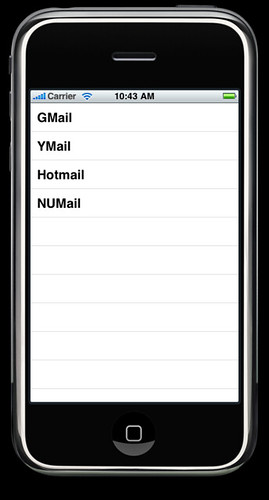
執行成果:
以上藍色字樣就是有增加或修改的地方,這是一個非常簡單的清單列表。重要的地方是在於 MVC 架構,在使用 UITableViewController 時,只需要去處理資料的來源(如 NSArray *myData),然後是回傳有多少東西(numberOfRowsInSection),以及顯示項目的處理 tableView:(UITableView *)tableView cellForRowAtIndexPath:(NSIndexPath *)indexPath ,只要把握住這三個關鍵點,一切就很正常啦!我一開始卡在一直沒東西出來,原因就是忘了去更新 numberOfRowsInSection 函數,它預設是 0 個東西。
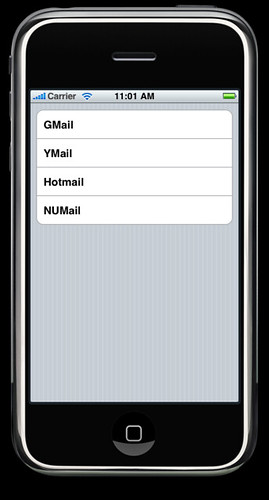
熟悉最簡單的東西後,你可以更改 Table 呈現方式,即在 MyTableAppDelegate.m 初始化 myTableController 時,改成:
myTableController = [[MyTableViewController alloc] initWithStyle:UITableViewStyleGrouped]; // 預設為 UITableViewStylePlain
執行的成果:
剩下的,可以去玩玩 Section 部分,讓顯示的清單有分群效果,或是讓 item 有事件,如點下後切換場景等等的。
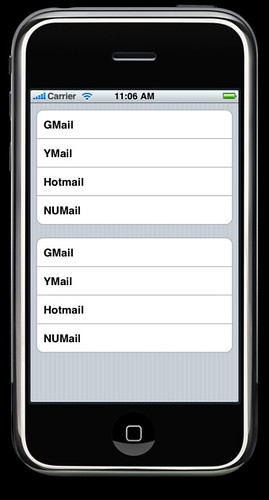
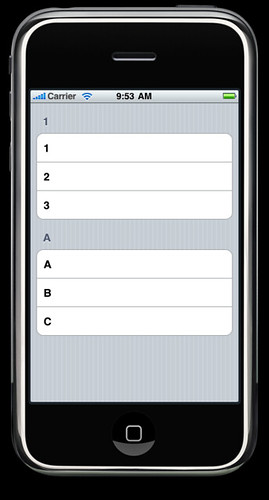
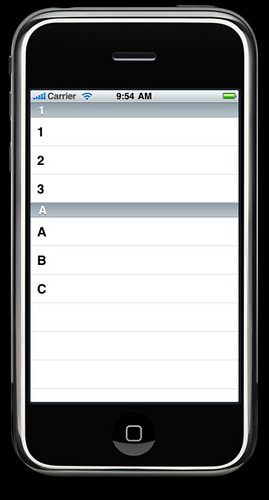
@2010/04/13 更新,以下是多個 Section 範例的部份程式碼:
MyTableViewController.h
@interface MyTableViewController : UITableViewController {
NSMutableArray *dataSource;
}
NSMutableArray *dataSource;
}
MyTableViewController.m
- (void)viewDidLoad {
[super viewDidLoad];
dataSource = [[NSMutableArray alloc] init];
NSMutableArray* b1 = [[NSMutableArray alloc] init];
[b1 addObject:@"1"];
[b1 addObject:@"2"];
[b1 addObject:@"3"];
[dataSource addObject:b1];
[b1 release];
NSMutableArray* b2 = [[NSMutableArray alloc] init];
[b2 addObject:@"A"];
[b2 addObject:@"B"];
[b2 addObject:@"C"];
[dataSource addObject:b2];
[b2 release];
// Uncomment the following line to display an Edit button in the navigation bar for this view controller.
// self.navigationItem.rightBarButtonItem = self.editButtonItem;
}
- (NSInteger)numberOfSectionsInTableView:(UITableView *)tableView {
if ( dataSource == nil )
return 1;
return [dataSource count];
}
- (NSInteger)tableView:(UITableView *)tableView numberOfRowsInSection:(NSInteger)section {
NSInteger bucketCount = -1;
NSObject *target_section;
if ( dataSource == nil )
return 0;
if( ( bucketCount = [dataSource count] ) < 1 || bucketCount <= section || (target_section = [dataSource objectAtIndex:section ]) == nil )
return 0;
return [ (NSMutableArray*)target_section count ];
}
- (UITableViewCell *)tableView:(UITableView *)tableView cellForRowAtIndexPath:(NSIndexPath *)indexPath {
static NSString *CellIdentifier = @"Cell";
UITableViewCell *cell = [tableView dequeueReusableCellWithIdentifier:CellIdentifier];
if (cell == nil) {
cell = [[[UITableViewCell alloc] initWithStyle:UITableViewCellStyleDefault reuseIdentifier:CellIdentifier] autorelease];
}
// Set up the cell...
cell.textLabel.text = (NSString*)[ (NSMutableArray*)[dataSource objectAtIndex:indexPath.section] objectAtIndex:indexPath.row];
return cell;
}
// 此函數預設沒有,要自己打一下
- (NSString *)tableView:(UITableView *)tableView titleForHeaderInSection:(NSInteger)section
{
NSInteger bucketCount = -1;
NSObject *target;
if ( dataSource == nil )
return @"";
if( ( bucketCount = [dataSource count] ) < 1 || bucketCount <= section || ( target = [dataSource objectAtIndex:section ] ) == nil || (target = [ (NSMutableArray*)target objectAtIndex:0] ) == nil )
return @"";
return (NSString*) target;
}
Demo
UITableViewStyleGrouped
UITableViewStylePlain
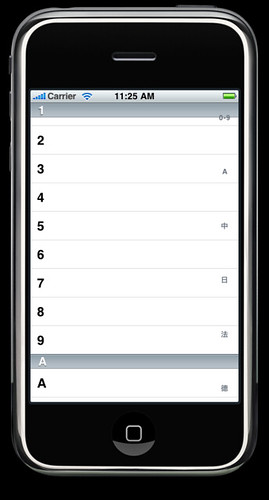
最後,如果你希望你的 Section 可以透過 index 跳過去,如下圖中右邊的文字
那就再替 MyTableViewController.m 增加一個函數,並且自定各個 section 要顯示的 title 囉!
- (NSArray *)sectionIndexTitlesForTableView:(UITableView *)tableView {
NSArray* sIndex = [[NSArray alloc] initWithObjects:@"0-9", @"A", @"中", @"日", @"法", @"德", nil];
return [sIndex autorelease];
}
NSArray* sIndex = [[NSArray alloc] initWithObjects:@"0-9", @"A", @"中", @"日", @"法", @"德", nil];
return [sIndex autorelease];
}
概念就只是依序點到哪個位置,直接切到該 section 的起頭。
參考資料:
感謝~分享~ 這篇文章很有教學價值
回覆刪除不過Apple產生的Sample code 並沒有
if (cell == nil) {
cell = [[[UITableViewCell alloc] initWithStyle:UITableViewCellStyleDefault reuseIdentifier:CellIdentifier] autorelease];
}
所以只注意看藍色的時候會一直發生問題
版主回覆:(09/22/2012 02:51:41 AM)
哇喔!今天也來練一下,才發現你的提醒 :D
出現的錯誤訊息:*** Terminating app due to uncaught exception 'NSInternalInconsistencyException', reason: 'UITableView dataSource must return a cell from tableView:cellForRowAtIndexPath:'
不知為何現在的 sample code 沒有這段 orz
會不會因為現在都流行透過 interfacebuilder ,幫你把元件拉一拉呢?
在 2010 年練習時,預設是會有這段程式碼的,這也是為何我沒對這段程式碼標色啦