雖然內建的 UITableViewController 已經有不少還不錯用的 Cell Style (UITableViewCellStyleDefault, UITableViewCellStyleValue1, UITableViewCellStyleValue2, UITableViewCellStyleSubtitle),但客製化自己 Cell 還是一種必學的技能。然而,客製化自己的 layout 大概可以分成兩種方式,一種是純程式碼的撰寫(覆寫 layoutSubViews 或對 contentView 加東西),例如把 ImageView 擺在哪個 (x,y) 座標並設定大小為 (w,h) 等,另一種則是使用 Interface Builder 對元件的拖拉,再跟 Class 進行相對應的設定。由於之前比較熱愛 Coding ,所以一直沒用 Interface Builder,這次就來摸個幾把美美的 UI 操作吧 *誤*
使用 Interface Builder 仍需搭配 Class 物件來使用。例如建立自己的 MyTableViewCell(繼承UITableViewCell) 排版畫面 MyCell.xib 後,需搭配物件使用,當物件初始化時,可以指定採用 MyCell.xib 來初始化,整個過程等同於跟系統要了記憶體來使用,所以有一些人認為透過 Iterface Builder 所建立的 layout 不太好進行資源管理,並且當程式不穩時,很難除錯。
以 UITalbViewController 為例,建立自己的 MyTalbeViewCell,其粗略的使用方式:
- 建立 XIB (MyCell.xib),規劃 UI 呈現部分
- 建立對應的 UIView Class (MyTableViewCell 並繼承 UITableViewCell),並新增所需的 IBOutlet
- 更新 XIB 的 Custom Class 及對 XIB 上的元件進行連結 (outlets)
- 在 UITableViewController - (void)viewDidLoad 中,進行 XIB 的註冊
- 在 UITableViewController - (UITableViewCell *)tableView:(UITableView *)tableView cellForRowAtIndexPath:(NSIndexPath *)indexPath 中,進行 cell 的初始化及設定使用
- 在 UITableViewController -(CGFloat)tableView:(UITableView *)tableView heightForRowAtIndexPath:(NSIndexPath *)indexPath 中,回傳 Cell 的高度
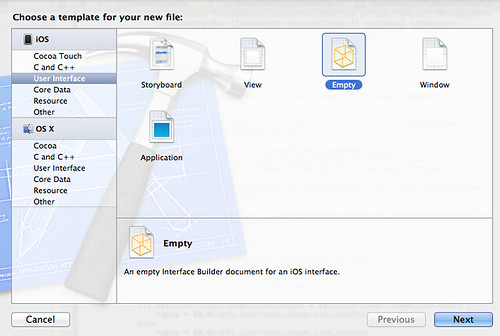
用法:[New File] -> [User Interface] -> 選 View or Empty 都行 -> 選擇 iPhone or iPad -> 取名 MyCell (此名稱跟之後XIB使用有關)
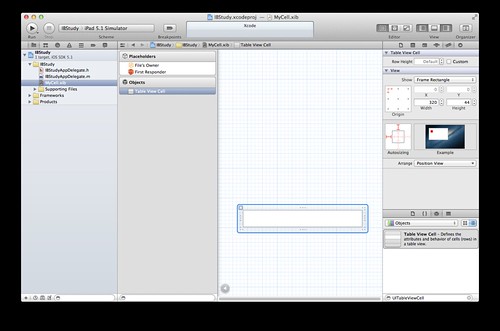
點一下 MyCell.xib 開啟設定頁面,接著可在右下角 Object Library 之下方 Search 欄位中,填入想要的元件並拖拉到畫面進行 layout 安排,如使用 UITableViewCell、UILabel、UIImageView、UITextView 等元件
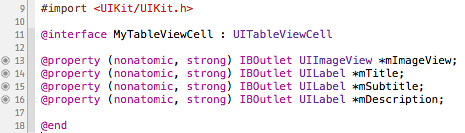
接著建立自己的 UITableViewCell 物件,此例為 MyTableViewCell,並將 XIB 中用到的元件進行宣告及實作(透過 Objective-C @property 語法可以請編譯器處理實作)
@interface MyTableViewCell : UITableViewCell
@property (nonatomic, strong) IBOutlet UIImageView *mImageView;
@property (nonatomic, strong) IBOutlet UILabel *mTitle;
@property (nonatomic, strong) IBOutlet UILabel *mSubtitle;
@property (nonatomic, strong) IBOutlet UILabel *mDescription;
@end
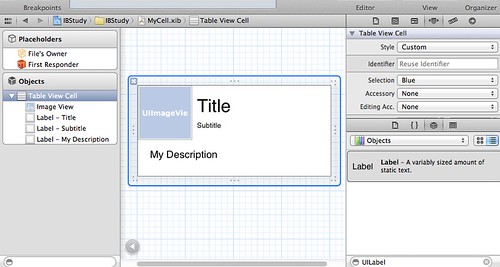
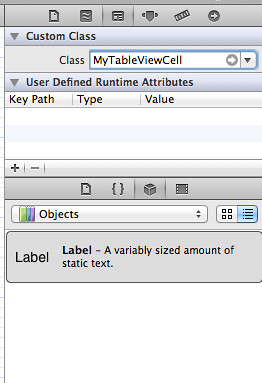
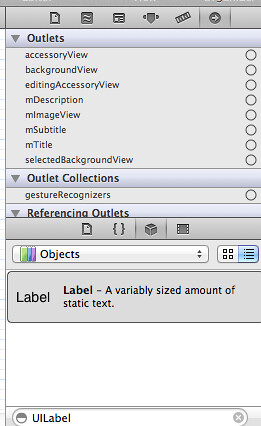
接著再切回 MyCell.XIB 進行元件的連結,先點選左邊 Objects 下的 UITableViewCell 後,在右邊選單上,切到 Identity inspector 可以進行 Custom Class 的更名,請更改成剛剛建立的 Class name (MyTableViewCell),如此一來切到 Connections inspector 可以進行 Outlets 連結,並可以看到 mImageView、mTitle、mSubtitle 和 mDescription 等項目。
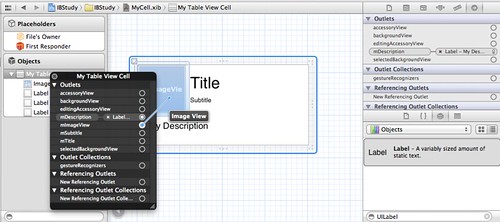
將滑鼠移至項目旁邊的圓形框中,可以看到 + 號,點選按著後,拖到左邊畫面上的對應元件,放開後則完成連結。

另外也可以在左邊 Objects 下,按著 Ctrl 點一下 My Table View Cell 後,也會出現 Connections 清單,其連結方式一樣。
一切的 Connections 設定完後,即可存檔關閉,在此僅 demo 呈現的部份,若有其他點擊互動則需要設定 IBAction。此外,點選 MyTableViewCell.h 中,可以看到左邊都可以看 IBOutlet 都有圓點的連結圖示,亦可用來 debug 觀看自己有沒有漏掉什麼連結。
最後則是挑一個 UITableViewController 來把玩吧:
- (void)viewDidLoad
{
[super viewDidLoad];
[self.tableView registerNib:[UINib nibWithNibName:@"MyCell" bundle:nil]
forCellReuseIdentifier:@"MyCellIdentifier"]; // "MyCell" for MyCell.xib
}
- (NSInteger)numberOfSectionsInTableView:(UITableView *)tableView
{
// Return the number of sections.
return 1;
}
- (NSInteger)tableView:(UITableView *)tableView numberOfRowsInSection:(NSInteger)section
{
// Return the number of rows in the section.
return 5;
}
-(CGFloat)tableView:(UITableView *)tableView heightForRowAtIndexPath:(NSIndexPath *)indexPath
{
return 150; // 可在 XIB 檔案,點選 My Talbe View Cell 從 Size inspector 得知
}
- (UITableViewCell *)tableView:(UITableView *)tableView cellForRowAtIndexPath:(NSIndexPath *)indexPath
{
//UITableViewCell *cell = [tableView dequeueReusableCellWithIdentifier:@"Cell"];
//if( cell == nil)
// cell = [[[UITableViewCell alloc] initWithStyle:UITableViewCellStyleSubtitle reuseIdentifier:@"Cell"] autorelease];
//cell.imageView.image = [UIImage imageNamed:@"icon_chrome.png"];
MyTableViewCell *cell = (MyTableViewCell *)[tableView dequeueReusableCellWithIdentifier:@"MyCellIdentifier"];
cell.mTitle.text = [NSString stringWithFormat:@"Row: %d", indexPath.row];
cell.mSubtitle.text = [NSString stringWithFormat:@"section: %d", indexPath.section];
cell.mDescription.text = @"My Description";
switch ((indexPath.row%4)) {
case 1:
cell.mImageView.image = [UIImage imageNamed:@"icon_chrome.png"];
break;
case 2:
cell.mImageView.image = [UIImage imageNamed:@"icon_firefox.png"];
break;
case 3:
cell.mImageView.image = [UIImage imageNamed:@"icon_safari.png"];
break;
default:
cell.mImageView.image = [UIImage imageNamed:@"icon_ie.png"];
break;
}
return cell;
}
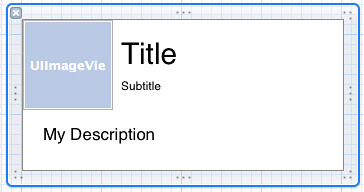
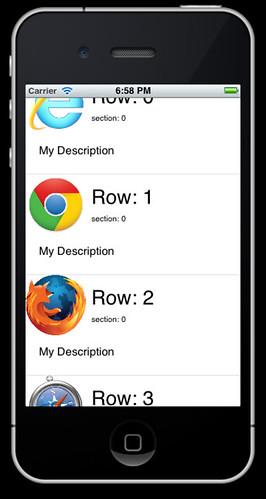
成果:
沒有留言:
張貼留言