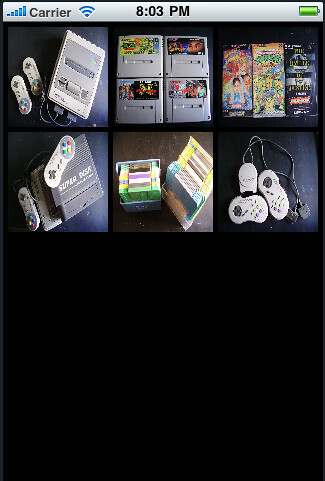
筆記之前透過 UIScorllView 呈現跟 iPhone 內建的照片瀏覽程式的類似效果
關鍵程式碼:
-
(void)viewWillAppear:(BOOL)animated
{
[super viewWillAppear:animated];
CGRect currFrame =
[[UIScreen mainScreen] bounds];
[scroll setDelegate:self];
[scroll
setBackgroundColor:[UIColor blackColor]];
[scroll
setScrollEnabled:YES];
[scroll setPagingEnabled:YES];
CGSize photoView =
CGSizeMake(100, 100);
int photo_cnt = 10;
int col_cnt =
currFrame.size.width / photoView.width;
int row_cnt =
photo_cnt / col_cnt + ( ( photo_cnt % col_cnt ) ? 1 : 0 );
float pandding =
(currFrame.size.width - photoView.width * col_cnt ) / ( col_cnt + 1 );
[scroll
setContentOffset:CGPointMake(0, 0)];
[scroll
setContentSize:CGSizeMake(currFrame.size.width, (photoView.height +
pandding )* row_cnt + pandding )];
[scroll setFrame:currFrame];
[[self view]
addSubview:scroll];
NSLog(@"row,col,pandding:(%d,%d,%f)", row_cnt ,col_cnt,pandding);
for( int i=0 ;
i<photo_cnt ; i++ )
{
int x = i % col_cnt;
int y = i /
col_cnt;
UIImage *thumbnail = [UIImage imageNamed:[NSString
stringWithFormat: ( i+1 < 10 ? @"0%d.jpg" : @"%d.jpg" ), i+1]];
UIButton *b =
[[UIButton alloc] init];
[b setBackgroundImage:thumbnail
forState:UIControlStateNormal];
[thumbnail release];
[b
setShowsTouchWhenHighlighted:YES];
[b
setUserInteractionEnabled:YES];
[b setFrame:CGRectMake( x * (
photoView.width + pandding ) + pandding , y * ( photoView.height +
pandding ) + pandding , photoView.width , photoView.height )];
[scroll
addSubview:b];
[b release];
}
}
使用上宣告一個 UIViewController 並且使用 UIScrollViewDelegate protocol,並且修改其 viewWillAppear 函式,除此之外,請自備 10 張圖,依序為 01.jpg, 02.jpg, ..., 10.jpg。程式碼中的 scroll 為 UIScrollView 物件。
程式流程:
- 取得當前設備的解析度
- 設定 scroll 物件的控制與回應、背景設成黑色等
- 假設一張圖將使用 75x75 的大小,計算一列可擺幾張圖,以及圖與圖之間要留多少空間,以及最後有幾列,透過這些資訊決定 scroll 物件的內容大小
- 接著使用 UIButton 來呈現圖片,並且依照圖片的順序決定顯示的位置
- 收工!
使用 UIScrollView 算是可以很輕鬆地達到 iPhone 內建軟體的照片呈現效果,但有個很致命的缺點,那就是上述的過程是直接用原圖呈現的,所以圖片看起來會有失真,並且因為是使用原圖大小,將導致記憶體使用吃緊,並隨著圖片很多張時,問題會越來越嚴重!其他細節,可以參考 UITableViewCotrller ,其架構不錯,特別是在 Cell 的重複使用上,巧妙地控制好記憶體的使用。
因此,其實也是可以用 UITableViewController 來這個效果,只需要把 Cell 做一些手腳處理就行,如 [cell setSelectionStyle:UITableViewCellSelectionStyleNone]; 和 [self.tableView setSeparatorStyle:UITableViewCellSeparatorStyleNone]; 等。在此感謝同事的提醒,不然我還沒留意 UITableViewController 是繼承 UIScrollViewController 的!
此篇主要記錄照片座標等計算的部分,雖然使用 UITableViewController 後座標計算又不一樣並且更加簡單,但還是留念一下囉。至於縮圖方面,可以參考此篇文章:UIImage: Resize, then Crop
沒有留言:
張貼留言