顯示具有 iPhone 標籤的文章。 顯示所有文章

2021年8月25日 星期三

[macOS] 使用 hashcat 驗證/回憶 iOS iPhone/iPad iTunes 備份檔 密碼

故事起源於幫長輩換手機,這時手機有用過 itunes 備份過一份並且加密,但...怎麼都想不起密碼。在網路上找尋解法時,大概可以看到幾款破解軟體(推論是免費試用,真正要破解時需加價)。此刻的不方便,反而要感謝起 Apple 資安服務,高規格保護資料!大家的破解原理都是一樣的:暴力解-猜密碼。

研究後,發現有個 hashcat 的 open source 統包了眾多加密系統的猜密碼任務,而網路上 2017年也以人講解使用過程,還滿仔細的:

Crack Encrypted iOS backups with Hashcat

筆記一下過程:
  1. 先找到 iOS 備份檔擺放的位置: https://support.apple.com/en-us/HT204215
    • macOS: ~/Library/Application Support/MobileSync/Backup/
  2. 備份都是目錄結構,找到目錄中的 Manifest.plist 檔案
  3. 依照裡頭的資訊,準備餵給 hashcat 的資料,可分成 iOS 10 以上跟 iOS 9 以前,組成 inputFromManifest.txt 資料
    • Less then iOS 10:
      • $itunes_backup$*<ver>*<WPKY>*<ITER>*<SALT>**
    • iOS 10 or later:
      • $itunes_backup$*<ver>*<WPKY>*<ITER>*<SALT>*<DPIC>*<DPSL>
如此,就可以靠 hashcat 來運算,其原理包括支援平行處理(GPU)去算出密碼,包括從字典檔、暴力猜等等的。此外,關於上述 2~3 步驟,其實也有人佛心提供工具:github.com/philsmd/itunes_backup2hashcat,透過 perl 小程式自動幫人從 Manifest.plist 組出資訊:

% perl itunes_backup2hashcat.pl yourBackupDir/Manifest.plist 
$itunes_backup$*10*#######*####*######*######*##################
% perl itunes_backup2hashcat.pl yourBackupDir/Manifest.plist > inputFromManifest.txt

後續就著重 hashcat 的指令筆記,若要更多指令資訊,逛個官方網站是最方便的:hashcat.net/wiki/doku.php?id=hashcat

以在 https://www.youtube.com/watch?v=MMySnPzsPYU 內提供的範例資訊:

% cat inputFromManifest.txt 
$itunes_backup$*10*c8c96e8d6175f1356da6dcf5791ad76be166232b4a01bd6974abb27c39034993591c15ba03a14e3b*10000*0ca3ccfc453b32f9ca9aceb754b87f4e0ab9cb95*10000000*bdee6869caa7999e9576f390a248a29f38d10d6f

這時都是 iOS 10 的密碼,因此在使用 hashcat 會採用 -m 148000 參數。若是 iOS 9 以前,要用 -m 14700 參數這些都有定義在官方網站的 wiki 中。

第一招:暴力解,此例猜4個數字:

% hashcat -d 1 -m 14800 ./inputFromManifest.txt -a 3 '?d?d?d?d'
hashcat (v6.2.3) starting

OpenCL API (OpenCL 1.2 (Jun 17 2021 15:24:17)) - Platform #1 [Apple]
====================================================================
* Device #1: Intel(R) Core(TM) i5-7360U CPU @ 2.30GHz, 16320/16384 MB (4096 MB allocatable), 4MCU
* Device #2: Intel(R) Iris(TM) Plus Graphics 640, skipped

Minimum password length supported by kernel: 0
Maximum password length supported by kernel: 256

Hashes: 1 digests; 1 unique digests, 1 unique salts
Bitmaps: 16 bits, 65536 entries, 0x0000ffff mask, 262144 bytes, 5/13 rotates

Optimizers applied:
* Zero-Byte
* Single-Hash
* Single-Salt
* Brute-Force
* Slow-Hash-SIMD-LOOP
* (null)

Watchdog: Temperature abort trigger set to 100c

Host memory required for this attack: 1 MB

[s]tatus [p]ause [b]ypass [c]heckpoint [f]inish [q]uit => 

這時隨時都可以按 s 去看暴力解的進度:

Session..........: hashcat
Status...........: Running
Hash.Name........: iTunes backup >= 10.0
Hash.Target......: $itunes_backup$*10*c8c96e8d6175f1356da6dcf5791ad76b...d10d6f
Time.Started.....: Wed Aug 25 20:37:03 2021 (6 mins, 50 secs)
Time.Estimated...: Wed Aug 25 23:30:00 2021 (2 hours, 46 mins)
Kernel.Feature...: Pure Kernel
Guess.Mask.......: ?d?d?d?d [4]
Guess.Queue......: 1/1 (100.00%)
Speed.#1.........:        1 H/s (13.34ms) @ Accel:128 Loops:256 Thr:1 Vec:4
Recovered........: 0/1 (0.00%) Digests
Progress.........: 0/10000 (0.00%)
Rejected.........: 0/0 (0.00%)
Restore.Point....: 0/1000 (0.00%)
Restore.Sub.#1...: Salt:0 Amplifier:0-1 Iteration:8056320-8056576
Candidate.Engine.: Device Generator
Candidates.#1....: 1234 -> 1124
Hardware.Mon.SMC.: Fan0: 100%
Hardware.Mon.#1..: Temp: 66c

[s]tatus [p]ause [b]ypass [c]heckpoint [f]inish [q]uit => 

而幸運解出密碼時,會顯示以下資訊,主要是 Status 會顯示 Cracked 而密碼則是紀錄在冒號後面 (:1234)

$itunes_backup$*10*c8c96e8d6175f1356da6dcf5791ad76be166232b4a01bd6974abb27c39034993591c15ba03a14e3b*10000*0ca3ccfc453b32f9ca9aceb754b87f4e0ab9cb95*10000000*bdee6869caa7999e9576f390a248a29f38d10d6f:1234
                                                          
Session..........: hashcat
Status...........: Cracked
Hash.Name........: iTunes backup >= 10.0
Hash.Target......: $itunes_backup$*10*c8c96e8d6175f1356da6dcf5791ad76b...d10d6f
Time.Started.....: Wed Aug 25 20:37:03 2021 (8 mins, 26 secs)
Time.Estimated...: Wed Aug 25 20:45:29 2021 (0 secs)
Kernel.Feature...: Pure Kernel
Guess.Mask.......: ?d?d?d?d [4]
Guess.Queue......: 1/1 (100.00%)
Speed.#1.........:        1 H/s (11.09ms) @ Accel:128 Loops:256 Thr:1 Vec:4
Recovered........: 1/1 (100.00%) Digests
Progress.........: 512/10000 (5.12%)
Rejected.........: 0/512 (0.00%)
Restore.Point....: 0/1000 (0.00%)
Restore.Sub.#1...: Salt:0 Amplifier:0-1 Iteration:9984-9999
Candidate.Engine.: Device Generator
Candidates.#1....: 1234 -> 1124
Hardware.Mon.SMC.: Fan0: 100%
Hardware.Mon.#1..: Temp: 65c

Started: Wed Aug 25 20:36:57 2021
Stopped: Wed Aug 25 20:45:30 2021

第二招:將可能的密碼寫在 myPasswordlist.txt 中去驗證,指令:

% cat myPasswords.txt 
5678
09876
1234

% hashcat -d 1 -m 14800 ./inputFromManifest.txt ./myPasswords.txt 
hashcat (v6.2.3) starting

OpenCL API (OpenCL 1.2 (Jun 17 2021 15:24:17)) - Platform #1 [Apple]
====================================================================
* Device #1: Intel(R) Core(TM) i5-7360U CPU @ 2.30GHz, 16320/16384 MB (4096 MB allocatable), 4MCU
* Device #2: Intel(R) Iris(TM) Plus Graphics 640, skipped

Minimum password length supported by kernel: 0
Maximum password length supported by kernel: 256

Hashes: 1 digests; 1 unique digests, 1 unique salts
Bitmaps: 16 bits, 65536 entries, 0x0000ffff mask, 262144 bytes, 5/13 rotates
Rules: 1

Optimizers applied:
* Zero-Byte
* Single-Hash
* Single-Salt
* Slow-Hash-SIMD-LOOP
* (null)

Watchdog: Temperature abort trigger set to 100c

Host memory required for this attack: 1 MB

Dictionary cache built:
* Filename..: ./myPasswords.txt
* Passwords.: 3
* Bytes.....: 16
* Keyspace..: 3
* Runtime...: 0 secs

The wordlist or mask that you are using is too small.     
This means that hashcat cannot use the full parallel power of your device(s).
Unless you supply more work, your cracking speed will drop.
For tips on supplying more work, see: https://hashcat.net/faq/morework

Approaching final keyspace - workload adjusted.           

$itunes_backup$*10*c8c96e8d6175f1356da6dcf5791ad76be166232b4a01bd6974abb27c39034993591c15ba03a14e3b*10000*0ca3ccfc453b32f9ca9aceb754b87f4e0ab9cb95*10000000*bdee6869caa7999e9576f390a248a29f38d10d6f:1234
                                                          
Session..........: hashcat
Status...........: Cracked
Hash.Name........: iTunes backup >= 10.0
Hash.Target......: $itunes_backup$*10*c8c96e8d6175f1356da6dcf5791ad76b...d10d6f
Time.Started.....: Wed Aug 25 20:52:58 2021 (10 secs)
Time.Estimated...: Wed Aug 25 20:53:08 2021 (0 secs)
Kernel.Feature...: Pure Kernel
Guess.Base.......: File (./myPasswords.txt)
Guess.Queue......: 1/1 (100.00%)
Speed.#1.........:        0 H/s (0.18ms) @ Accel:128 Loops:256 Thr:1 Vec:4
Recovered........: 1/1 (100.00%) Digests
Progress.........: 3/3 (100.00%)
Rejected.........: 0/3 (0.00%)
Restore.Point....: 0/3 (0.00%)
Restore.Sub.#1...: Salt:0 Amplifier:0-1 Iteration:9984-9999
Candidate.Engine.: Device Generator
Candidates.#1....: 5678 -> 1234
Hardware.Mon.SMC.: Fan0: 20%
Hardware.Mon.#1..: Temp: 58c

...

大概就這兩招筆記一下,未來忘記密碼時,就可以靠 hashcat 幫忙批次測試記憶中的密碼了

2019年9月18日 星期三

iOS 開發筆記 - 使用 Swift 完成 GA Measurement Protocol 實作

大概去年夏天,偶爾會寫一點 Swift 程式,雖然對 Objective c 比較熟,但時勢變遷就該順應潮流。那時採用 GoogleAnalytics 套件,但 Google Analytics for App 要在今年秋天下線了,Google一直要大家改用 Firebase ,且 Google 牌 cocoapods GoogleAnalytics 也的確幾年沒更新了。只是 Firebase 就明顯要人多花錢,例如要先把 Firebase 的數據匯入到 GA 上免錢,但有些查詢又要搞到 BigQuery 才行,雖然 BigQuery 有免費額度 啦 XD 因此趁 GA Measurement Protocol 還沒下線前,多用用他吧!把以前是 App Screen 就設法轉成 Web Pageview 吧,唯一的缺點是 Session 這類,若要硬做也是一招啦,在此就都不管了。

在此只包裝成 3 個函式供人使用即可,分別是取得 clientID、回報 pageview、回報 event 既可:

override func viewDidLoad() {
super.viewDidLoad()
// Do any additional setup after loading the view.

GAEvent(trackingID: "UA-########-#", clientID: getClientID(), eventCategory: "TestEC", eventAction: "TestEA", eventLabel: "TestEL", eventValue: 0)

GAPageView(trackingID: "UA-########-#", clientID: getClientID(), path:"/")
}

func getClientID() -> String {
// example
return UUID().uuidString
}

func GAPageView(trackingID:String, clientID:String, path:String ) {
var url = URLComponents(string: "https://www.google-analytics.com/collect")!
if trackingID.isEmpty || clientID.isEmpty || path.isEmpty {
return
}
url.queryItems = [
URLQueryItem(name: "v", value: "1"),
URLQueryItem(name: "tid", value: trackingID),
URLQueryItem(name: "cid", value: clientID),
URLQueryItem(name: "t", value: "pageview"),
URLQueryItem(name: "dh", value: "example.com"),
URLQueryItem(name: "dp", value: path),
]
//#if DEBUG
//url.queryItems?.append(URLQueryItem(name: "cd1", value: "DEBUG"))
//#endif
//if let appVersion = Bundle.main.infoDictionary?["CFBundleShortVersionString"] as? String, appVersion.isEmpty {
//    url.queryItems?.append(URLQueryItem(name: "cd2", value: appVersion))
//}

let request = URLRequest(url: url.url!)
let task = URLSession.shared.dataTask(with: request) {(data, response, error) in
//guard let data = data else { return }
//print(String(data: data, encoding: .utf8)!)
if let httpResponse = response as? HTTPURLResponse {
print("GAPageView: \(httpResponse.statusCode)" )
}
}
task.resume()
}

func GAEvent(trackingID:String, clientID:String, eventCategory:String, eventAction:String, eventLabel:String, eventValue:Int) {
var url = URLComponents(string: "https://www.google-analytics.com/collect")!
if trackingID.isEmpty || clientID.isEmpty || path.isEmpty {
return
}

url.queryItems = [
URLQueryItem(name: "v", value: "1"),
URLQueryItem(name: "tid", value: trackingID),
URLQueryItem(name: "cid", value: clientID),
URLQueryItem(name: "t", value: "event"),
URLQueryItem(name: "ec", value: eventCategory),
]
//#if DEBUG
//url.queryItems?.append(URLQueryItem(name: "cd1", value: "DEBUG"))
//#endif
//if let appVersion = Bundle.main.infoDictionary?["CFBundleShortVersionString"] as? String, appVersion.isEmpty {
//    url.queryItems?.append(URLQueryItem(name: "cd2", value: appVersion))
//}

if !eventAction.isEmpty {
url.queryItems?.append(URLQueryItem(name: "ea", value: eventAction))
if !eventLabel.isEmpty {
url.queryItems?.append(URLQueryItem(name: "el", value: eventAction))
if eventValue >= 0 {
url.queryItems?.append(URLQueryItem(name: "ev", value: "\(eventValue)"))
}
}
}

let request = URLRequest(url: url.url!)
let task = URLSession.shared.dataTask(with: request) {(data, response, error) in
//guard let data = data else { return }
//print(String(data: data, encoding: .utf8)!)
if let httpResponse = response as? HTTPURLResponse {
print("GAEvent: \(httpResponse.statusCode)" )
}
}
task.resume()
}


其中 getClientID() 只是個示意,因為每次呼叫 UUID().uuidString 都會產生一組新的,可以把它存起來使用,或是針對某些情境設計規劃,像是服務有提供登入機制時,就改用從 user id 計算得出等那類即可。

2019年2月10日 星期日

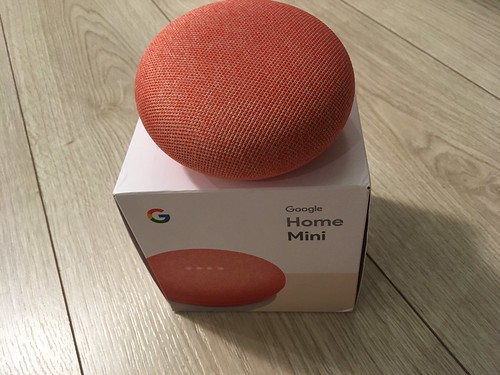
Google Home mini 中文音控設定 與 幼兒教育、長輩戲劇 應用?

GoogleHomeMini

2018年夏天因加速公司研究音控服務,自己買了一台 Google Home mini ,研究的差不多後就擺晾在一旁,今天整理了一下,想說該拍賣掉了 XD 意外發現已經支援中文音控! 可搜尋 "Google Home mini 中文設定教學" 囉!據說這招是需要兩隻 Android 手機也能達成,由於我本身是用 iPhone,就必須搭配另一隻 Android 手機

在此簡介環境,需要:
  1. Google Home mini
  2. Android 手機
  3. iPhone 手機 
  4. Android 手機安裝 Google Home app ; iPhone 安裝 Google Home app 
  5. Android phone 跟 iPhone 上的 Google Home app 都綁定同一個 Google 帳號
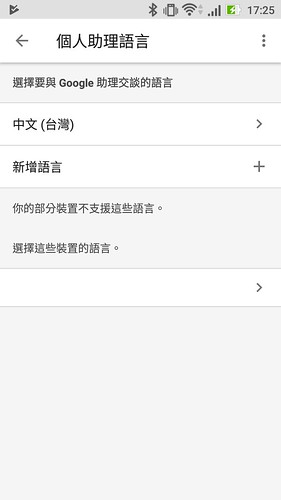
首先開啟 Android phone 上的 Google Home app => 右下角"帳戶" => 設定 => Google 助理 => 語言 => 第一語言設定成 "中文(台灣)",並將第二語言設定成 "無",且要讓最下方 "選擇這些裝置的語言" 留白,不做任何選擇 (此時若仍顯示英文,就來靠 iPhone 或另一隻手機處理)

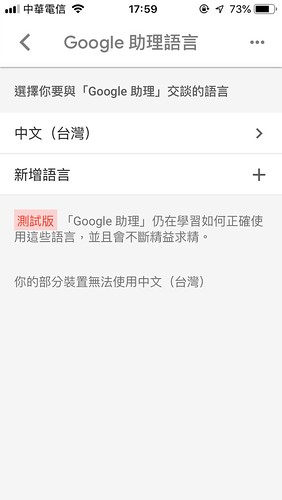
接著換 iPhone 開啟 Google Home app => 右下角"帳戶" => 往下滑到 "Google 助理" 區域,選擇 "更多設定" => 點擊 "Google 助理" 分頁 => "Google助理的聲音" => 把下方的英文也清掉,留下只有第一語言的中文(另外,iPhone 的 Google 助理語言不能選中文,要靠 Android phone 來處理)

後續你的 Google Home mini 就會講中文了!並且無論 Android 或 iPhone 的 Google Home mini ,進入 Google 助理 => 語言,都會看到最下方留白了:

Android Google助理-語言 iPhone Google助理-語言

接下來才是重頭戲 XD 若家裡也有 Chromecast 的話,小孩在吵的時候,就只要說:

OK Google, 請播放 Youtube 上的瑪莎與熊第一集

這樣就可以打發小孩了(誤),更別說還有一卡車正版戲劇可以隨叫隨播,長輩也能開開心心


當然,沒有 Chromecast 還有 Spotify !在台灣已經接近全平台可免費使用,可以直接說:

OK Google, 播放 K-POP 音樂

如此就可以聽聽韓流最新音樂,更別說南韓音樂的快速迭代,立刻有聽不完的韓流音樂

最後,無聊時可以多講講 OK Google ,想必小孩也會學的,接下來請谷歌小姐陪小孩講話唸故事了 XD

2014年3月11日 星期二

iOS 開發筆記 - 使用 MD5

忽然發現,自己在 iOS 上沒有用過 MD5 耶,一定是太少寫程式了 Orz

#import <CommonCrypto/CommonDigest.h>

- (NSString *)md5:(NSString *)str
{
    const char *cStr = [str UTF8String];
    unsigned char result[CC_MD5_DIGEST_LENGTH];
    CC_MD5( cStr, strlen(cStr), result );
    return [NSString
            stringWithFormat: @"%02X%02X%02X%02X%02X%02X%02X%02X%02X%02X%02X%02X%02X%02X%02X%02X",
            result[0], result[1],
            result[2], result[3],
            result[4], result[5],
            result[6], result[7],
            result[8], result[9],
            result[10], result[11],
            result[12], result[13],
            result[14], result[15]
            ];

}


驗證方式:

$ echo -n "string" | md5

參考資料:Calculate MD5 on iPhone

2014年1月18日 星期六

iOS 開發筆記 - The app references non-public selectors in Payload/.app/: id

這次碰到的問題是使用 Facebook SDK 造成的 Orz 但很妙的事,一樣的 code 再 10 天前並沒有這個現象。

追了一下可能的問題是在於 Facebook SDK 的設計:

id<FBGraphUser> friend
id<FBGraphUserExtraFields> user


然後範例都教人使用:

user.id 或 [user id]

解法:

[user objectForKey:@"id"]

只要透過存取方式的修改,即可避開。

2014年1月1日 星期三

iOS 開發筆記 - 設定 UIButton 發動 Storyboard Segue 事件(performSegueWithIdentifier)

使用 Storyboard 處理多個 UIViewController 進行切換時,可以很簡單地透過按住 ctrl + 元件(如 UIButton),拖拉到指定的 UIViewController ,完成 UIViewController 切換工作。然而,有時希望按了元件後,做完一堆事才切換到指定的 UIViewController ,這時候就要稍微更改 Segue 發動的流程。

例如,目前共有 AUIViewController 跟 BUIViewController ,其中 AUIViewController 上頭有一個 AUIButton ,當點選完 AUIButton 時,做完一些要事,再切換到 BUIViewController。

開發上,在 Storyboard 上,先在 AUIViewController 點一下,並按住 AUIViewController + Ctrl 後(並非點 AUIButton),拉條線到 BUIViewController 上,以此建立一個 Storyboard Segue 叫做 "ChangeViewController",接著把 AUIButton 拉條線到 AUIViewController.m ,做個  IBAction ,代表點選 AUIButton 將發動的動作,剩下的程式碼:

AUIViewController:

- (IBAction)AUIButtonEvent:(id)sender {
// Step 1 : doing …

// Step N : fire a segue event
[self performSegueWithIdentifier:@"ChangeViewController" sender:sender];
}

- (void)prepareForSegue:(UIStoryboardSegue *)segue sender:(id)sender
{
    if ([segue.identifier isEqualToString:@"ChangeViewController"]) {
        UIViewController *target = segue.destinationViewController;
        if ([target isKindOfClass:[UINavigationController class]]) {
            target = [[(UINavigationController *)target viewControllers] lastObject];
        }
        if([target isKindOfClass:[BUIViewController class]]) {
            BUIViewController *v = (BUIViewController *)target;
            // … other setting …
        }
    }
}


如此一來,當點選 UIButton 時,可以先做完事再切過去指定的 UIViewController 了,當然,也可以讓一個 UIButton 依照事件條件,切換到多個 UIViewController 。

2013年12月15日 星期日

iOS 開發筆記 - UITableViewController Editing Mode 隱藏 Delete 按鈕(Move Only)

UITableViewControllerEditMode

開始把玩 UITableViewController Editing mode,由於不想讓使用者刪資料,所以就需要把 Delete 相關的操作介面給關掉。

簡言之:

- (UITableViewCellEditingStyle)tableView:(UITableView *)tableView editingStyleForRowAtIndexPath:(NSIndexPath *)indexPath
{
    //if (self.editing)
    //    return UITableViewCellEditingStyleDelete;
 
    return UITableViewCellEditingStyleNone;
}


如此一來即可:

UITableViewControllerEditModeWithoutDeletition

2013年12月11日 星期三

iOS 開發筆記 - 使用 Core Graphics 進行文字繪圖輸出並設定 NSString Attributes (Font、Alignment) 等

draw string

整理一年多前的程式碼,發現用的函數已經在 iOS 7 宣告為 deprecated 啦,恰好重看 CS193P 時,得知 NSAttributedString 這東西,以為是最新出來的,沒想到這在 iOS 3.2 就存在啦。

順便把一些筆記都記下吧:

+ (UIImage *)buildImageAndDrawText:(NSString *)text size:(CGSize)size ios7:(BOOL)iOS7SDK
{
    UIGraphicsBeginImageContext(size);
    CGContextRef context = UIGraphicsGetCurrentContext();
    CGContextSetRGBFillColor(context, 1, 1, 1, 1);
    CGContextFillRect(context, CGRectMake(0, 0, size.width, size.height));

    UIFont *font = [UIFont italicSystemFontOfSize:15];
    UIColor *fontColor = [UIColor blueColor];

    if (iOS7SDK) {
        NSMutableParagraphStyle *paragrapStyle = [[NSMutableParagraphStyle alloc] init];
        [paragrapStyle setLineBreakMode:NSLineBreakByWordWrapping];
        [paragrapStyle setAlignment:NSTextAlignmentCenter];
     
        [text drawInRect:CGRectIntegral(CGRectMake(0, size.height/2, size.width, size.height))
          withAttributes:@{
                           NSParagraphStyleAttributeName: paragrapStyle,
                           NSFontAttributeName: font,
                           NSForegroundColorAttributeName: fontColor}
         ];
    } else {
        [fontColor set];
        [text drawInRect:CGRectIntegral(CGRectMake(0, size.height/2, size.width, size.height)) withFont:font lineBreakMode:NSLineBreakByWordWrapping alignment:NSTextAlignmentCenter];
    }
 
    UIImage *outImage = UIGraphicsGetImageFromCurrentImageContext();
    UIGraphicsEndImageContext();
    return outImage;
}


用法:

self.imageView = [YourClass buildImageAndDrawText:@"iOS app development @ blog.changyy.org" size:CGSizeMake(300, 300) ios7:YES];

細節可參考 Core Graphics Framework Reference


2013年12月10日 星期二

iOS 開發筆記 - 透過 semaphore 讓 function 特性從 nonblocking 回到 blocking 模式

相信從事 Window Programming 的大多都知道 Main thread(UI thread) 的特性,例如 Main Thread 用來處理事件,須儘量避免做太久的工作,此外,所謂的 nonblocking 的原理就只是在建立一支 thread 去執行任務,任務完成後在依照設計返回到 Main thread 去更動 UI 狀況。
因此,採用一些手機視窗程式等第三方 SDK 時,更是容易碰到 nonblocking functions。這會使得規劃的 function flow 有點亂掉。

在 iOS app development 環境中,以 block 為例,可以透過 semaphore 來達成 blocking 效果,如:

dispatch_semaphore_t waitJobDone = dispatch_semaphore_create(0);
[self callBlock:^{
// do something
dispatch_semaphore_signal(waitJobDone);
}];
dispatch_semaphore_wait(waitJobDone, DISPATCH_TIME_FOREVER);


順便筆記一下其他東西,隨意使用 nonblocking 用法:

dispatch_async( dispatch_queue_create(“job_running”, NULL), ^{


});


在非 UI thread 中,又想動 UI 方式:

dispatch_async( dispatch_queue_create("job_running", NULL), ^{
// do something ...
     
dispatch_async(dispatch_get_main_queue(), ^{
// update ui
});
});


最後一提,如果用到的 SDK 跟網路相關的(NSURLConnection),那大多不能用 semaphore 來使之改成 blocking 模式(或是改法很繁雜要深入or破壞SDK架構),這跟 NSURLConnection Delegate Callback 設計有關(NSRunLoop)。

iOS 開發筆記 - ARC forbids explicit message send of 'dealloc'

最近我也投入 ARC 開發模式 XD 再也不去管到底要不要對哪個 object 執行 release 的議題,這適應其實也不難,就真的不要寫 [object release] 即可 XD

但有些時候還是要在物件銷毀時去做一些處理,例如解決或等待相關的事件完成,就常常會寫這段:

- (void)dealloc
{
    // do something ...
    [super dealloc];

}


結果,Xcode 就噴這段訊息:

ARC forbids explicit message send of 'dealloc'

Transitioning to ARC Release Notes 文件查證:
You may implement a dealloc method if you need to manage resources other than releasing instance variables. You do not have to (indeed you cannot) release instance variables, but you may need to invoke [systemClassInstance setDelegate:nil] on system classes and other code that isn’t compiled using ARC. 
Custom dealloc methods in ARC do not require a call to [super dealloc] (it actually results in a compiler error). The chaining to super is automated and enforced by the compiler.

僅需改成這樣了:

- (void)dealloc
{
    // do something ...
}

2013年12月3日 星期二

iOS 開發筆記 - 解決 Storyboard UITableViewCell contentView 第一次設定 subViews frame 失效問題

為了讓自己趕快習慣 Storyboard 開發模式,瘋狂地用 Storyboard 做事 XD 除了降低原本的開發速度外,接著碰到一些好像是 bug 的奇妙問題?

這個問題是在 Storyboard 內已經拉好一個 UITableViewController ,接著在裡頭增加 UITableViewCell 後,再上頭加多個 ImageView 把玩,然而,希望 device rotation 後能後平均地顯示在 UITableViewCell 裡頭,例如有五個 ImageView 可以平均地分布。

此時在 (UITableViewCell *)tableView:(UITableView *)tableView cellForRowAtIndexPath:(NSIndexPath *)indexPath 已經完成重新計算各個 ImageView 的 frame 座標。

由於 Storyboard 是以 Portrait 模式設計,因此裝置一開始從 Portrait 轉換到 Landscape 時,一切都正常顯示。但如果裝置一開始就是在 Landscape 模式時,反而那些 ImageView 卻還是依照 Storyboard 裡的 Portrait 模式設計,無論我把他們的 frame 座標更新也無用。(但經過 device rotation 後,會顯示正常)

不曉得這是不是 bug ?總之,最後就想到一招就是第一次強制 ImageView 重新歸位 XD 希望這招之後可以拿掉。

- (UITableViewCell *)tableView:(UITableView *)tableView cellForRowAtIndexPath:(NSIndexPath *)indexPath
{
        // ...

        if( cell.tag == 0 )
        {
                cell.tag = 1;
                for (UIView *v in [cell.contentView subviews])
                {
                        [v removeFromSuperview];
                        [cell.contentView addSubview:v];
                }
        }
        return cell;
}

2013年11月29日 星期五

iOS 開發筆記 - 重溫 iOS app development


Developing iOS 7 Apps for iPhone and iPad
by Stanford

這星期一口氣連追了 12 堂課,把史丹佛 CS193P 2013 Fall 目前放出來的課程看完了 XD 距離我上一次看它可能是 2011 年,而我第一次看則是 2010 年的春天。說真的,老外上課有豐富的肢體語言,所以不必真的聽懂每一個字,看看投影片、程式碼就真的都學得會啦。

過去從 iOS 3.1 開始接觸 iPhone app development ,跟幾個同好討論怎樣把 UI 搞的炫炫的等等,當時 iOS 3 的特色大概是提出 In-App purchases,接著有幸還追到 iOS 4,帶出了 Background Tasks 跟 Objective C blocks 的概念,之後,我漸漸落伍了,如 iOS 5 提出 Storyboard 、iOS 6 帶入 iCloud 到現在的 iOS 7 等,基本上都沒有正式用過。

最近看了 CS193P 後,才真的理解 Storyboard 跟 Core Data 的好用之處,的確,沒有他們一樣可以做完事,但我相信,再過個一兩年,可能就完全跟不上潮流了

此外,想起前陣子跟新學 iOS 的聊天,被問起到底會什麼,說真的這種問題不是很好 Orz 不是不願意回答,而是答出來跟沒答出來的價值差不了多少。舉個例來說, C 跟 C99 的語法差在哪邊,知道或不知道都不會很大地影響一位工程師,同理 iOS 一直在更新,工作這種事,碰到在學就對了。至於 C 跟 C99 差別嘛,只要記得會用 Google 去查一下就好 XD

經過這次的複習,深深覺得資訊界的技術真的很難撐過兩年 XD 其中的心酸豈可不是 out of date 幾個字可道盡的。