顯示具有 event 標籤的文章。 顯示所有文章

2019年9月18日 星期三

iOS 開發筆記 - 使用 Swift 完成 GA Measurement Protocol 實作

大概去年夏天,偶爾會寫一點 Swift 程式,雖然對 Objective c 比較熟,但時勢變遷就該順應潮流。那時採用 GoogleAnalytics 套件,但 Google Analytics for App 要在今年秋天下線了,Google一直要大家改用 Firebase ,且 Google 牌 cocoapods GoogleAnalytics 也的確幾年沒更新了。只是 Firebase 就明顯要人多花錢,例如要先把 Firebase 的數據匯入到 GA 上免錢,但有些查詢又要搞到 BigQuery 才行,雖然 BigQuery 有免費額度 啦 XD 因此趁 GA Measurement Protocol 還沒下線前,多用用他吧!把以前是 App Screen 就設法轉成 Web Pageview 吧,唯一的缺點是 Session 這類,若要硬做也是一招啦,在此就都不管了。

在此只包裝成 3 個函式供人使用即可,分別是取得 clientID、回報 pageview、回報 event 既可:

override func viewDidLoad() {
super.viewDidLoad()
// Do any additional setup after loading the view.

GAEvent(trackingID: "UA-########-#", clientID: getClientID(), eventCategory: "TestEC", eventAction: "TestEA", eventLabel: "TestEL", eventValue: 0)

GAPageView(trackingID: "UA-########-#", clientID: getClientID(), path:"/")
}

func getClientID() -> String {
// example
return UUID().uuidString
}

func GAPageView(trackingID:String, clientID:String, path:String ) {
var url = URLComponents(string: "https://www.google-analytics.com/collect")!
if trackingID.isEmpty || clientID.isEmpty || path.isEmpty {
return
}
url.queryItems = [
URLQueryItem(name: "v", value: "1"),
URLQueryItem(name: "tid", value: trackingID),
URLQueryItem(name: "cid", value: clientID),
URLQueryItem(name: "t", value: "pageview"),
URLQueryItem(name: "dh", value: "example.com"),
URLQueryItem(name: "dp", value: path),
]
//#if DEBUG
//url.queryItems?.append(URLQueryItem(name: "cd1", value: "DEBUG"))
//#endif
//if let appVersion = Bundle.main.infoDictionary?["CFBundleShortVersionString"] as? String, appVersion.isEmpty {
//    url.queryItems?.append(URLQueryItem(name: "cd2", value: appVersion))
//}

let request = URLRequest(url: url.url!)
let task = URLSession.shared.dataTask(with: request) {(data, response, error) in
//guard let data = data else { return }
//print(String(data: data, encoding: .utf8)!)
if let httpResponse = response as? HTTPURLResponse {
print("GAPageView: \(httpResponse.statusCode)" )
}
}
task.resume()
}

func GAEvent(trackingID:String, clientID:String, eventCategory:String, eventAction:String, eventLabel:String, eventValue:Int) {
var url = URLComponents(string: "https://www.google-analytics.com/collect")!
if trackingID.isEmpty || clientID.isEmpty || path.isEmpty {
return
}

url.queryItems = [
URLQueryItem(name: "v", value: "1"),
URLQueryItem(name: "tid", value: trackingID),
URLQueryItem(name: "cid", value: clientID),
URLQueryItem(name: "t", value: "event"),
URLQueryItem(name: "ec", value: eventCategory),
]
//#if DEBUG
//url.queryItems?.append(URLQueryItem(name: "cd1", value: "DEBUG"))
//#endif
//if let appVersion = Bundle.main.infoDictionary?["CFBundleShortVersionString"] as? String, appVersion.isEmpty {
//    url.queryItems?.append(URLQueryItem(name: "cd2", value: appVersion))
//}

if !eventAction.isEmpty {
url.queryItems?.append(URLQueryItem(name: "ea", value: eventAction))
if !eventLabel.isEmpty {
url.queryItems?.append(URLQueryItem(name: "el", value: eventAction))
if eventValue >= 0 {
url.queryItems?.append(URLQueryItem(name: "ev", value: "\(eventValue)"))
}
}
}

let request = URLRequest(url: url.url!)
let task = URLSession.shared.dataTask(with: request) {(data, response, error) in
//guard let data = data else { return }
//print(String(data: data, encoding: .utf8)!)
if let httpResponse = response as? HTTPURLResponse {
print("GAEvent: \(httpResponse.statusCode)" )
}
}
task.resume()
}


其中 getClientID() 只是個示意,因為每次呼叫 UUID().uuidString 都會產生一組新的,可以把它存起來使用,或是針對某些情境設計規劃,像是服務有提供登入機制時,就改用從 user id 計算得出等那類即可。

2019年3月16日 星期六

Google Analytics 使用筆記 - 設定目標(Goal)追蹤關鍵字成效

ga-goal-tracking

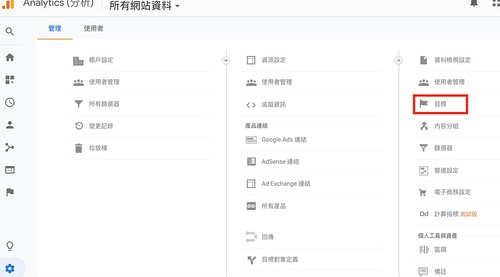
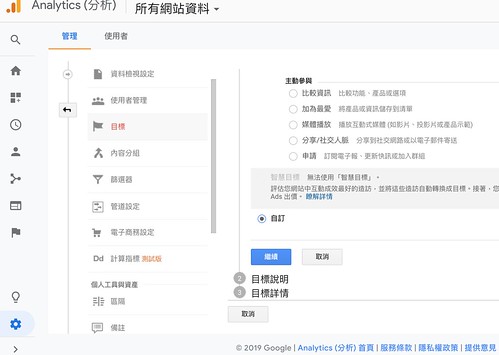
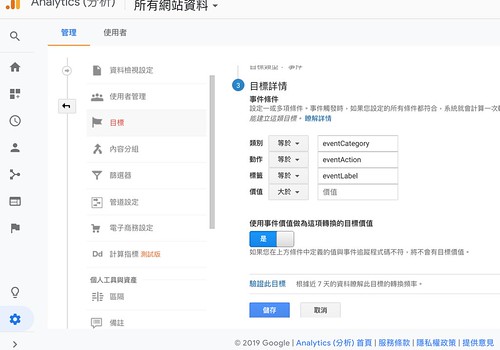
很久以前就想研究,一直拖到工作上買 Adwords 需要追蹤成效時,才開始學習 XD 而設定 Goal 其實非常簡單,就是在專案管理介面上,切換到最右邊有個"目標"可以設定,填一填就搞定,其中用 GA event 是最彈性的是部分,可以在對應的網頁動作上,發個 GA event 就能追蹤了。

ga-goal-setup-01

ga-goal-setup-02

ga-goal-setup-03

ga-goal-setup-04

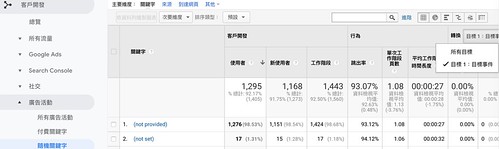
如此回到 GA 專案 -> 客戶開發 -> 廣告活動 -> 所有廣告活動/付費關鍵字/隨機關鍵字 ,就可以看到 “轉換” 那邊,可以有目標來關注,十分方便。

就 Adwords 就可以不斷調整、找尋最洽當的關鍵字購買。

2016年7月4日 星期一

Bootstrap 筆記 - 讓 table 以 <tr> 為單位支援 click event

這功能其實不難,但順手筆記一下自己選的解法:

<table class="table table-striped table-hover">
<thead>
<tr>
<td cols="3">
<img class="img-responsive" src="something"/>
</td>
</tr>
</thead>
<tbody>
<tr data-href="link">
<td>Data1</td>
<td>Data2</td>
<td><a href="link">Data3</a></td>
</tr>
</tbody>
</table>


搭配 Javascript(jQuery):

<script>
$(document).ready(function() {
$(".table > tbody > tr").css('cursor', 'pointer').click(function() {
var link = $(this).data("href").trim();
if (link.length > 0)
window.document.location = link;
return false;
});
});
</script>


簡單的說,就是在某個 <td> 欄位裡埋入 <a> tag,但在 <tr> 裡的屬性多個 data-href 來記錄,最後再用 Javascript 埋入 <tr> click event。

看起來好像多埋了 <a> tag ,其主因是為了 SEO。

2014年7月23日 星期三

iOS 開發筆記 - 使用 UITapGestureRecognizer / UISwipeGestureRecognizer 偵測 UIView Click/Tap/Swipe Event (手指點擊、滑動事件)

沒把玩過,趁颱風天筆記一下 :P

One Click (Single Tap):

- (void)viewDidLoad {
[super viewDidLoad];
UITapGestureRecognizer *tapGestureRecognizer;
tapGestureRecognizer = [[UITapGestureRecognizer alloc] initWithTarget:self action:@selector(singleTap:)];
tapGestureRecognizer.numberOfTapsRequired = 1;
[self.view addGestureRecognizer:tapGestureRecognizer];
}

- (void)singleTap:(UIGestureRecognizer *)recognizer {
NSLog(@"singleTap: %@", NSStringFromCGPoint([recognizer locationInView:[recognizer.view superview]]));
}


Double Click (Double Tap):

- (void)viewDidLoad {
[super viewDidLoad];
UITapGestureRecognizer *tapGestureRecognizer;
tapGestureRecognizer = [[UITapGestureRecognizer alloc] initWithTarget:self action:@selector(doubleTap:)];
tapGestureRecognizer.numberOfTapsRequired = 2;
[self.view addGestureRecognizer:tapGestureRecognizer];
}

- (void)doubleTap:(UIGestureRecognizer *)recognizer {
NSLog(@"doubleTap: %@", NSStringFromCGPoint([recognizer locationInView:[recognizer.view superview]]));
}


Swipe Up:

- (void)viewDidLoad {
[super viewDidLoad];
UISwipeGestureRecognizer *swipeGestureRecognizer;
swipeGestureRecognizer = [[UISwipeGestureRecognizer alloc] initWithTarget:self action:@selector(swipeUp:)];
swipeGestureRecognizer.direction = UISwipeGestureRecognizerDirectionUp;
[self.view addGestureRecognizer:swipeGestureRecognizer];
}

- (void)swipeUp:(UIGestureRecognizer *)recognizer {
NSLog(@"swipeUp: %@", NSStringFromCGPoint([recognizer locationInView:[recognizer.view superview]]));
}


Swipe Down:

- (void)viewDidLoad {
[super viewDidLoad];
UISwipeGestureRecognizer *swipeGestureRecognizer;
swipeGestureRecognizer = [[UISwipeGestureRecognizer alloc] initWithTarget:self action:@selector(swipeDown:)];
swipeGestureRecognizer.direction = UISwipeGestureRecognizerDirectionDown;
[self.view addGestureRecognizer:swipeGestureRecognizer];
}

- (void)swipeDown:(UIGestureRecognizer *)recognizer {
NSLog(@"swipeDown: %@", NSStringFromCGPoint([recognizer locationInView:[recognizer.view superview]]));
}


Swipe Left:

- (void)viewDidLoad {
[super viewDidLoad];
UISwipeGestureRecognizer *swipeGestureRecognizer;
swipeGestureRecognizer = [[UISwipeGestureRecognizer alloc] initWithTarget:self action:@selector(swipeLeft:)];
swipeGestureRecognizer.direction = UISwipeGestureRecognizerDirectionLeft;
[self.view addGestureRecognizer:swipeGestureRecognizer];
}

- (void)swipeLeft:(UIGestureRecognizer *)recognizer {
NSLog(@"swipeLeft: %@", NSStringFromCGPoint([recognizer locationInView:[recognizer.view superview]]));
}


Swipe Right:

- (void)viewDidLoad {
[super viewDidLoad];
UISwipeGestureRecognizer *swipeGestureRecognizer;
swipeGestureRecognizer = [[UISwipeGestureRecognizer alloc] initWithTarget:self action:@selector(swipeRight:)];
swipeGestureRecognizer.direction = UISwipeGestureRecognizerDirectionRight;
[self.view addGestureRecognizer:swipeGestureRecognizer];
}

- (void)swipeRight:(UIGestureRecognizer *)recognizer {
NSLog(@"swipeRight: %@", NSStringFromCGPoint([recognizer locationInView:[recognizer.view superview]]));
}


其他部分,大概是注意 UIView 跟 UIViewController 內定已經有把 events 接收處理的事項,例如 UIScrollView 就有捲動事件,假設 UIScrollView 只有提供左右捲動的功能,那就偵測不到 SwipeLeft 跟 SwipeRight ,但 SwipeUp 跟 SwipeDown 仍可以。而 Single Tap 跟 Double Tap 之間,基本上兩者存在時,點擊兩下的過程中,Single Tap Action 跟 Double Tap Action 都會被執行,並且 Single Tap Action 會先被執行。

2013年12月10日 星期二

iOS 開發筆記 - 使用 NSNotification 傳遞與接收事件

通常會設計多個 UIViewController 供使用者觀看與操作,如果 AUIViewController 提供設定參數後,當使用者切換到 BUIViewController 可以馬上就使用到新資料來操作時,這時可以把資料儲存在指定地方,當 BUIViewController 之 viewWillAppear 裡就能夠去重讀資料來用。

然而,有時希望 AUIViewController 改完資料時,可以馬上讓 BUIViewController 也得知,這時做法至少有兩種,第一種就是讓 AUIViewController 可以接觸到 BUIViewController ,例如把 BUIViewController 當作一個 member variable ,也就是 AUIViewController.member = BUIViewController object,只是這招有點破壞架構的美感,但偶爾使用還滿堪用的!第二種,就是採用 Notification 架構,讓 BUIViewController 聆聽專屬於它的事件,而 AUIViewController 在需要的時候送事件出去即可,此架構更加符合 async 。

此例筆記 NSNotification 的用法(此架構也稱 radio station,Android 派則是 broadcast 啦):

BUIViewController.h:

#define kTargetDataUpdate @"TargetDataUpdate"

BUIViewController.m 之註冊聆聽事件:

- (void)setupOptions:(NSNotification *)event
{
        NSLog(@"event:%@, object:%@", event, event.object);
}

- (void)viewDidAppear:(BOOL)animated
{
    [super viewDidAppear:animated];
    [[NSNotificationCenter defaultCenter] addObserver:self selector:@selector(setupOptions:) name:kTargetDataUpdate object:nil];

}


BUIViewController.m 之移除聆聽事件:

- (void)viewWillDisappear:(BOOL)animated
{
    [[NSNotificationCenter defaultCenter] removeObserver:self name: kTargetDataUpdate object:nil];
    [super viewWillDisappear:animated];
}


AUIViewController (或其他物件亦可) 之發送事件:

NSDictionary *info = @{@"status":@"ok"};
[[NSNotificationCenter defaultCenter] postNotificationName: kTargetDataUpdate object:info userInfo:nil];