顯示具有 install 標籤的文章。 顯示所有文章

2024年10月14日 星期一

Linux 開發筆記 - 在 Ubuntu 16.04 使用 Docker Ubuntu 24.04 無法正常更新套件 (apt update)@ Ubuntu 16.04

追蹤到最後,解法應當是把 Host 端的 docker 更新來修正,但一開始很懶,只好遮住雙眼摸魚一下 XD

狀態:

```
$ lsb_release -a
No LSB modules are available.
Distributor ID: Ubuntu
Description: Ubuntu 16.04 LTS
Release: 16.04
Codename: xenial

$ docker run -it ubuntu:24.04 /bin/bash
root@a0f5c64ed667:/# apt update
Get:1 http://security.ubuntu.com/ubuntu noble-security InRelease [126 kB]
Get:2 http://archive.ubuntu.com/ubuntu noble InRelease [256 kB]
Err:1 http://security.ubuntu.com/ubuntu noble-security InRelease    
  The following signatures couldn't be verified because the public key is not available: NO_PUBKEY 871920D1991BC93C
Err:2 http://archive.ubuntu.com/ubuntu noble InRelease
  The following signatures couldn't be verified because the public key is not available: NO_PUBKEY 871920D1991BC93C
Get:3 http://archive.ubuntu.com/ubuntu noble-updates InRelease [126 kB]
Err:3 http://archive.ubuntu.com/ubuntu noble-updates InRelease
  The following signatures couldn't be verified because the public key is not available: NO_PUBKEY 871920D1991BC93C
Get:4 http://archive.ubuntu.com/ubuntu noble-backports InRelease [126 kB]
Err:4 http://archive.ubuntu.com/ubuntu noble-backports InRelease
  The following signatures couldn't be verified because the public key is not available: NO_PUBKEY 871920D1991BC93C
Reading package lists... Done
W: GPG error: http://security.ubuntu.com/ubuntu noble-security InRelease: The following signatures couldn't be verified because the public key is not available: NO_PUBKEY 871920D1991BC93C
E: The repository 'http://security.ubuntu.com/ubuntu noble-security InRelease' is not signed.
N: Updating from such a repository can't be done securely, and is therefore disabled by default.
N: See apt-secure(8) manpage for repository creation and user configuration details.
W: GPG error: http://archive.ubuntu.com/ubuntu noble InRelease: The following signatures couldn't be verified because the public key is not available: NO_PUBKEY 871920D1991BC93C
E: The repository 'http://archive.ubuntu.com/ubuntu noble InRelease' is not signed.
N: Updating from such a repository can't be done securely, and is therefore disabled by default.
N: See apt-secure(8) manpage for repository creation and user configuration details.
W: GPG error: http://archive.ubuntu.com/ubuntu noble-updates InRelease: The following signatures couldn't be verified because the public key is not available: NO_PUBKEY 871920D1991BC93C
E: The repository 'http://archive.ubuntu.com/ubuntu noble-updates InRelease' is not signed.
N: Updating from such a repository can't be done securely, and is therefore disabled by default.
N: See apt-secure(8) manpage for repository creation and user configuration details.
W: GPG error: http://archive.ubuntu.com/ubuntu noble-backports InRelease: The following signatures couldn't be verified because the public key is not available: NO_PUBKEY 871920D1991BC93C
E: The repository 'http://archive.ubuntu.com/ubuntu noble-backports InRelease' is not signed.
N: Updating from such a repository can't be done securely, and is therefore disabled by default.
N: See apt-secure(8) manpage for repository creation and user configuration details.
E: Problem executing scripts APT::Update::Post-Invoke 'rm -f /var/cache/apt/archives/*.deb /var/cache/apt/archives/partial/*.deb /var/cache/apt/*.bin || true'
E: Sub-process returned an error code
```

硬解:

```
root@a0f5c64ed667:/# apt update --allow-insecure-repositories
...
```

安裝軟體:

```
root@a0f5c64ed667:/# apt install -y --allow-unauthenticated vim wget curl git tree python3-virtualenv 
...
```

結果越裝越痛苦 XD 還是回去看 Docker 官網安裝教學:docs.docker.com/engine/install/ubuntu/#install-using-the-repository 

如此就可以在 Host Ubuntu 16.04 ,正確呼喚出 docker Ubuntu 24.04 來運行,此外,也可以留意 Docker 官方文件建議的 Ubuntu OS 環境已經是 20.04 以上了

2023年8月31日 星期四

[macOS] 從 Macbook 遠端登入 Windows 筆電並使用 PowerShell 工作環境 @ macOS 13.2.1

由於想善用 Windows 筆電的資源(算力),先來試試看能不能打通 macOS command line 遠端登入進 Windows 11 筆電。查了一下資料,看來真的也有人有這種需求 XD

原理:
  1. Windows 11 安裝 OpenSSH Server
  2. macOS 安裝 PowerShell Core 資源 (非必要)
其中一還滿常見,二就有點怕怕,所幸資源算是微軟提供(?),有興趣可以裝 pkg 檔案,裝完在 macos command line 用 pwsh 指令就切換到 PowerShell 工作環境,目前只需做 (1) 就能完成需求,以下是在 Windows 11 筆電下運行指令,建議在上述微軟官方文件上複製使用,在此純做筆記:

PS C:\Users\user> Get-WindowsCapability -Online | Where-Object Name -like 'OpenSSH*'

Name  : OpenSSH.Client~~~~0.0.1.0
State : Installed

Name  : OpenSSH.Server~~~~0.0.1.0
State : NotPresent

PS C:\Users\user> ssh -V
OpenSSH_for_Windows_8.6p1, LibreSSL 3.4.3

PS C:\Users\user> Add-WindowsCapability -Online -Name OpenSSH.Server~~~~0.0.1.0

Path          :
Online        : True
RestartNeeded : False

PS C:\Users\user> Start-Service sshd
PS C:\Users\user> Set-Service -Name sshd -StartupType 'Automatic'
PS C:\Users\user> if (!(Get-NetFirewallRule -Name "OpenSSH-Server-In-TCP" -ErrorAction SilentlyContinue | Select-Object Name, Enabled)) {
>>     Write-Output "Firewall Rule 'OpenSSH-Server-In-TCP' does not exist, creating it..."
>>     New-NetFirewallRule -Name 'OpenSSH-Server-In-TCP' -DisplayName 'OpenSSH Server (sshd)' -Enabled True -Direction Inbound -Protocol TCP -Action Allow -LocalPort 22
>> } else {
>>     Write-Output "Firewall rule 'OpenSSH-Server-In-TCP' has been created and exists."
>> }
Firewall rule 'OpenSSH-Server-In-TCP' has been created and exists.

PS C:\Users\user> ssh localhost
user@localhost's password:

如此筆電重啟後,也會自動啟動 OpenSSH Server 。而 macOS 要遠端進去一樣把它當成 linux server 即可,靠 ssh 加上帳密遠端登入。

另外,常會使用 ping 來查看機器健康情況,而 Windows 11 默認關閉(也是滿好的資安規劃),在此要人工開啟:

系統 -> 隱私權與安全性 -> Windows 安全性 -> 防火牆與網路保護 -> 進階設定 -> 輸入規則 ->  核心網路診斷 - ICMP 回應要求 -> 啟動


可以自行依照需求開啟全部 ICMP 回應或部分情境。 

最後,莫忘筆電的電源節源設計,預設應該是 5分鐘就會進入休眠,可以把它調整成插電就永不進入休眠,以及要衝刺算力也可以調整電源策略。

2021年7月7日 星期三

[Linux] 修復 Ubuntu 12.04 無法安裝軟體 - W: Failed to fetch 404 @ Ubuntu 12.04

老機器環境:

$ lsb_release -a
No LSB modules are available.
Distributor ID: Ubuntu
Description: Ubuntu 12.04.5 LTS
Release: 12.04
Codename: precise

主要是在 server 運行 apt-get update 時,會出現一堆 404 問題:

W: Failed to fetch http://archive.ubuntu.com/ubuntu/dists/precise-backports/multiverse/binary-i386/Packages 404

追了一下應當是 12.04 已經不維護了。運氣不錯,有找到 old-releases.ubuntu.com 位置:
  • https://archive.ubuntu.com/ubuntu/
  • https://old-releases.ubuntu.com/ubuntu/
接著就動手換掉 /etc/apt/sources.lis 即可,包括來源 server 換完後,記得要再把 /var/lib/apt/lists 先移除:

$ sudo mv /var/lib/apt/lists /var/lib/apt/lists-backup
$ sudo mkdir -p /var/lib/apt/lists
$ sudo apt-get update

如此就會修復相關資訊,可以在靠 apt-get 安裝軟體了。

此外,若剛好在除錯時,刪除了已安裝過的軟體,接著做了上述後,又要安裝時,會碰到資訊對不上的問題,如:

dpkg:error processing package XXX (--configure):
subprocess installed post-installation script returned error exit status 10

解法就是清除 /var/lib/dpkg/info/ 下相關套件的資料後,重新安裝或是跑完後續流程:

$ sudo mkdir /var/lib/dpkg/info/backup
$ sudo mv /var/lib/dpkg/info/XXX* /var/lib/dpkg/info/backup/
$ sudo apt-get install -f

2021年1月23日 星期六

Chromecast with Google TV - 透過網頁安裝 愛奇藝 TV app 與 愛奇藝手機程式投放到 Chromecast


前陣子不小心買了 Chromecast with Google TV ,想說來試試看,結果裡頭一堆台灣內容提供者 App 不能安裝,如:

  • 動畫瘋
  • 愛奇藝
  • CATCHPLAY+
就明明在 應用程式 -> 娛樂 都有顯示一堆台灣的內容服務,卻說因為國家地區而無法安裝 Orz 推論可能是手上這台是美國貨...有地區限制吧?真是殘念

Updated @ 2021-02-03:

主要是我使用的 Google account 的地區落在美國。可以在 https://play.google.com/store/paymentmethods 的付款方式,查看網頁底部的 地 區資訊 

後來在找了一下,嘿嘿,原來可以靠網頁來安裝程式,立即測試了一下!但不是每一款都能安裝。

在 2021/01/23 成功者:
在 2021/01/23 失敗者:
後續再等看看會不會有什麼變化。

另外,愛奇藝其實有分新加坡(香港)跟北京兩個 App ,其中新加坡(香港)的手機程式可以直接投放到 Chromecast 上,而北京的不行,有興趣可以去找找!

2019年4月4日 星期四

[macOS] 製作 macOS High sierra USB 安裝碟 @ macOS 10.13.6

build macOS USB install 10.13

手上這台 Macbook Pro 已經無法安裝 macOS 10.14 了,正準備更換 SSD ,因此想先準備 USB 安裝碟時,發現竟然無法製作 Orz 透過官網教學文才找到 macOS 10.13 下載位置  ( https://itunes.apple.com/tw/app/macos-high-sierra/id1246284741?ls=1&mt=12 ) ,發現僅 15MB 的大小,執行指令時會看到以下錯誤訊息:

$ time sudo /Applications/Install\ macOS\ High\ Sierra.app/Contents/Resources/createinstallmedia --volume /Volumes/8GUSB/
/Applications/Install macOS High Sierra.app does not appear to be a valid OS installer application.


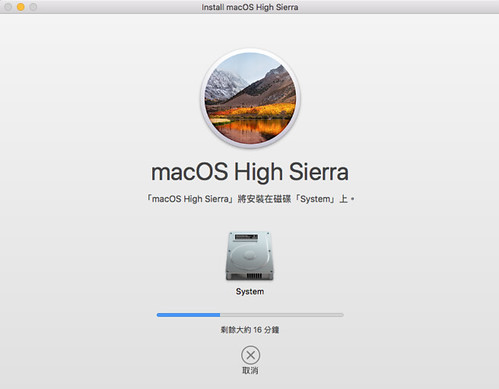
最後研究一下,原來要靠安裝流程,讓系統根目錄 macOS Install Data 會產生必要的資料,接著安裝過程下載完必須的軟體時,會停在要重開機的路上,這時就可以關閉安裝,並把必要的資料取出來使用。

$ tree /macOS\ Install\ Data/ ; sudo du -hd1 /macOS\ Install\ Data/
/macOS\ Install\ Data/
├── AppleDiagnostics.chunklist
├── AppleDiagnostics.dmg
├── BaseSystem.chunklist
├── BaseSystem.dmg
├── InstallESDDmg.pkg
├── InstallInfo.plist
├── Locked\ Files
└── index.sproduct

1 directory, 7 files
 20K /macOS Install Data//Locked Files
4.9G /macOS Install Data/


接著可透過"顯示套件"的方式,在 Install macOS High Sierra.app 內的 Contents 中,建立 SharedSupport 目錄,並把 macOS Install Data 複製進去:

$ tree /Applications/Install\ macOS\ High\ Sierra.app/Contents/SharedSupport
/Applications/Install\ macOS\ High\ Sierra.app/Contents/SharedSupport
├── AppleDiagnostics.chunklist
├── AppleDiagnostics.dmg
├── BaseSystem.chunklist
├── BaseSystem.dmg
├── InstallESDDmg.pkg
├── InstallInfo.plist
└── index.sproduct

0 directories, 7 files


就可以製作 USB 安裝碟:

$ time sudo /Applications/Install\ macOS\ High\ Sierra.app/Contents/Resources/createinstallmedia --volume /Volumes/8GUSB/
Password:
Ready to start.
To continue we need to erase the volume at /Volumes/8GUSB/.
If you wish to continue type (Y) then press return: Y


Updated @ 2019/04/06:

雖說可以順利製作出開機碟,但發現該 USB 無法完成 10.13.6 作業系統的安裝。推論是系統安裝流程已被修改的關係,應當是系統安裝時,會要求要安裝的系統碟的根目錄上,配有 "/macOS Install Data/" 資料,才能重開機後完成安裝流程。

以上並未驗證 :P 因為這次重安裝是為了把筆電換上新的 SSD ,因此單純先把原本的系統碟透過外接方式重啟,並跑正常的系統安裝流程,安置在新的 SSD ,而安裝過程就完全不靠 USB 開機碟。

或許把 SharedSupport 複製一份到新 SSD 的 "/macOS Install Data/" 有可能就可以搞定?!

2016年8月22日 星期一

[Mac] MacPorts: no destroot found @ Mac OSX 10.11.6

前陣子一直在測試相容性問題,不斷地用 sudo port -fp uninstall installed 清光軟體。但一直懶沒把所有相依性刪光,在安裝 py-pip27 時,就會蹦出以下錯誤訊息:

$ sudo port install py27-pip
--->  Computing dependencies for py27-pip
--->  Installing py27-pip @8.1.2_0
Error: org.macports.install for port py27-pip returned: no destroot found at: /opt/local/var/macports/build/_opt_local_var_macports_sources_rsync.macports.org_release_tarballs_ports_python_py-pip/py27-pip/work/destroot
Please see the log file for port py27-pip for details:
    /opt/local/var/macports/logs/_opt_local_var_macports_sources_rsync.macports.org_release_tarballs_ports_python_py-pip/py27-pip/main.log
To report a bug, follow the instructions in the guide:
    http://guide.macports.org/#project.tickets
Error: Processing of port py27-pip failed


解法就是老老實實參考 MacPorts - 2.4. Uninstall 官方文件清資料,仔細做了以下動作:

$ sudo rm -rf /opt/local/ ~/.macports

下載並安裝最新版 MacPorts: https://distfiles.macports.org/MacPorts/MacPorts-2.3.4-10.11-ElCapitan.pkg

重新安裝需要的軟體:

$ sudo port selfupdate
$ sudo port install py27-pip

2015年11月2日 星期一

[Linux] 透過 yum 安裝 Nginx 官方版 @ CentOS 6.6、nginx-1.8.0

最近在整理 yum server 才驚覺 nginx 沒有在 CentOS package 裡頭,同理 tmux 也是 Orz

$ vim /etc/yum.repos.d/nginx.repo
name=nginx repo
baseurl=http://nginx.org/packages/centos/6/$basearch/
gpgcheck=0
enabled=1

$ yum update
$ yum search nginx
Loaded plugins: security
============================================================= N/S Matched: nginx =============================================================
nginx-debug.x86_64 : debug version of nginx
nginx-debuginfo.x86_64 : Debug information for package nginx
nginx-nr-agent.noarch : New Relic agent for NGINX and NGINX Plus
nginx.x86_64 : High performance web server

$ yum install nginx
$ yum info nginx
Installed Packages
Name        : nginx
Arch        : x86_64
Version     : 1.8.0
Release     : 1.el6.ngx
Size        : 872 k
Repo        : installed
From repo   : nginx
Summary     : High performance web server
URL         : http://nginx.org/
License     : 2-clause BSD-like license
Description : nginx [engine x] is an HTTP and reverse proxy server, as well as
            : a mail proxy server.


對照 nginx.org 官方版本公告,其中 nginx-1.8.0 是 2015/04/21 釋放出的穩定版。

2014年9月19日 星期五

[OSX] 使用 App Store 更新 Xcode 發生錯誤 @ Mac OS X 10.9.5, MBA


主因也有可能是空間太少了 :P
除了準備空間外,可以試看看 App Store Debug 界面:

$ defaults write com.apple.appstore ShowDebugMenu -bool true

接著重新打開 App Store 後,上方最右邊有 Debug 選項 -> Reset Application,大概多做幾次即可。如果很不幸的一直不幸,最終解法就是反安裝後,再下載。

2013年10月24日 星期四

[OSX] 製作 Mac OS X Mavericks USB 安裝碟 @ Mac 10.9

既然 Mac OS X Mavericks 已經大方到變成免費了!那製作 USB 安裝碟也是必要的技能啊

首先,在先從 App Store 下載 OS X Mavericks 安裝程式,下載完時,先不要去安裝他,可以用以下指令製作 USB 安裝碟,此處假設隨身碟是在 /Volumns/8GB:

$ sudo /Applications/Install\ OS\ X\ Mavericks.app/Contents/Resources/createinstallmedia --volume /Volumes/8GB --applicationpath /Applications/Install\ OS\ X\ Mavericks.app --nointeraction

如此一來就完成啦。